編輯:Android技術基礎
好的,終於學習完Adapter類相關的一些控件,當然除了講解的那幾個,還有其他很多的 相關的控件,就不慢慢講解了~有需要的自行查閱文檔,查看相關的用法,本節帶來的是: Android用於提示信息的一個控件——Toast(吐司)!Toast是一種很方便的消息提示框,會在 屏幕中顯示一個消息提示框,沒任何按鈕,也不會獲得焦點一段時間過後自動消失! 非常常用!本節我們就來學習Toast的使用!
這是我們用的最多的一種形式了!比如點擊一個按鈕,然後彈出Toast,用法: Toast.makeText(MainActivity.this, "提示的內容", Toast.LENGTH_LONG).show(); 第一個是上下文對象!對二個是顯示的內容!第三個是顯示的時間,只有LONG和SHORT兩種 會生效,即時你定義了其他的值,最後調用的還是這兩個!
另外Toast是非常常用的,我們可以把這些公共的部分抽取出來,寫到一個方法裡! 需要顯示Toast的時候直接調用這個方法就可以顯示Toast,這樣方便很多! 示例如下:
>
void midToast(String str, int showTime)
{
    Toast toast = Toast.makeText(global_context, str, showTime);
    toast.setGravity(Gravity.CENTER_VERTICAL|Gravity.CENTER_HORIZONTAL , 0, 0);  //設置顯示位置
    TextView v = (TextView) toast.getView().findViewById(android.R.id.message);
    v.setTextColor(Color.YELLOW);     //設置字體顏色
    toast.show();
}
上面這個抽取出來的方法,我們發現我們可以調用setGravity設置Toast顯示的位置以及獲得 通過findViewById(android.R.id.message)獲得顯示的文本,然後進行設置顏色,或者大小等! 這就是第二種通過構造方法來定制Toast!
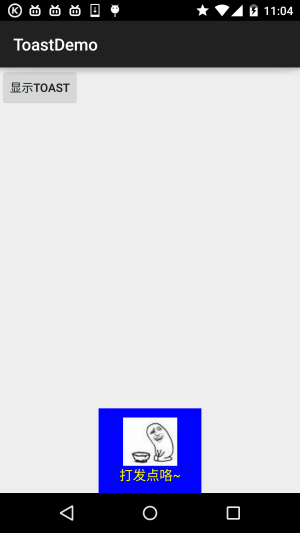
上面定制了文本,以及顯示位置,下面我們寫兩個簡單的例子:
效果圖:

關鍵代碼:
private void midToast(String str, int showTime)
{
    Toast toast = Toast.makeText(mContext, str, showTime);
    toast.setGravity(Gravity.CENTER_HORIZONTAL|Gravity.BOTTOM , 0, 0);  //設置顯示位置
    LinearLayout layout = (LinearLayout) toast.getView();
    layout.setBackgroundColor(Color.BLUE);
    ImageView image = new ImageView(this);
    image.setImageResource(R.mipmap.ic_icon_qitao);
    layout.addView(image, 0);
    TextView v = (TextView) toast.getView().findViewById(android.R.id.message);
    v.setTextColor(Color.YELLOW);     //設置字體顏色
    toast.show();
}
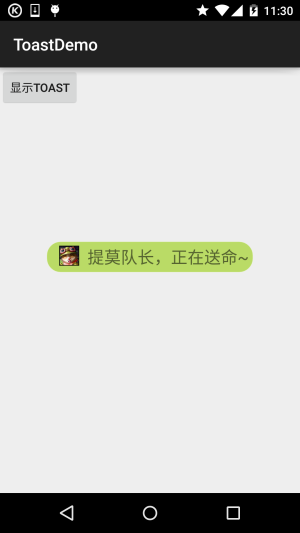
如果上面的那種還滿足不了你的話,那麼你完全可以自己寫一個Toast的布局,然後顯示出來; 但是時間我們依舊控制不了!
運行效果圖:

關鍵代碼:
private void midToast(String str, int showTime)
{
    LayoutInflater inflater = getLayoutInflater();
    View view = inflater.inflate(R.layout.view_toast_custom,
            (ViewGroup) findViewById(R.id.lly_toast));
    ImageView img_logo = (ImageView) view.findViewById(R.id.img_logo);
    TextView tv_msg = (TextView) view.findViewById(R.id.tv_msg);
    tv_msg.setText(str);
    Toast toast = new Toast(mContext);
    toast.setGravity(Gravity.CENTER, 0, 0);
    toast.setDuration(Toast.LENGTH_LONG);
    toast.setView(view);
    toast.show();
}
還有自定義Toast的布局以及圓角背景:
圓角背景:bg_toast.xml:
<?xml version="1.0" encoding="utf-8"?>
<shape xmlns:android="http://schemas.android.com/apk/res/android">
    <!-- 設置透明背景色 -->
    <solid android:color="#BADB66" />
    <!-- 設置一個黑色邊框 -->
    <stroke
        android:width="1px"
        android:color="#FFFFFF" />
    <!-- 設置四個圓角的半徑 -->
    <corners
        android:bottomLeftRadius="50px"
        android:bottomRightRadius="50px"
        android:topLeftRadius="50px"
        android:topRightRadius="50px" />
    <!-- 設置一下邊距,讓空間大一點 -->
    <padding
        android:bottom="5dp"
        android:left="5dp"
        android:right="5dp"
        android:top="5dp" />
</shape>
布局文件:view_toast_custom.xml:
<?xml version="1.0" encoding="utf-8"?>
<LinearLayout xmlns:android="http://schemas.android.com/apk/res/android"
    android:id="@+id/lly_toast"
    android:layout_width="match_parent"
    android:layout_height="match_parent"
    android:background="@drawable/bg_toast"
    android:orientation="horizontal">

    <ImageView
        android:id="@+id/img_logo"
        android:layout_width="24dp"
        android:layout_height="24dp"
        android:layout_marginLeft="10dp"
        android:src="@mipmap/iv_lol_icon1" />

    <TextView
        android:id="@+id/tv_msg"
        android:layout_width="match_parent"
        android:layout_height="wrap_content"
        android:layout_marginLeft="10dp"
        android:textSize="20sp" />

</LinearLayout>
非常簡單,嘿嘿~
ToastDemo.zip
好的,本節給大家講解了Toast的基本使用,以及如何自定義Toast,非常簡單,大家可以在實際開發中對自己的Toast進行定制~
 第63章、XML文件-SAX操作(從零開始學Android)
SAX(simpleAPIforXML)是一種XML解析的替代方法。相比於DOM,SAX是一種速度更快,更有效的方法。它逐行掃描文檔,一邊掃描一邊解析。而且相比於DOM,
 7.5.1 WebView(網頁視圖)基本用法
本節引言本節給大家帶來的是Android中的一個用於顯示網頁的控件:WebView(網頁視圖)。現在Android應用層開發的方向有兩種:客戶端開發
 2.5.4 AutoCompleteTextView(自動完成文本框)的基本使用
本節引言:本節繼續來學習Adapter類的控件,這次帶來的是AutoCompleteTextView(自動完成文本框),相信細心的你發現了,和Ada
 4.3.2 BroadcastReceiver庖丁解牛
本節引言:上節我們對BroadcastReceiver已經有了一個初步的了解了,知道兩種廣播類型:標准與有序,動態或靜態注冊廣播接收者,監聽系統廣播