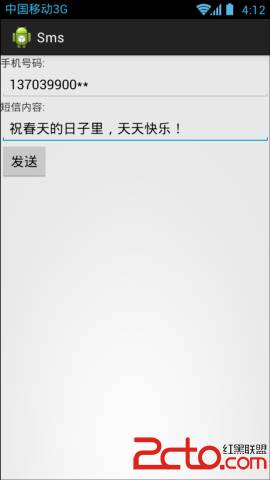
每逢佳節,中國移動、電信、聯通都是偷偷笑的日子,又不知道多少短信費用納入囊中,盡管微信、QQ、飛信漫天飛,但仍然阻擋不了節日祝福短信的火爆,但群發實在沒有意義,你是不是想來一個既個性而又群發呢?
譬如:“老夫子同學,你好!特祝愚人節快樂!”,按分類從聯系人取出信息,然後加上名字和稱呼,是不是這樣的短信才更有價值與別具一格呢?
發送短信的關鍵程序是通過SmsManager對象的sendTextMessage()方法來完成,其中sendTextMessage()方法需傳入五個值,依次是收件人地址(String),發送地址(String),發送服務(PendingIntent)與送達服務(PendingIntent),其中收件人與正文是不可為null的兩個參數。
一、設計界面
1、布局文件
打開res/layout/activity_main.xml文件。
輸入以下代碼:
[html] view plain copy
- <?xml version="1.0" encoding="utf-8"?>
- <LinearLayout
- xmlns:android="http://schemas.android.com/apk/res/android"
- android:layout_width="match_parent"
- android:layout_height="match_parent"
- android:orientation="vertical" >
-
- <TextView
- android:id="@+id/textphone"
- android:layout_width="wrap_content"
- android:layout_height="wrap_content"
- android:text="手機號碼:" />
-
- <EditText
- android:id="@+id/editphone"
- android:layout_width="match_parent"
- android:layout_height="wrap_content"
- android:ems="10" >
-
- <requestFocus />
- </EditText>
-
- <TextView
- android:id="@+id/textcont"
- android:layout_width="wrap_content"
- android:layout_height="wrap_content"
- android:text="短信內容:" />
-
- <EditText
- android:id="@+id/editcont"
- android:layout_width="match_parent"
- android:layout_height="wrap_content"
- android:ems="10" />
-
- <Button
- android:id="@+id/send"
- android:layout_width="wrap_content"
- android:layout_height="wrap_content"
- android:text="發送" />
-
- </LinearLayout>
二、程序文件
打開“src/com.genwoxue.sms/MainActivity.java”文件。
然後輸入以下代碼:
[java] view plain copy
- package com.genwoxue.sms;
-
- import android.os.Bundle;
- import android.telephony.SmsManager;
- import android.view.View;
- import android.view.View.OnClickListener;
- import android.widget.Button;
- import android.widget.EditText;
- import android.app.Activity;
- import android.app.PendingIntent;
-
- public class MainActivity extends Activity {
-
- private EditText editPhone=null;
- private EditText editCont=null;
- private Button btnSend=null;
-
- @Override
- protected void onCreate(Bundle savedInstanceState) {
- super.onCreate(savedInstanceState);
- setContentView(R.layout.activity_main);
-
- editPhone=(EditText)super.findViewById(R.id.editphone);
- editCont=(EditText)super.findViewById(R.id.editcont);
-
- btnSend=(Button)super.findViewById(R.id.send);
- btnSend.setOnClickListener(new OnClickListener(){
- @Override
- public void onClick(View v){
- //實例化PendingIntent
- PendingIntent intent=PendingIntent.getActivity(
- MainActivity.this,
- 0,
- MainActivity.this.getIntent(),
- PendingIntent.FLAG_UPDATE_CURRENT);
-
- //獲取SmsManager服務
- SmsManager sms=SmsManager.getDefault();
- //發送短信
- sms.sendTextMessage(
- editPhone.getText().toString(), //手機號碼
- "13800371500", //短信中心號碼
- editCont.getText().toString(), //內容
- intent,
- null);
- }
- });
- }
- }
三、配置文件
打開“AndroidManifest.xml”文件。
然後輸入以下代碼:
[html] view plain copy
- <?xml version="1.0" encoding="utf-8"?>
- <manifest xmlns:android="http://schemas.android.com/apk/res/android"
- package="com.genwoxue.sms"
- android:versionCode="1"
- android:versionName="1.0" >
-
- <uses-sdk
- android:minSdkVersion="10"
- android:targetSdkVersion="15" />
-
- <uses-permission android:name="android.permission.SEND_SMS"/>
-
- <application
- android:allowBackup="true"
- android:icon="@drawable/ic_launcher"
- android:label="@string/app_name"
- android:theme="@style/AppTheme" >
- <activity
- android:name="com.genwoxue.sms.MainActivity"
- android:label="@string/app_name" >
- <intent-filter>
- <action android:name="android.intent.action.MAIN" />
- <category android:name="android.intent.category.LAUNCHER" />
- </intent-filter>
- </activity>
- </application>
-
- </manifest>
注意:需要在AndroidManifest.xml文件中添加權限:
<uses-permission android:name="android.permission.SEND_SMS"/>
四、運行結果


 7.6.2 基於TCP協議的Socket通信(1)
 10.7 WindowManager(窗口管理服務)
 8.3.7 Paint API之—— Xfermode與PorterDuff詳解(四)
 8.3.16 Canvas API詳解(Part 1)