編輯:初級開發
這篇文章沒有打算有一個很好的邏輯去介紹android的某個方面,全盤大致上就是我接觸、了解android的ui開發後到現在的一些感想以及個人理解吧!
全文可能會涉及到Java、android開發、android源碼研究、設計模式等各方面的初級知識,屬於典型的雜侃天下,深入研究還需要各位和我一起給力、加油了!
好了,廢話少說,開動!
一、楔子:android界面開發意味著什麼
第一個問題,android界面開發涉及到了哪些方面。
當你接觸過一段時間的android應用開發,了解到了一些android的知識後,你應該能夠在心中形成這樣的印象:android的開發分為兩塊。一個是資源部分,一個是資源操作部分:詳細點說的話,就是一個是對資源的導入、設置、整合等這些方面的工作,另一個就是對資源的調用、使用、控制(甚至改變)等這些方面的工作。前者在一個典型的android工程中的表現形式就是assets文件夾中的音頻、視頻等原生資源文件和res文件夾中的各式各樣的XML文檔文件以及形形色色的圖片文件——很容易想到的是,這些東西是無法程序在運行時改變的,也就是靜態的。後者在android工程則表現為src文件夾和gen文件夾中各式各樣的Java文件(有的是你手動輸入生成的,有的則是adt通過aidl自動生成的),而通過開發人員的設計以及實現,這部分在應用運行時是可能發生改變的,也就是動態的。
而界面的開發便處在了這樣一個極為重要的位置之上:溝通資源和對資源的操作(後者我們還可以簡述為軟件的“功能”)這兩個部分。也就是說,如果你想要做出一個最低標准為“差強人意”的android界面的話,你至少首先對android的兩大開發部分有一個大致上的了解——你得會寫XML代碼,以至於你可以形成一個又一個的還算符合邏輯的界面結構;你得學會P圖(或者讓會P圖的人懂得該給你P什麼圖),抑或搜圖,從而可以為你的界面准備一些養眼的圖片資源,以給人眼前一亮的感覺;你得掌握android.widget包裡面的一些常用類的使用方法以及一些使用技巧,從而可以讓你的資源在應用運行時可以以很舒服的形態展示出來;你甚至得對android的窗口運行、管理機制有一定的了解,以到達更自由地定制界面特性的目的.....
另外一個問題就是,android界面開發到底體現在哪些地方。
這個問題就不得不提到用戶體驗這個永恆的話題上了,用戶體驗好,你就成功了一半。而用戶體驗的很大一部分就是界面的各種相關。讓我們羅列出下面幾個條件:
1.你的應用和用戶打交道的就是,而且僅僅是它的界面
2.界面是溝通程序後台功能和用戶的接口
3.界面有好壞之分
4.人是喜歡好的東西的
不知道你得出了什麼結論,我的是:界面開發很重要,是不可敷衍了事的!
你也許會反駁我:如果功能實現的不完美,動不動就崩潰,界面再好又有什麼用?是的,作為一個和我一樣的“程序猿”,這樣想是非常符合“騾跡”的,但一個對你的應用沒有任何了解的客戶卻不是這麼想的——他第一眼看到的僅僅是你應用的界面,而不是你的數據庫是咋麼工作的(能看到的話,估計黑客早就OUT了)——界面好看不,好用不?這些都是他所感受到、體驗到的。只有這些類似於第一印象的東西在客戶心中打下了獲得好感的基礎,客戶才會有進一步了解你這個應用的欲望:應用程序東施很賢惠,數據庫工作穩定,占用系統資源極少,但長的確實後現代了點;應用程序西施功能基本上沒啥特點,有的功能東施都有,而且都不及東施,有時候甚至會導致系統崩潰(亡國),但就是界面極為人性化(也就是漂亮)。就是這樣的兩個應用,當擺在客戶勾踐面前的時候,該小白就選擇花一美元買下西施,送給了上級夫差。
也就是說,想讓客戶相中你家應用,就得在它的界面上多下功夫。
其實剛開始我也是對界面這一塊不以為然,以為它屬於整個android開發流程中最為短期、最為輕松的部分,所以就打算用最快的速度弄完界面後和其他成員一起去進行功能上的開發。但是後來我才發現這是導致我們項目爛尾的最初起源之一:我的界面決定了整個應用的功能模塊分布情況,不僅僅會影響到用戶體驗,而且在某些方面甚至會影響到功能模塊的設計以及開發。而我的界面卻沒有像想象中完美,所以後來在功能開發完成後,我們都45度斜望著自家應用,淚流滿面。
把以上的文字總結為一句話就是:界面開發很重要,因為它直接關系到用戶體驗,而且間接關系到功能開發。
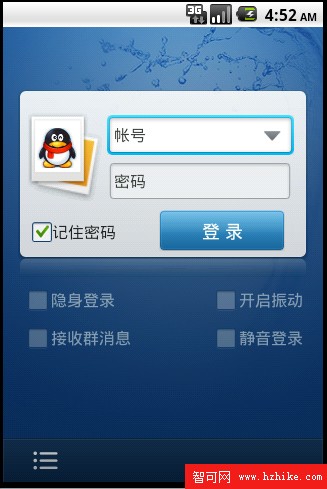
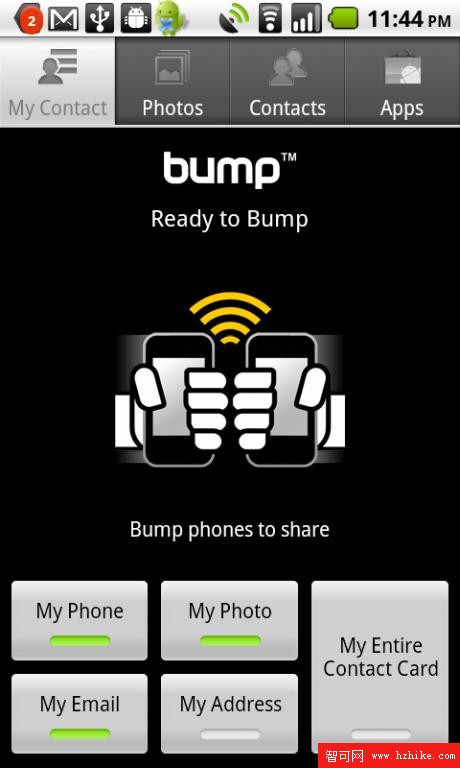
下面是幾個我曾經主要分析了的優秀的,成熟的界面:
(1)手機QQ

這個登錄界面很清爽,很美觀,我喜歡。
(2)Seesmic

這個好友列表看起來簡約大方,很Cool。
(3)bump

bump,很有創意的一款軟件,它的界面和剛才那個的風格極為類似——簡約不簡單。同時你也可以看到TabActivity的重要性。
二、開端:android界面開發基礎知識介紹
1.MVC模式和android界面開發
當我在欣賞四人幫(GoF)的《設計模式》的第一章時,就提到了這個在應用程序設計中最為經典的設計模式——MVC,也就是Model-VIEw-Controller(模型-視圖-控制器)。
這個模式的最大特點在我理解來看,就是實現了視圖和控制器的分離,視圖的更新經由模型,完全聽由控制器的安排。詳細了解請點擊鏈接。
以下為《設計模式》書中原話的援引:

看到這段話你想到了什麼?沒錯,想到了兩個類:android.view.VIEw和android.view.ViewGroup。前者很像上述文字中提到的View, 後者則很像CompositeView——而且ViewGroup就是View的子類,它還可以嵌套View以及VIEwGroup。
沒這麼巧吧?
其實這不是一個巧合,而是android界面系統的構建本身就是一個借鑒了MVC模式的活生生的例子(有些地方說是C/S模式也是對的,但我個人覺得那是偏向管理方面的,真正結構上還是吸收了MVC模式的影子。而且更重要的是,C/S模式對於我們來說還太難懂,所以我選擇了android擦了邊的MVC來引入話題)。我們甚至可以找到android中對應於控制器的東西:android.view.VIEwManager,雖然它僅僅是一個接口而已。然後你再想想那些常用的android.widget包中的會顯示在屏上的類都是繼承自VIEw....是不是有一種豁然開朗的感覺啊?
看了這半天你也許會問,講android界面開發好好的,為啥忽然跳到了設計模式上面來了?其實你應該了解這樣一個事實:android也是人做出來的,能做出來,也就一定有它的依據——而所謂的設計模式也就是其中的依據之一。這麼看來,如果想要了解android的實質,在 android的開發中能夠更如魚得水,設計模式是一定要研究的——這樣至少可以讓你了解到系統各個組件之間的依存關系。
希望了解到了MVC模式後,再去看看android參考文檔,你能夠對android的界面系統有一個較為本質性的深入化的了解。
再舉兩個在android中應用設計模式例子:
(1)老在開發中用到名字中帶Factory的類,而其實這裡屬於工廠模式的范疇。
(2)你可以讓你的Activity帶上singleInstance的activity launch mode,而這裡涉及到了單例模式。
更多的就等待你去發現了,不過發現了別忘了第一個告訴我啊!
2.關於一些界面開發中重要的組件
對於什麼是Activity、什麼是TextVIEw等等,我就不多說了,因為大家都已經對這些有了一些基本的了解了。在這裡,我想談談自己平時較常用到的一些界面開發組件的特點以及怎麼用它。
(1)常用VIEwGroup
一個界面的設計工作,第一步就是整個界面框架結構的設計,而這些框架結構在android中是用ViewGroup類別組件來實現的。ViewGroup有常見子類AbsoluteLayout, AdapterVIEw<T extends Adapter>, FrameLayout, LinearLayout, RelativeLayout, SlidingDrawer。
由於android設備市場現在群雄並起,所以各種顯示特點的設備都有。為了讓你家應用可以在各種機器上都能夠得到最真實的寫照,AbsoluteLayou最好還是別用了。要用的話你就必須有巧妙的技術避開其缺點,或者你就不得不針對每種設備設計一套獨有的UI(當然我們是不會這樣去做的)。
SlidingDrawer是一個還算炫的組件,它可以讓你實現一個抽屜功能,進而去擴展那少的可憐的手機屏幕面積。在1.6時代的機子上Home界面下方的那個點了之後拉出很多應用的箭頭就是SlidingDrawer的一個實例。
我個人使用的最多的是LinearLayout,RelativeLayout,AdapterVIEw<T extends Adapter>。
LinearLayout和RelativeLayout我主要用來進行界面的整體布局。
界面中經常出現一種幾個widget成豎排或橫排的形式出現的情況,這個時候通常就得用LinearLayout。它有一個屬性:orIEntation,這個屬性可以設置LinearLayout內部的組件是怎樣排列的。
RelativeLayout沒有LinearLayout死板,但比AbsoluteLayout要設備兼容性更強,所以一旦涉及到方位的布局,我一般會首先考慮它,它的一些類似於android:layout_alignLeft、android:layout_alignParentLeft等屬性在方位布局上用起來總是得心應手。
而如果將剛才兩把利器結合起來的話,你就會發現,只要是信息容量不大的界面,基本上用它們都可以實現布局了。例如剛才的手機QQ的登錄界面就是這樣的。
當界面中有大量的信息內容需要展現時,我們通常會想到AdapterVIEw<T extends Adapter>。
其實AdapterVIEw<T extends Adapter>(尖括號涉及到Java中泛型的概念)只是一個抽象類,它是android中一類信息包含量極大,可以顯示幾乎各種形式數據的界面組件們的父類。而它的子類就包含了我們熟悉的Gallery, GridView, ListVIEw, Spinner。這個系列的組件在顯示數據時都會需要一個接口android.widget.Adapter的實現類幫忙,例如ArrayAdapter<T>, BaseAdapter, CursorAdapter,SimpleAdapter, SimpleCursorAdapter, SpinnerAdapter(相信大家都很熟悉了,所以就不簡介了,而且我很懷疑這又是一個設計模式的實例,但還沒找到具體是哪種,希望知道的同學告訴我)。
(2)常用VIEw
界面結構弄好了,當然就是向裡面加入東西了。常用的View(除去ViewGroup)有這些:TextView,ImageView,, ProgressBar,AutoCompleteTextView, Button, CheckBox,EditText,ImageButton, ImageSwitcher,RadioButton, RadioGroup,SeekBar,Spinner, TabHost, TabWidget, TableLayout,WebVIEw等等等等,等等等等.....
可以說深入的了解這些組件是開發出西施級界面的必由之路。當然,限於篇幅,這裡還是不一一介紹了,有興趣的同學可以去網上搜索(我以後會把關於該組件的我看到的最好的博文以鏈結的方式放上來)。
在這裡就和大家分享幾個小經驗:
(1).這些組件應該都有一個類似的構造方法:某某(Context context)。例如TextView就有構造方法TextVIEw(Context context),這樣以後如果你在Java代碼中想要生成一個VIEw實例時,就可以用這個萬金油式的構造方法(關於Context,剛接觸時我也是很納悶的,但看了這篇文章,和這篇文章後,我就有了一個大致的了解)。
(2).有時候你想在java文件裡面設置一個組件的屬性,但是你卻不知道這個方法是否存在,那你就可可以去參看android文檔中該類的XML Attributes一欄,這裡羅列了該組件在xml文件中所有的可設置屬性,更給力的是,這裡也把該屬性對應的java方法羅列了出來——如果xml屬性後面有對應java方法,那你就可以很有福氣的在java文檔中調用了,如果沒有,那你就只能自認倒霉了。舉個例子:VIEw類有一個XML屬性是設置其背景的,名字叫做android:background="@%#$@%$#",而文檔中它後面有一個setBackgroundResource(int)方法(如圖),這就表明在Java代碼中你可以通過vIEw實例來動態設置其背景了。

(3).這些組件其實並不是一成不變的——它們是具有極大的定制性的。這句話也就是說,你可以初級性的定義該組件的外觀(後面的一個實例會提到這個),也可以高級性的定義該組件的行為——這些意味著,你可以設置一個Button在成為焦點,失去焦點,按下等等狀態下的外觀(點這裡看例子),也可以設置該Button對觸摸事件,按鍵事件等等做出怎樣的反應(我又想起了事件機制,呵呵)。有了這些,難怪有些應用會然你看到一些組件很奇怪的反應——例如禁止單擊,只許長按。
(4).這些組件的可設置屬性大致可以這樣分組:應用於該組件內部的,應用於該組件的。舉個例子:android:layout_gravity屬性設置的是該組件在其父組件內部的位置特性,而和其相對應的就有android:gravity來設置該組件子組件在其內部的位置特性;android:paddingLeft="10dip"指的是該組件內部組件裡左邊必須有10dip的距離,而android:marginLeft="10dip"則指的該組件離其父組件左邊界必須有10dip的距離......
說了這麼多,其實就是想給大家一個tip,希望大家能夠在以後的界面開發中有什麼想法後能夠知道可以用什麼組件去實現。還有一個觀點想告訴大家,想了解一個android庫類,最先想到的一定要是android文檔——雖然是英文,但只有它才會告訴你最本源的信息。同時你也可以采取廣而深的查看方法去地毯式的查看文檔中某一方面的類——這樣看就會有一個很全面的了解過程,印象也就會更深。在這裡推薦大家看看android.view.VIEw和android.app.Activity的文檔,那裡有許多很基礎、很給力的知識。
3.關於開發工具
哎,到了這裡,我就不得不吐槽下了:android的可視化界面開發工具——Layout Editor——剛開始用的真的很不習慣!竟然連vc的都不如,實在有點out了!
所以在這裡推薦一個還算好的民間高手用Java編寫的DroidDraw(雖然還有些不完善,但它的“所見即所得”還是做的比Layout Editor好很多的):介紹在這裡,下載在這裡。
三、升華:高級技巧淺嘗
哈哈,小生菜鳥,不敢魯班門前甩斧頭,在這裡就簡單說說幾個自己了解的比較高手級別的做法吧。另外,雪地原地翻轉720度凌空轉體三周半空中抱頭翻轉兩周半後跪求高手指教小弟。一日為師,終生為..你懂的。
1.自建widget
也就是說,你可以自己建立一個類繼承於android.view.View類,然後override一些View的方法,之後再加上你的一些自己的實現,最終構成一個自己構建的widget(當然你也可以來一個自定義的VIEwGroup,我可是不介意的)。有興趣了解這方面知識的童鞋可以去百度上Google一下,這裡就不貼具體帖子了。
另附文檔中一段比較重要的文字:
Implementing a Custom VIEw
To implement a custom view, you will usually begin by providing overrides for some of the standard methods that the framework calls on all vIEws. You do not need to override all of these methods. In fact, you can start by just overriding onDraw(android.graphics.Canvas).
Category Methods Description
Creation Constructors There is a form of the constructor that are called when the view is created from code and a form that is called when the vIEw is inflated from a layout file. The second form should parse and apply any attributes defined in the layout file.
onFinishInflate() Called after a vIEw and all of its children has been inflated from XML.
Layout onMeasure(int, int) Called to determine the size requirements for this vIEw and all of its children.
onLayout(boolean, int, int, int, int) Called when this vIEw should assign a size and position to all of its children.
onSizeChanged(int, int, int, int) Called when the size of this vIEw has changed.
Drawing onDraw(Canvas) Called when the vIEw should render its content.
Event processing onKeyDown(int, KeyEvent) Called when a new key event occurs.
onKeyUp(int, KeyEvent) Called when a key up event occurs.
onTrackballEvent(MotionEvent) Called when a trackball motion event occurs.
onTouchEvent(MotionEvent) Called when a touch screen motion event occurs.
Focus onFocusChanged(boolean, int, Rect) Called when the vIEw gains or loses focus.
onWindowFocusChanged(boolean) Called when the window containing the vIEw gains or loses focus.
Attaching onAttachedToWindow() Called when the vIEw is attached to a window.
onDetachedFromWindow() Called when the vIEw is detached from its window.
onWindowVisibilityChanged(int) Called when the visibility of the window containing the vIEw has changed
2.在源碼環境下進行應用開發
沒錯,Google是很大方的,因為android實現了完全開源——你可以用Git這個代碼版本管理工具下載整個android平台的源代碼(甚至自己利用源碼編譯一個android平台出來,不過聽說至少2小時)。但如果我告訴你,我們經常接觸的android SDK僅僅只提供了這些源碼中的一部分實現,你又會怎麼看呢?嗯,不是Google小氣,做這些隱藏實現其實是為了保證系統的安全性、穩定性(水果公司的隱藏實現部分還必須勤勞的開源社區人士破解出來才能使用,所以Google確實不是小氣的)。當然,既然Google給了我們源碼,我們就得好好利用它——在源碼環境下實現android程序開發。在源碼環境下,你可以實現sdk環境中無法實現的一些界面效果:例如用虛擬按鈕來模擬Menu按鍵(後面有一帖子介紹)。這個是我即將進行探索的一個領域,所以現在還無法和大家分享自己的經驗。就推薦兩個帖子給大家解解饞吧:
(1)環境搭建:android源碼環境搭建
(2)實例:android模擬按鍵——源碼環境下開發應用程序
希望大家能夠有志於android的高級技巧探索,然後和大家分享(我再次表示不會介意的)。
四、高潮:一個界面的實現
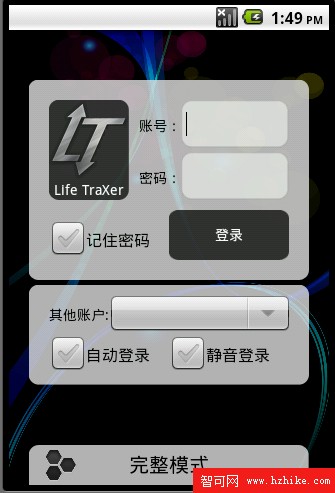
說了這麼多,咱們“程序猿”該看點代碼了。在這裡就把我最新做出來的Life TraXer的歡迎界面以及Log In 界面的代碼貼出來大家拍拍板磚。
1.歡迎界面的XML代碼
vIEw plaincopy to clipboardprint?
1.<?XML version="1.0" encoding="utf-8"?>
2.<LinearLayout XMLns:android="http://schemas.android.com/apk/res/android"
3. android:orIEntation="vertical"
4. android:background="@drawable/welcome_background"
5. android:layout_width="fill_parent"
6. android:layout_height="fill_parent">
7. <LinearLayout
8. android:layout_width="fill_parent"
9. android:layout_height="fill_parent"
10. android:background="@drawable/welcome_logo">
11. <RelativeLayout
12. android:layout_width="fill_parent"
13. android:layout_height="390dip"
14. >
15. <TextVIEw
16. android:text="@string/welcome_moto"
17. android:layout_height="wrap_content"
18. android:layout_width="wrap_content"
19. android:layout_alignParentBottom="true"
20. android:layout_centerHorizontal="true"></TextVIEw>
21. </RelativeLayout>
22. </LinearLayout>
23.</LinearLayout>
2.歡迎界面的Java代碼(注意Handler那部分)
vIEw plaincopy to clipboardprint?
1.package com.TheMessenger.LifeTraXer;
2.import android.app.Activity;
3.import android.content.Intent;
4.import android.os.Bundle;
5.import android.os.Handler;
6.import android.util.Log;
7.import android.vIEw.Window;
8.import android.vIEw.WindowManager;
9.public class Welcome extends Activity {
10. private final int SPLASH_DELAY_TIME = 5000 ;
11. private String Tag = "WelcomeActivity" ;
12.
13. @Override
14. public void onCreate(Bundle savedInstanceState) {
15. Log.i(Tag , "onCreate()" );
16. super.onCreate(savedInstanceState);
17. getWindow().setFlags(WindowManager.LayoutParams.FLAG_FULLSCREEN, WindowManager.LayoutParams.FLAG_FULLSCREEN);
18. requestWindowFeature(Window.FEATURE_NO_TITLE);
19. setContentVIEw(R.layout.welcome);
20.
21. new Handler().postDelayed(
22. new Runnable()
23. {
24. @Override
25. public void run() {
26. // TODO Auto-generated method stub
27. startActivity(new Intent(Welcome.this , Login.class));
28. Welcome.this.finish();
29. }
30.
31. }
32. , SPLASH_DELAY_TIME);
33. }
34.}
3.登陸界面XML代碼(看看嵌套的方式)
vIEw plaincopy to clipboardprint?
1.<?XML version="1.0" encoding="utf-8"?>
2.<LinearLayout
3. XMLns:android="http://schemas.android.com/apk/res/android"
4. android:orIEntation="vertical"
5. android:background="@drawable/login_background"
6. android:layout_width="fill_parent"
7. android:layout_height="fill_parent">
8. <RelativeLayout
9. android:layout_height="250dip"
10. android:layout_width="fill_parent">
11. <RelativeLayout
12. android:layout_centerHorizontal="true"
13. android:layout_alignParentBottom="true"
14. android:layout_height="200dip"
15. android:layout_width="280dip"
16. android:background="@drawable/login_input_area_background">
17. <LinearLayout
18. android:orIEntation="vertical"
19. android:layout_height="160dip"
20. android:layout_width="240dip"
21. android:layout_centerInParent="true">
22. <LinearLayout
23. android:orIEntation="horizontal"
24. android:layout_height="100dip"
25. android:layout_width="fill_parent">
26. <LinearLayout
27. android:layout_width="80dip"
28. android:layout_height="fill_parent"
29. android:orIEntation="vertical"
30. android:background="@drawable/login_input_area_logo_background">
31. <ImageVIEw
32. android:layout_width="fill_parent"
33. android:layout_height="80dip"
34. android:src="@drawable/login_input_area_logo"/>
35. <TextVIEw
36. android:layout_width="fill_parent"
37. android:layout_height="20dip"
38. android:gravity="center_horizontal"
39. android:text="@string/login_textvIEw_app_name_text"
40. android:textColor="@drawable/white"/>
41. </LinearLayout>
42. <RelativeLayout
43. android:layout_width="160dip"
44. android:paddingLeft="10dip"
45. android:layout_height="fill_parent">
46. <LinearLayout
47. android:orIEntation="horizontal"
48. android:layout_width="fill_parent"
49. android:layout_height="48dip"
50. android:layout_alignParentLeft="true"
51. android:layout_alignParentTop="true">
52. <TextVIEw
53. android:layout_width="42dip"
54. android:layout_height="50dip"
55. android:text="@string/login_textvIEw_username_text"
56. android:textColor="@drawable/black"/>
57. <EditText
58. android:id="@+id/login_edittext_username"
59. android:padding="5dip"
60. android:layout_width="108dip"
61. android:layout_height="fill_parent"
62. android:background="@drawable/login_edittext_background"
63. android:textColor="@drawable/black"
64. android:singleLine="true"/>
65. </LinearLayout>
66. <LinearLayout
67. android:orIEntation="horizontal"
68. android:layout_width="fill_parent"
69. android:layout_height="48dip"
70. android:layout_alignParentLeft="true"
71. android:layout_alignParentBottom="true">
72. <TextVIEw
73. android:layout_width="42dip"
74. android:layout_height="50dip"
75. android:text="@string/login_textvIEw_passWord_text"
76. android:textColor="@drawable/black"/>
77. <EditText
78. android:id="@+id/login_edittext_passWord"
79. android:padding="5dip"
80. android:layout_width="108dip"
81. android:layout_height="fill_parent"
82. android:background="@drawable/login_edittext_background"
83. android:textColor="@drawable/black"
84. android:passWord="true"
85. android:singleLine="true"/>
86. </LinearLayout>
87. </RelativeLayout>
88. </LinearLayout>
89. <RelativeLayout
90. android:layout_height="60dip"
91. android:layout_width="fill_parent">
92. <CheckBox
93. android:id="@+id/login_checkbox_remember_passWord"
94. android:layout_height="40dip"
95. android:layout_width="120dip"
96. android:layout_alignParentLeft="true"
97. android:layout_alignParentBottom="true"
98. android:text="@string/login_checkbox_remember_passWord_text"
99. android:textColor="@drawable/black"/>
100. <Button
101. android:id="@+id/login_button_log_in"
102. android:layout_height="50dip"
103. android:layout_width="120dip"
104. android:gravity="center"
105. android:background="@drawable/login_button_log_in_selector"
106. android:layout_alignParentRight="true"
107. android:layout_alignParentBottom="true"
108. android:text="@string/login_button_log_in_text"
109. android:textColor="@drawable/white"/>
110. </RelativeLayout>
111. </LinearLayout>
112. </RelativeLayout>
113. </RelativeLayout>
114. <RelativeLayout
115. android:layout_height="110dip"
116. android:layout_width="fill_parent">
117. <RelativeLayout
118. android:layout_width="280dip"
119. android:layout_height="100dip"
120. android:layout_centerInParent="true"
121. android:background="@drawable/login_others_background">
122. <LinearLayout
123. android:orIEntation="vertical"
124. android:layout_width="240dip"
125. android:layout_height="80dip"
126. android:layout_centerInParent="true">
127. <LinearLayout
128. android:orIEntation="horizontal"
129. android:layout_width="fill_parent"
130. android:layout_height="40dip">
131. <TextVIEw
132. android:layout_height="fill_parent"
133. android:layout_width="wrap_content"
134. android:gravity="center"
135. android:text="@string/login_spinner_more_users_text"
136. android:textColor="@drawable/black"/>
137. <Spinner
138. android:id="@+id/login_spinner_more_users"
139. android:layout_height="fill_parent"
140. android:layout_width="182dip"/>
141. </LinearLayout>
142. <LinearLayout
143. android:orIEntation="horizontal"
144. android:layout_width="fill_parent"
145. android:layout_height="40dip">
146. <CheckBox
147. android:id="@+id/login_checkbox_auto_log_in"
148. android:layout_width="120dip"
149. android:layout_height="fill_parent"
150. android:text="@string/login_checkbox_auto_log_in_text"
151. android:textColor="@drawable/black"/>
152. <CheckBox
153. android:id="@+id/login_checkbox_mute_log_in"
154. android:layout_width="120dip"
155. android:layout_height="fill_parent"
156. android:text="@string/login_checkbox_mute_log_in_text"
157. android:textColor="@drawable/black"/>
158. </LinearLayout>
159. </LinearLayout>
160. </RelativeLayout>
161. </RelativeLayout>
162. <RelativeLayout
163. android:layout_width="fill_parent"
164. android:layout_height="fill_parent">
165. <RelativeLayout
166. android:orIEntation="horizontal"
167. android:layout_height="40dip"
168. android:layout_width="280dip"
169. android:layout_alignParentBottom="true"
170. android:layout_centerHorizontal="true"
171. android:background="@drawable/login_bottom_bar_background"
172. android:paddingLeft="10dip">
173. <Button
174. android:id="@+id/login_button_log_in_mode"
175. android:layout_width="40dip"
176. android:layout_height="40dip"
177. android:layout_alignParentLeft="true"
178. android:background="@drawable/login_button_log_in_mode_selector"/>
179. <TextVIEw
180. android:id="@+id/login_textvIEw_current_log_in_mode"
181. android:layout_height="40dip"
182. android:layout_width="120dip"
183. android:layout_centerInParent="true"
184. android:gravity="center"
185. android:text="@string/login_textvIEw_log_in_complete_mode_text"
186. android:textColor="@drawable/black"
187. android:textSize="20sp"
188. />
189. </RelativeLayout>
190. </RelativeLayout>
191.</LinearLayout>
4.登錄界面的Java
vIEw plaincopy to clipboardprint?
1.package com.TheMessenger.LifeTraXer;
2.
3.import android.app.Activity;
4.import android.app.AlertDialog;
5.import android.app.Dialog;
6.import android.content.DialogInterface;
7.import android.content.Intent;
8.import android.os.Bundle;
9.import android.util.Log;
10.import android.vIEw.KeyEvent;
11.import android.vIEw.Menu;
12.import android.vIEw.MenuInflater;
13.import android.vIEw.MenuItem;
14.import android.view.VIEw;
15.import android.vIEw.Window;
16.import android.widget.Button;
17.import android.widget.TextVIEw;
18.
19.public class Login extends Activity {
20. private final String Tag = "LoginActivity" ;
21. private final int ON_EXIT_DIALOG = 1;
22. private final int ABOUT_US_DIALOG = 2;
23. private final int LOG_IN_MODE_SELECT_DIALOG = 3;
24.
25. private AlertDialog onExitDialog;
26. private AlertDialog aboutUsDialog;
27.
28. private Button buttonLogin;
29. private Button buttonLoginMode;
30. private TextView textVIEwLoginMode;
31.
32.
33. @Override
34. public void onCreate(Bundle savedInstanceState) {
35. Log.i(Tag , "onCreate()" );
36. super.onCreate(savedInstanceState);
37. requestWindowFeature(Window.FEATURE_NO_TITLE);
38. setContentVIEw(R.layout.before_login);
39. initializeVIEw();
40. }
41.
42. @Override
43. public boolean onKeyDown(int keyCode, KeyEvent event) {
44. if(keyCode == KeyEvent.KEYCODE_BACK && event.getRepeatCount() == 0){
45. dialogFactory(ON_EXIT_DIALOG).show();
46. }
47.
48. return false;
49. }
50.
51. @Override
52. public boolean onCreateOptionsMenu(Menu menu) {
53. MenuInflater mInflater = getMenuInflater();
54. mInflater.inflate(R.menu.login_menu, menu);
55.
56. return true;
57. }
58.
59. @Override
60. public boolean onOptionsItemSelected(MenuItem item) {
61. switch(item.getItemId()){
62. case R.id.login_menu_delete_username:
63. /*還沒完成*/
64. break;
65. case R.id.login_menu_set_net:
66. startActivity(new Intent("android.settings.WIRELESS_SETTINGS"));
67. break;
68. case R.id.login_menu_about_us:
69. dialogFactory(ABOUT_US_DIALOG).show();
70. break;
71. case R.id.login_menu_exit_app:
72. dialogFactory(ON_EXIT_DIALOG).show();
73. break;
74. default :
75. break;
76. }
77. return super.onOptionsItemSelected(item);
78. }
79.
80. private Dialog dialogFactory(int dialogType){
81. switch(dialogType){
82. case ON_EXIT_DIALOG:
83. return createOnExitDialog();
84. case ABOUT_US_DIALOG:
85. return createAboutUsDialog();
86. case LOG_IN_MODE_SELECT_DIALOG:
87. return createLoginModeDialog();
88. }
89. return null ;
90. }
91.
92. private Dialog createOnExitDialog(){
93. AlertDialog.Builder dialogBuilder = new AlertDialog.Builder(this);
94. View dialogVIEw = this.getLayoutInflater().inflate(R.layout.login_alertdialog_on_exit, null);
95. dialogBuilder.setView(dialogVIEw);
96. onExitDialog = dialogBuilder.create();
97.
98. dialogView.findVIEwById(R.id.login_button_alertdialog_on_exit_yes)
99. .setOnClickListener(
100. new Button.OnClickListener()
101. {
102.
103. @Override
104. public void onClick(VIEw v) {
105. Login.this.finish();
106. }
107.
108. }
109. );
110. dialogView.findVIEwById(R.id.login_button_alertdialog_on_exit_no)
111. .setOnClickListener(
112. new Button.OnClickListener()
113. {
114.
115. @Override
116. public void onClick(VIEw v) {
117. onExitDialog.dismiss();
118. }
119.
120. }
121. );
122. return onExitDialog ;
123. }
124.
125. private Dialog createAboutUsDialog(){
126. AlertDialog.Builder dialogBuilder = new AlertDialog.Builder(this);
127. View dialogVIEw = this.getLayoutInflater().inflate(R.layout.login_alertdialog_about_us, null);
128. dialogBuilder.setView(dialogVIEw);
129. aboutUsDialog = dialogBuilder.create();
130.
131. dialogView.findVIEwById(R.id.login_button_alertdialog_about_us_ok)
132. .setOnClickListener(
133. new Button.OnClickListener(){
134.
135. @Override
136. public void onClick(VIEw v) {
137. aboutUsDialog.dismiss();
138. }
139.
140. }
141. );
142.
143. return aboutUsDialog;
144. }
145.
146. private Dialog createLoginModeDialog(){
147. return new AlertDialog.Builder(this)
148. .setTitle(R.string.login_dialog_login_mode_select_title_text)
149. .setItems(
150. R.array.login_mode_selector_array
151. ,
152. new DialogInterface.OnClickListener() {
153.
154. @Override
155. public void onClick(DialogInterface dialog, int which) {
156. switch(which){
157. case 0:
158. textVIEwLoginMode.setText("完整模式");
159. /*沒有完成*/
160. break;
161. case 1:
162. textVIEwLoginMode.setText("Gps模式");
163. /*沒有完成*/
164. break;
165. case 2:
166. break;
167. }
168. }
169. })
170. .create();
171. }
172.
173.
174. private void initializeVIEw()
175. {
176. buttonLogin = (Button) findVIEwById(R.id.login_button_log_in);
177. buttonLogin.setOnClickListener(
178. new Button.OnClickListener()
179. {
180.
181. @Override
182. public void onClick(VIEw v) {
183. startActivity(new Intent(Login.this , DuringLogin.class));
184. }
185.
186. }
187. );
188.
189. buttonLoginMode = (Button) findVIEwById(R.id.login_button_log_in_mode);
190. buttonLoginMode.setOnClickListener(
191. new Button.OnClickListener()
192. {
193.
194. @Override
195. public void onClick(VIEw v) {
196. dialogFactory(LOG_IN_MODE_SELECT_DIALOG).show();
197. }
198.
199. }
200. );
201.
202. textViewLoginMode = (TextView) findViewById(R.id.login_textvIEw_current_log_in_mode);
203. }
204.}
5.實際效果貼圖
歡迎界面

登錄界面

五、尾聲:鳴謝
 Android 輕松實現語音識別
完整代碼如下:package com.example.android.apis.app;import com.example.android.apis.R;import
 android 界面布局 之 LinearLayout(垂直線性布局)
 開啟/關閉/監聽 飛行模式
不多說,上圖,見代碼。 package lab.sodino.airplane; import Java.text.SimpleDate
 Android核心分析 Zygote Service
在本章我們會接觸到這兩個單詞:Zygote [生物] 受精卵, 接合子, 接合體Spawn:產卵通過這兩個單詞,我們就可以大體知道Zygote是干什麼的了,就是叫老母雞