編輯:初級開發
TextVIEw 部分字體高
[功能]
TextVIEw是不支持部分字段高亮的 但是我們可以進行擴展
[思路]
1. 利用LinearLayout 作為 TextVIEw 的 容器
2. 字符串中每個字都使用一個TextVIEw顯示之
3. 還可以使用*.9.png來作為所有TextVIEw的背景 使之看上去成為整體
[思路 步驟]
1. 定義TextSelectionHelper 構造函數 傳入 Activity上下文 及 子VIEw對齊方式 以及 layout_width layout_height
Java代碼
public class TextHighlightHelper{
Activity activity;
LinearLayout lLayout;
public TextHighlightHelper(Activity a,int l){
activity = a;
lLayout = new LinearLayout(activity);
lLayout.setOrIEntation(l);
lLayout.setLayoutParams(
new LinearLayout.LayoutParams(LinearLayout.LayoutParams.WRAP_CONTENT,LinearLayout.LayoutParams.WRAP_CONTENT));
}
}
2. 定義函數 用於接收字符串
Java代碼
//之所以每個字符都分別用一個TextVIEw顯示之 因為這樣做 會使得後面顏色設定非常容易
public void addText(CharSequence cs){
for(int i=0;i
TextView tv = new TextVIEw(activity);
tv.setText(cs.charAt(i)+"");
lLayout.addVIEw(tv);
}
}
//之所以每個字符都分別用一個TextVIEw顯示之 因為這樣做 會使得後面顏色設定非常容易
public void addText(CharSequence cs){
for(int i=0;i
TextView tv = new TextVIEw(activity);
tv.setText(cs.charAt(i)+"");
lLayout.addVIEw(tv);
}
}
3. 設定 部分字符 顏色
Java代碼
//函數解釋: 從s開始 選取l個字符 顏色都設定為i
public void addColor(int s,int l,int c){
if(l > lLayout.getChildCount()){
//error argument
}
else {
for(int i=s;i< p>
TextView item = (TextVIEw)lLayout.getChildAt(i);
item.setTextColor(c);
}
}
}
//函數解釋: 從s開始 選取l個字符 顏色都設定為i
public void addColor(int s,int l,int c){
if(l > lLayout.getChildCount()){
//error argument
}
else {
for(int i=s;i< p>
TextView item = (TextVIEw)lLayout.getChildAt(i);
item.setTextColor(c);
}
}
}
4. 設定所有字符的背景 最好使用*.9.png 資源 因為長度可變
Java代碼
public void addBackResource(int r){
lLayout.setBackgroundResource(r);
}
public void addBackResource(int r){
lLayout.setBackgroundResource(r);
}
5. 得到整個LinearLayout 並供使用
Java代碼
public View loadVIEw(){
return lLayout;
}
public View loadVIEw(){
return lLayout;
}
6. 如何使用TextSelectionHelper
* TextHighlightUsage 的布局 並定義最外層的id
Java代碼
< ?XML version="1.0" encoding="utf-8"?>
< LinearLayout XMLns:android="http://schemas.android.com/apk/res/android"
android:orIEntation="vertical"
android:id="@+id/layout"
android:layout_width="fill_parent"
android:layout_height="fill_parent"
>
< TextVIEw
android:text="HelloText1"
android:layout_width="fill_parent"
android:layout_height="wrap_content" />
< /LinearLayout>
* 具體使用:
Java代碼
public class TextHighlightUsage extends Activity {
TextHighlightHelper tHelper1;
TextHighlightHelper tHelper2;
LinearLayout ll;
/** Called when the activity is first created. */
@Override
public void onCreate(Bundle savedInstanceState) {
super.onCreate(savedInstanceState);
setContentVIEw(R.layout.main);
ll = (LinearLayout)findVIEwById(R.id.layout);
//Text:HelloText2
CharSequence c1 = "HelloText2";
tHelper1 = new TextHighlightHelper(this,LinearLayout.HORIZONTAL);
tHelper1.addText(c1);
tHelper1.addColor(0, 3, Color.RED);
tHelper1.addBackResource(R.drawable.dot);
ll.addView(tHelper1.loadVIEw());
//Text:創新源於模仿!
CharSequence c2 = "創新源於模仿!";
tHelper2 = new TextHighlightHelper(this,LinearLayout.VERTICAL);
tHelper2.addText(c2);
tHelper2.addColor(1, 3, Color.RED);
ll.addView(tHelper2.loadVIEw());
}
}
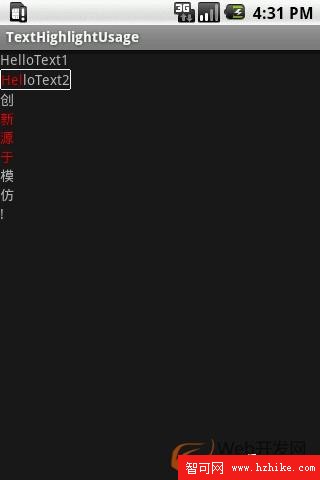
7. emulator 運行截圖:

至於其能不能滿足需求 見仁見智了 大家可以參考截圖
 Android編譯並運行launcher2
 android ListView詳解
在android開發中ListView是比較常用的組件,它以列表的形式展示具體內容,並且能夠根據數據的長度自適應顯示。抽空把對ListVIEw的使用做了整理,並寫了個小
 Google發布Android 2.3.3 全面支持NFC
谷歌於去年12月底正式推出了Android 2.3姜餅系統,支持NFC近場通訊功能成為該系統最大亮點之一。今日,谷歌正式發布了android 2.3.3 SDK,實現了
 Android軟鍵盤的隱藏顯示研究
android是一個針對觸摸屏專門設計的操作系統,當點擊編輯框,系統自動為用戶彈出軟鍵盤,以便用戶進行輸入。 那麼,彈出軟鍵盤後必然