編輯:關於android開發
隨著大眾口味的不斷提高,對app要的開發的要求也不斷提高,開發人員們要在app上展示的東西安也越來越多,android早期的一些控件慢慢的不不能滿足開發的要求了,比如TitleBar的應用的就沒有原來的那麼多了,後來,谷歌推出了ActionBar,再後來又推出了ToolBar.來滿足日益增加的開發需求。
本文還是為了復習原來的一些技術,至於新的技術,其實道理都是一個樣的,掌握一些關鍵的地方,很容易就弄明白。
下面,我們說一下,如何自定義一個TitleBar,來實現一些功能:1.可以在任一要用到此統一樣式的TitleBar的Activity中,設置TitleBar了不同標題。2.在不同標題中,依據需求,顯示後退按鈕。3.在不同activity中,依據需求,設置titleBar左側展示圖片,文字,並實現點擊執行動作的功能。
最終要實現的樣示:
特點:把TitleBarActiviti.class放在一個util文件夾中,哪裡用到,直接在個xml布局文件裡如本類中一樣引用(像用TextView一樣去用就行了。)。可以設置左側後退不顯示,右側刷新不顯示。至於titleBar的樣式,大家完全可以自己設置。
1 <RelativeLayout xmlns:android="http://schemas.android.com/apk/res/android"
2 xmlns:tools="http://schemas.android.com/tools"
3 android:layout_width="match_parent"
4 android:layout_height="48dp"
5 android:gravity="center_horizontal"
6 android:background="#ffffff">
7
8 <View
9 android:id="@+id/view_line"
10 android:layout_width="match_parent"
11 android:layout_height="1dp"
12 android:layout_alignParentBottom="true"
13 android:background="#0000ff" />
14
15 <RelativeLayout
16 android:id="@+id/rel_titlebar"
17 android:layout_width="match_parent"
18 android:layout_height="match_parent" >
19
20 <TextView
21 android:id="@+id/tv_back"
22 android:layout_width="45dp"
23 android:layout_height="match_parent"
24 android:layout_alignParentLeft="true"
25 android:background="#66ff0000"
26 android:gravity="center"
27 android:focusable="true"
28 android:clickable="true"
29 android:text="後退"
30 android:visibility="invisible" />
31
32 <View
33 android:id="@+id/view_left"
34 android:layout_width="1dp"
35 android:layout_height="match_parent"
36 android:layout_toRightOf="@id/tv_back"
37 android:background="#6600ff00"
38 android:visibility="invisible" />
39
40 <TextView
41 android:id="@+id/tv_other"
42 android:layout_width="45dp"
43 android:layout_height="match_parent"
44 android:layout_alignParentRight="true"
45 android:background="#66ff0000"
46 android:gravity="center"
47 android:text="刷新"
48 android:focusable="true"
49 android:clickable="true"
50 android:visibility="invisible" />
51
52 <View
53 android:id="@+id/view_right"
54 android:layout_width="1dp"
55 android:layout_height="match_parent"
56 android:layout_toLeftOf="@id/tv_other"
57 android:background="#6600ff00"
58 android:visibility="invisible" />
59
60 <TextView
61 android:id="@+id/tv_title_name"
62 android:layout_width="45dp"
63 android:layout_height="match_parent"
64 android:layout_toLeftOf="@id/view_right"
65 android:layout_toRightOf="@id/view_left"
66 android:background="#6600ff00"
67 android:gravity="center"
68 android:text="Title_Name" />
69 </RelativeLayout>
70
71 </RelativeLayout>
1 package com.example.ttilebardemo;
2
3 import android.app.Activity;
4 import android.content.Context;
5 import android.graphics.Color;
6 import android.util.AttributeSet;
7 import android.view.LayoutInflater;
8 import android.view.View;
9 import android.view.View.OnClickListener;
10 import android.widget.RelativeLayout;
11 import android.widget.TextView;
12 import android.widget.Toast;
13
14 public class TitleBarActivity extends RelativeLayout implements OnClickListener {
15
16 private Context mContext;
17 private View left, bottom, right;
18 private TextView backTextView, titleName, refersh;
19 private OnClickListener onClickListener;
20 private boolean canBack = false;
21
22 public TitleBarActivity(Context context) {
23 this(context, null);
24
25 }
26
27 public TitleBarActivity(Context context, AttributeSet attr) {
28 super(context, attr);
29 mContext = context;
30 init();
31 }
32
33 private void init() {
34 LayoutInflater.from(mContext).inflate(R.layout.activity_titlebar, this, true);
35 // 初始化view
36 left = findViewById(R.id.view_left);
37 bottom = findViewById(R.id.view_line);
38 right = findViewById(R.id.view_right);
39 // 初始化textview
40 backTextView = (TextView) findViewById(R.id.tv_back);
41 backTextView.setOnClickListener(this);
42 titleName = (TextView) findViewById(R.id.tv_title_name);
43 refersh = (TextView) findViewById(R.id.tv_other);
44
45 }
46
47 /**
48 * 設置titleBar的名字
49 */
50 public void setTitleName(String name) {
51 titleName.setText(name);
52 }
53
54 /**
55 * 設置titleBar左側可見性
56 */
57 public void setBackVisible() {
58 backTextView.setVisibility(View.VISIBLE);
59 left.setVisibility(View.VISIBLE);
60
61 }
62
63
64 /**
65 * 設置右側字體可見
66 */
67 public void setRefeshVisible() {
68 refersh.setVisibility(View.VISIBLE);
69 right.setVisibility(View.VISIBLE);
70 }
71 /**
72 * 設置左側刷新的監聽
73 */
74 public void setRefreshListener(OnClickListener onRefresh , boolean canBack){
75 refersh.setOnClickListener(onRefresh);
76 this.canBack = canBack;
77 }
78
79
80 /**
81 * 設左邊的按鈕的點擊事件。
82 */
83
84 @Override
85 public void onClick(View v) {
86 if(v.getId() == R.id.tv_back && backTextView.isShown() && canBack){
87 backTextView.setBackgroundColor(Color.GREEN);
88 }
89
90 }
91
92 }
好了,titleBar已經定義完成,下面就開始 使用了。
三、在使用類的xml布局文件中引用Titlebar
activity_main.xml
 1 <RelativeLayout xmlns:android="http://schemas.android.com/apk/res/android"
 2     xmlns:tools="http://schemas.android.com/tools"
 3     android:layout_width="match_parent"
 4     android:layout_height="match_parent"
 5     android:gravity="center_horizontal"
 6     android:background="#e7e7e7" >
 7
 8     <com.example.ttilebardemo.TitleBarActivity
 9         android:id="@+id/title_bar"
10         android:layout_width="match_parent"
11         android:layout_height="wrap_content"
12         >
13     </com.example.ttilebardemo.TitleBarActivity>
14
15     <TextView
16         android:id="@+id/tv_haha"
17         android:layout_width="match_parent"
18         android:layout_height="wrap_content"
19         android:layout_marginTop="50dp"
20         android:gravity="center"
21         android:layout_below="@id/title_bar"
22         android:text="你好,titleBar" />
23
24 </RelativeLayout>
四、在代碼中對Titlebar依據需求進行編寫。
 1 package com.example.ttilebardemo;
 2
 3 import android.annotation.SuppressLint;
 4 import android.app.Activity;
 5 import android.os.Bundle;
 6 import android.util.Log;
 7 import android.view.Menu;
 8 import android.view.MenuItem;
 9 import android.view.View;
10 import android.view.View.OnClickListener;
11 import android.widget.TextView;
12 import android.widget.Toast;
13
14 public class MainActivity extends Activity {
15     private TextView tvHa;
16     @Override
17     protected void onCreate(Bundle savedInstanceState) {
18         super.onCreate(savedInstanceState);
19         setContentView(R.layout.activity_main);
20         initView();
21     }
22
23     private void initView() {
24         tvHa = (TextView) findViewById(R.id.tv_haha);
25         TitleBarActivity titleBar = (TitleBarActivity) findViewById(R.id.title_bar);
26         titleBar.setBackVisible();
27         titleBar.setTitleName("在窗口設置");
28         titleBar.setRefeshVisible();
29
30         titleBar.setRefreshListener(new OnClickListener() {
31
32             public void onClick(View v) {
33                 Log.d("引用頁面::::::", "kwg kwg ........");
34             }
35         },true);
36     }
37 }
好了,就這樣吧。
 Android應用程序的啟動流程
Android應用程序的啟動流程 Android系統中一個應用程序的主題是由ActivityThread構成的。不過涉及到很多細節如ActivityThread是由誰來創
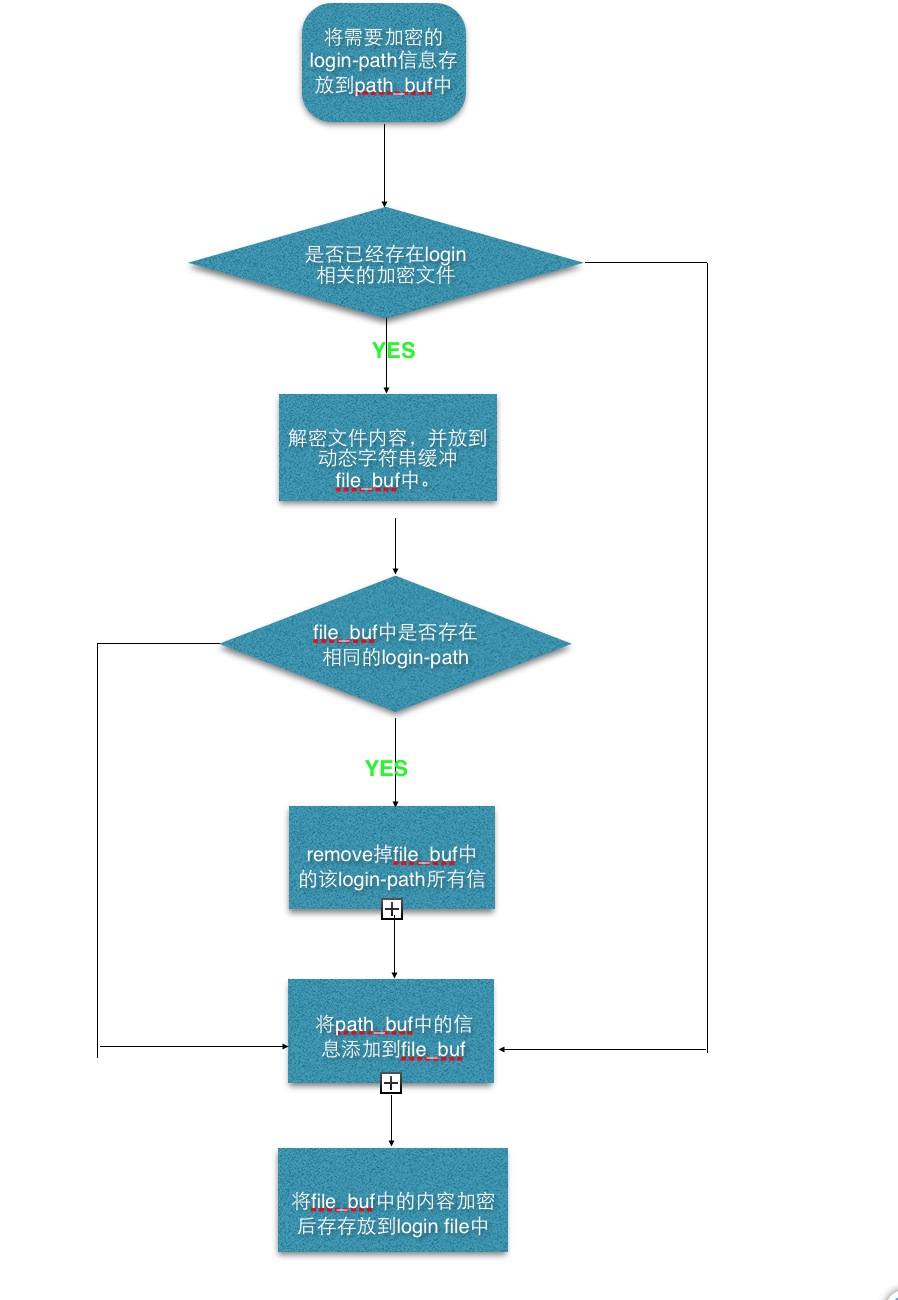 MySQL新特性之mysql_config_editor源碼解析
MySQL新特性之mysql_config_editor源碼解析從mysql5.6開始,mysql推出了加密工具mysql_config_editor。在此之前我們通過將
 Android中Activity處理返回結果的實現方式,androidactivity
Android中Activity處理返回結果的實現方式,androidactivity大家在網上購物時都有這樣一個體驗,在確認訂單選擇收貨人以及地址時,會跳轉頁面到我們存
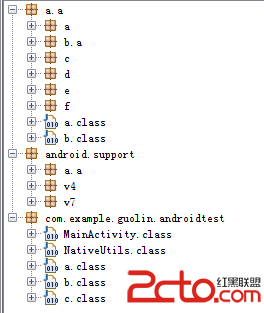 Android安全攻防戰,反編譯與混淆技術完全解析(下)
Android安全攻防戰,反編譯與混淆技術完全解析(下) 在上一篇文章當中,我們學習了Android程序反編譯方面的知識,包括反編譯代碼、反編譯資源、以及重新打包等內