編輯:關於android開發
首先弄懂怎麼設置adb wifi無線調試的功能,如下所示。
1. 手機端開啟adb tcp連接端口
:/$setprop service.adb.tcp.port 5555
:/$stop adbd
:/$start adbd
其中setprop是用來設置系統屬性的,這裡不需要root權限,su即可。可通過adb shell設置,亦可通過手機上安裝的Android terminal設置。
2. 電腦端的設置和使用
連接adb,其中phone_ipaddress和portnumber是指手機的ip和前面設置的監聽端口號(如5555)
adb connect phone_ipaddress:portnumber
直接adb shell或adb -s 設備shell連接設備
如若要斷開則如下:
adb disconnect phone_ipaddress:port
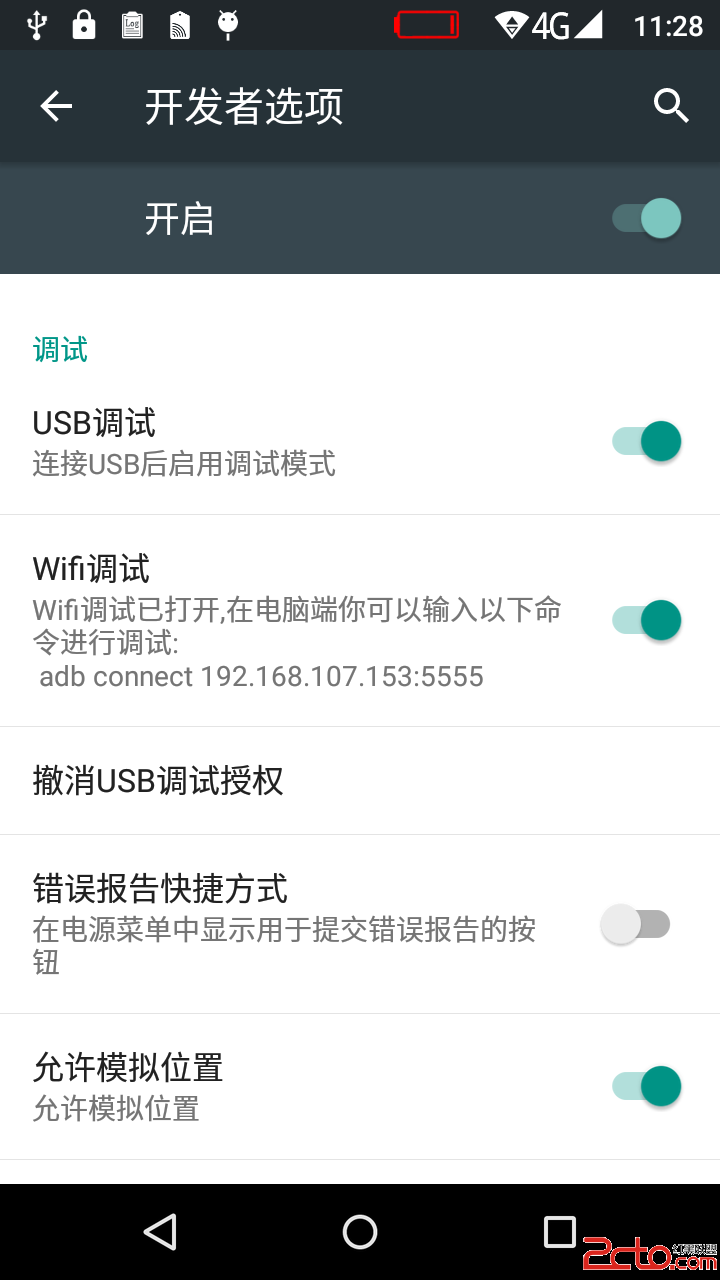
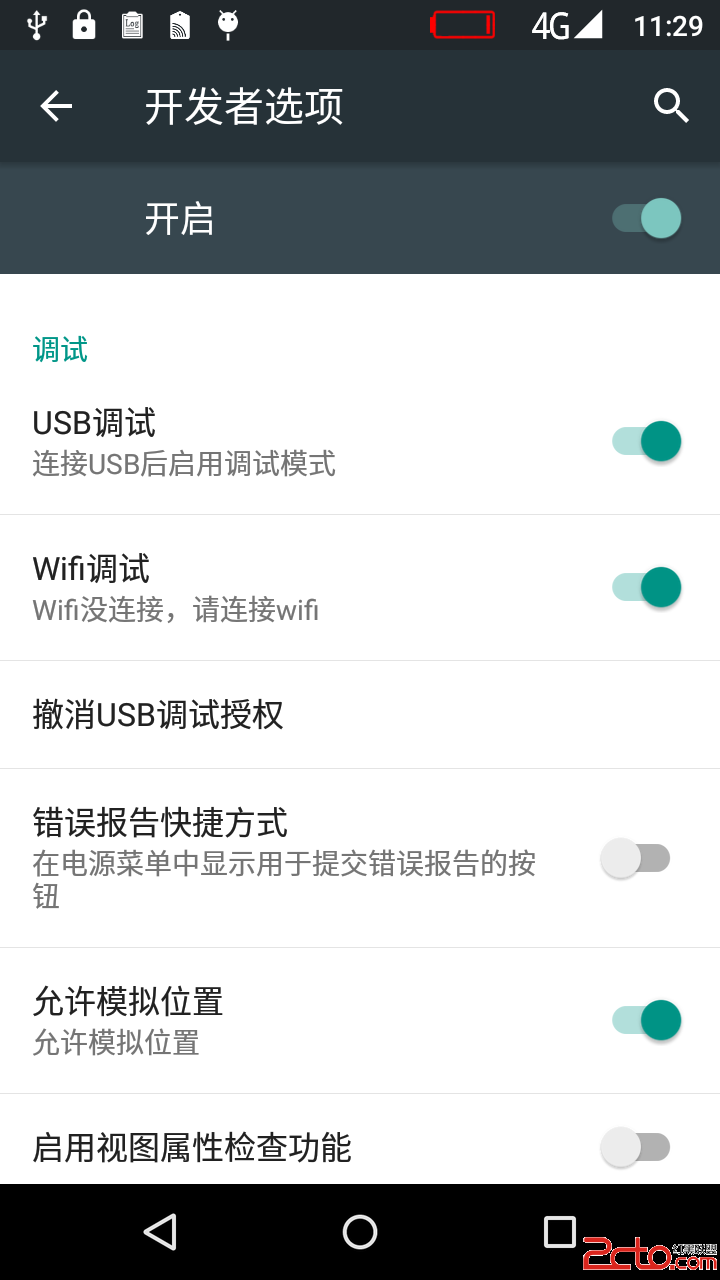
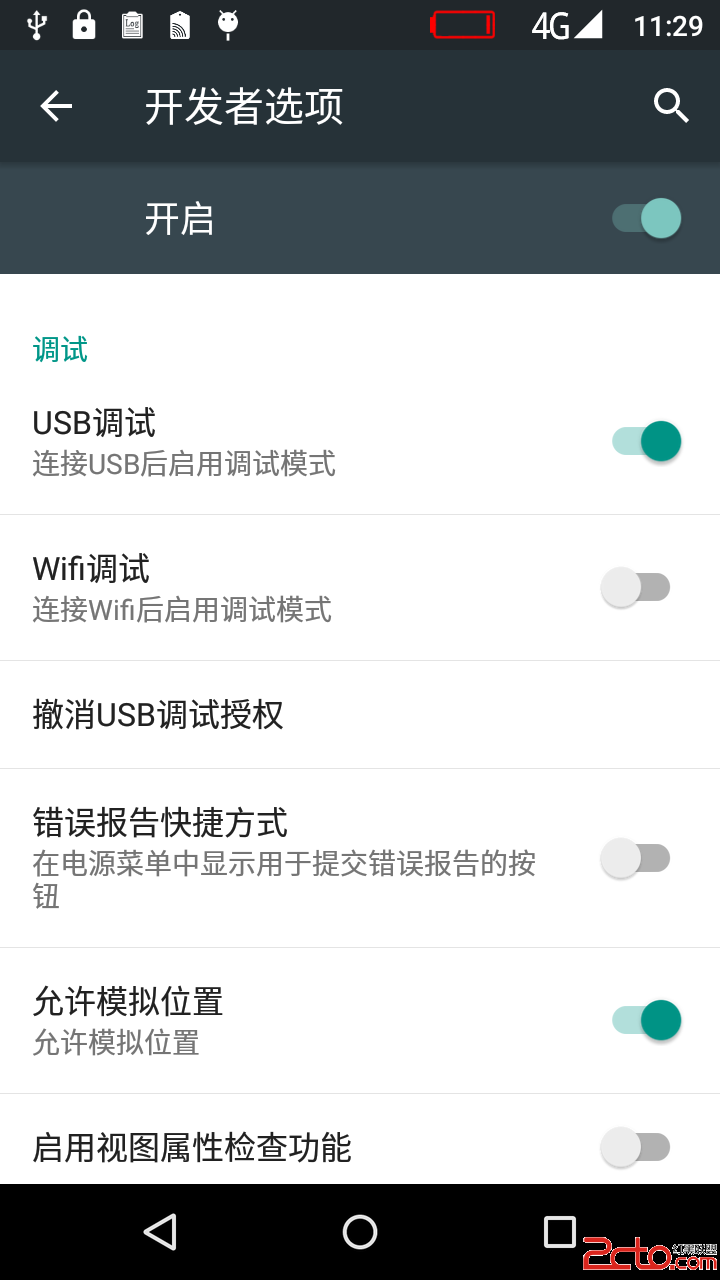
但是每次這樣的去設置很繁瑣,所以直接在設置中做一個開關就把手機端的設置做好,如下所示:
一、打開開關,並連接Wifi
二、打開開關,沒有連接Wifi
三、未打開開關
這樣就可以直接進行adb wifi調試了,手機端就不用每次都先用USB調試去設置修改的屬性,才能激活adb wifi調試。
======================================================================================================
下面來具體說說實現的思路:
第一步:在【設置】-->【開發者選項】中做一個類似於【USB調試】的開關【Wifi調試】
第二步:【Wifi調試】開關打開就激活監聽5555端口,用來進行adb wifi調試,【Wifi調試】開關關閉就不監聽5555端口,這樣就不能進行adb wifi調試
第三步:在第二步中打開關閉【Wifi調試】開關的時候,調用相應的接口進行設置
第四步:將第三步中要調用的接口寫好
1、先在布局中加入該開關
首先找到布局文件,packages/apps/Settings/res/xml/development_prefs.xml,找到【USB調試】開關的相應代碼,然後再裡面加一個【Wifi調試】開關,代碼如下:
<SwitchPreference android:key="enable_adb" android:title="@string/enable_adb" android:summary="@string/enable_adb_summary"/><!-- added by ouyang start --><SwitchPreference android:key="enable_wifi_adb" android:title="@string/enable_wifi_adb" android:summary="@string/enable_wifi_adb_summary"/> <!-- added by ouyang end -->上面代碼中,第一個代碼是【USB調試】開關的代碼,第二個是我加的【Wifi調試】開關的代碼,然後為什麼的字符串做相應的國際化操作,代碼如下:
packages/apps/Settings/res/values-zh-rCN/strings.xml 中加入:
<!-- added by ouyang start 2015-12-17 --> <string name="enable_wifi_adb">Wifi調試</string> <string name="enable_wifi_adb_openwifi">Wifi沒連接,請連接wifi</string> <string name="enable_wifi_adb_summary">連接Wifi後啟用調試模式</string> <string name="enable_wifi_adb_connected_summary">Wifi調試已打開,在電腦端你可以輸入以下命令進行調試:/n adb connect <xliff:g id="ip_address">%1$s</xliff:g>:5555</string> <!-- added by ouyang end 2015-12-17 -->
<!-- added by ouyang start 2015-12-17 --> <string name="enable_wifi_adb">Wifi debugging</string> <string name="enable_wifi_adb_openwifi">Wifi is not connected,please turn wifi on and connect it</string> <string name="enable_wifi_adb_summary">Debug mode when Wifi is connected</string> <string name="enable_wifi_adb_connected_summary">adb wifi is on,from your computer run:/n adb connect <xliff:g id="ip_address">%1$s</xliff:g>:5555</string> <!-- added by ouyang end 2015-12-17 -->
2、在packages/apps/Settings/src/com/android/settings/DevelopmentSettings.java文件中,對剛才加入的【Wifi調試】開關進行相關的邏輯處理。
首先先定義開關的幾個變量,如下:
    //add by ouyang 2015-12-17  start
    private static final String ENABLE_WIFI_ADB = "enable_wifi_adb";
    private static final String ADB_WIFI_ENABLED_KEY = "ADB_WIFI_ENABLED";
    private static SwitchPreference mEnableWifiAdb;
    //add by ouyang 2015-12-17  end
然後再onCreate()方法中初始化【Wifi調試】開關,如下:
   mEnableAdb = findAndInitSwitchPref(ENABLE_ADB);
   //add by ouyang 2015-12-17
   mEnableWifiAdb = findAndInitSwitchPref(ENABLE_WIFI_ADB);
然後在onPreferenceTreeClick(PreferenceScreen preferenceScreen, Preference preference)方法中對【Wifi調試】開關的打開和關閉操作做邏輯處理。
           if (preference == mEnableAdb) {
             if (mEnableAdb.isChecked()) {
                mDialogClicked = false;
                if (mAdbDialog != null) dismissDialogs();
                mAdbDialog = new AlertDialog.Builder(getActivity()).setMessage(
                        getActivity().getResources().getString(R.string.adb_warning_message))
                        .setTitle(R.string.adb_warning_title)
                        .setPositiveButton(android.R.string.yes, this)
                        .setNegativeButton(android.R.string.no, this)
                        .show();
                mAdbDialog.setOnDismissListener(this);
            } else {
                Settings.Global.putInt(getActivity().getContentResolver(),
                        Settings.Global.ADB_ENABLED, 0);
                mVerifyAppsOverUsb.setEnabled(false);
                mVerifyAppsOverUsb.setChecked(false);
                /// M: ALPS01256802, The "Developer options" status is opened.
                onPreferenceTreeClick(null, mVerifyAppsOverUsb);
                updateBugreportOptions();
            }
        }
        //add by ouyang 2015-12-17 start
        else if (preference == mEnableWifiAdb) {
            if (mEnableWifiAdb.isChecked()) {
            	Settings.Global.putInt(getActivity().getContentResolver(),ADB_WIFI_ENABLED_KEY, 1);
            	android.os.SystemProperties.set("sys.connect.adb.wifi","1");

            	WifiManager wifiManager = (WifiManager)getSystemService(Context.WIFI_SERVICE);
                WifiInfo wifiInfo = wifiManager.getConnectionInfo();
                int ipAddress = wifiInfo.getIpAddress();
                String ipAddressString = (ipAddress & 0xFF ) + "." +((ipAddress >> 8 ) & 0xFF) + "." +
                        ((ipAddress >> 16 ) & 0xFF) + "." +( ipAddress >> 24 & 0xFF) ;
                Log.i(TAG, "ipAddress="+ipAddress);
                Log.i(TAG, "ipAddressString="+ipAddressString);
            	if ("0.0.0.0".equals(ipAddressString)) {
            		mEnableWifiAdb.setSummary(getResources().getString(R.string.enable_wifi_adb_openwifi));
				}else{
					mEnableWifiAdb.setSummary(getResources().
							getString(R.string.enable_wifi_adb_connected_summary,ipAddressString));
				}
            } else {
            	Settings.Global.putInt(getActivity().getContentResolver(),ADB_WIFI_ENABLED_KEY, 0);
            	android.os.SystemProperties.set("sys.connect.adb.wifi","0");
            	mEnableWifiAdb.setSummary(getResources().getString(R.string.enable_wifi_adb_summary));
            }
        }
        //add by ouyang 2015-12-17 end
當【Wifi調試】開關打開的時候,保存一個原來表示該【Wifi調試】開關打開關閉的狀態的值為1,然後調用接口android.os.SystemProperties.set("sys.connect.adb.wifi","1");如果wifi這個時候打開就顯示相應的adb wifi命令,如ip地址為192.168.107.201的時候就顯示,"Wifi調試已打開,在電腦端你可以輸入以下命令進行調試:adb connect 192.168.107.201:5555";如果wifi為打開,就提示“Wifi沒連接,請連接wifi”
當【Wifi調試】開關關閉的時候,保存一個原來表示該【Wifi調試】開關打開關閉的狀態的值為0,然後調用接口android.os.SystemProperties.set("sys.connect.adb.wifi","0");
ADB_WIFI_ENABLED_KEY這個狀態值,在進入該Activity的時候,如果上次打開了【Wifi調試】開關,那麼下次進來的時候就要顯示【Wifi調試】開關是打開狀態,否則是關閉狀態。下面說說ADB_WIFI_ENABLED_KEY這個狀態值的相關代碼,如下:
在onResume()方法中,加入下面代碼:
        //add by ouyang 2015-12-17 start
        IntentFilter filter = new IntentFilter();
    	filter.addAction(WifiManager.NETWORK_STATE_CHANGED_ACTION);
    	filter.addAction(WifiManager.WIFI_STATE_CHANGED_ACTION);
    	filter.addAction(ConnectivityManager.CONNECTIVITY_ACTION);
    	getActivity().registerReceiver(wifiBroadcastReceiver, filter);

    	boolean isAdbWifiChecked = Settings.Global.getInt(getActivity().getContentResolver(),ADB_WIFI_ENABLED_KEY, 0) != 0;
        mEnableWifiAdb.setChecked(isAdbWifiChecked);
        Log.i(TAG, "isAdbWifiChecked:" + isAdbWifiChecked);
    	//add by ouyang 2015-12-17 end
代碼的意思是,進入該Activity就動態的注冊一個廣播,用來監聽Wifi的狀態改變的,然後來動態的顯示Android手機獲取的IP地址。然後根據ADB_WIFI_ENABLED_KEY這個狀態值來顯示【Wifi調試】開關的打開關閉狀態。
在updateAllOptions()方法中,也要去做下處理,代碼如下:
/// M: CR ALPS00244115. Lock and unlock screen, the "USB debugging" is unchecked.
        boolean isChecked = (mAdbDialog != null && mAdbDialog.isShowing()) ? true :
                    (Settings.Global.getInt(cr, Settings.Global.ADB_ENABLED, 0) != 0);
        updateSwitchPreference(mEnableAdb, isChecked);

        //add by ouyang 2015-12-17 start
        boolean isAdbWifiChecked = Settings.Global.getInt(cr,ADB_WIFI_ENABLED_KEY, 0) != 0;
        updateSwitchPreference(mEnableWifiAdb, isAdbWifiChecked);
        //add by ouyang 2015-12-17 end

        /// M: update usb preference again
        mExt.customUSBPreference(mEnableAdb);
        //add by ouyang 2015-12-17
        mExt.customUSBPreference(mEnableWifiAdb);
BroadcastReceiver wifiBroadcastReceiver = new BroadcastReceiver() {
		@Override
		public void onReceive(Context context, Intent intent) {
			String TAG = "wifiBroadcastReceiver";
			boolean isAdbWifiChecked = mEnableWifiAdb.isChecked();
			ConnectivityManager connectivityManager = (ConnectivityManager) context
					.getSystemService(Context.CONNECTIVITY_SERVICE);
			NetworkInfo net = connectivityManager.getActiveNetworkInfo();
			if (net == null) {
				Log.i(TAG, "No net type");
				if (isAdbWifiChecked) {
					mEnableWifiAdb.setSummary(getResources()
							.getString(R.string.enable_wifi_adb_openwifi));
				}
			} else {
				Log.i(TAG, "Net Type:" + net.getTypeName());
			}
			State wifi = connectivityManager.getNetworkInfo(ConnectivityManager.TYPE_WIFI).getState();
			if (wifi == State.CONNECTED || wifi == State.CONNECTING) {
				Log.i(TAG, "wifi connected");
				WifiManager wifiManager = (WifiManager) context.getSystemService(Context.WIFI_SERVICE);
				WifiInfo wifiInfo = wifiManager.getConnectionInfo();
				int ipAddress = wifiInfo.getIpAddress();
				String ipAddressString = (ipAddress & 0xFF) + "." + ((ipAddress >> 8) & 0xFF) + "."
						+ ((ipAddress >> 16) & 0xFF) + "." + (ipAddress >> 24 & 0xFF);
				if (isAdbWifiChecked) {
					mEnableWifiAdb.setSummary(
							getResources().getString(
									R.string.enable_wifi_adb_connected_summary, ipAddressString));
				}
				Log.i(TAG, getResources().getString(
						R.string.enable_wifi_adb_connected_summary, ipAddressString));
			} else if (wifi == State.DISCONNECTED || wifi == State.DISCONNECTING) {
				Log.i(TAG, "wifi disconnected");
				if (isAdbWifiChecked) {
					mEnableWifiAdb.setSummary(
							getResources().getString(R.string.enable_wifi_adb_openwifi));
				}
				Log.i(TAG, getResources().getString(
						R.string.enable_wifi_adb_connected_summary));
			}

		}
	};
======================================================================================================
好吧,在packages/apps/Settings/,即Settings APP層面的代碼寫完了,下面來說說調用的兩個接口怎麼實現。
android.os.SystemProperties.set("sys.connect.adb.wifi", "1");
android.os.SystemProperties.set("sys.connect.adb.wifi", "0");
首先找到frameworks/base/core/java/android/os/SystemProperties.java文件,找到set(String key, String val)方法,代碼如下,發現調用了native_set(key, val)方法。
   /**
     * Set the value for the given key.
     * @throws IllegalArgumentException if the key exceeds 32 characters
     * @throws IllegalArgumentException if the value exceeds 92 characters
     */
    public static void set(String key, String val) {
        if (key.length() > PROP_NAME_MAX) {
            throw new IllegalArgumentException("key.length > " + PROP_NAME_MAX);
        }
        if (val != null && val.length() > PROP_VALUE_MAX) {
            throw new IllegalArgumentException("val.length > " +
                PROP_VALUE_MAX);
        }
        native_set(key, val);
    }
native_set(key, val)方法定義如下:
private static native void native_set(String key, String def);該接口類在初始化運行環境中注冊對應的cpp接口android_os_SystemProperties.cpp,實際操作通過JNI調用的是cpp文件對應的接口:
frameworks/base/core/jni/AndroidRuntime.cpp
namespace android {
      extern int register_android_os_SystemProperties(JNIEnv *env);
}
static void SystemProperties_set(JNIEnv *env, jobject clazz,
                                      jstring keyJ, jstring valJ)
{
    int err;
    const char* key;
    const char* val;

    if (keyJ == NULL) {
        jniThrowNullPointerException(env, "key must not be null.");
        return ;
    }
    key = env->GetStringUTFChars(keyJ, NULL);

    if (valJ == NULL) {
        val = "";       /* NULL pointer not allowed here */
    } else {
        val = env->GetStringUTFChars(valJ, NULL);
    }

    err = property_set(key, val);

    env->ReleaseStringUTFChars(keyJ, key);

    if (valJ != NULL) {
        env->ReleaseStringUTFChars(valJ, val);
    }

    if (err < 0) {
		ALOGE("setproperty key=%s value=%s err=%d\n", key, val, err);
        jniThrowException(env, "java/lang/RuntimeException",
                          "failed to set system property");
    }
}
http://blog.csdn.net/ameyume/article/details/8056492
http://www.blogjava.net/anymobile/articles/301989.html
下面直接寫下面兩個接口的實現
android.os.SystemProperties.set("sys.connect.adb.wifi", "1");
android.os.SystemProperties.set("sys.connect.adb.wifi", "0");
在device/lentek/lentk6735_66t_l1/E580/init.rc文件中加入下面的代碼,其中E580是項目的名稱。
#added by ouyang start connect adb with wifi
on property:sys.connect.adb.wifi=1
	setprop service.adb.tcp.port 5555
	stop adbd
	start adbd
on property:sys.connect.adb.wifi=0
	setprop service.adb.tcp.port ""
	stop adbd
	start adbd
#added by ouyang end connect adb with wifi
上面代碼就是當調用
android.os.SystemProperties.set("sys.connect.adb.wifi", "1");和sys.connect.adb.wifiandroid.os.SystemProperties.set("sys.connect.adb.wifi", "0");接口的時候的具體實現,
即"sys.connect.adb.wifi"屬性設置為1的時候,監聽5555端口,
"sys.connect.adb.wifi"屬性設置為0的時候,不監聽任何端口
====================================================================================
好了,下面來再一次測一測該功能怎麼樣,重新打開wifi,重新打開【Wifi調試】開關,顯示如下:
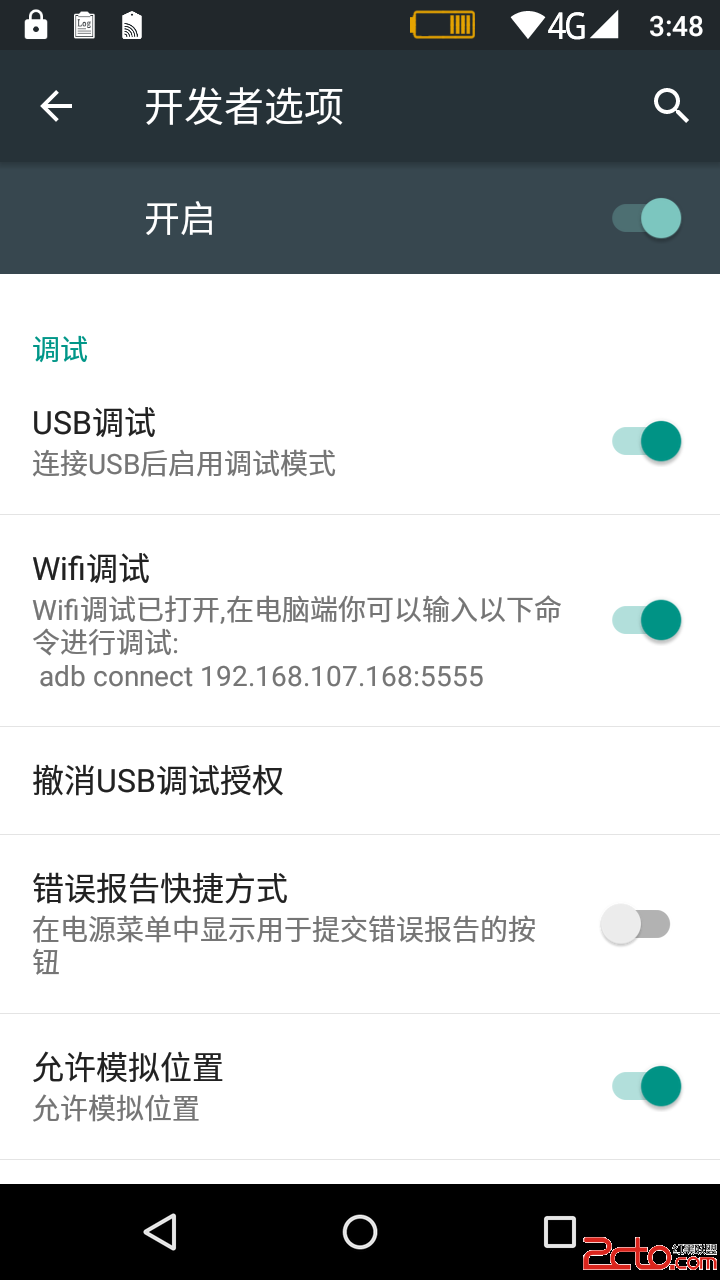
可以看出來,此時Android手機的IP地址是192.168.107.168,因此下面在PC端測試看是否可以用adb wifi無線調試,使用命令adb connect 192.168.107.168連接,adb disconnect 192.168.107.168斷開連接,如下圖所示:
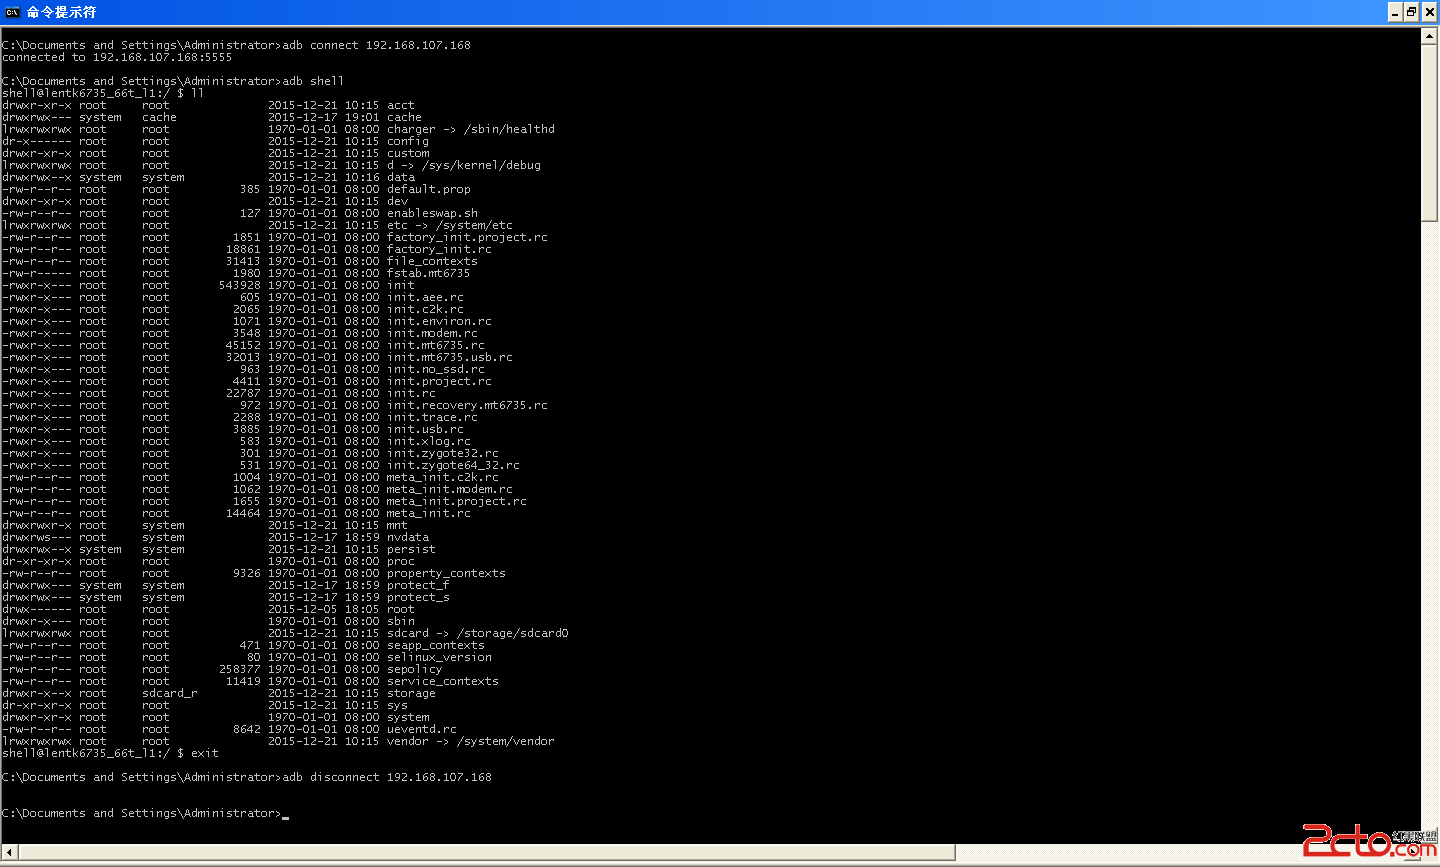
C:\Documents and Settings\Administrator>adb connect 192.168.107.168
connected to 192.168.107.168:5555

C:\Documents and Settings\Administrator>adb shell
shell@lentk6735_66t_l1:/ $ ll
drwxr-xr-x root     root              2015-12-21 10:15 acct
drwxrwx--- system   cache             2015-12-17 19:01 cache
lrwxrwxrwx root     root              1970-01-01 08:00 charger -> /sbin/healthd
dr-x------ root     root              2015-12-21 10:15 config
drwxr-xr-x root     root              2015-12-21 10:15 custom
lrwxrwxrwx root     root              2015-12-21 10:15 d -> /sys/kernel/debug
drwxrwx--x system   system            2015-12-21 10:16 data
-rw-r--r-- root     root          385 1970-01-01 08:00 default.prop
drwxr-xr-x root     root              2015-12-21 10:15 dev
-rw-r--r-- root     root          127 1970-01-01 08:00 enableswap.sh
lrwxrwxrwx root     root              2015-12-21 10:15 etc -> /system/etc
-rw-r--r-- root     root         1851 1970-01-01 08:00 factory_init.project.rc
-rw-r--r-- root     root        18861 1970-01-01 08:00 factory_init.rc
-rw-r--r-- root     root        31413 1970-01-01 08:00 file_contexts
-rw-r----- root     root         1980 1970-01-01 08:00 fstab.mt6735
-rwxr-x--- root     root       543928 1970-01-01 08:00 init
-rwxr-x--- root     root          605 1970-01-01 08:00 init.aee.rc
-rwxr-x--- root     root         2065 1970-01-01 08:00 init.c2k.rc
-rwxr-x--- root     root         1071 1970-01-01 08:00 init.environ.rc
-rwxr-x--- root     root         3548 1970-01-01 08:00 init.modem.rc
-rwxr-x--- root     root        45152 1970-01-01 08:00 init.mt6735.rc
-rwxr-x--- root     root        32013 1970-01-01 08:00 init.mt6735.usb.rc
-rwxr-x--- root     root          963 1970-01-01 08:00 init.no_ssd.rc
-rwxr-x--- root     root         4411 1970-01-01 08:00 init.project.rc
-rwxr-x--- root     root        22787 1970-01-01 08:00 init.rc
-rwxr-x--- root     root          972 1970-01-01 08:00 init.recovery.mt6735.rc
-rwxr-x--- root     root         2288 1970-01-01 08:00 init.trace.rc
-rwxr-x--- root     root         3885 1970-01-01 08:00 init.usb.rc
-rwxr-x--- root     root          583 1970-01-01 08:00 init.xlog.rc
-rwxr-x--- root     root          301 1970-01-01 08:00 init.zygote32.rc
-rwxr-x--- root     root          531 1970-01-01 08:00 init.zygote64_32.rc
-rw-r--r-- root     root         1004 1970-01-01 08:00 meta_init.c2k.rc
-rw-r--r-- root     root         1062 1970-01-01 08:00 meta_init.modem.rc
-rw-r--r-- root     root         1655 1970-01-01 08:00 meta_init.project.rc
-rw-r--r-- root     root        14464 1970-01-01 08:00 meta_init.rc
drwxrwxr-x root     system            2015-12-21 10:15 mnt
drwxrws--- root     system            2015-12-17 18:59 nvdata
drwxrwx--x system   system            2015-12-21 10:15 persist
dr-xr-xr-x root     root              1970-01-01 08:00 proc
-rw-r--r-- root     root         9326 1970-01-01 08:00 property_contexts
drwxrwx--- system   system            2015-12-17 18:59 protect_f
drwxrwx--- system   system            2015-12-17 18:59 protect_s
drwx------ root     root              2015-12-05 18:05 root
drwxr-x--- root     root              1970-01-01 08:00 sbin
lrwxrwxrwx root     root              2015-12-21 10:15 sdcard -> /storage/sdcard0
-rw-r--r-- root     root          471 1970-01-01 08:00 seapp_contexts
-rw-r--r-- root     root           80 1970-01-01 08:00 selinux_version
-rw-r--r-- root     root       258377 1970-01-01 08:00 sepolicy
-rw-r--r-- root     root        11419 1970-01-01 08:00 service_contexts
drwxr-x--x root     sdcard_r          2015-12-21 10:15 storage
dr-xr-xr-x root     root              2015-12-21 10:15 sys
drwxr-xr-x root     root              1970-01-01 08:00 system
-rw-r--r-- root     root         8642 1970-01-01 08:00 ueventd.rc
lrwxrwxrwx root     root              2015-12-21 10:15 vendor -> /system/vendor
shell@lentk6735_66t_l1:/ $ exit

C:\Documents and Settings\Administrator>adb disconnect 192.168.107.168

C:\Documents and Settings\Administrator>adb connect 192.168.107.168
unable to connect to 192.168.107.168:5555

C:\Documents and Settings\Administrator>
 【Android】由淺到深理解AIDL
【Android】由淺到深理解AIDL 一、 Binder概述 1.1 為什麼要用binder 出於安全性、穩定性和內存管理的考慮,Android的應用和系統服務運行在分
 git 上的pull request 是什麼意思?,gitpull
git 上的pull request 是什麼意思?,gitpull 1、git 上有常見的pull request 功能
 Linux Netlink基本使用
Linux Netlink基本使用Netlink基本使用——lvyilong3161.什麼是Netlink什麼是Netlink?Netlink是linux提供的用於內核和
 在android中使用SQLite數據庫
在android中使用SQLite數據庫 SQLite數據庫以其輕量、體積小等特點,使其在開發中運用的非常廣泛,在前面的博客中我也介紹過在Cocos2d-x中使用SQ