編輯:關於android開發
  1 package com.lixu.tongxunlu;
  2
  3 import java.util.ArrayList;
  4 import com.lixu.tongxunlu.PinnedSectionListView.PinnedSectionListAdapter;
  5 import android.app.Activity;
  6 import android.content.ContentResolver;
  7 import android.content.Context;
  8 import android.content.Intent;
  9 import android.database.Cursor;
 10 import android.graphics.Color;
 11 import android.net.Uri;
 12 import android.os.Bundle;
 13 import android.provider.ContactsContract;
 14 import android.view.LayoutInflater;
 15 import android.view.View;
 16 import android.view.ViewGroup;
 17 import android.view.Window;
 18 import android.view.WindowManager;
 19 import android.widget.AdapterView;
 20 import android.widget.AdapterView.OnItemClickListener;
 21 import android.widget.ArrayAdapter;
 22 import android.widget.TextView;
 23
 24 public class MainActivity extends Activity {
 25     private ArrayList<Contacts> contacts;
 26     private ArrayList<Data> data;
 27
 28     @Override
 29     protected void onCreate(Bundle savedInstanceState) {
 30         super.onCreate(savedInstanceState);
 31         // 去掉標題頭
 32         requestWindowFeature(Window.FEATURE_NO_TITLE);
 33         setContentView(R.layout.activity_main);
 34         // 設置程序全屏
 35         toggleFullscreen(true);
 36
 37         data = new ArrayList<Data>();
 38         contacts = new ArrayList<Contacts>();
 39         // 獲取手機聯系人後裝到contacts中
 40         getcontacts(contacts);
 41
 42         int A = (int) 'A';
 43         for (int i = 0; i < 26; i++) {
 44             int letter = A + i;
 45             char c = (char) letter;
 46
 47             Data group = new Data();
 48
 49             group.type = Data.GROUP;
 50             group.text = c + "";
 51             data.add(group);
 52             for (int j = 0; j < contacts.size(); j++) {
 53                 Contacts cc = contacts.get(j);
 54                 String ss = cc.firstLetterofNmae();
 55                 // 判斷聯系人名字首字母是否和組名字母一樣,一樣後加入本組
 56                 if (ss.equals(group.text)) {
 57                     Data child = new Data();
 58                     child.type = Data.CHILD;
 59                     child.text = cc.name + "" + cc.getPhoneNumbers();
 60                     child.contacts = cc;
 61                     data.add(child);
 62                 }
 63
 64             }
 65
 66         }
 67
 68         PinnedSectionListView pslv = (PinnedSectionListView) findViewById(R.id.pslv);
 69
 70         pslv.setAdapter(new MyAdapter(this, -1));
 71
 72         pslv.setOnItemClickListener(new OnItemClickListener() {
 73
 74             @Override
 75             public void onItemClick(AdapterView<?> parent, View view, int position, long id) {
 76                 // 判斷點擊子菜單才會觸發點擊事件
 77                 if (data.get(position).type == Data.CHILD) {
 78                     Data datas = data.get(position);
 79                     Contacts contact = datas.contacts;
 80                     // 獲取電話號碼
 81                     String number = contact.getPhoneNumbers();
 82
 83                     Intent intent = new Intent(Intent.ACTION_CALL, Uri.parse("tel:" + number));
 84                     startActivity(intent);
 85                 }
 86             }
 87         });
 88
 89     }
 90
 91     // 設置程序全屏的方法
 92     public void toggleFullscreen(boolean fullScreen) {
 93         // fullScreen為true時全屏
 94
 95         WindowManager.LayoutParams attrs = getWindow().getAttributes();
 96
 97         if (fullScreen) {
 98             attrs.flags |= WindowManager.LayoutParams.FLAG_FULLSCREEN;
 99         } else {
100             attrs.flags &= ~WindowManager.LayoutParams.FLAG_FULLSCREEN;
101         }
102
103         getWindow().setAttributes(attrs);
104     }
105
106     private class Data {
107         public static final int GROUP = 0;
108         public static final int CHILD = 1;
109         public static final int STYE = 2;
110         public String text;
111         public int type;
112         public Contacts contacts = null;
113
114     }
115
116     private class MyAdapter extends ArrayAdapter implements PinnedSectionListAdapter {
117         private LayoutInflater flater;
118
119         public MyAdapter(Context context, int resource) {
120             super(context, resource);
121             flater = LayoutInflater.from(context);
122         }
123
124         @Override
125         public int getCount() {
126             return data.size();
127         }
128
129         @Override
130         public Object getItem(int position) {
131             return data.get(position);
132         }
133
134         @Override
135         public int getItemViewType(int position) {
136             return data.get(position).type;
137         }
138
139         @Override
140         public int getViewTypeCount() {
141             return Data.STYE;
142         }
143
144         @Override
145         public View getView(int position, View convertView, ViewGroup parent) {
146             int type = getItemViewType(position);
147             Data data = (Data) getItem(position);
148             switch (type) {
149             case Data.GROUP:
150                 if (convertView == null)
151                     convertView = flater.inflate(android.R.layout.simple_list_item_1, null);
152
153                 TextView tv = (TextView) convertView.findViewById(android.R.id.text1);
154                 tv.setBackgroundColor(Color.GREEN);
155                 tv.setTextSize(35);
156                 tv.setText(data.text);
157
158                 break;
159
160             case Data.CHILD:
161                 if (convertView == null)
162                     convertView = flater.inflate(android.R.layout.simple_list_item_1, null);
163
164                 TextView tv1 = (TextView) convertView.findViewById(android.R.id.text1);
165                 tv1.setTextSize(20);
166                 tv1.setText(data.text);
167
168                 break;
169
170             default:
171                 break;
172             }
173             return convertView;
174         }
175
176         @Override
177         public boolean isItemViewTypePinned(int viewType) {
178             boolean type = false;
179             switch (viewType) {
180             case Data.CHILD:
181
182                 type = false;
183
184                 break;
185
186             case Data.GROUP:
187
188                 type = true;
189
190                 break;
191
192             default:
193                 break;
194             }
195             return type;
196         }
197
198     }
199
200     // 獲取手機聯系人的方法
201     private void getcontacts(ArrayList<Contacts> contacts) {
202         Uri uri = Uri.parse("content://com.android.contacts/contacts");
203         ContentResolver resolver = this.getContentResolver();
204         // 給query傳遞一個SORT_KEY_PRIMARY,讓ContentResolver將獲得的數據按照聯系人名字首字母排序
205         Cursor cursor = resolver.query(uri, null, null, null,
206                 android.provider.ContactsContract.Contacts.SORT_KEY_PRIMARY);
207         while (cursor.moveToNext()) {
208             // 聯系人的id
209             String id = cursor.getString(cursor.getColumnIndex(android.provider.ContactsContract.Contacts._ID));
210             // 將聯系人按姓名首字母分組
211             String sort_key_primary = cursor
212                     .getString(cursor.getColumnIndex(android.provider.ContactsContract.Contacts.SORT_KEY_PRIMARY));
213             // 獲取聯系人的名字
214             String name = cursor
215                     .getString(cursor.getColumnIndex(android.provider.ContactsContract.Contacts.DISPLAY_NAME));
216             Contacts mContacts = new Contacts();
217             mContacts.id = id;
218             mContacts.name = name;
219             mContacts.sort_key_primary = sort_key_primary;
220             // 獲取聯系人手機號碼
221             Cursor phone = resolver.query(ContactsContract.CommonDataKinds.Phone.CONTENT_URI, null,
222                     ContactsContract.CommonDataKinds.Phone.CONTACT_ID + "=" + id, null, null);
223             // 將獲取到的號碼遍歷
224             ArrayList<String> phonenumbers = new ArrayList<String>();
225             while (phone.moveToNext()) {
226                 int phoneFieldColumnIndex = phone.getColumnIndex(ContactsContract.CommonDataKinds.Phone.NUMBER);
227                 String phonenumber = phone.getString(phoneFieldColumnIndex);
228                 phonenumbers.add(phonenumber);
229             }
230             mContacts.phonenumbers = phonenumbers;
231             contacts.add(mContacts);
232
233         }
234     }
235
236     private class Contacts {
237         public String id;
238         public String name;
239         public String sort_key_primary;
240         public ArrayList<String> phonenumbers;
241
242         // 獲取漢字首字母轉換成大寫字母
243         public String firstLetterofNmae() {
244             String s = sort_key_primary.charAt(0) + "";
245             return s.toUpperCase();
246
247         }
248
249         public String getPhoneNumbers() {
250             String phones = "";
251             for (int i = 0; i < phonenumbers.size(); i++) {
252                 phones += ":" + phonenumbers.get(i);
253             }
254             return phones;
255
256         }
257     }
258
259 }
xml文件:
不要忘記添加各種權限。
 1 <RelativeLayout xmlns:android="http://schemas.android.com/apk/res/android"
 2     xmlns:tools="http://schemas.android.com/tools"
 3     android:layout_width="match_parent"
 4     android:layout_height="match_parent"
 5     android:padding="10dp" >
 6
 7     <com.lixu.tongxunlu.PinnedSectionListView
 8         android:id="@+id/pslv"
 9         android:layout_width="wrap_content"
10         android:layout_height="wrap_content" />
11
12 </RelativeLayout>
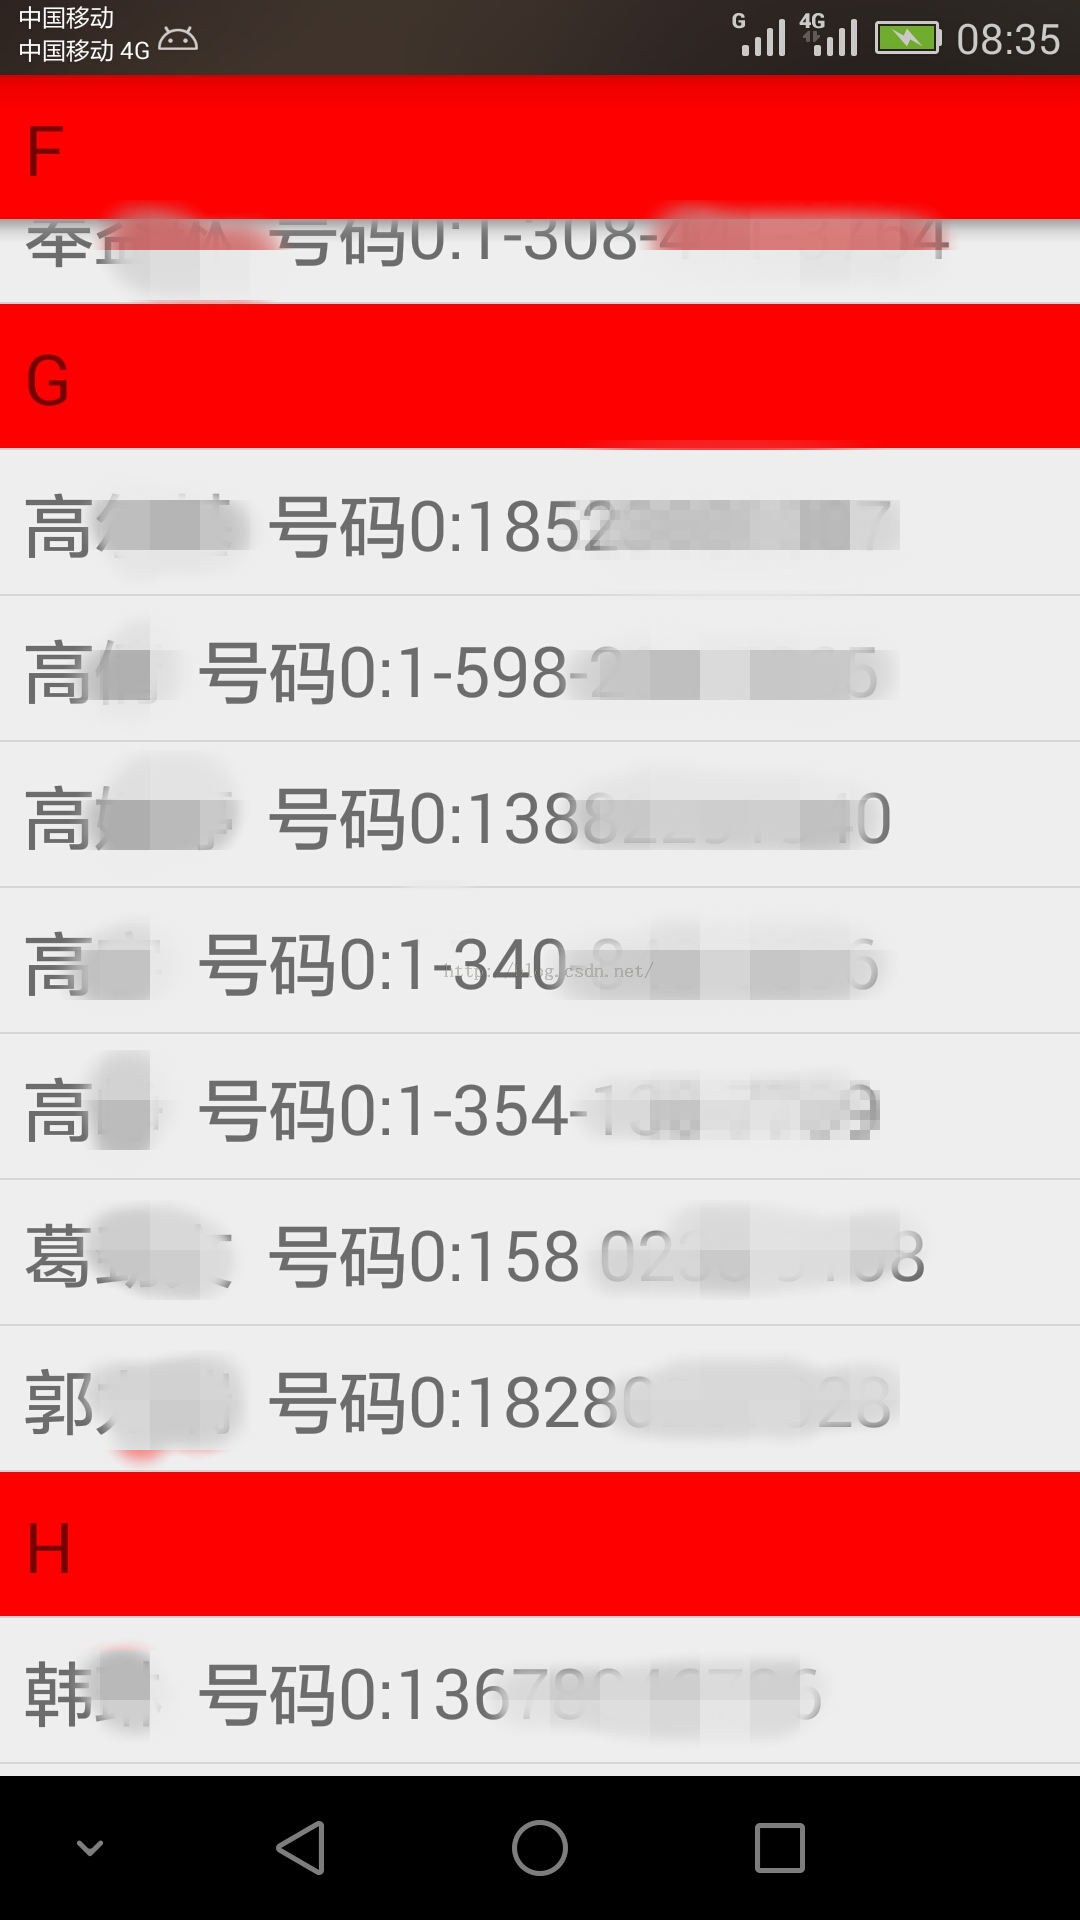
效果示例圖:

 來自GitHub的Android UI開源項目,githubandroid
來自GitHub的Android UI開源項目,githubandroid最近在搞Android開發,做了一個項目後感覺,Android開發入門很是簡單,但要能做出用戶體
 Android 創建一個新的Activity,androidactivity
Android 創建一個新的Activity,androidactivity本文轉載自:http://www.cnblogs.com/wuyudong/p/5658020
 安卓客戶端a標簽長按彈框提示解決辦法,安卓標簽
安卓客戶端a標簽長按彈框提示解決辦法,安卓標簽昨天工作時候發現一個bug,是關於a標簽的,在安卓客戶端中,如果是a標簽的話,長按會出現一個彈框,如圖所示 是因為安卓客戶端
 Android 繪圖機制:canvas初解
Android 繪圖機制:canvas初解 Canvas 即“畫布”的意思,在Android中用其來進行2D繪畫。 在使用can