編輯:關於android開發
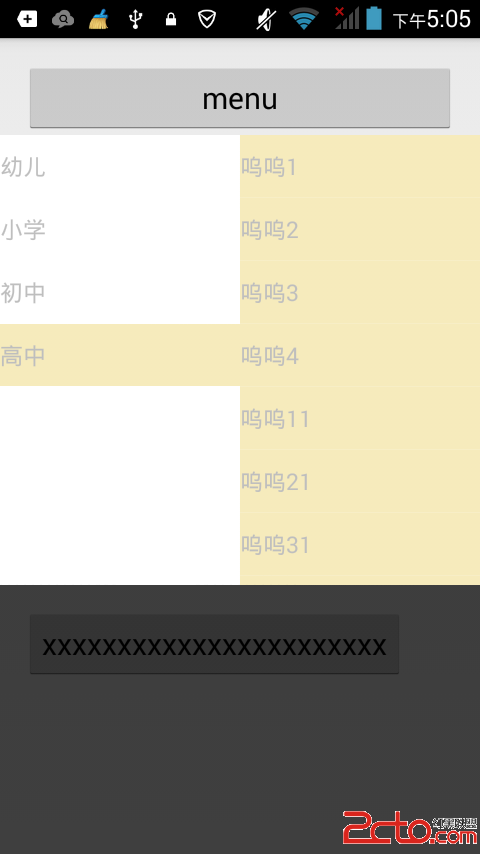
美團首頁類似的下拉彈出菜單工程中經常遇到的控件,不同工程中菜單條目的類型與數量也不一樣
所以需要根據實際需要填充不同內容。先寫個demo,一倍不時之需吧。

既然每個項目用到的菜單樣式不同,此時我們必須根據實際情況填充,這樣就需要將容器和內容分開。

容器的畫當然就使用popWindow了,我們需要在點擊指定控件後彈出window,需要
1.指定當前window的位置及大小
2.指定window出方式
3.如果要求其他部分變暗,我們必須指定變暗部分的高度
內容需要被填充到容器中,根據不同的數據類型及需求,設置不同的頁面填充。可以將其定義為**組合控件**或者一個**Holder**。
需要提供控件填充方法和數據刷新兩個基本方法,同時還需要一個方法暴露一個View的引用,這樣就可以將這個View填充到我們想添加的任何位置。
BaseHolder
/**
 * Created by Administrator on 2015/10/30 0030.
 */
public abstract class BaseHolder {

    private View mView;

    public abstract View initView();
    public abstract void refreshView(T info);

    public BaseHolder(){
        mView = initView();
        mView.setTag(this);
    }

    public View getView(){
        return mView;
    }
}
假定我們現在按下一個按鍵,然後彈出popwindow,此時我們需要繼承一個Button,
復寫Button的OnClick方法,從而實現點擊按鍵在按鍵正下方彈出popwindow的效果。
public class PopMenuButton extends Button  implements View.OnClickListener {

    private Context mCtx;
    private PopupWindow mPopupWindow;
    private LinearLayout mPopupWindowView;
    //根布局設置為Button 彈出popwindow的位置可以以根布局為參照
    private View mRootView;
    private View mShodowView;
    private LinearLayout mContentView;

    private int[] mLocation = new int[2];
    private int mStartY;
    private int mScreenHeight;

    public PopMenuButton(Context context, AttributeSet attrs) {
        super(context, attrs);
        mCtx = context;
        mRootView = this;
    }

    public PopMenuButton(Context context) {
        super(context);
        mCtx = context;
        mRootView = this;
    }

    @Override
    protected void onFinishInflate() {
        super.onFinishInflate();
        initPopWindow();
    }

    public void setContentView(View view){

        LinearLayout.LayoutParams params = new LinearLayout.LayoutParams(LinearLayout.LayoutParams.WRAP_CONTENT, LinearLayout.LayoutParams.WRAP_CONTENT);
        mContentView.addView(view, params);
    }

    private void initView(){
        mPopupWindowView = (LinearLayout) View.inflate(mCtx, R.layout.popmenu_layout, null);
        mContentView = (LinearLayout) mPopupWindowView.findViewById(R.id.rl_content);
        mShodowView = mPopupWindowView.findViewById(R.id.rl_shodow);

        mShodowView.setOnClickListener(new OnClickListener() {
            @Override
            public void onClick(View v) {
                mPopupWindow.dismiss();
            }
        });

        setOnClickListener(this);
    }

    private void initPopWindow(){

        initView();
        //獲取按鍵的位置
        mRootView.getLocationOnScreen(mLocation);
        mStartY = mLocation[1] + mRootView.getHeight();
    }

    @Override
    public void onClick(View v) {

        if(mPopupWindow == null) {
            //initPopWindow();

            int[] location = new int[2];
            this.getLocationOnScreen(location);
            //y軸起始位置
            int start = location[1] + this.getHeight() + 1;
            //測量屏幕的高度
            int screenHeight = ((Activity) mCtx).getWindowManager().getDefaultDisplay().getHeight();

            //設置彈框的大小  彈框位置在按鈕以下,占據所有屏幕
            mPopupWindow = new PopupWindow(mPopupWindowView, ViewGroup.LayoutParams.MATCH_PARENT, screenHeight - start, false);
            // mPopupWindow = new PopupWindow(mPopupWindowView,  ViewGroup.LayoutParams.MATCH_PARENT, ViewGroup.LayoutParams.MATCH_PARENT,false);
            mPopupWindow.setBackgroundDrawable(new ColorDrawable(0xb0000000));
            //mPopupWindow.setAnimationStyle(R.style.AnimationFade);
            mPopupWindow.setAnimationStyle(R.style.popupAnimation);
            mPopupWindow.setFocusable(true);
            mPopupWindow.setOutsideTouchable(true);
        }

        if (mPopupWindow.isShowing()) {
            mPopupWindow.dismiss();
        } else {

            int[] location1 = new int[2];
            this.getLocationOnScreen(location1);
            //設置彈框的位置
            mPopupWindow.showAtLocation(mRootView, Gravity.NO_GRAVITY, 0,  location1[1]+this.getHeight()+1);
        }
    }

    private int dip2px(Context context, float dpValue) {
        final float scale = context.getResources().getDisplayMetrics().density;
        return (int) (dpValue * scale);
    }
}
假設我們當前要彈出一個二級菜單,我們可以將邏輯封裝到一個Holder中,最終讓holder為我們提供頁面,直接將頁面貼到容器中。
/**
 * Created by vonchenchen on 2015/10/30 0030.
 */
public class DoubleListViewHolder extends BaseHolder>> {

    private List> mData;

    private ListView mLeftListView;
    private ListView mRightListView;

    private List mLeftList;
    private List mRightList;
    private TextListAdapter mLeftAdapter;
    private TextRightListAdapter mRightAdapter;

    private View mViewClickRecorder = null;
    private boolean mFirstMesure = true;

    @Override
    public View initView() {
        View view = View.inflate(MyApplication.getContext(), R.layout.doublelistview_layout, null);

        mLeftListView = (ListView) view.findViewById(R.id.ll_left);
        mRightListView = (ListView) view.findViewById(R.id.ll_right);


        mLeftListView.setOnItemClickListener(new AdapterView.OnItemClickListener() {
            @Override
            public void onItemClick(AdapterView parent, View view, int position, long id) {

                //如果點擊條目,更換被點擊條目的顏色
                if(mViewClickRecorder != view){
                    view.setBackgroundColor(MyApplication.getContext().getResources().getColor(R.color.normal_selected_color));
                    if(mViewClickRecorder != null) {
                        mViewClickRecorder.setBackgroundColor(MyApplication.getContext().getResources().getColor(R.color.normal_unselected_color));
                    }
                   mViewClickRecorder = view;
                }

                mRightList = mData.get(position+1);

                mRightAdapter = new TextRightListAdapter(mRightList);
                mRightListView.setAdapter(mRightAdapter);
            }
        });

        return view;
    }

    @Override
    public void refreshView(List> info) {

        this.mData = info;

        mLeftList = info.get(0);
        mLeftAdapter = new TextListAdapter(mLeftList);

        mRightList = info.get(1);
        mRightAdapter = new TextRightListAdapter(mRightList);

        mLeftListView.setAdapter(mLeftAdapter);
        mRightListView.setAdapter(mRightAdapter);
    }

    class TextListAdapter extends MyAdapter{

        public TextListAdapter(List list) {
            super(list);
        }

        @Override
        public View getView(final int position, View convertView, ViewGroup parent) {

            TextViewHolder holder = null;
            if(convertView == null){
                holder = new TextViewHolder();
            }else{
                holder = (TextViewHolder) convertView.getTag();
            }

            convertView = holder.getView();
            holder.refreshView((String) getItem(position));

            //防止多次測量
            if(position == 0 && mFirstMesure){
                mFirstMesure = false;
                convertView.setBackgroundColor(MyApplication.getContext().getResources().getColor(R.color.normal_selected_color));
                mViewClickRecorder = convertView;
            }

            return convertView;
        }
    }

    class TextRightListAdapter extends MyAdapter{

        public TextRightListAdapter(List list) {
            super(list);
        }

        @Override
        public View getView(final int position, View convertView, ViewGroup parent) {

            TextViewHolder holder = null;
            if(convertView == null){
                holder = new TextViewHolder();
            }else{
                holder = (TextViewHolder) convertView.getTag();
            }

            convertView = holder.getView();
            holder.refreshView((String) getItem(position));
            return convertView;
        }
    }

    /**
     * ListView 中的 Holder
     */
    private class TextViewHolder extends BaseHolder{

        private TextView mTextView;

        @Override
        public View initView() {
            View view = View.inflate(MyApplication.getContext(), R.layout.simpletext_item, null);
            mTextView = (TextView) view.findViewById(R.id.tv_text);
            return view;
        }

        @Override
        public void refreshView(String info) {
            mTextView.setText(info);
        }
    }
}
調用的時候分為以下四步。這樣,顯示,邏輯和數據就自然分離開來了。
        //創建容器
        PopMenuButton mPopMenuButton = (PopMenuButton) findViewById(R.id.btn_pop);
        //創建Holder,提供內容
        DoubleListViewHolder holder = new DoubleListViewHolder();

        //將 內容 貼到 容器 中
        mPopMenuButton.setContentView(holder.getView());
        //用數據刷新容器的顯示內容
        holder.refreshView(mLists);
 Android React-Native系列之(一)零基礎搭建React-Native開發環境
Android React-Native系列之(一)零基礎搭建React-Native開發環境 很早就聽說過大名鼎鼎的React-Native了(不大清楚的童靴們可以自行
 Android事件分發機制實例驗證
Android事件分發機制實例驗證 我的程序是在MainActivity中有一個自定義的MyLayout布局,MyLayout布局下面有一個自定義的MyB
 ListView中響應item的點擊事件並且刷新界面,listviewitem
ListView中響應item的點擊事件並且刷新界面,listviewitem---恢復內容開始--- 最近在在實現listview功能中遇到了這個問題: 點擊事件寫在了
 android:padding和android:layout_margin的區別,
android:padding和android:layout_margin的區別,margin和padding是隔開元素中最常用的兩個屬性 ◆Padding屬性: Pad