編輯:關於android開發
話說一個乞丐在看一個程序員寫程序,程序員遇到一個問題怎麼都解決不了,這時乞丐說這少個分號,程序員照做結果問題解決了,就問:你怎麼知道?乞丐笑笑說:我之前就是干這個的。通過這個笑話我們學到了不會唱歌的主播不是好司機,那麼問題來了今天我們要學習什麼呢?
通過本篇博客你將學到
①自定義控件中onLayout的源碼分析
②getLeft,getRight,getWidth,getHeight表示的意義
③一個例子來理解自定義控件的onLayout的過程
④getMeasureWidth和getWidth的區別
如有謬誤歡迎批評指正,如有疑問歡迎留言,謝謝
1.簡單回顧
在上一篇我們詳細講解了onMeasure方法,我們首先來回顧一下上一篇的內容如果你還沒有閱讀請先閱讀(Android開發之自定義控件(一)---onMeasure詳解),上一篇我們說到onMeasure的過程,在onMeasure方法中最終調用setMeasuredDimension方法來確定控件的大小,假如是自定義一個View的話,測量一下其大小就行了,如果是ViewGroup呢,則需要遍歷其所有的子View來,並為每個子View測量它的大小。在測量子View時需要兩個參數,measureWidth和measureHeight這兩個值是根布局傳過來的,也就是說是父View和子View本身共同決定子View的大小。
2.源碼分析
今天呢,就和大家一起來探討自定義控件的第二步onLayout即確定控件的位置,上篇文章我們說到performTraversals方法中會調用host.measure方法,在調用完host.measure方法後,就會調用host.layout對View進行定位,這也是今天我們要討論的內容。
首先我們來看看layout的源碼
public final void layout(int l, int t, int r, int b) {
        boolean changed = setFrame(l, t, r, b);
        if (changed || (mPrivateFlags & LAYOUT_REQUIRED) == LAYOUT_REQUIRED) {
            if (ViewDebug.TRACE_HIERARCHY) {
                ViewDebug.trace(this, ViewDebug.HierarchyTraceType.ON_LAYOUT);
            }
            onLayout(changed, l, t, r, b);
            mPrivateFlags &= ~LAYOUT_REQUIRED;
        }
        mPrivateFlags &= ~FORCE_LAYOUT;
    }
在其中調用了setFrame方法的源碼如下
protected boolean setFrame(int left, int top, int right, int bottom) {
        boolean changed = false;
        if (mLeft != left || mRight != right || mTop != top || mBottom != bottom) {
            changed = true;

            。。。省略部分代碼。。。

            mLeft = left;
            mTop = top;
            mRight = right;
            mBottom = bottom;

            。。。省略部分代碼。。。

        }
        return changed;
    }
在setFrame方法中將left,top,right,bottom這四個值保存下來。也就是說在layout中的setFrame方法中會將子View相對於父View的左,上,右,下這四個值保存下來,這四個值就會確定子View在父View中的位置。仔細的看layout方法的源碼你會發現和measure方法一樣在layout中調用了onLayout方法,趕緊先去看看View的onLayout的邏輯
View——onLayout
protected void onLayout(boolean changed, int left, int top, int right, int bottom) {
    }
啊?啥都沒有,你這是弄啥嘞?其實仔細想想你就會理解,因為onLayout的目的是確定子View在父View中的位置,那麼這個步驟肯定是由父View來決定的,因此在View中onLayout是一個空的實現,既然如此我們就去看看ViewGroup的onLayout的源碼呗。
ViewGroup——onLayout
@Override
    protected abstract void onLayout(boolean changed,
            int l, int t, int r, int b);
我們看到它是一個抽象的方法,我們都知道當繼承一個類時必須實現其中的抽象方法,這也就是說在自定義ViewGroup時我們必須實現onLayout方法。在上一篇我們就說過onLayout的作用就是確定子View的位置,那麼它是怎樣確定子View的位置的呢?其實它是通過四個參數 l,t,r,b即代表距離父View的左上右下的距離,看張圖你就會明白它的含義
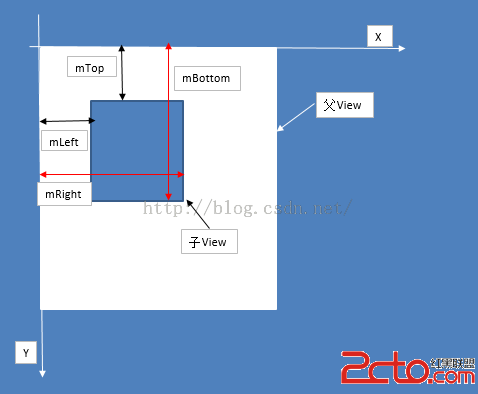
mLeft,mTop,mRight,mBottom的講解
mLeft——View.getLeft():子View的左邊界到父View的左邊界的距離
       // 獲取子View的左邊界到父View的左邊界的距離
	public final int getLeft() {
		return mLeft;
	}
mTop——View.getTop():子View的頂部到父View頂部的距離
mRight——View.getRight():子View的右邊界到父View的左邊界的距離
mBottom——View.getBottom():子View的底部到父View的頂部的距離
它們在源碼中的表現如下
        /**
	 * Top position of this view relative to its parent.
	 *
	 * @return The top of this view, in pixels.
	 */
	// 獲取子View的頂部到父View頂部的距離
	public final int getTop() {
		return mTop;
	}

	// 獲取子View的底部到父View的頂部的距離
	public final int getBottom() {
		return mBottom;
	}

	// 獲取子View的左邊界到父View的左邊界的距離
	public final int getLeft() {
		return mLeft;
	}

	// 獲取子View的右邊界到父View的左邊界的距離
	public final int getRight() {
		return mRight;
	}

	public final int getWidth() {
		return mRight - mLeft;
	}

	/**
	 * Return the height of your view.
	 *
	 * @return The height of your view, in pixels.
	 */
	public final int getHeight() {
		return mBottom - mTop;
	}

	/**
	 * The height of this view as measured in the most recent call to measure().
	 * This should be used during measurement and layout calculations only. Use
	 * {@link #getHeight()} to see how tall a view is after layout.
	 *
	 * @return The measured height of this view.
	 */
	// 獲取測量的寬度
	public final int getMeasuredWidth() {
		return mMeasuredWidth;
	}

	/**
	 * The width of this view as measured in the most recent call to measure().
	 * This should be used during measurement and layout calculations only. Use
	 * {@link #getWidth()} to see how wide a view is after layout.
	 *
	 * @return The measured width of this view.
	 */
	// 獲取測量的高度
	public final int getMeasuredHeight() {
		return mMeasuredHeight;
	}
如果你仔細看上面的源碼你會看到在上面的距離中還有兩對方法,getMeasureWidth,getMeasureHeight和getWidth,getHeight它們有什麼區別呢?對於這個問題可能有很多人不是特別理解,在這裡我們以getMeasureWidth和getWidth這兩個方法為例來進行說明,
①getMeasureWidth()方法在measure()過程結束後就可以獲得到它的值,而getWidth()方法要在layout()過程結束後才能獲取到。這麼說有什麼依據?首先看看getMeasureWidth()方法的返回值,它是mMeasureWidth,對於它你熟悉嗎?這就是在上篇博客中通過setMeasureDimension()方法設置的值,而getWidth()的返回值是mRight-mLeft,這兩個值是在layout()過程中的setFrame方法中才設置的值,也就是說在layout結束後才確定的。
②getMeasureWidth()方法中的值是通過setMeasuredDimension()方法來進行設置的,而getWidth()方法中的值則是通過視圖右邊的坐標減去左邊的坐標計算出來的。關於這兩個方法的區別,現在有網上的很多說法是不正確的,我將通過一篇博客來給大家詳細的說說這兩個值的區別。
3.小例子
接下來通過一個簡單的例子來了解下latyout的過程,這個例子是這樣的,自定義一個ViewGroup讓其子View在屏幕中間位置橫向排列,首先我們來談談它的思想,我覺得當你在做一件事情的時候一定認真的去分析它的實現過程,按照自己的思想去設計自己的東西,不管可不可行,去嘗試即使錯了對自己也是一個很好的歷練,這樣時間長了你會發現你的技術提升了很多
我的思路是這樣的
讓自定義的ViewGroup的子View在屏幕中間橫向排列思路:
①獲得屏幕的高度
②獲得子View的寬度和高度,通過屏幕的高度和子View的高度來計算layout時子View到父View頂端的距離
③因為子View是橫向排列的,所以需要設定一個變量表示子View到父View左邊界的距離,每次循環加上子View的寬度來設定下一個子View到父View左側的距離
先上效果圖
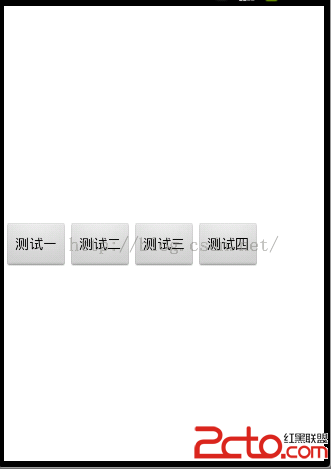
就是這麼一個效果,接下來看看其代碼吧,按照上面我們分析的思路,跟著代碼看看吧
package com.example.customviewpractice;

import android.app.Activity;
import android.content.Context;
import android.util.AttributeSet;
import android.util.DisplayMetrics;
import android.view.View;
import android.view.ViewGroup;

public class MyViewGroup extends ViewGroup {

	private Context mContext;
	private int sreenH;

	public MyViewGroup(Context context, AttributeSet attrs) {
		super(context, attrs);
		mContext = context;
		// 獲取屏幕的高度
		sreenH = getScreenSize(((Activity) mContext))[1];
	}

	@Override
	protected void onMeasure(int widthMeasureSpec, int heightMeasureSpec) {

		super.onMeasure(widthMeasureSpec, widthMeasureSpec);
		// 測量子View
		measureChildren(widthMeasureSpec, heightMeasureSpec);
	}

	@Override
	protected void onLayout(boolean changed, int l, int t, int r, int b) {
		// 獲得子View個數
		int childCount = getChildCount();
		// 設置一個變量保存到父View左側的距離
		int mLeft = 0;
		// 遍歷子View
		for (int i = 0; i < childCount; i++) {

			View childView = getChildAt(i);
			// 獲得子View的高度
			int childViewHeight = childView.getMeasuredHeight();
			// 獲得子View的寬度
			int childViewWidth = childView.getMeasuredWidth();
			// 讓子View在豎直方向上顯示在屏幕的中間位置
			int height = sreenH / 2 - childViewHeight / 2;
			// 調用layout給每一個子View設定位置mLeft,mTop,mRight,mBottom.左上右下
			childView.layout(mLeft, height, mLeft + childViewWidth, height
					+ childViewHeight);
			// 改變下一個子View到父View左側的距離
			mLeft += childViewWidth;
		}
	}

	/**
	 * 獲取屏幕尺寸
	 */
	public static int[] getScreenSize(Activity activity) {
		DisplayMetrics metrics = new DisplayMetrics();
		activity.getWindowManager().getDefaultDisplay().getMetrics(metrics);
		return new int[] { metrics.widthPixels, metrics.heightPixels };
	}
}
布局文件
運行後就會看到上面的效果圖,這裡需要注意的是,在這個小例子中我們並沒有進行換行處理,這裡只是學習下layout的用法,如果需要你掌握了自定義控件的過程,完全可以去自定義一個FlowLayout。
4.總結
到這裡關於自定義控件的基礎知識onMeasure和onLayout就講完了,其實剛開始的時候很懼怕這部分的內容,感覺很難,但是沉下心來認真的去學習,認真去屢清思路,你會發現其實並不是特別難,有了上兩篇的基礎我們就可以去實現一些小的自定義控件了,在進行自定義控件時思路很重要,只有把基礎掌握好了,才能按照我們的設計去實現所要實現的效果,學習編程就是這樣它需要我們有思想這個思想是靠平時我們不斷的積累而產生的。
 手機安全衛士——閃屏頁相關處理,手機安全衛士
手機安全衛士——閃屏頁相關處理,手機安全衛士根據功能模塊劃分(Android開發推薦此方法) - Activity mo
 Android APK 在32bit 和64bit 的區別問題
Android APK 在32bit 和64bit 的區別問題 目前64bitandroid系統也慢慢的多了,看到也有apk聲稱支持64bitsystem,然後就往裡面打
 手機安全衛士——通訊衛士-黑名單的管理,安全衛士衛士
手機安全衛士——通訊衛士-黑名單的管理,安全衛士衛士CallSafeActivity .java public class CallSafeActivity exten
 android的消息機制
android的消息機制 很多以前掌握的知識,總是慢慢的再忘記,看來還是自己理解的不夠透徹,希望用博客的形式記錄下來。 說起android的消息機制,那不得不提Handl