編輯:關於android開發
最近一段時間因為工作上的事以及面試等等,耽誤了博客的更新,這裡道歉下~
今天下午去追夢網絡面試了一趟,全齊大神給小弟我上了一課,增長了自己的見識,
以及對以後一些成長的路線的規劃,盡管進去的概率不大,還是要謝謝一番,
另外再一次讓我感受到畢業證的重要性,找工作處處碰壁,錯失了很多機會哈,
各位還在讀大學的讀者,師兄在這裡奉勸一句,千萬別掛科…好的,不BB了,
本節帶來的是Paint的另一個API——Shader(圖像渲染),我們可以調用Paint的setShader()方法來
為畫筆設置Shader渲染效果,我們可以打開官方的API文檔:Shader
和我們前面的MaskFilter(面具),ColorFilter(顏色過濾器),PathEffect(路徑效果)一樣,我們
一般不會直接使用Shader,而是使用它的五個子類,他們分別是:
BitmapShader(圖像渲染),ComposeShader(混合渲染),LinearGradient(線性渲染)
RadialGradient(環形渲染),SweepGradient(梯度渲染)
我們同樣一一來介紹下他們的構造方法~
BitmapShader(Bitmap bitmap, Shader.TileMode tileX, Shader.TileMode tileY)
使用一張位圖作為紋理來對某一區域進行填充,參數依次:
bitmap:用來作為填充的位圖;
tileX:X軸方向上位圖的銜接形式;
tileY:Y軸方向上位圖的銜接形式;
而這個Shader.TileMode有三種:
CLAMP就是如果渲染器超出原始邊界范圍,則會復制邊緣顏色對超出范圍的區域進行著色,
REPEAT則是平鋪形式重復渲染,MIRROR則是在橫向和縱向上以鏡像的方式重復渲染位圖。
ComposeShader(Shader shaderA, Shader shaderB, PorterDuff.Mode mode)
渲染效果的疊加,看到PorterDuff就知道什麼了吧?比如將BitmapShader與LinearGradient的混合渲染
效果等。參數依次:
shaderA:第一種渲染效果
shaderB:第二種渲染效果
mode:兩種渲染效果的疊加模式
LinearGradient(float x0, float y0, float x1, float y1, int[] colors, float[] positions, Shader.TileMode tile);
實現某一區域內顏色的線性漸變效果,參數依次是:
x0:漸變的起始點x坐標
y0:漸變的起始點y坐標
x1:漸變的終點x坐標
y1:漸變的終點y坐標
colors:漸變的顏色數組
positions:顏色數組的相對位置
tile:平鋪方式
public RadialGradient (float x, float y, float radius, int[] colors, float[] positions, Shader.TileMode tile);
實現某一區域內顏色的環形漸變效果,參數依次是:
x:環形的圓心x坐標
y:環形的圓心y坐標
radius:環形的半徑
colors:環形漸變的顏色數組
positions:指定顏色數組的相對位置
tile:平鋪方式
public SweepGradient (float cx, float cy, int[] colors, float[] positions)
掃描渲染,就是以某個點位中心旋轉一周所形成的效果!參數依次是:
cx:掃描的中心x坐標
cy:掃描的中心y坐標
colors:梯度漸變的顏色數組
positions:指定顏色數組的相對位置
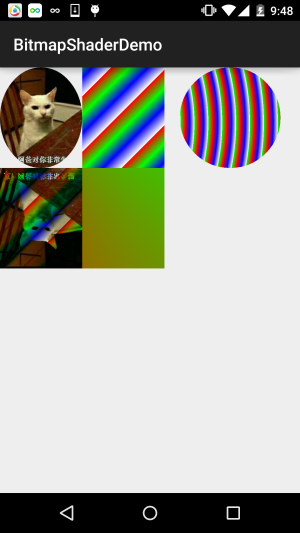
可能從文字上我們可以簡單的知道下他們對應的一個大概作用,但是我們還是寫個代碼來
驗證下他們所起的作用,畢竟有碼(圖)有真相嗎~
運行效果圖:

實現代碼:
BitmapShaderView.java:
/**
 * Created by Jay on 2015/11/4 0030.
 */
public class BitmapShaderView extends View {


    private Bitmap mBitmap = null;
    private ShapeDrawable sDrawable = null;
    private Paint mPaint = null;
    private int bitW = 0, bitH = 0;     //Bitmap寬高

    private Shader mBitmapShader = null;   //Bitmap渲染
    private Shader mLinearGradient = null; //線性漸變渲染
    private Shader mComposeShader = null; //混合渲染
    private Shader mRadialGradient = null; //環形漸變渲染
    private Shader mSweepGradient = null; //梯度渲染


    public BitmapShaderView(Context context) {
        this(context, null);
    }

    public BitmapShaderView(Context context, AttributeSet attrs) {
        super(context, attrs);
        init();
    }

    public BitmapShaderView(Context context, AttributeSet attrs, int defStyleAttr) {
        super(context, attrs, defStyleAttr);
    }


    private void init() {

        mBitmap = BitmapFactory.decodeResource(getResources(), R.mipmap.img_cat);
        bitW = mBitmap.getWidth();
        bitH = mBitmap.getHeight();
        mPaint = new Paint();

        //創建BitmapShader
        mBitmapShader = new BitmapShader(mBitmap, Shader.TileMode.MIRROR, Shader.TileMode.MIRROR);

        //創建LinearGradient並設置漸變的顏色數組
        mLinearGradient = new LinearGradient(0, 0, 100, 100,
                new int[]{Color.RED, Color.GREEN, Color.BLUE, Color.WHITE},
                null, Shader.TileMode.REPEAT);

        //混合渲染,這裡使用了BitmapShader和LinearGradient進行混合,可以試試其他~
        mComposeShader = new ComposeShader(mBitmapShader, mLinearGradient, PorterDuff.Mode.DARKEN);

        //環形漸變渲染
        mRadialGradient = new RadialGradient(50, 200, 50,
                new int[]{Color.GREEN, Color.RED, Color.BLUE, Color.WHITE},
                null, Shader.TileMode.REPEAT);

        //梯度渲染
        mSweepGradient = new SweepGradient(30, 30, new int[]{Color.GREEN, Color.RED,
                Color.BLUE, Color.WHITE}, null);

    }

    @Override
    protected void onDraw(Canvas canvas) {
        super.onDraw(canvas);

        //將圖片裁剪為橢圓形
        sDrawable = new ShapeDrawable(new OvalShape());
        sDrawable.getPaint().setShader(mBitmapShader);
        sDrawable.setBounds(0, 0, bitW, bitH);
        sDrawable.draw(canvas);

        //繪制線性漸變的矩形
        mPaint.setShader(mLinearGradient);
        canvas.drawRect(bitW, 0, bitW * 2, bitH, mPaint);

        //繪制混合渲染效果
        mPaint.setShader(mComposeShader);
        canvas.drawRect(0, bitH, bitW , bitH * 2, mPaint);

        //繪制環形漸變
        mPaint.setShader(mRadialGradient);
        canvas.drawCircle(bitW * 2.8f, bitH / 2, bitH / 2, mPaint);

        //繪制梯度漸變
        mPaint.setShader(mSweepGradient);
        canvas.drawRect(bitW, bitH, bitW * 2, bitH * 2, mPaint);


    }
}
就那麼一百來行代碼,就不用解釋了吧,如果覺得有疑惑的,動手試試~
 【騰訊Bugly干貨分享】微信熱補丁Tinker的實踐演進之路,buglytinker
【騰訊Bugly干貨分享】微信熱補丁Tinker的實踐演進之路,buglytinker本文來自於騰訊bugly開發者社區,非經作者同意,請勿轉載,原文地址:http://
 Touch事件分發
Touch事件分發 Touch事件分發中只有兩個主角:ViewGroup和View。Activity的Touch事件事實上是調用它內部的ViewGroup的Touch
 Android 應用程序集成FaceBook 登錄,androidfacebook
Android 應用程序集成FaceBook 登錄,androidfacebook1、首先在Facebook 開發者平台注冊一個賬號 &nbs
 android:Activity數據傳遞之基本數據類型
android:Activity數據傳遞之基本數據類型 既然是activity之間的數據傳遞 肯定有兩個activity 我們先創建兩個activity,在MainA