編輯:關於android開發
Android RecyclerView 是Android5.0推出來的,導入support-v7包即可使用。
個人體驗來說,RecyclerView絕對是一款功能強大的控件。
首先總結下RecyclerView的特點:
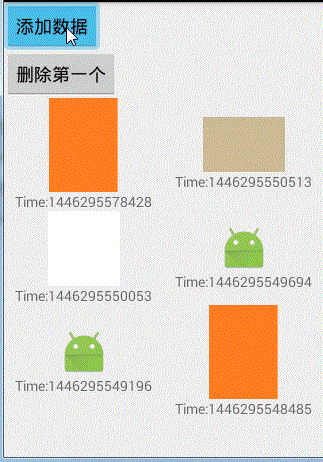
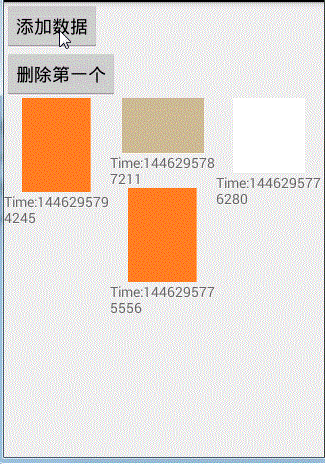
1.支持不同方向,不同排版模式,實現多種展現數據的形式,涵蓋了ListView,GridView,瀑布流等數據表現的形式
2.內部實現了回收機制,無需我們考慮View的復用情況
3.取消了onItemClick等點擊事件,需要自己手動去寫
------------------------------------------------------------------------------------
那麼讓我們通過一些Demo來了解RecyclerView的基本使用
首先,要導入support-v7 包
import android.support.v7.widget.RecyclerView;
RecyclerView和ListView的使用一樣,都需要有對應的Adapter,列表項布局,數據源
1.先寫主Activity布局
可以看到RecyclerView的標簽
<android.support.v7.widget.RecyclerView>
 1 <LinearLayout xmlns:android="http://schemas.android.com/apk/res/android"
 2               xmlns:tools="http://schemas.android.com/tools" xmlns:app="http://schemas.android.com/apk/res-auto"
 3               android:layout_width="match_parent"
 4               android:layout_height="match_parent"
 5               android:orientation="vertical"
 6               tools:context="com.xqx.superapp.app.Android5Activity">
 7
 8     <Button
 9             android:text="添加一個數據"
10             android:layout_width="wrap_content"
11             android:layout_height="wrap_content"
12             android:onClick="btnAddItem"
13             />
14     <Button
15             android:text="刪除第一個"
16             android:onClick="btnRemoveItem"
17             android:layout_width="wrap_content"
18             android:layout_height="wrap_content"/>
19
20     <android.support.v7.widget.RecyclerView
21         android:id="@+id/recycle_view"
22         android:layout_width="match_parent"
23         android:layout_height="match_parent"
24         >
25     </android.support.v7.widget.RecyclerView>
26
27 </LinearLayout>
菜單項布局,標准的上面圖片,下面文字
<?xml version="1.0" encoding="utf-8"?>
<LinearLayout xmlns:android="http://schemas.android.com/apk/res/android"
              android:orientation="vertical"
              android:gravity="center"
              android:layout_width="match_parent"
              android:layout_height="match_parent">
        <ImageView
                android:id="@+id/item_icon"
                android:src="@mipmap/machao_moqi"
                android:layout_width="wrap_content"
                android:layout_height="wrap_content"/>
        <TextView
                android:id="@+id/item_title"
                android:text="名稱"
                android:layout_width="wrap_content"
                android:layout_height="wrap_content"
                />
</LinearLayout>
2.接下來就看Activity代碼了
首先看成員變量,與ListView,GridView一樣 標准三樣, 控件,數據源,適配器
private List<String> data;
private RecyclerView recyclerView;
private MyRecycleAdapter adapter;   //自定義適配器,繼承RecyclerView.Adapter
接著我們必須要自定義一個ViewHolder,這個ViewHolder 必須要繼承 RecyclerView.ViewHolder
注意RecyclerView不再提供onItemClick事件監聽,所以需要我們自己手工寫監聽事件的方法
private static class ViewHolder extends RecyclerView.ViewHolder implements View.OnClickListener {
        public ImageView imageView;
        public TextView textView;

        public ViewHolder(View itemView) {
            super(itemView);
            // 通常ViewHolder的構造,就是用於獲取控件視圖的
            imageView = (ImageView) itemView.findViewById(R.id.item_icon);
            textView = (TextView) itemView.findViewById(R.id.item_title);
            // TODO 後續處理點擊事件的操作
            itemView.setOnClickListener(this);

        }
        @Override
        public void onClick(View v) {
            int position = getAdapterPosition();
            Context context = imageView.getContext();
            Toast.makeText(context,"顯示第"+position+"個項",Toast.LENGTH_SHORT).show();
        }
    }
再讓我們看自定義適配器,注意這裡的參數是ViewHolder,這個ViewHodler是我們自己的,不要導入v7包下的ViewHolder,
之後要重寫三個方法
private class MyRecycleAdapter extends RecyclerView.Adapter<ViewHolder>{
@Override
public ViewHolder onCreateViewHolder(ViewGroup viewGroup, int i) {
    return null;
}

@Override
public void onBindViewHolder(ViewHolder viewHolder, int i) {

}

@Override
public int getItemCount() {
    return 0;
}
}
在自定義適配器MyRecycleAdapter中,首先要寫一個構造方法,因為有數據源,所有構造方法裡必然有List
private List<String> strings;
public MyRecycleAdapter(List<String> strings) {
     this.strings = strings;
}
然後就要重寫三個方法了,

---------------------------------------------------------------------------------------------------------------
完成自定義適配器和自定義ViewHolder的代碼 就要進行RecyclerView的使用了
首先 要了解 RecyclerView.LayoutManager 這個屬性
用於進行一個布局的設置,可以設置顯示模式,ListView或者GridView或者瀑布流
1.ListView顯示模式
1 // 1.線性布局
2         LinearLayoutManager layoutManager =
3                 new LinearLayoutManager(this,   // 上下文
4                                         LinearLayout.VERTICAL,  //垂直布局,
5                                         false);
2.GridView顯示模式
1 // 2.Grid布局
2         RecyclerView.LayoutManager layoutManager =
3                 new GridLayoutManager(this,
4                                       2,  // 每行顯示item項數目
5                                       GridLayoutManager.HORIZONTAL, //水平排列
6                                       false
7                                       );
3.瀑布流顯示模式
1 // 3.瀑布流
2         RecyclerView.LayoutManager layoutManager =
3                 new StaggeredGridLayoutManager(3,  // 每行顯示的item項數目
4                         StaggeredGridLayoutManager.VERTICAL);  // 垂直排列
以上三種顯示模式任意設置一種 就可以繼續下面的代碼
recyclerView.setLayoutManager(layoutManager);
        // 設置 RecyclerView的Adapter
        // 注意一定在設置了布局管理器之後調用
        adapter = new MyRecycleAdapter(data);
        recyclerView.setAdapter(adapter);
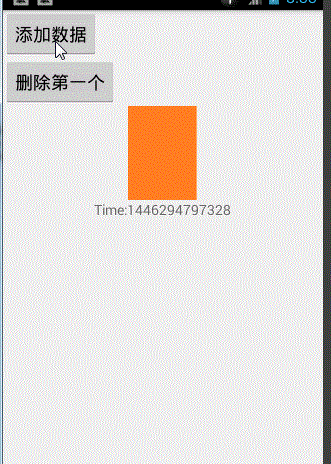
最後記得加上“添加一個數據”,“刪除第一個數據”的按鈕響應事件
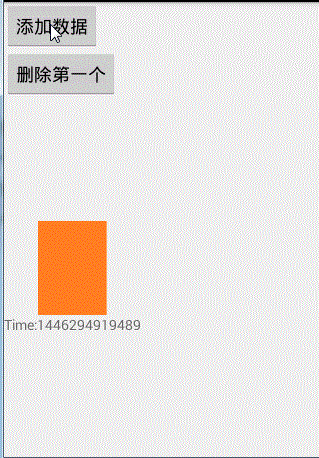
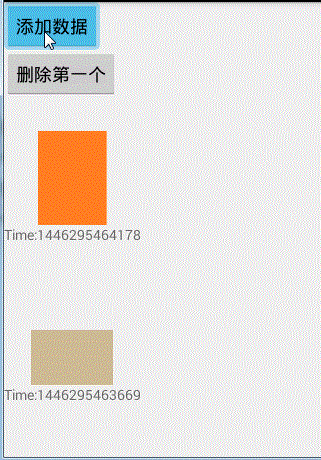
public void btnAddItem(View view) {
        data.add(0,"Time:"+System.currentTimeMillis());
        adapter.notifyDataSetChanged();
    }
    public void btnRemoveItem(View view) {
        if (!data.isEmpty()) {
            data.remove(0);
        }
        adapter.notifyItemRemoved(0);
    }
完整代碼:
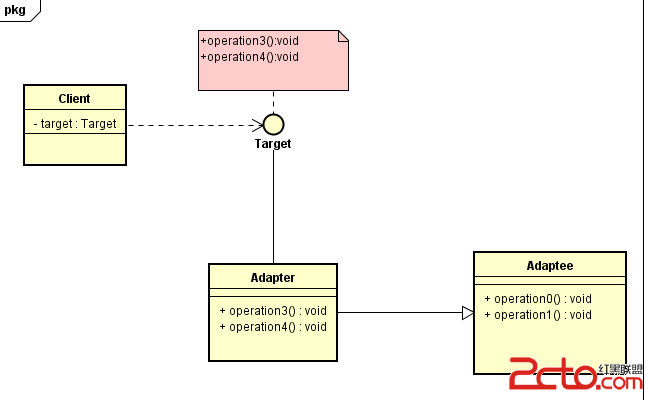 Android框架設計模式(四)——Adapter Method
Android框架設計模式(四)——Adapter Method 一、適配器模式介紹 適配器在平常在生活中是經常會用到的,特別是電子產品。像手機、電腦、家用電器都會用到
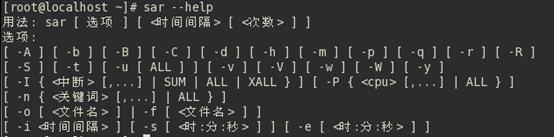 linux性能測試與監控 sar 命令
linux性能測試與監控 sar 命令sar(System Activity Reporter系統活動情況報告)是目前Linux上最為全面的系統性能分析工具之一,可以從多
 Fragment學習筆記,fragment學習
Fragment學習筆記,fragment學習Fragment為大量型號,尺寸,分辨率的設備提供了一種統一的UI優化方案。將Activity分解為多個Fragment,將
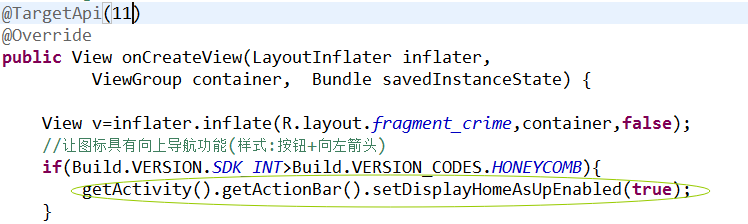 Android-操作欄之圖標導航,android-導航
Android-操作欄之圖標導航,android-導航 想實現圖標向上導航功能,步子分兩步走: 1.樣式上要改變-->圖標要變成可點擊的按鈕,並有一個向左的箭