Android教程網
  1. 首頁
  2. Android 技術
  3. Android 手機
  4. Android 系統教程
  5. Android 游戲
 Android教程網 >> Android技術 >> Android開發 >> 關於android開發 >> Android應用開發教程之二十六:列表項添加進度框進階

Android應用開發教程之二十六:列表項添加進度框進階

編輯:關於android開發

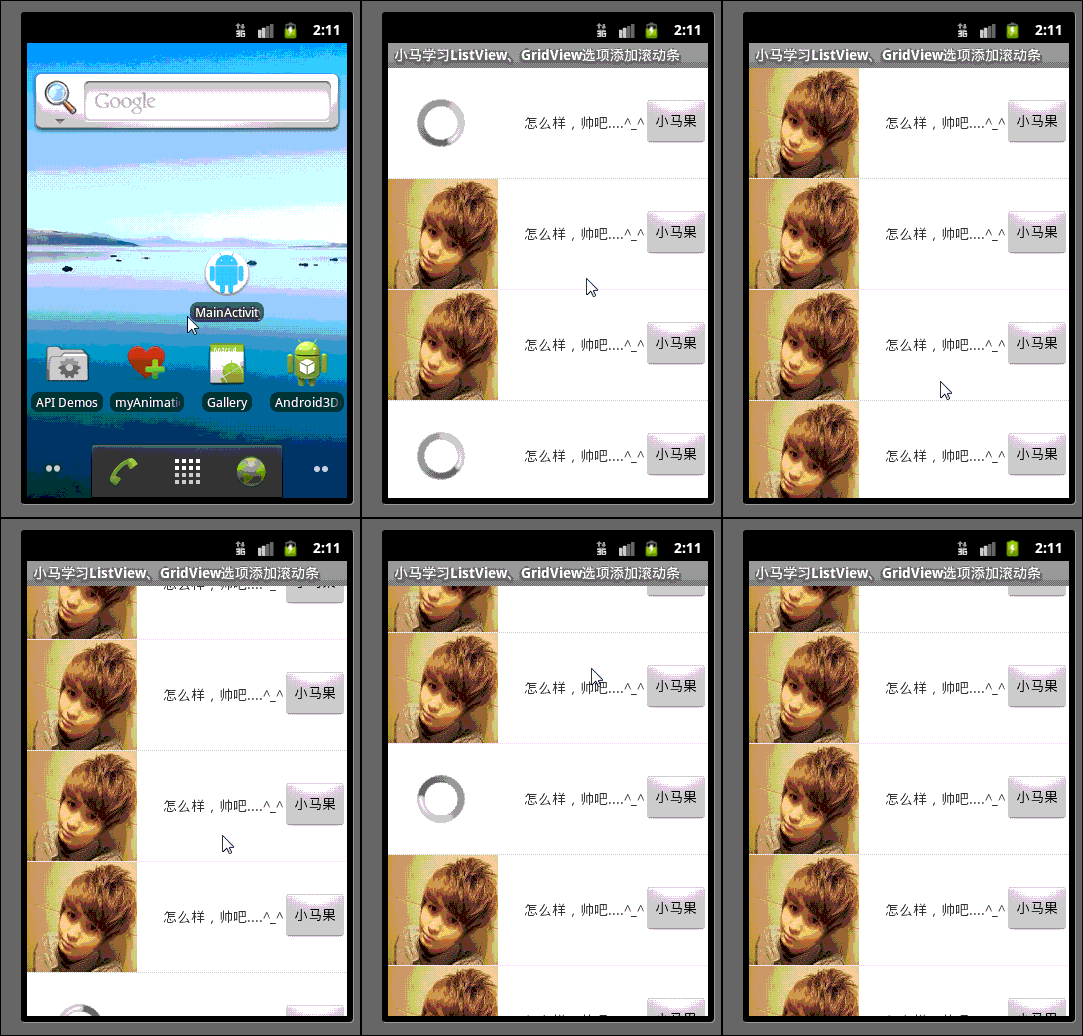
  今天有時間就學習了下在ListView、GridView列表項中清加ProgressBar,本文用最簡單的代碼實現可以通用的功能,人人都能看懂,哈哈,直接說下,如果你的適配器getView方法返回的View是一個自定義控件的話,有點不好實現哦,不過可以用兩個控件之間Visible 、Invisible來切換實現今天的效果,下面的例子是主類、適配器、異步下載類等的都寫在一個類裡面了,為的是發的博文裡一次性看的話方便,如果大家覺得結構不清楚的話根據自身需求自行抽取下,今天的DEMO只是個簡單的思路,其它控件列表項中添加進度框大家也可以用如下的方法實現,老規矩,先看效果,再看代碼(截圖有點失真,但無防):

  一:效果圖如下
Android應用開發教程之二十六:列表項添加進度框進階

  二:效果看完了,看下實現的路是怎樣的,吼吼:核心代碼如下:

Java代碼
  1. package com.example.listviewitemprogress;   
  2.    
  3. import java.io.InputStream;   
  4. import java.net.HttpURLConnection;   
  5. import java.net.URL;   
  6.    
  7. import android.app.Activity;   
  8. import android.content.Context;   
  9. import android.graphics.Bitmap;   
  10. import android.graphics.BitmapFactory;   
  11. import android.os.AsyncTask;   
  12. import android.os.Bundle;   
  13. import android.view.LayoutInflater;   
  14. import android.view.View;   
  15. import android.view.ViewGroup;   
  16. import android.widget.BaseAdapter;   
  17. import android.widget.Button;   
  18. import android.widget.ImageView;   
  19. import android.widget.ListView;   
  20. import android.widget.ProgressBar;   
  21. import android.widget.TextView;   
  22.    
  23. /**  
  24.  * @author 小馬果  
  25.  * ListView列表項中添加ProgressBar  
  26.  */   
  27. public class MainActivity extends Activity {   
  28.    
  29.     private ListView mListView = null ;    
  30.     private static final String imgUrl = "http://www.qq510.net/uploads/allimg/100613/2_100613171230_5.jpg";   
  31.     @Override   
  32.     public void onCreate(Bundle savedInstanceState) {   
  33.         super.onCreate(savedInstanceState);   
  34.         setContentView(R.layout.activity_main);   
  35.         init();   
  36.     }   
  37.        
  38.        
  39.     private void init(){   
  40.         mListView =  (ListView)findViewById(R.id.listview);   
  41.         mListView.setAdapter(new MyListViewAdapter(this));   
  42.     }   
  43.        
  44.     private class MyListViewAdapter extends BaseAdapter{   
  45.    
  46.         private LayoutInflater inflater = null;    
  47.            
  48.         public MyListViewAdapter(Context con){   
  49.             inflater = (LayoutInflater)con.getSystemService(LAYOUT_INFLATER_SERVICE);   
  50.         }   
  51.         @Override   
  52.         public int getCount() {   
  53.             // TODO Auto-generated method stub   
  54.             return Integer.MAX_VALUE;   
  55.         }   
  56.    
  57.         @Override   
  58.         public Object getItem(int arg0) {   
  59.             // TODO Auto-generated method stub   
  60.             return arg0;   
  61.         }   
  62.    
  63.         @Override   
  64.         public long getItemId(int position) {   
  65.             // TODO Auto-generated method stub   
  66.             return position;   
  67.         }   
  68.    
  69.         @Override   
  70.         public View getView(int position, View convertView, ViewGroup parent) {   
  71.             // TODO Auto-generated method stub   
  72.             ViewHolder mHolder = new ViewHolder() ;   
  73.             if(convertView == null){   
  74.                 convertView = inflater.inflate(R.layout.list_item, null);   
  75.                 mHolder.iv = (ImageView)(convertView.findViewById(R.id.iv));   
  76.                 mHolder.mBtn = (Button)(convertView.findViewById(R.id.button));   
  77.                 mHolder.pb = (ProgressBar)(convertView.findViewById(R.id.progressBar1));   
  78.                 mHolder.tv = (TextView)(convertView.findViewById(R.id.textView1));   
  79.                 convertView.setTag(mHolder);   
  80.             }else{   
  81.                 mHolder = (ViewHolder)convertView.getTag();   
  82.             }   
  83.                
  84.             new AsyncTask<ViewHolder, Void, Bitmap>() {   
  85.                 private ViewHolder v;   
  86.    
  87.                 @Override   
  88.                 protected Bitmap doInBackground(ViewHolder... params) {   
  89.                     v = params[0];   
  90.                     return  BitmapFactory.decodeStream(getStreamFromURL(imgUrl));   
  91.                 }   
  92.    
  93.                 @Override   
  94.                 protected void onPostExecute(Bitmap result) {   
  95.                     super.onPostExecute(result);   
  96.                         v.pb.setVisibility(View.GONE);   
  97.                         v.mBtn.setVisibility(View.VISIBLE);   
  98.                         v.iv.setImageBitmap(result);   
  99.                 }   
  100.             }.execute(mHolder);   
  101.             return convertView;   
  102.         }   
  103.            
  104.     }   
  105.        
  106.     static class ViewHolder{   
  107.         ImageView iv = null ;    
  108.         Button mBtn = null ;   
  109.         ProgressBar pb = null ;    
  110.         TextView tv = null ;    
  111.     }   
  112.        
  113.        
  114.     static String length;   
  115.     public static InputStream getStreamFromURL(String imageURL) {   
  116.         InputStream in=null;   
  117.         try {   
  118.             URL url=new URL(imageURL);   
  119.             HttpURLConnection connection=(HttpURLConnection) url.openConnection();   
  120. //          connection.setRequestProperty("Connection", "Keep-Alive");//維持長連接   
  121.             connection.setConnectTimeout(6* 1000);//設置連接超時   
  122.             if (connection.getResponseCode() != 200) throw new RuntimeException("請求失敗");   
  123.              length = connection.getHeaderField("Content-Length");   
  124.             in=connection.getInputStream();   
  125.                
  126.         } catch (Exception e) {   
  127.             // TODO Auto-generated catch block   
  128.             e.printStackTrace();   
  129.         }   
  130.         return in;   
  131.            
  132.     }   
  133.        
  134.        
  135. }   

  三:再來看下兩個布局吧(為方便查就放一起了:)

  主布局文件:

XML/HTML代碼
  1. <RelativeLayout xmlns:android="http://schemas.android.com/apk/res/android"   
  2.     xmlns:tools="http://schemas.android.com/tools"   
  3.     android:layout_width="match_parent"   
  4.     android:layout_height="match_parent" >   
  5.    
  6.     <ListView   
  7.         android:id="@+id/listview"   
  8.         android:layout_width="fill_parent"   
  9.         android:layout_height="fill_parent"   
  10.         android:drawSelectorOnTop="false"    
  11.         android:choiceMode="none"   
  12.         android:focusable="false"    
  13.         android:scrollingCache="false"   
  14.         android:fadingEdge="none"    
  15.         android:focusableInTouchMode="false"   
  16.         android:clickable="false"    
  17.         android:dividerHeight="0.5dip" />   
  18.        
  19. </RelativeLayout>   
  20.    
  21. ListView列表控件Item布局:   
  22.    
  23. <RelativeLayout xmlns:android="http://schemas.android.com/apk/res/android"   
  24.     xmlns:tools="http://schemas.android.com/tools"   
  25.     android:layout_width="match_parent"   
  26.     android:layout_height="110dp"    
  27.     android:background="#00ffeeaa"   
  28.     >   
  29.    
  30.     <ImageView    
  31.         android:id="@+id/iv"   
  32.         android:layout_width="110dp"   
  33.         android:background="@drawable/ic_action_search"   
  34.         android:layout_height="110dp"    
  35.         android:contentDescription="@string/hello_world"/>   
  36.        
  37.     <Button   
  38.         android:id="@+id/button"   
  39.         android:layout_width="wrap_content"   
  40.         android:layout_height="wrap_content"   
  41.         android:layout_alignParentRight="true"   
  42.         android:layout_centerVertical="true"   
  43.         android:text="@string/xiaomaguo"/>   
  44.    
  45.     <ProgressBar   
  46.         android:id="@+id/progressBar1"   
  47.         android:layout_width="wrap_content"   
  48.         android:layout_height="wrap_content"   
  49.         android:layout_alignParentLeft="true"   
  50.         android:layout_centerVertical="true"   
  51.         android:layout_alignTop="@+id/button"   
  52.         android:layout_marginLeft="29dp" />   
  53.    
  54.     <TextView   
  55.         android:id="@+id/textView1"   
  56.         android:layout_width="wrap_content"   
  57.         android:layout_height="wrap_content"   
  58.         android:layout_alignBaseline="@+id/button"   
  59.         android:layout_alignBottom="@+id/button"   
  60.         android:layout_centerVertical="true"   
  61.         android:layout_toLeftOf="@+id/button"   
  62.         android:text="@string/cool" />   
  63.        
  64. </RelativeLayout>   

  最後,由於選項中使用的圖片是從網上異步下載加載的,所以得開下聯網權限,大家別忘了加就行了,如下:

  <uses-permission android:name=”android.permission.INTERNET”/>

  怎麼樣?簡單吧,剛開始的時間沒思路,後來玩花辨的時候想到了,美麗說瀑布流實現的原理跟這個差不多,上面這個只是個小的DEMO,給大家提供個思路,GridView等其它控件,大家可以直接參照上面這個代碼來寫,吼吼,小DEMO源碼在WorePress中好像沒上傳支持的功能哇,有興趣的朋友可以點此處下載,覺得有用就下下來瞅瞅吧,加油,每天進步一點點,祝 :Happy ! O_O
  1. 上一頁:
  2. 下一頁:
熱門文章
閱讀排行版
Copyright © Android教程網 All Rights Reserved