Android系統中解析XML通常使用三種方法,分別是SAX、pull和DOM。這三種方法各有優缺點。本文將在一個簡單的Google天氣預報實例的基礎上,來講解如何使用SAX和pull方式解析XML文件。
一、Google天氣預報API簡介
我們上一講的時候使用過Google Weather API,這裡要說明的是Google Weather API 並不是官方提供的,是非公開的API,你可以拿來用,但是不能保證准確和及時。
首先我們可以根據經緯度來獲取天氣信息。
http://www.google.com/ig/api?hl=zh-cn&ie=utf-8&weather=,,,34720001,113650001
上面網址查詢的結果如下所示:
XML/HTML代碼
- <?xml version="1.0"?>
- <XML_API_REPLY version="1">
- <WEATHER module_id="0" tab_id="0" mobile_row="0" mobile_zipped="1" row="0" section="0">
- <FORECAST_INFORMATION>
- <CITY data="" />
- <POSTAL_CODE data="" />
- <LATITUDE_E6 data="34720001" />
- <LONGITUDE_E6 data="113650001" />
- <FORECAST_DATE data="2011-03-08" />
- <CURRENT_DATE_TIME data="2011-03-08 14:00:00 +0000" />
- <UNIT_SYSTEM data="SI" />
- </FORECAST_INFORMATION>
- <CURRENT_CONDITIONS>
- <CONDITION data="晴" />
- <TEMP_F data="" />
- <TEMP_C data="" />
- <HUMIDITY data="濕度: 61%" />
- <ICON data="/ig/images/weather/sunny.gif" />
- <WIND_CONDITION data="風向: 北、風速:0 米/秒" />
- </CURRENT_CONDITIONS>
- <FORECAST_CONDITIONS>
- <DAY_OF_WEEK data="周二" />
- <LOW data="3" />
- <HIGH data="16" />
- <ICON data="/ig/images/weather/sunny.gif" />
- <CONDITION data="晴" />
- </FORECAST_CONDITIONS>
- <FORECAST_CONDITIONS>
- <DAY_OF_WEEK data="周三" />
- <LOW data="2" />
- <HIGH data="12" />
- <ICON data="/ig/images/weather/cn_cloudy.gif" />
- <CONDITION data="多雲" />
- </FORECAST_CONDITIONS>
- <FORECAST_CONDITIONS>
- <DAY_OF_WEEK data="周四" />
- <LOW data="2" />
- <HIGH data="15" />
- <ICON data="/ig/images/weather/sunny.gif" />
- <CONDITION data="晴" />
- </FORECAST_CONDITIONS>
- </WEATHER>
- </XML_API_REPLY>
其次我們可以根據城市名稱的漢語拼音來獲取天氣信息。
http://www.google.com/ig/api?hl=zh-cn&ie=utf-8&weather=zhengzhou
上面網址的查詢結果如下所示:
XML/HTML代碼
- <?xml version="1.0"?>
- <XML_API_REPLY version="1">
- <WEATHER module_id="0" tab_id="0" mobile_row="0" mobile_zipped="1" row="0" section="0">
- <FORECAST_INFORMATION>
- <CITY data="Zhengzhou, Henan" />
- <POSTAL_CODE data="zhengzhou" />
- <LATITUDE_E6 data="" />
- <LONGITUDE_E6 data="" />
- <FORECAST_DATE data="2011-03-08" />
- <CURRENT_DATE_TIME data="2011-03-08 16:00:00 +0000" />
- <UNIT_SYSTEM data="SI" />
- </FORECAST_INFORMATION>
- <CURRENT_CONDITIONS>
- <CONDITION data="霧霾" />
- <TEMP_F data="50" />
- <TEMP_C data="10" />
- <HUMIDITY data="濕度: 43%" />
- <ICON data="/ig/images/weather/haze.gif" />
- <WIND_CONDITION data="風向: 北、風速:2 米/秒" />
- </CURRENT_CONDITIONS>
- <FORECAST_CONDITIONS>
- <DAY_OF_WEEK data="周二" />
- <LOW data="4" />
- <HIGH data="14" />
- <ICON data="/ig/images/weather/mostly_sunny.gif" />
- <CONDITION data="晴間多雲" />
- </FORECAST_CONDITIONS>
- <FORECAST_CONDITIONS>
- <DAY_OF_WEEK data="周三" />
- <LOW data="1" />
- <HIGH data="11" />
- <ICON data="/ig/images/weather/sunny.gif" />
- <CONDITION data="晴" />
- </FORECAST_CONDITIONS>
- <FORECAST_CONDITIONS>
- <DAY_OF_WEEK data="周四" />
- <LOW data="3" />
- <HIGH data="15" />
- <ICON data="/ig/images/weather/sunny.gif" />
- <CONDITION data="晴" />
- </FORECAST_CONDITIONS>
- <FORECAST_CONDITIONS>
- <DAY_OF_WEEK data="周五" />
- <LOW data="7" />
- <HIGH data="19" />
- <ICON data="/ig/images/weather/mostly_sunny.gif" />
- <CONDITION data="以晴為主" />
- </FORECAST_CONDITIONS>
- </WEATHER>
- </XML_API_REPLY>
順便說一下,我們通過 http://www.google.com/ig/cities?output=xml&hl=zh-cn&country=cn 查到鄭州的經緯度是(經度113650001,緯度34720001),那麼也就是說通過查詢經度113650001,緯度34720001處的天氣和查找鄭州的天氣應該是一致的了,實際上你也看到了,上面兩次查詢的結果並不相同。好在我們出於學習目的這點小誤差不是我們考慮的問題。
簡單分析一下上述XML文件,會發現第二個forecast_conditions標簽裡面就是我們需要的明日天氣預報信息,包括有最高、最低氣溫、天氣情況描述和天氣描述圖片。
二、使用SAX解析Google Weather
DOM解析在Android開發裡一般是不被推薦的,因為DOM需要把整個XML文件都讀到內存裡,才能組裝成一個樹形結構,雖然這樣的樹形結構我們用起來很舒服,可是它的內存開銷在很多時候是難以承受的。
而SAX(Simple API for XML)則提供了一種基於事件的處理思路,他不需要裝載、遍歷整個XML文件,只要發現你所關心的標簽或者數據,就可以隨時停止解析。這在資源比較緊缺的智能手機領域裡,還是顯得非常有價值的。廢話不說,我們還是用一個例子來展示如何使用SAX來解析XML文件,我會同樣把講解寫在文檔的注釋裡。如果同學們看著還是辛苦的話,建議找些SAX的相關知識先期補習一下。
1、新建一個項目 Lesson31_XmlSaxParser。
2、在MainActivit.java的代碼如下:
Java代碼
- package basic.android.xml.sax;
-
- import android.app.Activity;
- import android.os.Bundle;
- import android.view.View;
- import android.widget.Button;
- import android.widget.TextView;
-
- public class MainActivity extends Activity {
-
- @Override
- public void onCreate(Bundle savedInstanceState) {
- super.onCreate(savedInstanceState);
- setContentView(R.layout.main);
-
- //定義UI組件
- Button b1 = (Button) findViewById(R.id.button1);
- final TextView tv1 = (TextView) findViewById(R.id.textView1);
-
- //為按鈕綁定監聽器
- b1.setOnClickListener(new View.OnClickListener() {
- @Override
- public void onClick(View arg0) {
- //定義一個查詢Google天氣的字符串,後面的經緯度我寫死成鄭州的坐標了,你懂的
- String googleWeatherUrl = "http://www.google.com/ig/api?hl=zh-cn&ie=utf-8&weather=,,,34720001,113650001";
- //定義了一個HttpClientConnector工具類用來把google天氣預報返回的XML信息存儲在一個字符串裡,這裡可能會有聰明的同學說,你已經把整個xml都讀回來了,還扯什麼讀一半就可以退出的話,這裡要說明的是google Weather API很蛋疼,直接用sax解析會出錯,所以只能先完整讀回來
- String googleWeatherString = HttpClientConnector.getStringByUrl(googleWeatherUrl);
- //定義一個SAX Parse對象把xml的字符串解析成我們要的 明日天氣信息Bean
- TomorrowWeatherVO tomorrowWeatherVO = TomorrowWeatherParse.parse(googleWeatherString);
- //顯示天氣信息
- if(tomorrowWeatherVO!=null){
- tv1.setText("明日天氣情況:" + tomorrowWeatherVO.getCondition() + " 最高氣溫:" + tomorrowWeatherVO.getHigh()
- + " 最低氣溫:" + tomorrowWeatherVO.getLow());
- }
- }
- });
- }
-
- }
3、上面使用的HttpClientConnector工具類代碼如下:
Java代碼
- package basic.android.xml.sax;
-
- import org.apache.http.client.ResponseHandler;
- import org.apache.http.client.methods.HttpGet;
- import org.apache.http.impl.client.BasicResponseHandler;
- import org.apache.http.impl.client.DefaultHttpClient;
-
- import android.util.Log;
-
- public class HttpClientConnector {
-
- static String getStringByUrl(String url) {
-
- String outputString = "";
-
- // DefaultHttpClient
- DefaultHttpClient httpclient = new DefaultHttpClient();
- // HttpGet
- HttpGet httpget = new HttpGet(url);
- // ResponseHandler
- ResponseHandler<STRING> responseHandler = new BasicResponseHandler();
-
- try {
- outputString = httpclient.execute(httpget, responseHandler);
- Log.i("yao", "連接成功");
- } catch (Exception e) {
- Log.i("yao", "連接失敗");
- e.printStackTrace();
- }
- httpclient.getConnectionManager().shutdown();
- return outputString;
-
- }
-
- }</STRING>
4、SAX解析器 TomorrowWeatherParse.java的代碼如下:
Java代碼
- package basic.android.xml.sax;
-
- import java.io.IOException;
- import java.io.StringReader;
-
- import javax.xml.parsers.ParserConfigurationException;
- import javax.xml.parsers.SAXParserFactory;
-
- import org.xml.sax.InputSource;
- import org.xml.sax.SAXException;
- import org.xml.sax.XMLReader;
-
- public class TomorrowWeatherParse {
-
- // 解析天氣預報字符串成一個天氣信息對象
- public static TomorrowWeatherVO parse(String googleWeatherString) {
-
- SAXParserFactory saxParserFactory = SAXParserFactory.newInstance();
-
- TomorrowWeatherVO tomorrowWeatherVO = new TomorrowWeatherVO();
-
- try {
- XMLReader xmlReader = saxParserFactory.newSAXParser().getXMLReader();
- WeatherXMLHandler handler = new WeatherXMLHandler(tomorrowWeatherVO);
- xmlReader.setContentHandler(handler);
-
- xmlReader.parse(new InputSource(new StringReader(googleWeatherString)));
-
- } catch (SAXException e) {
- e.printStackTrace();
- } catch (ParserConfigurationException e) {
- e.printStackTrace();
- } catch (IOException e) {
- e.printStackTrace();
- }
-
- return tomorrowWeatherVO;
-
- }
-
- }
5、TomorrowWeatherParse.java 中使用到的內容處理器 WeatherXMLHandler.java的代碼如下:
Java代碼
- package basic.android.xml.sax;
-
- import org.xml.sax.Attributes;
- import org.xml.sax.SAXException;
- import org.xml.sax.helpers.DefaultHandler;
- import android.util.Log;
-
- public class WeatherXMLHandler extends DefaultHandler {
-
- // 明日天氣預報Bean
- TomorrowWeatherVO tomorrowWeatherVO;
-
- // 記錄出現次數
- int findCount = 0;
-
- // 默認構造方法
- public WeatherXMLHandler() {
- super();
- }
-
- // 構造方法
- public WeatherXMLHandler(TomorrowWeatherVO tomorrowWeatherVO) {
- this.tomorrowWeatherVO = tomorrowWeatherVO;
- }
-
- /*
- * 文檔結束時觸發
- */
- @Override
- public void endDocument() throws SAXException {
- Log.i("yao", "文檔解析結束");
- super.endDocument();
- }
-
- /*
- * 文檔開始時觸發
- */
- @Override
- public void startDocument() throws SAXException {
- Log.i("yao", "文檔解析開始");
- super.startDocument();
- }
-
- /*
- * 元素開始時觸發
- */
- @Override
- public void startElement(String uri, String localName, String qName, Attributes attributes) throws SAXException {
- Log.i("yao", qName);
- if (qName.equals("forecast_conditions")) {
- findCount++;
- }
- Log.i("yao", "" + findCount);
- if (findCount == 2) {
- if (qName.equals("low")) {
- tomorrowWeatherVO.setLow(attributes.getValue("data"));
- }
- if (qName.equals("high")) {
- tomorrowWeatherVO.setHigh(attributes.getValue("data"));
- }
- if (qName.equals("icon")) {
- tomorrowWeatherVO.setIcon(attributes.getValue("data"));
- }
- if (qName.equals("condition")) {
- tomorrowWeatherVO.setCondition(attributes.getValue("data"));
- }
- }
- super.startElement(uri, localName, qName, attributes);
- }
-
- /*
- * 元素結束時觸發
- */
- @Override
- public void endElement(String uri, String localName, String qName) throws SAXException {
- Log.i("yao", "元素解析結束");
- super.endElement(uri, localName, qName);
- }
-
- /*
- * 讀取元素內容
- */
- @Override
- public void characters(char[] ch, int start, int length) throws SAXException {
- super.characters(ch, start, length);
- }
-
- }
上面的代碼裡有好多空方法,是為了讓你了解默認的內容處理器DefaultHandler中的常用方法,其中因為google天氣xml的特殊結構,讓我們沒有機會使用一個更常用的方法characters,很是遺憾,大家自己找資料學習吧。
6、最後還有一個,存儲明日天氣信息的Bean:TomorrowWeatherVO.java。
Java代碼
- package basic.android.xml.sax;
-
- public class TomorrowWeatherVO {
-
- String low;
- String high;
- String icon;
- String condition;
-
- public String getLow() {
- return low;
- }
- public void setLow(String low) {
- this.low = low;
- }
- public String getHigh() {
- return high;
- }
- public void setHigh(String high) {
- this.high = high;
- }
- public String getIcon() {
- return icon;
- }
- public void setIcon(String icon) {
- this.icon = icon;
- }
- public String getCondition() {
- return condition;
- }
- public void setCondition(String condition) {
- this.condition = condition;
- }
-
- public TomorrowWeatherVO(String low, String high, String icon,
- String condition) {
- super();
- this.low = low;
- this.high = high;
- this.icon = icon;
- this.condition = condition;
- }
-
- public TomorrowWeatherVO() {
-
- }
- }
7、照例還是把簡陋的布局文件貼出來main.xml。
XML/HTML代碼
- <?xml version="1.0" encoding="utf-8"?>
- <LINEARLAYOUT xmlns:android="http://schemas.android.com/apk/res/android" android:orientation="vertical" android:layout_width="fill_parent" android:layout_height="fill_parent">
- <BUTTON type=submit android:layout_width="wrap_content" android:layout_height="wrap_content" android:text="獲取明天天氣情況" android:id="@+id/button1">
- </BUTTON>
- <TEXTVIEW android:layout_width="wrap_content" android:layout_height="wrap_content" android:text="" android:id="@+id/textView1">
- </TEXTVIEW>
- </LINEARLAYOUT>
8、最後不要忘了在AndroidManifest.xml中加入訪問互聯網的權限:
XML/HTML代碼
- <USES android:name="android.permission.INTERNET" -permission></USES>
好,我們可以編譯並運行程序,查看結果了:
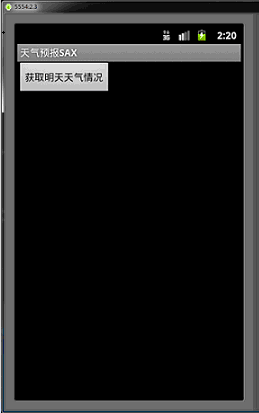
點擊按鈕:
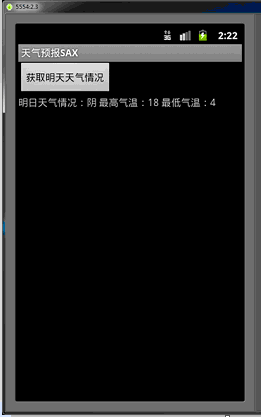
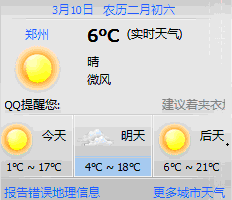
OK,我們發現和QQ的天氣預報信息還是滿切合的,是不是有那麼一點點成就感?
三、使用pull解析Google Weather
pull解析XML的方式和SAX比較相近,它的官網是 http://www.xmlpull.org/ ,Android中集成了pull解析方式,因此你不必自己找支持庫文件。廢話不說我們直接上實例。
1、新建一個項目 Lesson31_XmlPullParser。
2、重用上面項目的大部分內容,只在解析上替換一下,因此我就把解析器代碼貼出來就可以了,TomorrowWeatherPullParse.java的代碼如下:
Java代碼
- package basic.android.lesson31;
-
- import java.io.IOException;
- import java.io.StringReader;
-
- import org.xmlpull.v1.XmlPullParser;
- import org.xmlpull.v1.XmlPullParserException;
- import org.xmlpull.v1.XmlPullParserFactory;
-
- import android.util.Log;
-
- public class TomorrowWeatherPullParse {
-
- // 解析天氣預報字符串成一個天氣信息對象
- public static TomorrowWeatherVO parse(String googleWeatherString) {
-
- Log.i("yao", "TomorrowWeatherPullParse.parse");
-
- // 記錄出現次數
- int findCount = 0;
-
- // 明日天氣預報Bean
- TomorrowWeatherVO tomorrowWeatherVO = new TomorrowWeatherVO();
-
- try {
-
- //定義工廠 XmlPullParserFactory
- XmlPullParserFactory factory = XmlPullParserFactory.newInstance();
-
- //定義解析器 XmlPullParser
- XmlPullParser parser = factory.newPullParser();
-
- //獲取xml輸入數據
- parser.setInput(new StringReader(googleWeatherString));
-
- //開始解析事件
- int eventType = parser.getEventType();
-
- //處理事件,不碰到文檔結束就一直處理
- while (eventType != XmlPullParser.END_DOCUMENT) {
- //因為定義了一堆靜態常量,所以這裡可以用switch
- switch (eventType) {
- case XmlPullParser.START_DOCUMENT:
- break;
-
- case XmlPullParser.START_TAG:
- //給當前標簽起個名字
- String tagName = parser.getName();
- //看到感興趣的標簽個計數
- if (tagName.equals("forecast_conditions")) {
- findCount++;
- }
- //看到要處理的標簽,就處理
- if (findCount == 2) {
- if (tagName.equals("low")) {
- //XML中的屬性可以用下面的方法獲取,其中0是序號,代表第一個屬性
- tomorrowWeatherVO.setLow(parser.getAttributeValue(0));
- }
- if (tagName.equals("high")) {
- tomorrowWeatherVO.setHigh(parser.getAttributeValue(0));
- }
- if (tagName.equals("icon")) {
- tomorrowWeatherVO.setIcon(parser.getAttributeValue(0));
- }
- if (tagName.equals("condition")) {
- Log.i("yao", "condition=" + parser.getAttributeValue(0));
- tomorrowWeatherVO.setCondition(parser.getAttributeValue(0));
- }
- }
- break;
- case XmlPullParser.END_TAG:
- break;
- case XmlPullParser.END_DOCUMENT:
- break;
- }
-
- //別忘了用next方法處理下一個事件,忘了的結果就成死循環#_#
- eventType = parser.next();
- }
-
- } catch (XmlPullParserException e) {
- e.printStackTrace();
- } catch (IOException e) {
- e.printStackTrace();
- }
-
- return tomorrowWeatherVO;
- }
- }
因為編譯和運行結果與二中的完全相同,這裡就不貼圖了。
經過總結我們知道,用pull方式解析XML文件的代碼更簡潔,也更直接方便些,最直觀的是可以少用一個Handler文件。
本節內容就是這些了,希望大家在看完本節教程後,能夠熟練的使用SAX和pull方式解析XML文件。


 Android(Java)控制GPIO的方法及耗時分析,androidgpio
 Android 應用程序集成Google 登錄,androidgoogle
 Android源碼解析--SwipeMenuListView仿QQ聊天左滑
 安卓開發之RecyclerView,安卓recyclerview
 minSdkVersion maxSdkVersion targetSdkVersion target 的區別,targetsdkversion