上一節講了使用WebView控件訪問網絡的方法,而除這種方法之外,我們還可以使用代碼的方式訪問網絡,代碼方式在很多時候用起來更靈活。本節要講的就是使用URLConnection對象和HttpClient組件訪問網絡的方法。
實際上URLConnection和HttpClient訪問網絡的方法和Java Web開發中的使用方式幾乎沒什麼區別,而Java Web開發的資料比較多,大家可以在學完本節後去查閱相關資料,深入研究下HttpClient4.0的內容,以學習更多更深的知識。
分別使用URLConnection和HttpClient訪問Google天氣服務的例子
這個例子的的目的就是從Google哪裡獲取鄭州的天氣預報信息,並顯示在TextView中,本講只會把返回的XML數據顯示出來,下一講我們學XML解析的時候再把這個天氣預報做成圖文並茂的形式,所以大家先暫時忍耐一下丑陋的界面。
1、新建一個項目 Lesson30_HttpClient ,主Activity的文件名是 MainActivity.java。
2、res/layout/main.xml的內容如下:
XML/HTML代碼
- <?xml version="1.0" encoding="utf-8"?>
- <LINEARLAYOUT xmlns:android="http://schemas.android.com/apk/res/android" android:layout_height="fill_parent" android:layout_width="fill_parent" android:orientation="vertical">
-
- <TEXTVIEW android:layout_height="wrap_content" android:layout_width="fill_parent" android:text="網絡連接測試" android:id="@+id/TextView01" />
-
- <BUTTON type=submit android:layout_height="wrap_content" android:layout_width="wrap_content" android:text="使用URLConnection訪問GoogleWeatherAPI" android:id="@+id/Button01">
- </BUTTON>
-
- <BUTTON type=submit android:layout_height="wrap_content" android:layout_width="wrap_content" android:text="使用HttpClient訪問GoogleWeatherAPI" android:id="@+id/Button02">
- </BUTTON>
-
- <SCROLLVIEW android:layout_height="wrap_content" android:layout_width="wrap_content" android:id="@+id/ScrollView01">
- <TEXTVIEW android:layout_height="wrap_content" android:layout_width="wrap_content" android:id="@+id/TextView02">
- </TEXTVIEW>
- </SCROLLVIEW>
- </LINEARLAYOUT>
3、MainActivity.java的內容如下:
Java代碼
- package android.basic.lesson30;
-
- import java.io.InputStreamReader;
- import java.net.HttpURLConnection;
- import java.net.URL;
-
- import org.apache.http.client.ResponseHandler;
- import org.apache.http.client.methods.HttpGet;
- import org.apache.http.impl.client.BasicResponseHandler;
- import org.apache.http.impl.client.DefaultHttpClient;
-
- import android.app.Activity;
- import android.os.Bundle;
- import android.view.View;
- import android.widget.Button;
- import android.widget.TextView;
- import android.widget.Toast;
-
- public class MainActivity extends Activity {
-
- TextView tv;
-
- String googleWeatherUrl1 = "http://www.google.com/ig/api?weather=zhengzhou";
- String googleWeatherUrl2 = "http://www.google.com/ig/api?hl=zh-cn&weather=zhengzhou";
-
- /** Called when the activity is first created. */
- @Override
- public void onCreate(Bundle savedInstanceState) {
- super.onCreate(savedInstanceState);
- setContentView(R.layout.main);
-
- // 定義UI組件
- Button b1 = (Button) findViewById(R.id.Button01);
- Button b2 = (Button) findViewById(R.id.Button02);
- tv = (TextView) findViewById(R.id.TextView02);
-
- // 設置按鈕單擊監聽器
- b1.setOnClickListener(new View.OnClickListener() {
- @Override
- public void onClick(View v) {
- // 使用URLConnection連接GoogleWeatherAPI
- urlConn();
- }
- });
-
- // 設置按鈕單擊監聽器
- b2.setOnClickListener(new View.OnClickListener() {
- @Override
- public void onClick(View v) {
- // 使用HttpCient連接GoogleWeatherAPI
- httpClientConn();
-
- }
- });
-
- }
-
- // 使用URLConnection連接GoogleWeatherAPI
- protected void urlConn() {
-
- try {
- // URL
- URL url = new URL(googleWeatherUrl1);
- // HttpURLConnection
- HttpURLConnection httpconn = (HttpURLConnection) url.openConnection();
-
- if (httpconn.getResponseCode() == HttpURLConnection.HTTP_OK) {
- Toast.makeText(getApplicationContext(), "連接Google Weather API成功!",
- Toast.LENGTH_SHORT).show();
- // InputStreamReader
- InputStreamReader isr = new InputStreamReader(httpconn.getInputStream(), "utf-8");
- int i;
- String content = "";
- // read
- while ((i = isr.read()) != -1) {
- content = content + (char) i;
- }
- isr.close();
- //設置TextView
- tv.setText(content);
- }
- //disconnect
- httpconn.disconnect();
-
- } catch (Exception e) {
- Toast.makeText(getApplicationContext(), "連接Google Weather API失敗", Toast.LENGTH_SHORT)
- .show();
- e.printStackTrace();
- }
- }
-
- // 使用HttpCient連接GoogleWeatherAPI
- protected void httpClientConn() {
- //DefaultHttpClient
- DefaultHttpClient httpclient = new DefaultHttpClient();
- //HttpGet
- HttpGet httpget = new HttpGet(googleWeatherUrl2);
- //ResponseHandler
- ResponseHandler<STRING> responseHandler = new BasicResponseHandler();
-
- try {
- String content = httpclient.execute(httpget, responseHandler);
- Toast.makeText(getApplicationContext(), "連接Google Weather API成功!",
- Toast.LENGTH_SHORT).show();
- //設置TextView
- tv.setText(content);
- } catch (Exception e) {
- Toast.makeText(getApplicationContext(), "連接Google Weather API失敗", Toast.LENGTH_SHORT)
- .show();
- e.printStackTrace();
- }
- httpclient.getConnectionManager().shutdown();
- }
- }</STRING>
4、最後別忘了在AndroidManifest.xml中加入訪問網絡的權限:
XML/HTML代碼
- <uses-permission android:name="android.permission.INTERNET"></uses-permission>
5、運行程序查看結果:

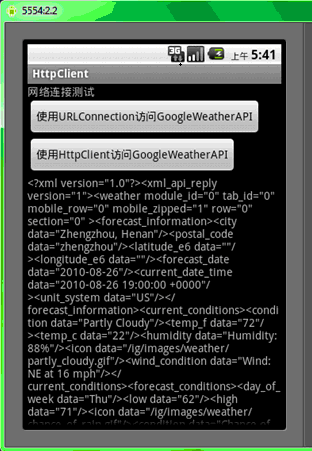
按第一個按鈕的效果,返回的數據結果顯示在了TextView裡:

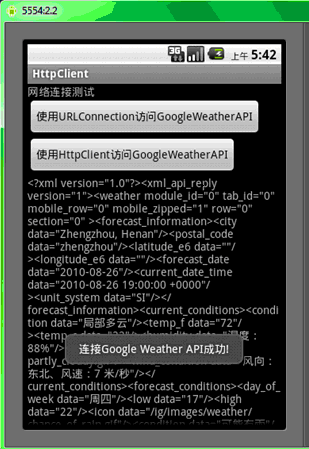
按第二個按鈕的效果,返回的數據結果顯示在了TextView裡, 所不同的是顯示的是中文。
本節就講到這裡了,相信大家對URLConnection和HttpClient訪問網絡的知識有了初步了解。


 閱讀《Android 從入門到精通》(17)——進度條
 Android Sqlite基本命令,androidsqlite命令
 Android指南,android編程權威指南
 Android 一個改善的okHttp封裝庫