編輯:關於android開發
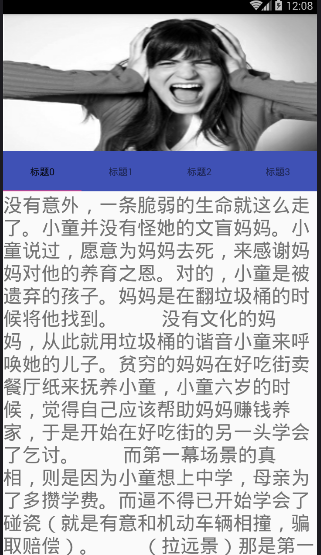
效果:

main_activity.xml
<?xml version="1.0" encoding="utf-8"?>
<!--CoordinatorLayout:協調者布局。-->
<android.support.design.widget.CoordinatorLayout xmlns:android="http://schemas.android.com/apk/res/android"
    xmlns:app="http://schemas.android.com/apk/res-auto"
    xmlns:tools="http://schemas.android.com/tools"
    android:layout_width="match_parent"
    android:layout_height="match_parent">

    <android.support.design.widget.AppBarLayout
        android:id="@+id/teach_appbar"
        android:layout_width="match_parent"
        android:layout_height="260dp">

        <!-- app:layout_scrollFlags="scroll|enterAlways"-->

        <ImageView
            android:id="@+id/teach_image"
            android:layout_width="match_parent"
            android:layout_height="200dp"
            android:scaleType="fitXY"
            android:src="@mipmap/seek"
            app:layout_scrollFlags="scroll|enterAlways" />

        <android.support.design.widget.TabLayout
            android:id="@+id/teach_tablayout"
            android:layout_width="match_parent"
            android:layout_height="60dp" />
    </android.support.design.widget.AppBarLayout>

    <!--app:layout_behavior="@string/appbar_scrolling_view_behavior"
            下面布局僅支持:NestedScrollView和ViewPager
    -->
    <android.support.v4.view.ViewPager
        android:id="@+id/teach_viewpager"
        android:layout_width="match_parent"
        android:layout_height="match_parent"
        app:layout_behavior="@string/appbar_scrolling_view_behavior" />

</android.support.design.widget.CoordinatorLayout>
<?xml version="1.0" encoding="utf-8"?>
<android.support.v4.widget.NestedScrollView xmlns:android="http://schemas.android.com/apk/res/android"
    android:layout_width="match_parent"
    android:layout_height="match_parent">
    <LinearLayout
        android:orientation="vertical"
        android:layout_width="match_parent"
        android:layout_height="wrap_content">
        <TextView
            android:id="@+id/tv_fragment_content"
            android:text="@string/article"
            android:textSize="28sp"
            android:layout_width="match_parent"
            android:layout_height="wrap_content" />
    </LinearLayout>
</android.support.v4.widget.NestedScrollView>
/**
 * Design:
 *      TextInputLayout:輸入布局,需要嵌套EditText進行使用
 *      TextInputEditText:輸入框,可以設置錯誤提示,
 *      snackBar:加強版的吐司,可以添加點擊事件
 *  在開發過程中,要使用一些材料風格的特效,即Design特效
 *  CoordinatorLayout:協調者布局,專門用來處理滑動特效,加強版的FrameLayout
 *  AppBarLayout:專門用來裝載導航區域的,非滾動區域。
 *
 */
public class MainActivity extends AppCompatActivity {

    private ViewPager mViewPager;
    private ViewpagerAdapter adapter;
    private TabLayout mTabLaypout;

    @Override
    protected void onCreate(Bundle savedInstanceState) {
        super.onCreate(savedInstanceState);
        setContentView(R.layout.activity_main);
        initView();
    }

    private void initView() {
        mViewPager = (ViewPager) findViewById(R.id.teach_viewpager);

        adapter = new ViewpagerAdapter(getSupportFragmentManager(),getData());
        mViewPager.setAdapter(adapter);

        mTabLaypout = (TabLayout) findViewById(R.id.teach_tablayout);
        mTabLaypout.setupWithViewPager(mViewPager);
    }

    public List<Fragment> getData() {
        List<Fragment>data=new ArrayList<>();
        for (int i=0;i<4;i++){
            TeachFragment fragment = new TeachFragment();
            data.add(fragment);
        }
        return data;
    }
}
public class ViewpagerAdapter extends FragmentPagerAdapter {

    private List<Fragment>data;


    public ViewpagerAdapter(FragmentManager fm,List<Fragment>data) {
        super(fm);
        this.data=data;
    }

    @Override
    public Fragment getItem(int position) {
        return data.get(position);
    }

    @Override
    public int getCount() {
        return data.size();
    }

    @Override
    public CharSequence getPageTitle(int position) {
        return "標題"+position;
    }
}
public class TeachFragment extends Fragment {
    private View layout;

    @Nullable
    @Override
    public View onCreateView(LayoutInflater inflater, @Nullable ViewGroup container, @Nullable Bundle savedInstanceState) {
        layout = inflater.inflate(R.layout.fragment_teach,container,false);
        return layout;
    }
}
 Android 自定義View高級特效,神奇的貝塞爾曲線
Android 自定義View高級特效,神奇的貝塞爾曲線 效果圖 效果圖中我們實現了一個簡單的隨手指滑動的二階貝塞爾曲線,還有一個復雜點的,穿越所有已知點的貝塞爾曲線。
 推送:騰迅信鴿 VS Bmob,信鴿bmob
推送:騰迅信鴿 VS Bmob,信鴿bmob最近幾天了解市場上主流的推送SDK。 騰迅信鴿 所需SDK,去官網自行下載。去下載 完整的清單文件如下: 1
 Android 貝塞爾曲線實現QQ拖拽清除效果
Android 貝塞爾曲線實現QQ拖拽清除效果 純屬好奇心驅動寫的一個學習性Demo,效果如下: 兩個帶圓弧的線就是由三點確認的一個貝塞爾曲線: 在Android已經
 Android動畫全解,Android動畫
Android動畫全解,Android動畫在Android開發中經常會碰到動畫,看到別的應用有很酷炫的應用時,總是想怎麼去實現,但是每次都是發現感覺是知道怎麼做的,實際做