編輯:關於android開發
啦啦啦~大家好,又見面啦~
本篇博文講和大家一起完成一個需要注冊、登錄的備忘錄的,一起學習 SharedPreferences 的基本使用,學習 Android 中常見的文件操作方法,復習 Android 界面編程。
直接進入正題~
使用SharedPreferences儲存用戶名和密碼,SharedPreferences是直接處理xml文件,不需要做字符串分割,存儲效率會比使用內部存儲,和外部存儲存儲用戶名和密碼高。
(1) SharedPreferences 的讀取
在 Android 中,用於獲取 SharedPreferences 的接⼝是 getSharedPreferences(String, int) 函數。 兩個參數的意義:
String: Desired preferences file. If a preferences file by this name does not exist, it will be created when you retrieve an editor.
int: Operating mode. Use 0 or MODE_PRIVATE for the default operation.
我們對 SharedPreferences 的讀取操作是通過 getSharedPreferences(String, int) 函數返回的 SharedPreferences 對象的方法來完成的。查閱文檔可以看到,SharedPreferences 支持如下幾種方法讀取之前存儲的數據:
所有方法都需要傳入一個 defValue 參數,在給定的 key 不存在時,SharedPreferences 會直接返回 這個默認值。
(2)SharedPreferences 的寫入
所有對 SharedPreferences 的寫入操作,都必須通過 SharedPreferences.edit() 函數返回的 Editor對象來完成。
舉例:
Context context = getActivity();
SharedPreferences sharedPref = context.getSharedPreferences("MY_PREFERENCE", Context.MODE_PRIVATE);
// Alternatively, if you need just one shared preference file for your activity, you can use the getPreferences() method:
//    SharedPreferences sharedPref =getActivity().getPreferences(Context.MODE_PRIVATE);
SharedPreferences.Editor editor = sharedPref.edit();
editor.putInt("KEY_SCORE", newHighScore);
editor.commit();
使用SharedPreferences將用戶名和密碼保存在本地後,可以在\data\data\+包名+\shared_prefs目錄下找到一個info.xml文件
Android 中的存儲空間分為兩種:Internal Storage 和 External Storage.
(1)Internal Storage
默認情況下,保存在 Internal Storage 的文件只有應用程序可見,其他應用,以及用戶本⾝是無法訪問這些文件的。
向 Internal Storage 寫入文件的示例代碼如下:
try (FileOutputStream fileOutputStream = openFileOutput(FILE_NAME, MODE_PRIVATE)) {
 String str = "Hello, World!";
 fileOutputStream.write(str.getBytes());
 Log.i("TAG", "Successfully saved file.");
} catch (IOException ex) {
 Log.e("TAG", "Fail to save file.");
}
若對應的文件不存在,openFileOutput(String, int) 函數會直接新建文件。注意傳入的文件名參數不能含有 path separators(即 '/'). 該函數返回一個 FileOutputStream 對象,可以調用 write() 方法寫入內容。
相應地,文件的讀取可以使用 openFileInput(String) 來讀取文件。該函數返回一個 FileInput- Stream,調用 read() 方法讀取內容。
try (FileInputStream fileInputStream =openFileInput(FILE_NAME)) {
 byte[] contents = new byte[fileInputStream.available()];
 fileInputStream.read(contents);
} catch (IOException ex) {
 Log.e("TAG", "Fail to read file.");
}
(2)External Storage
Android 支持使用 Java 的文件 API 來讀寫文件,但是關鍵的點在於要有一個合適的路徑。如果你要存儲一些公開的,體積較大的文件(如媒體文件),External Storage 就是一個比較合適的地方。如文檔中所說:
All Android devices have two file storage areas: “internal” and “external” storage. These names come from the early days of Android, when most devices offered built-in non-volatile memory (internal storage), plus a removable stor- age medium such as a micro SD card (external storage). Some devices divide the permanent storage space into “internal” and “external” partitions, so even without a removable storage medium, there are always two storage spaces and the API behavior is the same whether the external storage is removable or not.
無論是否支持外置 SD 卡,所有的 Android 設備都會將存儲空間分為 internal 和 external 兩部分。
要往 External Storage 寫入文件,需要在 AndroidManifest.xml 文件中聲明權限:
<manifest ...>
<uses-permission android:name="android.permission.WRITE_EXTERNAL_STORAGE" />
...
</manifest>
隨後調用 getExternalFilesDir(String type) 或 Environment.getExternalStoragePublicDirectory()來獲取 SD 卡路徑。兩者的區別在於:前者指向的目錄會在應用卸載時被刪除,而後者不會。
上面的兩個函數均返回一個 File 對象,代表一個目錄路徑,使用這個 File 對象,再結合文件名,即 可創建 FileInputStream 或 FileOutputStream 來進⾏文件讀寫。
舉例:
void createExternalStoragePrivateFile() {
// Create a path where we will place our private file on  external
// storage.
File file = new File(getExternalFilesDir(null), "DemoFile.jpg");
try {
// Very simple code to copy a picture from the  application's
// resource into the external file.    Note that this code does
// no error checking, and assumes the picture is small (does
// not try to copy it in chunks).    Note that if external storage is // not currently mounted this will silently  fail.
InputStream is =getResources().openRawResource(R.drawable.balloons);
OutputStream os = new FileOutputStream(file);
byte[] data = new byte[is.available()];
is.read(data);
os.write(data); is.close();
os.close();
} catch (IOException e) {
// Unable to create file, likely because external storage  is
// not currently mounted.
Log.w("ExternalStorage", "Error writing " + file, e);
}

}
1 2 3 4
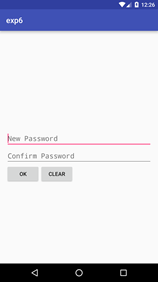
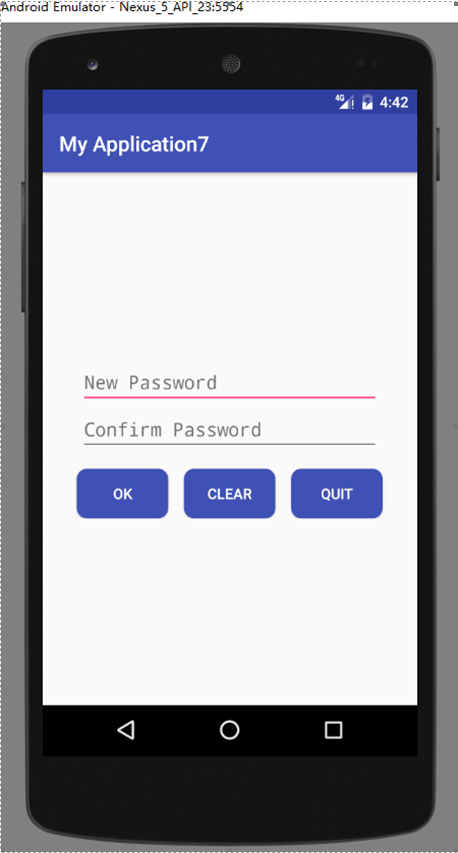
Figure 1: 首次進入, 呈現創建密碼界面
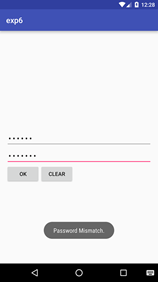
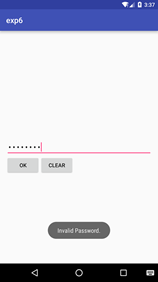
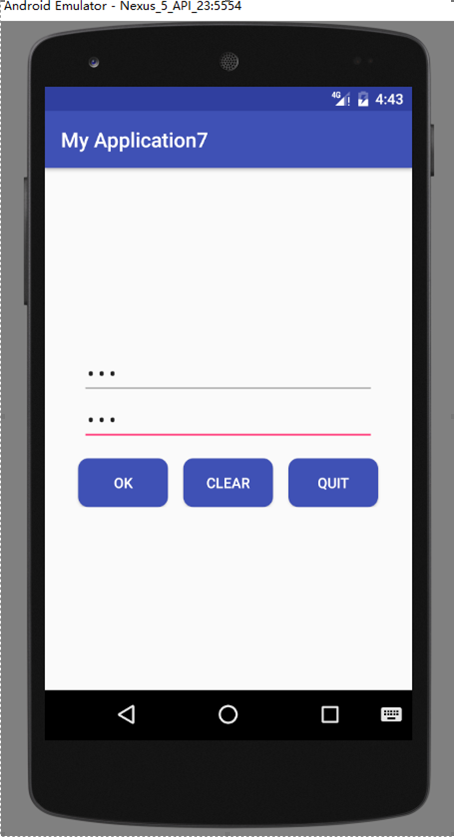
Figure 2: 若密碼不匹 配,彈出 Toast 提示
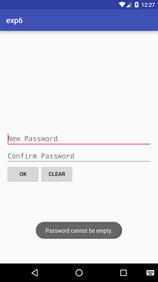
Figure 3: 若密碼為空, 彈出 Toast 提示
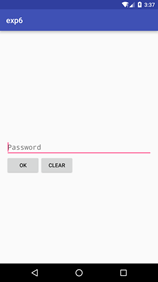
Figure 4: 退出後第二次進入呈現輸入密碼界面


5 6 7 8
Figure 5: 若密碼不正 確,彈出 Toast 提示
Figure 6: 文件加載失 敗,彈出 Toast 提示
Figure 7: 成功導入文 件,彈出 Toast 提示
Figure 8: 成功保存文 件,彈出 Toast 提示
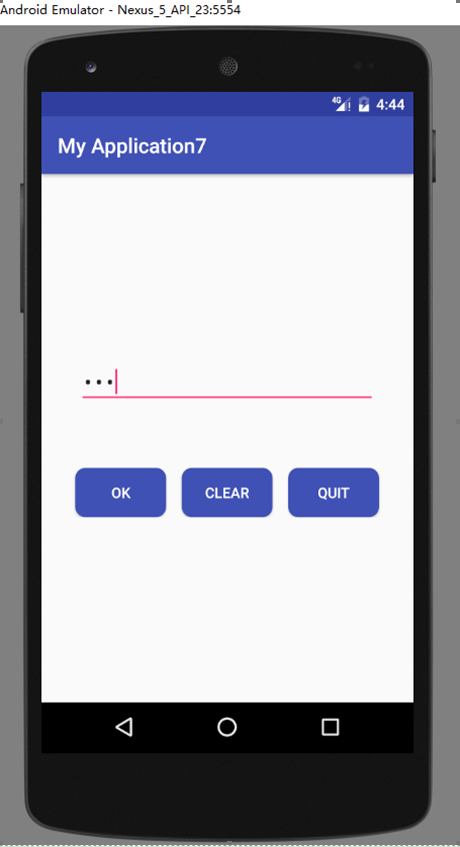
若應用首次啟動,則界面呈現出兩個輸入框,分別為新密碼輸入框和確認密碼輸入框。
輸入框下方有兩個按鈕:
– OK 按鈕點擊後:
* 若 New Password 為空,則發出 Toast 提示。見 Figure 3。
* 若 New Password 與 Confirm Password 不匹配,則發出 Toast 提示。見 Figure 2。
* 若兩密碼匹配,則保存此密碼,並進入文件編輯 Activity。
– CLEAR 按鈕點擊後:清除兩輸入框的內容。
• 完成創建密碼後,退出應用再進入應用,則只呈現一個密碼輸入框。見 Figure 4。
– 點擊 OK 按鈕後,若輸入的密碼與之前的密碼不匹配,則彈出 Toast 提示。見 Figure 5.
– 點擊 CLEAR 按鈕後,清除密碼輸入框的內容。
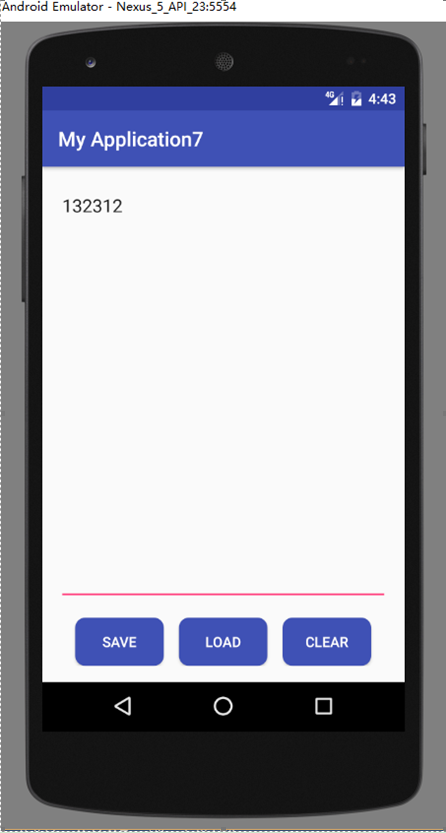
• 界面底部有三個按鈕,⾼度一致,頂對齊,按鈕⽔平均勻分布。三個按鈕上方除 ActionBar 和 StatusBar 之外的全部空間由一個 EditText 占據(保留 margin)。EditText 內的文字豎直方 向置頂,左對齊。
• 在編輯區域輸入任意內容,點擊 SAVE 按鈕後能保存到指定文件(文件名隨意). 成功保存後,彈 出 Toast 提示。見 Figure 8。
• 點擊 CLEAR 按鈕,能清空編輯區域的內容。
• 點擊 LOAD 按鈕,能夠從同一文件導入內容,並顯示到編輯框中。若成功導入,則彈出 Toast。
提示。見 Figure 7。 若讀取文件過程中出現異常(如文件不存在),則彈出 Toast 提示。見Figure 6。
使用 LinearLayout 和 layout_weight 屬性。
if there are three text fields and two of them declare a weight of 1, while the other is given no weight, the third text field without weight will not grow and will only occupy the area required by its content. The other two will expand equally to fill the space remaining after all three fields are measured.
AndroidManifest.xml 中設置 noHistory 屬性。
Whether or not the activity should be removed from the activity stack and finished (its finish() method called) when the user navigates away from it and it’s no longer visible on screen —“true” if it should be finished, and “false”
if not. The default value is “false”.
Set visibility: You can hide or show views using setVisibility(int).
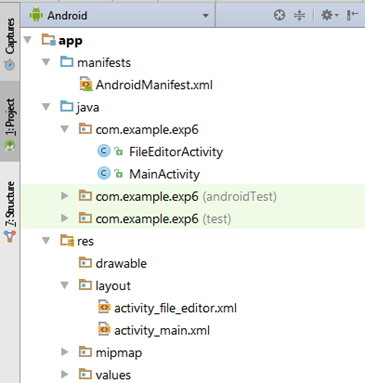
本次實驗主要是實現一個備忘錄,實現數據存儲的功能。本次實驗主要涉及SharePreferences的使用(讀取和寫入)。
首先,寫好兩個界面的XML布局文件(這裡注意使用LinearLayout和layout_weigh屬性,使得文件編輯Activity的EditText占據上方全部空間)。
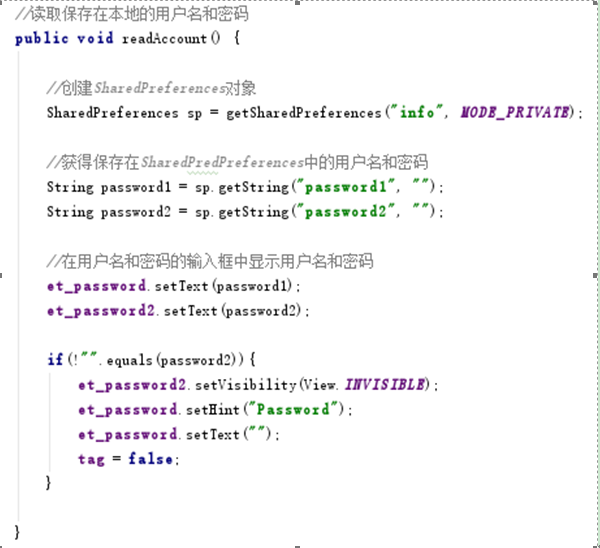
接下來完成MainActivity.java類,在 Android 中,用於獲取 SharedPreferences 的接口是 getSharedPreferences(String, int) 函數。對 SharedPreferences 的讀取操作是通過 getSharedPreferences(String,int)函數返回的 SharedPreferences 對象的方法來完成的:
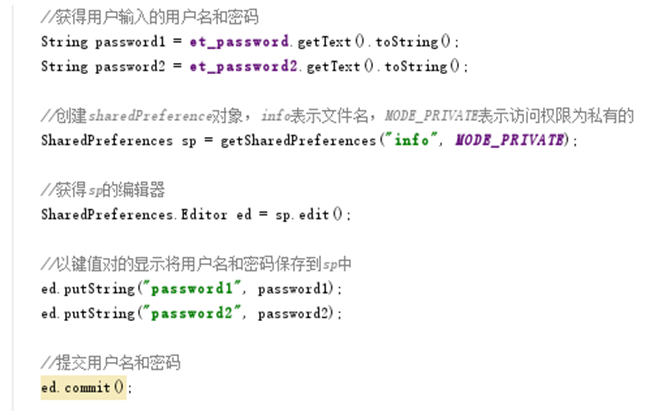
所有對 SharedPreferences 的寫入操作,都必須通過 SharedPreferences.edit()函數返回的Editor對象來完成:
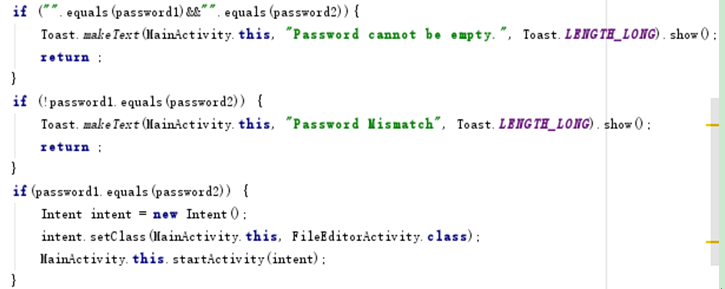
在OK按鈕點擊事件中,設置若 New Password為空,則發出Toast 提示。若New Password 與 Confirm Password不匹配,則發出Toast 提示,若New Password與 Confirm Password 匹配,則跳轉到文件編輯界面:
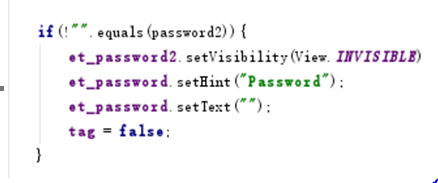
獲取本地存儲的密碼,密碼不為空就隱藏其中一個密碼框(保證完成創建密碼後,退出應用再進入應用,則只呈現一個密碼輸入框):
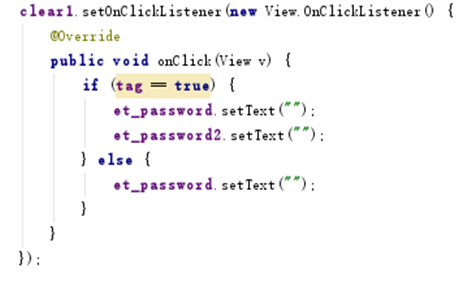
然後在clear按鈕點擊事件中,通過設置tag來控制密碼輸入欄的清空事件(tag初始設為true,在創建密碼界面中點擊clear會清除兩個密碼輸入框中的所有內容,在輸入密碼的登錄界面中點擊clear隱藏的密碼框中的內容不會清除,通過與隱藏了的密碼框中的已存儲的密碼進行比較確認輸入的密碼是否正確):
通過在AndroidManifest.xml中設置noHistory屬性,使得當Activity不可見時,如何將其從activity stack中除去(按返回鍵直接返回Home):

在文件編輯的java類中,我們向Internal Storage 寫入文件。
默認情況下,保存在 Internal Storage 的文件只有應用程序可見,其他應用,以及用戶本身是無法 訪問這些文件的。
若對應的文件不存在,openFileOutput(String, int) 函數會直接新建文件。注意傳入的文件名參數不能含有 path separators(即 '/')。該函數返回一個 FileOutputStream 對象,可以調用 write() 方法寫入內容(寫在save點擊事件中):
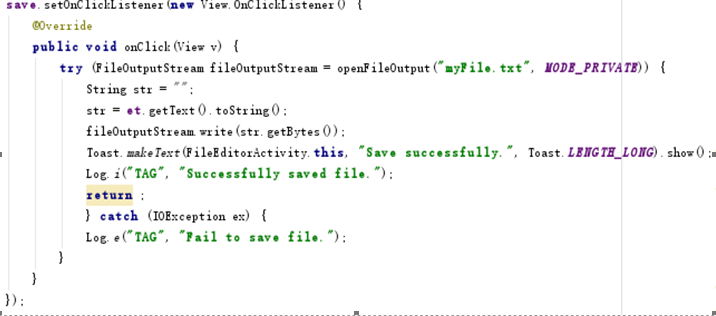
相應地,文件的讀取可以使用 openFileInput(String) 來讀取文件。該函數返回一個 FileInput- Stream,調用 read()方法讀取內容(寫在load點擊事件中):
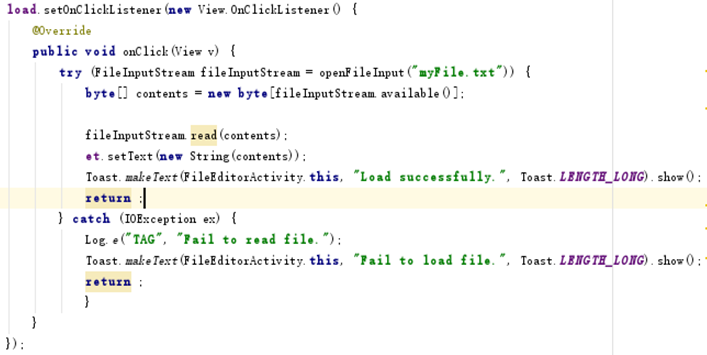
實現文件編輯中的文件存儲和文件加載的功能。
完成實驗~
1.Android為應用程序的存儲提供了五種方式:
Shared Preferences
Internal Storage
External Storage
SQLite Database
Network Connection
2.Internal Storage 和 External Storage 的區別:
Internal storage:總是可用的;這裡的文件默認是只能被自己的app所訪問的;當用戶卸載app的時候,系統會把internal裡面的相關文件都清除干淨;Internal是在你想確保不被用戶與其他app所訪問的最佳存儲區域。Internal storage 是屬於應用程序的,文件管理器看不見。
External storage:並不總是可用的,因為用戶可以選擇把這部分作為USB存儲模式,這樣就不可以訪問了;是大家都可以訪問的,因此保存到這裡的文件是失去訪問控制權限的;當用戶卸載你的app時,系統僅僅會刪除external根目錄(getExternalFilesDir)下的相關文件;External是在你不需要嚴格的訪問權限並且你希望這些文件能夠被其他app所共享或者是允許用戶通過電腦訪問時的最佳存儲區域。External storage 在文件浏覽器裡是可以看見的/mnt。
這兩個概念都是相對於應用來說的,應該理解為邏輯上的概念,不應理解為物理上的外部SD卡和手機或移動設備內存。一個應用把數據存在external storage上時,那麼數據成為共有的,所有人都可見的和可用的。存在internal storage上時,只有這個應用本身可以看到和使用。很多沒有插SD卡的設備,系統會虛擬出一部分存儲空間用來做公共存儲(主要是音樂,文檔之類的media)。
3.使用方法:
1)向內部存儲器中創建一個私有文件並向其中寫入數據,使用以下方法:
a.調用openFileOutput(String fileName, int mode)方法,
若fileName對應的文件存在,就打開該文件,若不存在,並以mode權限創建該文件並打開,該方法返回一個指向fileName對應文件的FileOutputStream,使用這個FileOutputStream可向文件中寫入數據。
b.調用FileOutputStream對象的write()方法向文件中寫入數據。
c.調用FileOutputStream對象的close()方法關閉文件寫入流。
例:向內部存儲器中寫入一個名為"abc.txt"的文件後,會在內部存儲器的/data/data/<package name>/files/目錄下生成"abc.txt"文件。
讀取內部存儲器中私有文件的數據,使用以下方法:
a.調用openFileInputStream(String fileName)方法打開內部存儲器中fileName對應的文件,若該文件存在,該方法返回一個指向fileName文件的FileInputStream對象。
b.調用FileInputStream對象的read()方法讀取fileName文件中的內容。
c.調用FileInputStream對象的close()方法關閉文件讀取流。
2)剛才保存到Internal中的時候什麼都沒有配置,需要保存到外部的時候需要配置讀寫的權限,讀的權限READ_EXTERNAL_STORAGE,寫的權限:READ_EXTERNAL_STORAGE。
首先需要判斷一下SD卡是不是可用,因為external storage可能是不可用的比如SD卡被拔出,那麼你應該在訪問之前去檢查是否可用。你可以通過執行 getExternalStorageState()來查詢external storage的狀態。如果返回的狀態是MEDIA_MOUNTED, 那麼你可以讀寫。看到這個獲取完之後跟上面保存在內部存儲設備的過程一樣。是路徑是在/mnt/sdcard目錄下,如果是弄成私有文件,不允許外部訪問,目錄是在/mnt/sdcard/Android/data/包名 目錄下。
4.其它相關:
如果想在編譯時就在應用程序中保存一個不允許修改的文件,就把這個文件保存在/res/raw/目錄下。
在程序中打開這個文件可以調用openRawResource(int id)方法, 裡面的參數id表示R.raw.<file name>,
這個方法打開後會返回一個InputStream,使用它可以讀取這個文件。這個文件不能被執行寫入操作。
如果有緩存文件需要保存,而這些文件並不需要永久保存,可以調用getCacheDir()方法,該方法執行後會在內部存儲器的/data/data/<package name>/目錄下創建一個名為cache/的空目錄(或打開cache/目錄),並返回一個File對象指向這個(空)文件夾。在這個cache/目錄下,可以保存緩存文件,當設備的內部存儲器空間不夠用時,系統會自動刪除一部分cache/目錄下的緩存文件,但為了保證系統運行效率,應該手動對cache/目錄的大小進行控制,如控制它不能大於1M。當用戶卸載應用程序時,cache/目錄會連同一起被刪除。
例:調用getCacheDir()方法,該方法執行後會在內部存儲器的/data/data/<package name>/目錄下創建一個名為cache/的空目錄。
源碼下載點擊這裡~
1、本實驗實驗環境:
操作系統 Windows 10
實驗軟件 Android Studio 2.2.1
虛擬設備:Nexus_5X
API:23
2、貼代碼的時候由於插入代碼框的大小問題,代碼格式不太嚴整,望見諒~
 Linux0.11內核--加載可執行二進制文件之1.copy_strings,notepad二進制copy
Linux0.11內核--加載可執行二進制文件之1.copy_strings,notepad二進制copy從現在開始就是分析最後的核心模塊exec.c了,分析完這個文件後
 有趣的checkbox動畫切換狀態(支付寶轉賬成功顯示)--第三方開源--AnimCheckBox,
有趣的checkbox動畫切換狀態(支付寶轉賬成功顯示)--第三方開源--AnimCheckBox, 這個很有趣的指標通過AnimCheckBox實現,下載地址:http
 Android IPC 之 AIDL(一)
Android IPC 之 AIDL(一) IPC是Inter-Process Communication的縮寫,即跨進程通信。Android中跨進程通信有多種方式,如文
 android:ScrollView監視什麼時候滑到底部
android:ScrollView監視什麼時候滑到底部 這是效果 主要是onTouchListener監聽事件,監視什麼時候滑到底部 同時要理解getMeasur