編輯:關於android開發
前言:近來學習了Android Material Design 兼容庫,為了把這個弄懂,才有了這篇博客,這裡先推薦兩篇博客:1.Android Material Design 兼容庫的使用詳解
2.Android應用Design Support Library完全使用實例
第一篇博客是這個兼容庫的詳細解析,我參考了裡面的許多內容,第二篇是兼容庫的大致介紹,如果你能把這兩篇全部弄懂,我這篇也沒有必要看了。說了這麼多,開始正文吧,大家有什麼問題或建議,歡迎留言交流。本文同時發布在簡書:http://www.jianshu.com/p/8ec9cfc7a7b0
文章所用的示例地址:[mecury/MeterialDesignSupportLibrary]
在2015年,google官方升級了Design Support Library,為開發者增加了不少可用的開發控件。
支持Android 2.1以上設備。
Gradle build script dependency:
compile 'com.android.support:design:22.2.0' //可修改版本號為自己匹配
Design Support Library包含8個控件,具體如下:
注意事項:
這裡需要添加額外的命名空間appNs(xmlns:app="http://schemas.android.com/apk/res-auto" )
在介紹各個控件之前,大家先看一下預覽圖,這裡我自己寫了一個示例,看起來不太好,但是用來介紹是夠了,下面看圖。
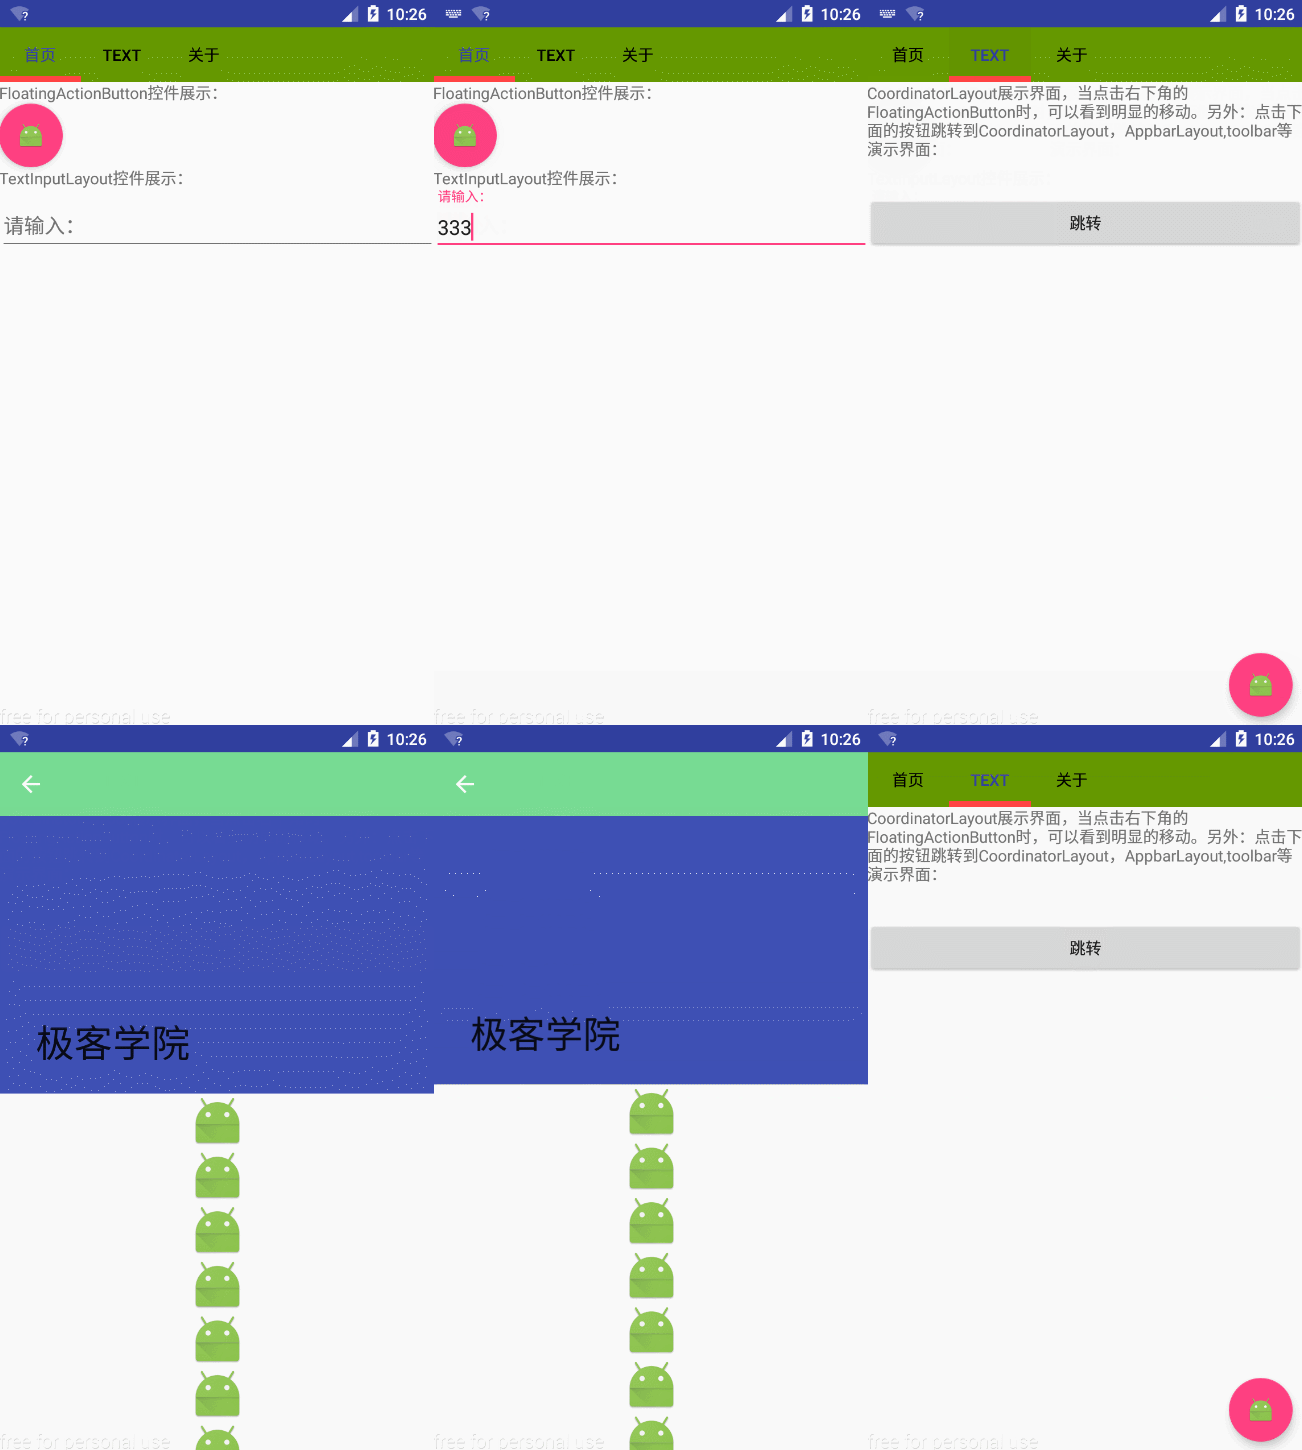
演示動畫.gif
演示gif

FloatingActionButton]NU.png
一 個負責顯示界面基本操作的圓形按鈕。Design library中的FloatingActionButton 實現了一個默認顏色為主題中colorAccent的懸浮操作按鈕。FloatingActionButton繼承自ImageView,你可以通過 android:src或者 ImageView的任意方法,比如setImageDrawable()來設置FloatingActionButton裡面的圖標。下面介紹幾種常用 的設置屬性:
code:<android.support.design.widget.FloatingActionButton android:id="@+id/floatingButton"
android:layout_width="wrap_content"
android:layout_height="wrap_content"
android:src="@mipmap/ic_launcher"
app:elevation="5dp"
app:fabSize="normal" />
無特別注意項,和普通控件類似。
演示gif:

TextInputLayout.gif
在MD中,使用TextInputLayout將EditText進行了封裝。其最大的改變就是為EditText添加了兩個提示效果。一個顯示在上面,提示用戶輸入的是什麼,另一個可以設為Error提示,當輸入錯誤的時候顯示出來。
code:
<android.support.design.widget.TextInputLayout
android:id="@+id/textInput"
android:layout_width="match_parent"
android:layout_height="wrap_content">
<EditText
android:layout_width="match_parent"
android:layout_height="wrap_content" />
</android.support.design.widget.TextInputLayout>
在代碼中使用的是時候,需要監聽EditText的變化。
editText.addTextChangedListener(new TextWatcher() {
            @Override
            public void beforeTextChanged(CharSequence s, int start, int count, int after) {

            }

            @Override
            public void onTextChanged(CharSequence s, int start, int before, int count) {
                Log.e("TAG",s.length()+"");
                if (s.length() > 4){
                    inputLayout.setError("字符不能超過5個");
                    inputLayout.setErrorEnabled(true);
                }else{
                    inputLayout.setErrorEnabled(false);
                }
            }

            @Override
            public void afterTextChanged(Editable s) {

            }
        });
注意項
TextInputLayout中至少嵌套一個EditText。
演示gif:

SnackBar.gif
SnackBar
提供一個輕量級的、快速的反饋。它可以說是一個增強功能的Toast,不同的是SnackBar被固定在底部(Snackbar試圖找到一個合適的父親以
確保自己是被放置於底部),包含一段文本信息與一個可選的操作按鈕。它會在時間到達時刪除,或者被用戶點擊按鈕提前刪除。
code
SnackBar的使用十分簡單,和Toast十分類似,使用下面代碼就可以創建一個SnackBar:
final Snackbar snackbar = Snackbar.make(view,"你點擊按鈕",Snackbar.LENGTH_SHORT);
snackbar.show();
此時如果,你想添加在SnackBar上添加一個按鈕,你可以這樣:
snackbar.setAction("知道了", new View.OnClickListener() {
@Override
 public void onClick(View v) {
 snackbar.dismiss();
 }});
上面代碼放在一起,就是動態圖的效果。
無特別注意項,和普通控件類似。

CoordinatorLayout.gif
我們來看看官方對他的描述:
CoordinatorLayout的另一個用例是ActionBar與滾動技巧。你可能已經在自己的布局中使用了Toolbar ,它允許你更加自由的自定義其外觀與布局的其余部分融為一體。Design library把這種設計帶到了更高的水平,使用AppBarLayout可以讓你的Toolbar與其他View(比如TabLayout的選項卡)能 響應被標記了ScrollingViewBehavior的View的滾動事件。
code
<?xml version="1.0" encoding="utf-8"?>
<android.support.design.widget.CoordinatorLayout xmlns:android="http://schemas.android.com/apk/res/android"
xmlns:app="http://schemas.android.com/apk/res-auto"
android:layout_width="match_parent"
android:layout_height="match_parent"
android:orientation="vertical">
<TextView
 android:id="@+id/tv"
android:layout_width="match_parent"
android:layout_height="wrap_content"
android:text="CoordinatorLayout展示界面,當點擊右下角的FloatingActionButton時,可以看到明顯的移動。另外:點擊下面的按鈕跳轉到CoordinatorLayout,AppbarLayout,toolbar等演示界面:" />
<android.support.v7.widget.AppCompatButton
android:id="@+id/act_btn"
android:layout_width="match_parent"
android:layout_height="wrap_content"
android:layout_marginTop="100dp"
android:text="跳轉"
/>
<android.support.design.widget.FloatingActionButton
android:id="@+id/fab_btn"
android:layout_width="wrap_content"
android:layout_height="wrap_content"
android:layout_gravity="bottom|right"
android:layout_margin="10dp"
android:src="@mipmap/ic_launcher"
app:fabSize="normal"
/>
</android.support.design.widget.CoordinatorLayout>
無特別注意項,和普通控件類似。
演示gif
這個在上面的錄制過程中忘了錄了,這裡也錄的有點小瑕疵,大家見諒啊。

Navigation.gif
NavgationView是一個抽屜式的導航控件,它可以讓我們很方便的建立一個滑動菜單。
關於用法,以上圖為例,見下面代碼:
code
navigationview_layout.xml:
<?xml version="1.0" encoding="utf-8"?>
<android.support.v4.widget.DrawerLayout xmlns:android="http://schemas.android.com/apk/res/android"
xmlns:app="http://schemas.android.com/apk/res-auto"
android:id="@+id/drawer_layout"
android:layout_width="match_parent"
android:layout_height="match_parent"
android:orientation="vertical">


<include layout="@layout/activity_main"
/>


<android.support.design.widget.NavigationView
android:id="@+id/navigationView"
android:layout_width="wrap_content"
android:layout_height="match_parent"
android:layout_gravity="start"
android:fitsSystemWindows="true"
app:headerLayout="@layout/head"
app:menu="@menu/navigationview_item"
/>
</android.support.v4.widget.DrawerLayout>
裡面內容區的布局,就是側滑不滑動時顯示的布局。裡面headerLayout和menu分別為側滑導航中的頭部和item。這裡我頭部用了一張圖片:
head.xml:
<?xml version="1.0" encoding="utf-8"?>
<LinearLayout xmlns:android="http://schemas.android.com/apk/res/android"
android:layout_width="match_parent"
android:layout_height="wrap_content"
android:orientation="vertical">

<ImageView
android:layout_width="match_parent"
android:layout_height="match_parent"
android:adjustViewBounds="true"
android:src="@drawable/header"
/>
</LinearLayout>
對於menu,就是菜單項的配置:
navigationview_item.xml:
<?xml version="1.0" encoding="utf-8"?>
<menu xmlns:android="http://schemas.android.com/apk/res/android"
xmlns:app="http://schemas.android.com/apk/res-auto">
<group
android:checkableBehavior="single">
<item
android:id="@+id/menu_main"
android:icon="@mipmap/ic_home_white"
android:title="首頁"
app:showAsAction="always"
/>
<item
android:id="@+id/menu_about"
android:icon="@mipmap/ic_about"
android:title="關於"
app:showAsAction="always"
/>
</group>
</menu>
上面的布局已經完成了,如果我們添加抽屜導航的Item的點擊事件,那又該怎麼做呢?下面簡單介紹一下:
private void navigationViewListener(){
NavigationView mNavigationView = (NavigationView) findViewById(R.id.navigationView);
mNavigationView.setNavigationItemSelectedListener(new NavigationView.OnNavigationItemSelectedListener() {
@Override
public boolean onNavigationItemSelected(MenuItem item) {
switch(item.getItemId()){
case R.id.menu_main:
Toast.makeText(MainActivity.this, "點擊了首頁", Toast.LENGTH_SHORT).show();
break;
case R.id.menu_about:
Toast.makeText(MainActivity.this, "點擊了關於", Toast.LENGTH_SHORT).show();
break;
}
item.setChecked(true);
mDrawerLayout.closeDrawer(Gravity.LEFT);
return false;
}
});
}
看了上面的代碼,大家應該很明白應該怎麼做了。
TabLayout.png
通 過選項卡的方式切換View並不是MD中才有的新概念,它們和頂層導航模式或者組織app中不同分組內容(比如,不同風格的音樂)是同一個概念。 Design library的TabLayout 既實現了固定的選項卡(View的寬度平均分配),也實現了可滾動的選項卡(View寬度不固定同時可以橫向滾動)。如果你使用ViewPager在 tab之間橫向切換,你可以直接從PagerAdapter的getPageTitle() 中創建選項卡,然後使用setupWithViewPager()將兩者聯系在一起。它可以使tab的選中事件能更新ViewPager,同時 ViewPager的頁面改變能更新tab的選中狀態。
ViewPager viewPager = (ViewPager) findViewById(R.id.viewPager);
FragmentAdapter mAdapter = new FragmentAdapter(getSupportFragmentManager(), titles, fragments);
viewPager.setAdapter(mAdapter);
tabLayout.setupWithViewPager(viewPager);
tabLayout.setTabsFromPagerAdapter(mAdapter);
注意事項
如果你使用ViewPager在tab之間橫向切換,切記可以直接從PagerAdapter的getPageTitle() 中創建選項卡,然後使用setupWithViewPager()將兩者聯系在一起。
這介紹這兩個之前,大家要明白什麼是ToolBar。
ToolBar:這代表一個標題欄,圖中的綠色區域就是ToolBar。
AppBarLayout: 其繼承於LinearLayout,使用AppBarLayout可以讓包含在其中的子控件能響應被標記了ScrollingViewBehavior的 的滾動事件(要與CoordinatorLayout 一起使用),利用它我們可以很容易的去實現視差滾動效果,見下圖(藍色區域就是AppBarLayout)。

AppBarLayout.gif
CollapsingToolbarLayout: 可伸縮折疊的Toolbar (Collapsing Toolbar),直接添加Toolbar到AppBarLayout可以讓你使用enterAlwaysCollapsed和 exitUntilCollapsedscroll標志,但是無法控制不同元素如何響應collapsing的細節。當你讓 CollapsingToolbarLayout和Toolbar在一起使用的時候,title 會在展開的時候自動變得大些,而在折疊的時候讓字體過渡到默認值。
這裡面有一些屬性十分重要:這裡先介紹一下:
1.app:layout_collapseMode
pin:來確保Toolbar在view折疊的時候仍然被固定在屏幕的頂部
parallax:見3
2. app:layout_scrollFlags
scroll: 所有想滾動出屏幕的view都需要設置這個flag,沒有設置這個flag的view將被固定在屏幕頂部。
enterAlways: 這個flag讓任意向下的滾動都會導致該view變為可見,當向上滑的時候Toolbar就隱藏,下滑的時候顯示。
enterAlwaysCollapsed: 顧名思義,這個flag定義的是何時進入(已經消失之後何時再次顯示)。假設你定義了一個最小高度(minHeight)同時enterAlways也定義了,那麼view將在到達這個最小高度的時候開始顯示,並且從這個時候開始慢慢展開,當滾動到頂部的時候展開完。
exitUntilCollapsed: 同樣顧名思義,這個flag時定義何時退出,當你定義了一個minHeight,這個view將在滾動到達這個最小高度的時候消失。
3.定位到ImageView,有這兩個屬性是我們平常用沒看到的,說明我寫在注釋上了
app:layout_collapseMode="parallax"
app:layout_collapseParallaxMultiplier="0.7"
code
xml文件:
<?xml version="1.0" encoding="utf-8"?>
<android.support.design.widget.CoordinatorLayout xmlns:android="http://schemas.android.com/apk/res/android"
    xmlns:app="http://schemas.android.com/apk/res-auto"
    android:id="@+id/root"
    android:layout_width="match_parent"
    android:layout_height="match_parent"
    android:orientation="vertical">


    <android.support.design.widget.AppBarLayout
        android:layout_width="match_parent"
        android:layout_height="300dp">

        <android.support.design.widget.CollapsingToolbarLayout
            android:id="@+id/collapsingtoolbarlayout"
            android:layout_width="match_parent"
            android:layout_height="match_parent"
            app:layout_scrollFlags="scroll|exitUntilCollapsed">

            <android.support.v7.widget.Toolbar
                android:id="@+id/toolbar"
                android:layout_width="match_parent"
                android:layout_height="?attr/actionBarSize"
                android:background="#77db93"
                app:layout_collapseMode="pin"
                app:popupTheme="@style/ThemeOverlay.AppCompat.Light"
                app:theme="@style/ThemeOverlay.AppCompat.Dark.ActionBar" />
        </android.support.design.widget.CollapsingToolbarLayout>
    </android.support.design.widget.AppBarLayout>

    <android.support.v4.widget.NestedScrollView
        android:layout_width="match_parent"
        android:layout_height="wrap_content"
        app:layout_behavior="@string/appbar_scrolling_view_behavior">

        <LinearLayout
            android:layout_width="match_parent"
            android:layout_height="wrap_content"
            android:orientation="vertical">

            <ImageView
                android:layout_width="match_parent"
                android:layout_height="wrap_content"
                android:src="@mipmap/ic_launcher" />

        </LinearLayout>
    </android.support.v4.widget.NestedScrollView>

</android.support.design.widget.CoordinatorLayout>
activity:
public class CoordinationActivity extends AppCompatActivity {

    private Toolbar toolbar;
    private CollapsingToolbarLayout collapsingToolbarLayout;

    @Override
    protected void onCreate(@Nullable Bundle savedInstanceState) {
        super.onCreate(savedInstanceState);
        setContentView(R.layout.activity_coordinator);

        toolbar = (Toolbar) findViewById(R.id.toolbar);
        setSupportActionBar(toolbar);
        collapsingToolbarLayout = (CollapsingToolbarLayout) findViewById(R.id.collapsingtoolbarlayout);
        collapsingToolbarLayout.setTitle("極客學院");

        getSupportActionBar().setHomeButtonEnabled(true);
        getSupportActionBar().setDisplayHomeAsUpEnabled(true);
        toolbar.setNavigationOnClickListener(new View.OnClickListener() {
            @Override
            public void onClick(View v) {
                onBackPressed();
            }
        });
    }
}
附(一些控件使用使用應注意的地方):
1.在使用CardView的時候,一定要注意,當CardView的寬和高填充父容器的時候,CardView的margin最好要比cardElevation大,不然就看不到立體的效果。
2. 我們知道ListView有一個onItemClick的事件,但是RecyclerView卻沒有,那麼我們應該怎樣去設置呢?其實很簡單,關於 RecyclerView設置item的點擊事件,只需在創建ViewHolder的時候,給填充的View設置單擊事件即可。
3.在使用
android.support.design.widget.AppBarLayout的時候內容區最好使用
android.support.v4.widget.NestedScrollView,之前我的內容區用的是ScrollView,在往上拉的時候
AppBarLayout一直沒有動畫效果,折騰了幾個小時都沒找到原因。最後逼不得用Android
Studio創建了一個他自帶的關於AppBarLayout的模板項目,看到他用的是NestedScrollView作為內容區,我果斷就把我的內容
區換成了這個,立馬就有動畫效果了。
NestedScrollView官方的描述:
NestedScrollView is just
likeScrollView, but it supports acting as both a nested scrolling parent
and child on both new and old versions of Android. Nested scrolling is
enabled by default.
如果感覺還不錯的就給個喜歡支持一下吧,有問題請留言,謝謝
最後附一張MD的主題色解析圖:
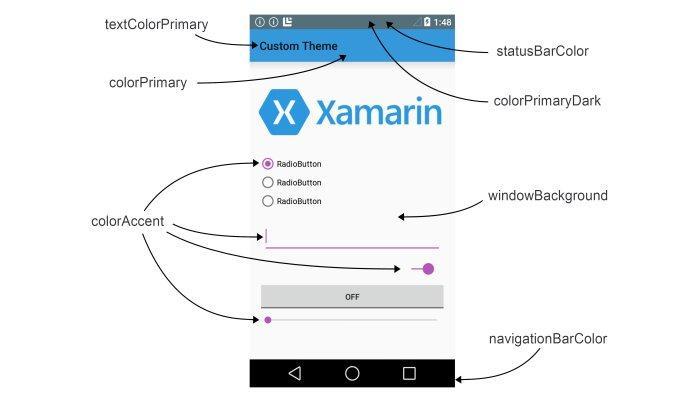
主題色.jpg
參考
1.Android Material Design 兼容庫的使用詳解
2.Android應用Design Support Library完全使用實例
 《Android源碼設計模式解析與實戰》讀書筆記(十七)
《Android源碼設計模式解析與實戰》讀書筆記(十七) 第十七章、中介者模式 中介者模式也稱為調解者模式或調停者模式,是一種行為型模式。 1.定義 中介者模式包裝
 Android App監聽軟鍵盤按鍵的三種方式與改變軟鍵盤右下角確定鍵樣式,androidapp
Android App監聽軟鍵盤按鍵的三種方式與改變軟鍵盤右下角確定鍵樣式,androidappactionNone : 回車鍵,按下後光標到下一行actionGo :
 Linux內核系列—9.操作系統開發之Loader,linuxloader
Linux內核系列—9.操作系統開發之Loader,linuxloader一個操作系統從開機到開始運行,大致經歷“引導—>加載內核入內存&m
 緩存之 ACache
緩存之 ACache 1.android緩存的介紹 Android開發本質上就是手機和互聯網中的web服務器之間進行通信,就必然需要從服務端獲取數據,而反復通過網絡獲
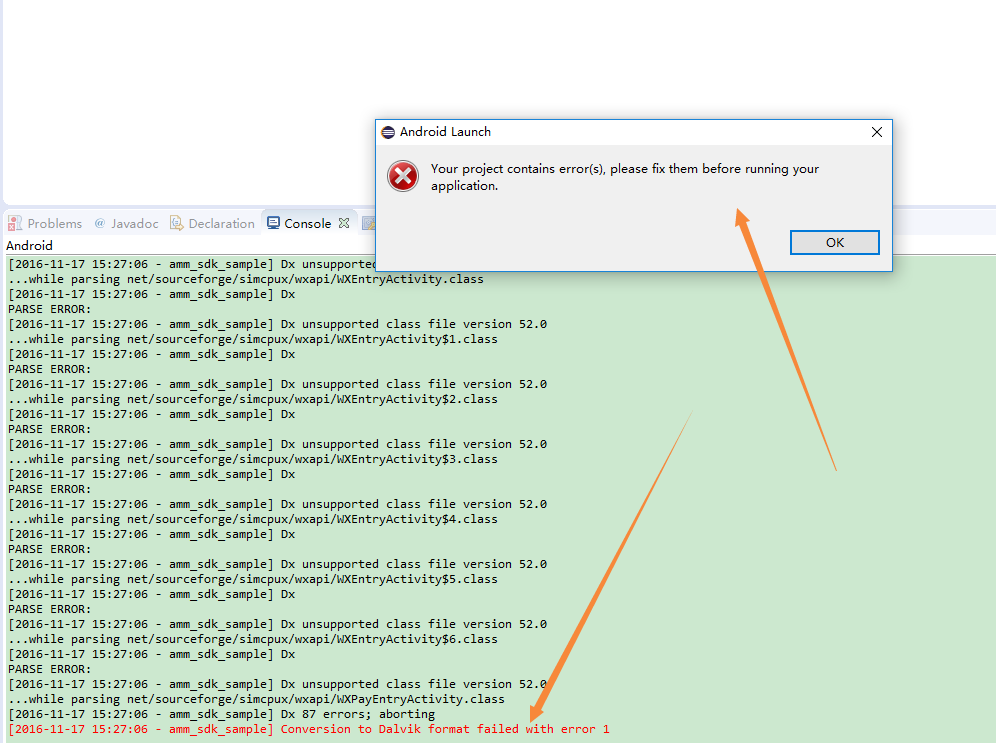 Android——eclipse下運行android項目報錯 Conversion to Dalvik format failed with error 1解決,androiddalvik
Android——eclipse下運行android項目報錯 Conve