Android Animation學習 實現 IOS 濾鏡退出動畫,androidios
IOS的用戶體驗做的很好,其中一點很重要的地方就是動畫效果。
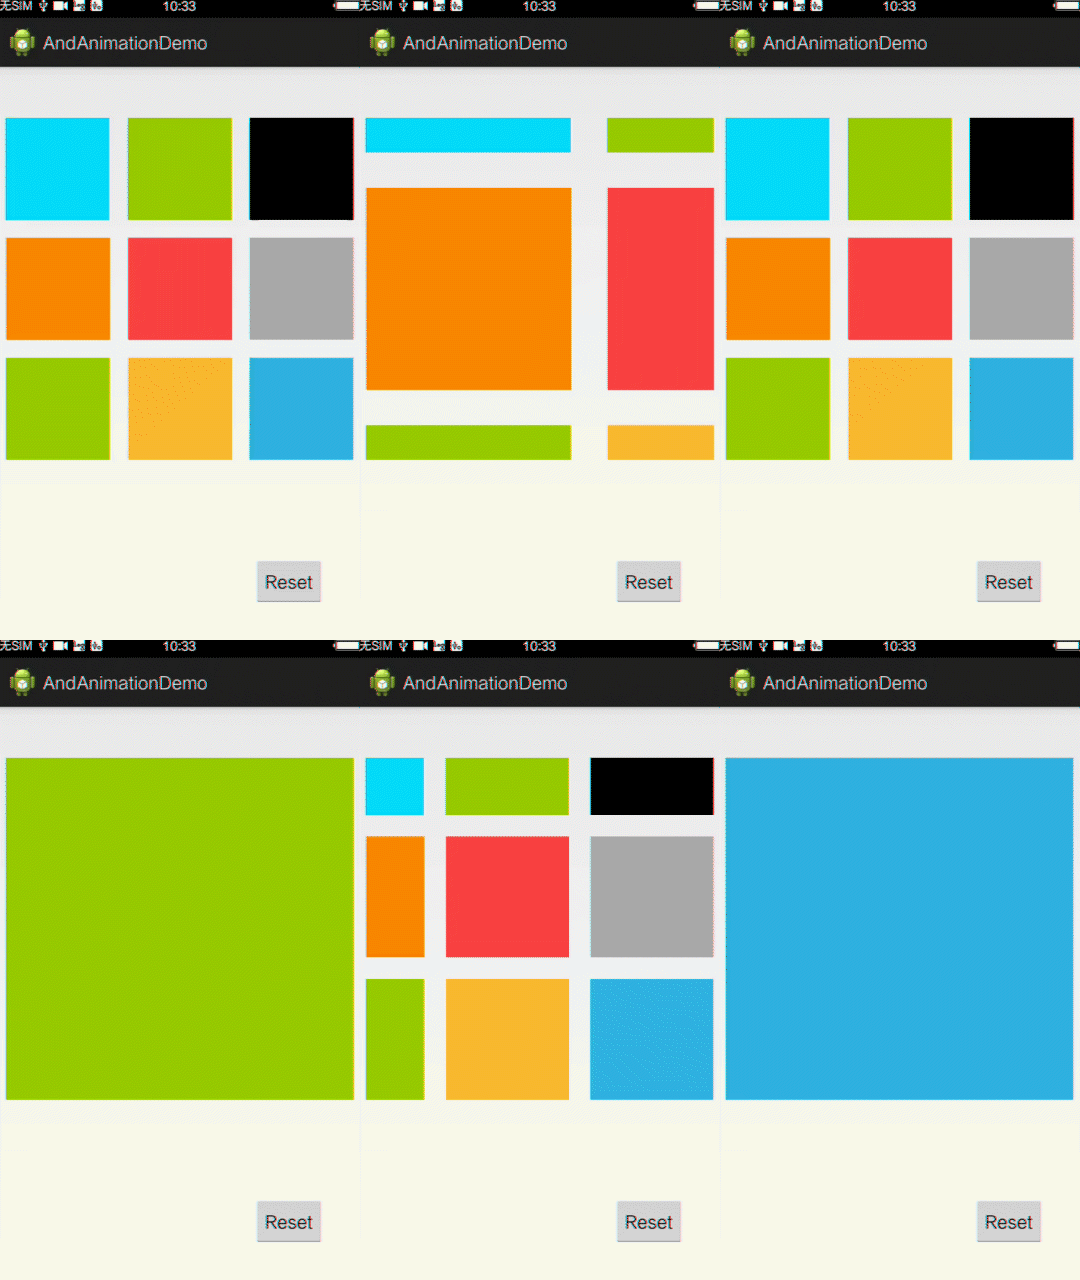
最近在學習Android的Animation,簡單實現了一個IOS相機濾鏡退出的動畫:
布局文件:activity_animation_demo.xml 布局未考慮各個分辨率,只是為了實現動畫邏輯,(代碼測試是在720P分辨率的手機上)

![]()
1 <RelativeLayout xmlns:android="http://schemas.android.com/apk/res/android"
2 xmlns:tools="http://schemas.android.com/tools"
3 android:layout_width="match_parent"
4 android:layout_height="match_parent"
5 tools:context="com.example.andanimationdemo.AnimationDemoActivity" >
6
7 <FrameLayout
8 android:layout_width="wrap_content"
9 android:layout_height="wrap_content"
10 android:layout_marginTop="50dp"
11 android:layout_marginLeft="25px"
12 android:layout_marginRight="25px"
13 >
14 <LinearLayout
15 android:id="@+id/rootLinearLayout"
16 android:layout_width="wrap_content"
17 android:layout_height="wrap_content"
18 android:orientation="vertical"
19 >
20 <LinearLayout
21 android:id="@+id/firstLinearLayout"
22 android:orientation="horizontal"
23 android:layout_width="wrap_content"
24 android:layout_height="wrap_content">
25 <Button
26 android:id="@+id/Button_1"
27 android:layout_width="200px"
28 android:layout_height="200px"
29 android:background="@android:color/holo_blue_bright"/>
30 <Button
31 android:id="@+id/Button_2"
32 android:layout_width="200px"
33 android:layout_height="200px"
34 android:layout_marginLeft="35px"
35 android:background="@android:color/holo_green_light"/>
36 <Button
37 android:layout_marginLeft="35px"
38 android:id="@+id/Button_3"
39 android:layout_width="200px"
40 android:layout_height="200px"
41 android:background="@android:color/black"/>
42 </LinearLayout>
43
44 <LinearLayout
45 android:id="@+id/SencondLinearLayout"
46 android:layout_marginTop="35px"
47 android:orientation="horizontal"
48 android:layout_width="wrap_content"
49 android:layout_height="wrap_content">
50 <Button
51 android:id="@+id/Button_4"
52 android:layout_width="200px"
53 android:layout_height="200px"
54 android:background="@android:color/holo_orange_dark"/>
55 <Button
56 android:id="@+id/Button_5"
57 android:layout_width="200px"
58 android:layout_height="200px"
59 android:layout_marginLeft="35px"
60 android:background="@android:color/holo_red_light"/>
61 <Button
62 android:layout_marginLeft="35px"
63 android:id="@+id/Button_6"
64 android:layout_width="200px"
65 android:layout_height="200px"
66 android:background="@android:color/darker_gray"/>
67 </LinearLayout>
68
69 <LinearLayout
70 android:id="@+id/ThirdLinearLayout"
71 android:layout_marginTop="35px"
72 android:orientation="horizontal"
73 android:layout_width="wrap_content"
74 android:layout_height="wrap_content">
75 <Button
76 android:id="@+id/Button_7"
77 android:layout_width="200px"
78 android:layout_height="200px"
79 android:background="@android:color/holo_green_light"/>
80 <Button
81 android:id="@+id/Button_8"
82 android:layout_width="200px"
83 android:layout_height="200px"
84 android:layout_marginLeft="35px"
85 android:background="@android:color/holo_orange_light"/>
86 <Button
87 android:layout_marginLeft="35px"
88 android:id="@+id/Button_9"
89 android:layout_width="200px"
90 android:layout_height="200px"
91 android:background="@android:color/holo_blue_light"/>
92 </LinearLayout>
93 </LinearLayout>
94 </FrameLayout>
95
96 <Button
97 android:id="@+id/Reset"
98 android:layout_width="wrap_content"
99 android:layout_height="wrap_content"
100 android:layout_alignParentRight="true"
101 android:layout_alignParentBottom="true"
102 android:layout_marginRight="40dp"
103 android:layout_marginBottom="40dp"
104 android:text="Reset"></Button>
105
106 </RelativeLayout>
View Code
AnimationDemoActivity.java

![]()
1 package com.example.andanimationdemo;
2
3 import android.app.Activity;
4 import android.os.Bundle;
5 import android.util.Log;
6 import android.view.View;
7 import android.view.View.OnClickListener;
8 import android.view.animation.Animation;
9 import android.view.animation.Animation.AnimationListener;
10 import android.view.animation.ScaleAnimation;
11 import android.widget.Button;
12 import android.widget.LinearLayout;
13
14 public class AnimationDemoActivity extends Activity implements OnClickListener{
15
16 private static final String TAG = "AnimationDemo";
17 LinearLayout rootLinearLayout;
18 Button resetButton;
19 int mCurrentClickButtonId = -1;
20
21 int[] ButtonID = new int[] {
22 R.id.Button_1,R.id.Button_2,R.id.Button_3,
23 R.id.Button_4,R.id.Button_5,R.id.Button_6,
24 R.id.Button_7,R.id.Button_8,R.id.Button_9
25 };
26
27 @Override
28 protected void onCreate(Bundle savedInstanceState) {
29 super.onCreate(savedInstanceState);
30 setContentView(R.layout.activity_animation_demo);
31 rootLinearLayout = (LinearLayout) findViewById(R.id.rootLinearLayout);
32 resetButton = (Button) findViewById(R.id.Reset);
33 setButtonListener();
34 }
35
36 private void setButtonListener() {
37 for (int i = 0; i < ButtonID.length; i++) {
38 rootLinearLayout.findViewById(ButtonID[i]).setOnClickListener(this);
39 }
40 resetButton.setOnClickListener(this);
41 }
42
43 /**
44 * 點擊某個按鈕後,開始放大動畫
45 * 這裡提供的是一個思路,並不局限於當前布局,放大倍數,通過哪個點放大,都可以計算出來。
46 */
47 boolean onAnimationRunning = false;
48
49 public void onAnimationButtonClick() {
50 Log.d(TAG, "onAnimationButtonClick");
51 int[] position = new int[2];
52 int[] ButtonPosition = new int[2];
53 Button AnimaitonBtton = (Button) rootLinearLayout.findViewById(ButtonID[mCurrentClickButtonId - 1]);
54 rootLinearLayout.getLocationInWindow(position);
55 AnimaitonBtton.getLocationInWindow(ButtonPosition);
56 int rootWidth = rootLinearLayout.getWidth();
57 int rootHeight = rootLinearLayout.getHeight();
58 int ButtonWidth = AnimaitonBtton.getWidth();
59 int ButtonHeight = AnimaitonBtton.getHeight();
60
61 /**
62 * 計算 scale factor
63 */
64 float widthRate = (float)rootWidth/ButtonWidth;
65 float heightRate = (float)rootHeight/ButtonHeight;
66
67 /**
68 * 計算放大的中心點
69 */
70 float PointA = (ButtonPosition[0] - position[0]) * widthRate / (widthRate - 1);
71 float PointB = (ButtonPosition[1] - position[1]) * heightRate / (heightRate - 1);
72
73 onAnimationRunning = true;
74 ScaleAnimation mScaleAnimation = new ScaleAnimation(1.0f, widthRate, 1.0f, heightRate,PointA,PointB);
75 mScaleAnimation.setDuration(2000);
76 mScaleAnimation.setFillAfter(true);
77 mScaleAnimation.setAnimationListener(new AnimationListener() {
78
79 @Override
80 public void onAnimationStart(Animation animation) {
81 }
82
83 @Override
84 public void onAnimationRepeat(Animation animation) {
85 }
86
87 @Override
88 public void onAnimationEnd(Animation animation) {
89 Log.d(TAG,"onAnimationEnd");
90 onAnimationRunning = false;
91 for (int i = 0; i< ButtonID.length; i++) {
92 rootLinearLayout.findViewById(ButtonID[i]).setEnabled(false);
93 }
94 }
95 });
96 rootLinearLayout.startAnimation(mScaleAnimation);
97
98 }
99
100 @Override
101 public void onClick(View v) {
102 // TODO Auto-generated method stub
103 Log.d(TAG, "onClick :" + v.getId());
104 if (onAnimationRunning) {
105 Log.d(TAG, "onAnimationRunning = true");
106 return;
107 }
108
109 switch (v.getId()) {
110 case R.id.Button_1:
111 mCurrentClickButtonId = 1;
112 onAnimationButtonClick();
113 break;
114 case R.id.Button_2:
115 mCurrentClickButtonId = 2;
116 onAnimationButtonClick();
117 break;
118 case R.id.Button_3:
119 mCurrentClickButtonId = 3;
120 onAnimationButtonClick();
121 break;
122 case R.id.Button_4:
123 mCurrentClickButtonId = 4;
124 onAnimationButtonClick();
125 break;
126 case R.id.Button_5:
127 mCurrentClickButtonId = 5;
128 onAnimationButtonClick();
129 break;
130 case R.id.Button_6:
131 mCurrentClickButtonId = 6;
132 onAnimationButtonClick();
133 break;
134 case R.id.Button_7:
135 mCurrentClickButtonId = 7;
136 onAnimationButtonClick();
137 break;
138 case R.id.Button_8:
139 mCurrentClickButtonId = 8;
140 onAnimationButtonClick();
141 break;
142 case R.id.Button_9:
143 mCurrentClickButtonId = 9;
144 onAnimationButtonClick();
145 break;
146 case R.id.Reset:
147 mCurrentClickButtonId = -1;
148 rootLinearLayout.clearAnimation();
149 rootLinearLayout.postInvalidate();
150 for (int i = 0; i< ButtonID.length; i++) {
151 rootLinearLayout.findViewById(ButtonID[i]).setEnabled(true);
152 }
153 break;
154 default:
155 break;
156 }
157 }
158 }
View Code
點擊某個Button後,可以通過它所在的位置坐標,以及父布局所在的位置坐標,計算出通過哪個點放大。
實現的效果如下圖:

如有什麼不對的地方,還望大神指正。


 谷歌電子市場9--詳情界面,谷歌電子市場9--
 安卓開源項目周報1227,安卓開源項目1227
 ListView添加頭布局和腳布局,listview添加布局
 android ViewFlipper使用示例(注冊引導頁)