編輯:關於android開發
上一篇我們了解了HTTP協議原理,這一篇我們來講講Apache的HttpClient和Java的HttpURLConnection,這兩種都是我們平常請求網絡會用到的。無論我們是自己封裝的網絡請求類還是第三方的網絡請求框架都離不開這兩個類庫。
Android SDK中包含了HttpClient,在Android6.0版本直接刪除了HttpClient類庫,如果仍想使用則解決方法是:
如果使用的是eclipse則在libs中加入org.apache.http.legacy.jar
   android {
       useLibrary 'org.apache.http.legacy'
        }
首先我們來用DefaultHttpClient類來實例化一個HttpClient,並配置好默認的請求參數:
 //創建HttpClient
    private HttpClient createHttpClient() {
        HttpParams mDefaultHttpParams = new BasicHttpParams();
        //設置連接超時
        HttpConnectionParams.setConnectionTimeout(mDefaultHttpParams, 15000);
        //設置請求超時
        HttpConnectionParams.setSoTimeout(mDefaultHttpParams, 15000);
        HttpConnectionParams.setTcpNoDelay(mDefaultHttpParams, true);
        HttpProtocolParams.setVersion(mDefaultHttpParams, HttpVersion.HTTP_1_1);
        HttpProtocolParams.setContentCharset(mDefaultHttpParams, HTTP.UTF_8);
        //持續握手
        HttpProtocolParams.setUseExpectContinue(mDefaultHttpParams, true);
        HttpClient mHttpClient = new DefaultHttpClient(mDefaultHttpParams);
        return mHttpClient;

    }
接下來創建HttpGet和HttpClient,請求網絡並得到HttpResponse,並對HttpResponse進行處理:
  private void useHttpClientGet(String url) {
        HttpGet mHttpGet = new HttpGet(url);
        mHttpGet.addHeader("Connection", "Keep-Alive");
        try {
            HttpClient mHttpClient = createHttpClient();
            HttpResponse mHttpResponse = mHttpClient.execute(mHttpGet);
            HttpEntity mHttpEntity = mHttpResponse.getEntity();
            int code = mHttpResponse.getStatusLine().getStatusCode();
            if (null != mHttpEntity) {
                InputStream mInputStream = mHttpEntity.getContent();
                String respose = converStreamToString(mInputStream);
                Log.i("wangshu", "請求狀態碼:" + code + "\n請求結果:\n" + respose);
                mInputStream.close();
            }
        } catch (IOException e) {
            e.printStackTrace();
        }
    }
converStreamToString方法將請求結果轉換成String類型:
private String converStreamToString(InputStream is) throws IOException {
        BufferedReader reader = new BufferedReader(new InputStreamReader(is));
        StringBuffer sb = new StringBuffer();
        String line = null;
        while ((line = reader.readLine()) != null) {
            sb.append(line + "\n");
        }
        String respose = sb.toString();
        return respose;
    }
最後我們開啟線程訪問百度:
  new Thread(new Runnable() {
            @Override
            public void run() {
                useHttpClientGet("http://www.baidu.com");
            }
        }).start();
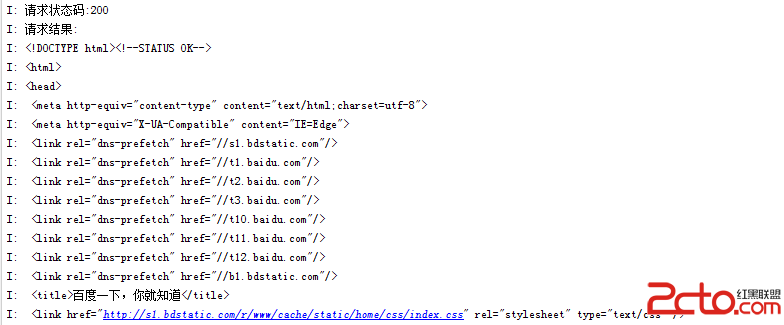
請求的返回結果,請求狀態碼為200,結果就是個html頁,這裡只截取了部分html代碼:

GET請求的參數暴露在URL中,這有些不大妥當,而且URL的長度也有限制:長度在2048字符之內,在HTTP 1.1後URL長度才沒有限制。一般情況下POST可以替代GET,接下來我們來看看HttpClient的POST請求。
post請求和get類似就是需要配置要傳遞的參數:
    private void useHttpClientPost(String url) {
        HttpPost mHttpPost = new HttpPost(url);
        mHttpPost.addHeader("Connection", "Keep-Alive");
        try {
            HttpClient mHttpClient = createHttpClient();
            List postParams = new ArrayList<>();
            //要傳遞的參數
            postParams.add(new BasicNameValuePair("username", "moon"));
            postParams.add(new BasicNameValuePair("password", "123"));
            mHttpPost.setEntity(new UrlEncodedFormEntity(postParams));
            HttpResponse mHttpResponse = mHttpClient.execute(mHttpPost);
            HttpEntity mHttpEntity = mHttpResponse.getEntity();
            int code = mHttpResponse.getStatusLine().getStatusCode();
            if (null != mHttpEntity) {
                InputStream mInputStream = mHttpEntity.getContent();
                String respose = converStreamToString(mInputStream);
                Log.i("wangshu", "請求狀態碼:" + code + "\n請求結果:\n" + respose);
                mInputStream.close();
            }
        } catch (IOException e) {
            e.printStackTrace();
        }
    }
Android 2.2版本之前,HttpURLConnection一直存在著一些令人厭煩的bug。比如說對一個可讀的InputStream調用close()方法時,就有可能會導致連接池失效了。那麼我們通常的解決辦法就是直接禁用掉連接池的功能:
private void disableConnectionReuseIfNecessary() {
      // 這是一個2.2版本之前的bug
      if (Integer.parseInt(Build.VERSION.SDK) < Build.VERSION_CODES.FROYO) {
            System.setProperty("http.keepAlive", "false");
      }
}
所以在Android 2.2版本以及之前的版本使用HttpClient是較好的選擇,而在Android 2.3版本及以後,HttpURLConnection則是最佳的選擇,它的API簡單,體積較小,因而非常適用於Android項目。壓縮和緩存機制可以有效地減少網絡訪問的流量,在提升速度和省電方面也起到了較大的作用。另外在Android 6.0版本中,HttpClient庫被移除了,HttpURLConnection則是以後我們唯一的選擇。
因為會了HttpURLConnection的POST請求那GET請求也就會了,所以我這裡只舉出POST的例子
首先我們創建一個UrlConnManager類,然後裡面提供getHttpURLConnection()方法用於配置默認的參數並返回HttpURLConnection:
   public static HttpURLConnection getHttpURLConnection(String url){
        HttpURLConnection mHttpURLConnection=null;
        try {
            URL mUrl=new URL(url);
            mHttpURLConnection=(HttpURLConnection)mUrl.openConnection();
            //設置鏈接超時時間
            mHttpURLConnection.setConnectTimeout(15000);
            //設置讀取超時時間
            mHttpURLConnection.setReadTimeout(15000);
            //設置請求參數
            mHttpURLConnection.setRequestMethod("POST");
            //添加Header
            mHttpURLConnection.setRequestProperty("Connection","Keep-Alive");
            //接收輸入流
            mHttpURLConnection.setDoInput(true);
            //傳遞參數時需要開啟
            mHttpURLConnection.setDoOutput(true);
        } catch (IOException e) {
            e.printStackTrace();
        }
        return mHttpURLConnection ;
    }
因為我們要發送POST請求,所以在UrlConnManager類中再寫一個postParams()方法用來組織一下請求參數並將請求參數寫入到輸出流中:
 public static void postParams(OutputStream output,ListparamsList) throws IOException{
       StringBuilder mStringBuilder=new StringBuilder();
       for (NameValuePair pair:paramsList){
           if(!TextUtils.isEmpty(mStringBuilder)){
               mStringBuilder.append("&");
           }
           mStringBuilder.append(URLEncoder.encode(pair.getName(),"UTF-8"));
           mStringBuilder.append("=");
           mStringBuilder.append(URLEncoder.encode(pair.getValue(),"UTF-8"));
       }
       BufferedWriter writer=new BufferedWriter(new OutputStreamWriter(output,"UTF-8"));
       writer.write(mStringBuilder.toString());
       writer.flush();
       writer.close();
   }
接下來我們添加請求參數,調用postParams()方法將請求的參數組織好傳給HttpURLConnection的輸出流,請求連接並處理返回的結果:
   private void useHttpUrlConnectionPost(String url) {
        InputStream mInputStream = null;
        HttpURLConnection mHttpURLConnection = UrlConnManager.getHttpURLConnection(url);
        try {
            List postParams = new ArrayList<>();
            //要傳遞的參數
            postParams.add(new BasicNameValuePair("username", "moon"));
            postParams.add(new BasicNameValuePair("password", "123"));
            UrlConnManager.postParams(mHttpURLConnection.getOutputStream(), postParams);
            mHttpURLConnection.connect();
            mInputStream = mHttpURLConnection.getInputStream();
            int code = mHttpURLConnection.getResponseCode();
            String respose = converStreamToString(mInputStream);
            Log.i("wangshu", "請求狀態碼:" + code + "\n請求結果:\n" + respose);
            mInputStream.close();
        } catch (IOException e) {
            e.printStackTrace();
        }
    }
最後開啟線程請求網絡:
 private void useHttpUrlConnectionGetThread() {
        new Thread(new Runnable() {
            @Override
            public void run() {
                useHttpUrlConnectionPost("http://www.baidu.com");
            }
        }).start();
    }
這裡我們仍舊請求百度,看看會發生什麼?

mInputStream = mHttpURLConnection.getInputStream() 這句代碼報錯了,找不到文件。打開Fiddler來分析一下,不了解Fiddler和HTTP協議原理的請查看Android網絡編程(一)HTTP協議原理這篇文章。
我們的請求報文:

看來請求報文沒有問題,再來看看響應報文:

報504錯誤,讀取響應的數據報錯,對於我們這次請求服務端不能返回完整的響應,返回的數據為0 bytes,所以mHttpURLConnection.getInputStream() 也讀不到服務端響應的輸入流。當然這次錯誤是正常的,百度沒理由處理我們的這次POST請求。
github源碼下載
 PostgreSQL空值null參與運算的處理方法
PostgreSQL空值null參與運算的處理方法 在數字加減乘除運算中遇到某個字段值為空值(null)的時候,輸出的結果往往會讓我們失望,得不到我們所期待的數值,可以通
 Fragment配合RadioGroup實現點擊切換布局,fragmentradiogroup
Fragment配合RadioGroup實現點擊切換布局,fragmentradiogroup 這裡用了 compile com.jakewharton:butter
 Android版多線程下載器核心代碼分享,android下載器
Android版多線程下載器核心代碼分享,android下載器首先給大家分享多線程下載核心類: 按 Ctrl+C 復制代碼 按 Ctrl+C 復制代碼 下面是界面的
 Android安全之旅系列博客導讀
Android安全之旅系列博客導讀 總結下近一年的學習經歷,以中國的新年為節點。時間從2015年年後到今天,2015年年末。 首先我必須要感謝前輩的書籍和高質量的博客。