編輯:關於android開發
很早之前就想寫下關於Volley的源碼解析。一開始學android網絡訪問都是使用HttpClient,剛接觸麼Volley的時候就瞬間愛不釋手,雖說現在項目中使用OkHttp多些(Volley更新慢),但是作為google自家推出的網絡框架,Volley還是有很多值得學習的地方。這篇博客是我對Volley源碼分析後的一個總結。
Volley的使用非常簡單,相信大家都很熟悉。首先需要獲取到一個RequestQueue對象。
RequestQueue mQueue = Volley.newRequestQueue(context);
如果想通過網絡獲取json,如下:
StringRequest stringRequest = new StringRequest("http://www.baidu.com",
                        new Response.Listener() {
                            @Override
                            public void onResponse(String response) {
                                Log.d("TAG", response);
                            }
                        }, new Response.ErrorListener() {
                            @Override
                            public void onErrorResponse(VolleyError error) {
                                Log.e("TAG", error.getMessage(), error);
                            }
                        });
只要在onResponse中處理返回的response即可。如果訪問出錯,則會調用onErrorResonse方法。 注意Volley是異步,是在子線程中進行網絡訪問,而onResponse裡的代碼是在主線程中執行。所以使用Volley的地方切記不要把它當成單線程,這是初學者經常犯錯的地方。最後,將這個StringRequest對象添加到RequestQueue裡面就可以了。
mQueue.add(stringRequest);
如果要加載圖片,則首先要定義一個ImageCache,用於定義圖片的緩存。通過ImageLoader來加載圖片,ImageListener則用於指定ImageView以及加載失敗和加載過程中默認圖片 :
            private final LruCache mLruCache = new LruCache(
                    (int) (Runtime.getRuntime().maxMemory() / 10))
            {
                @Override
                protected int sizeOf(String key, Bitmap value)
                {
                    return value.getRowBytes() * value.getHeight();
                }
            };

            @Override
            public void putBitmap(String url, Bitmap bitmap)
            {
                mLruCache.put(url, bitmap);
            }

            @Override
            public Bitmap getBitmap(String url)
            {
                return mLruCache.get(url);
            }
        });
ImageListener listener = ImageLoader.getImageListener(imageView,
        R.drawable.default, R.drawable.failed);
        imageLoader.get(imageurl, listener);
介紹完簡單用法之後,就來分析源代碼了。
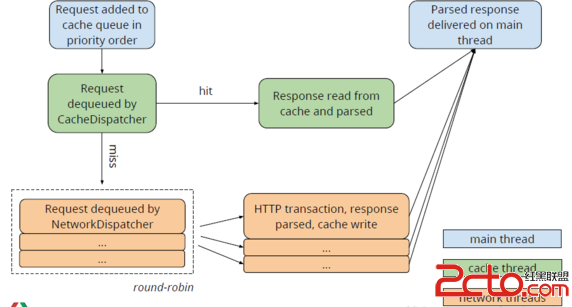
先看下官網給出的介紹圖:
 vc34wufH68fzttPB0NbQo6zIu7rztKbA7beiy81IVFRQx+vH86OsveLO9s/s06a94bn7o6zQtMjru7q05qOssqK72LX31vfP37PMoaO908/CwLTP6s+4tcS9+NDQt9bO9qGjPGJyIC8+DQqyu9PDy7WjrMjrv9q/z7aoysdWb2xsZXkubmV3UmVxdWVzdFF1ZXVlKGNvbnRleHQpoaPPyL+0z8JuZXdSZXF1ZXN0UXVldWW1xLT6wuujujwvcD4NCjxwcmUgY2xhc3M9"brush:java;">
public static RequestQueue newRequestQueue(Context context, HttpStack stack) {
        File cacheDir = new File(context.getCacheDir(), DEFAULT_CACHE_DIR);

        String userAgent = "volley/0";
        try {
            String packageName = context.getPackageName();
            PackageInfo info = context.getPackageManager().getPackageInfo(packageName, 0);
            userAgent = packageName + "/" + info. versionCode;
        } catch (NameNotFoundException e) {
        }

        if (stack == null) {
            if (Build.VERSION. SDK_INT >= 9) {
                stack = new HurlStack();
            } else {
                // Prior to Gingerbread, HttpUrlConnection was unreliable.
                // See: http://android-developers.blogspot.com/2011/09/androids-http-clients.html
                stack = new HttpClientStack(AndroidHttpClient. newInstance(userAgent));
            }
        }

        Network network = new BasicNetwork(stack);

        RequestQueue queue = new RequestQueue( new DiskBasedCache(cacheDir), network);
        queue.start();

        return queue;
    }
首先封裝得到userAgent,User-Agent 字段設置為 App 的packageName/{versionCode},如果異常則使用 “volley/0”。上面代碼主要是實例化stack ,如果SDK版本大於9,使用HurlStack,否則使用HttpClientStack。實際上HurlStack的內部就是使用HttpURLConnection進行網絡通訊的,而HttpClientStack的內部則是使用HttpClient進行網絡通訊的。也就是說android2.2以上的都是使用HttpURLConnection,否則使用HttpClient。接著new了一個RequestQueue,並調用它的start方法。來看下它的RequestQueue構造方法:
/** Number of network request dispatcher threads to start. */
    private static final int DEFAULT_NETWORK_THREAD_POOL_SIZE = 4;

    /** Cache interface for retrieving and storing responses. */
    private final Cache mCache;

    /** Network interface for performing requests. */
    private final Network mNetwork;

    /** Response delivery mechanism. */
    private final ResponseDelivery mDelivery;

    /** The network dispatchers. */
    private NetworkDispatcher[] mDispatchers;
   public RequestQueue(Cache cache, Network network, int threadPoolSize,
            ResponseDelivery delivery) {
        mCache = cache;
        mNetwork = network;
        mDispatchers = new NetworkDispatcher[threadPoolSize];
        mDelivery = delivery;
    }
初始化主要就是4個參數:mCache、mNetwork、mDispatchers、mDelivery。第一個是硬盤緩存;第二個主要用於Http相關操作;第三個用於轉發請求的;第四個參數用於把結果轉發到UI線程,通過它來對外聲明接口。接下來看下start方法。
 private static final int DEFAULT_NETWORK_THREAD_POOL_SIZE = 4;

    /** Cache interface for retrieving and storing responses. */
    private final Cache mCache;

    /** Network interface for performing requests. */
    private final Network mNetwork;

    /** Response delivery mechanism. */
    private final ResponseDelivery mDelivery;

    /** The network dispatchers. */
    private NetworkDispatcher[] mDispatchers;

 /**
     * Starts the dispatchers in this queue.
     */
    public void start() {
        stop();  // Make sure any currently running dispatchers are stopped.
        // Create the cache dispatcher and start it.
        mCacheDispatcher = new CacheDispatcher(mCacheQueue, mNetworkQueue, mCache, mDelivery);
        mCacheDispatcher.start();

        // Create network dispatchers (and corresponding threads) up to the pool size.
        for (int i = 0; i < mDispatchers.length; i++) {
            NetworkDispatcher networkDispatcher = new NetworkDispatcher(mNetworkQueue, mNetwork,
                    mCache, mDelivery);
            mDispatchers[i] = networkDispatcher;
            networkDispatcher.start();
        }
    }

    /**
     * Stops the cache and network dispatchers.
     */
    public void stop() {
        if (mCacheDispatcher != null) {
            mCacheDispatcher.quit();
        }
        for (int i = 0; i < mDispatchers.length; i++) {
            if (mDispatchers[i] != null) {
                mDispatchers[i].quit();
            }
        }
    }
首先調用stop()方法,確保此時所有轉發器都處於停止狀態。接下來就new了一個CacheDispatcher轉發器,它其實就是一個線程,用於硬盤緩存。再new了四個NetworkDispatcher轉發器,用於網絡請求。並分別調用這些線程的start()方法。如果是加載圖片,我們還需定義一個imageLoader,來看看Volley中為我們定義的ImageLoader,主要看它的get方法:
 public ImageContainer get(String requestUrl, ImageListener imageListener,
            int maxWidth, int maxHeight) {
        // only fulfill requests that were initiated from the main thread.
        throwIfNotOnMainThread();

        final String cacheKey = getCacheKey(requestUrl, maxWidth, maxHeight);

        // Try to look up the request in the cache of remote images.
        Bitmap cachedBitmap = mCache.getBitmap(cacheKey);
        if (cachedBitmap != null) {
            // Return the cached bitmap.
            ImageContainer container = new ImageContainer(cachedBitmap, requestUrl, null, null);
            imageListener.onResponse(container, true);
            return container;
        }

        // The bitmap did not exist in the cache, fetch it!
        ImageContainer imageContainer =
                new ImageContainer(null, requestUrl, cacheKey, imageListener);

        // Update the caller to let them know that they should use the default bitmap.
        imageListener.onResponse(imageContainer, true);

        // Check to see if a request is already in-flight.
        BatchedImageRequest request = mInFlightRequests.get(cacheKey);
        if (request != null) {
            // If it is, add this request to the list of listeners.
            request.addContainer(imageContainer);
            return imageContainer;
        }

        // The request is not already in flight. Send the new request to the network and
        // track it.
        Request newRequest =
            new ImageRequest(requestUrl, new Listener() {
                @Override
                public void onResponse(Bitmap response) {
                    onGetImageSuccess(cacheKey, response);
                }
            }, maxWidth, maxHeight,
            Config.RGB_565, new ErrorListener() {
                @Override
                public void onErrorResponse(VolleyError error) {
                    onGetImageError(cacheKey, error);
                }
            });

        mRequestQueue.add(newRequest);
        mInFlightRequests.put(cacheKey,
                new BatchedImageRequest(newRequest, imageContainer));
        return imageContainer;
    }
上面代碼具體流程是這樣,首先通過throwIfNotOnMainThread()方法限制必須在UI線程調用;然後根據傳入的參數計算cacheKey,獲取緩存;如果存在cache,直接將返回結果封裝為一個ImageContainer,然後直接回調imageListener.onResponse(container, true);這時我們就可以設置圖片了。如果不存在,那就初始化一個ImageContainer,然後直接回調imageListener.onResponse(imageContainer, true),這裡是為了讓我們設置默認圖片。所以,在實現listener的時候,要先判斷resp.getBitmap()是否為null;接下來檢查該url是否早已加入了請求對了,如果已加入,則將剛初始化的ImageContainer加入BatchedImageRequest。這就是加載圖片時的內存緩存。
然後調用RequestQueue的add()方法將Request傳入就可以完成網絡請求操作了,讓我們來看看add方法中到底做了什麼事。
 private final Map>> mWaitingRequests =
            new HashMap>>();

    /**
     * The set of all requests currently being processed by this RequestQueue. A Request
     * will be in this set if it is waiting in any queue or currently being processed by
     * any dispatcher.
     */
    private final Set> mCurrentRequests = new HashSet>();

    /** The cache triage queue. */
    private final PriorityBlockingQueue< Request> mCacheQueue =
        new PriorityBlockingQueue< Request>();

    /** The queue of requests that are actually going out to the network. */
    private final PriorityBlockingQueue< Request> mNetworkQueue =
        new PriorityBlockingQueue< Request>();
 /**
     * Adds a Request to the dispatch queue.
     * @param request The request to service
     * @return The passed -in request
     */
    public  Request add(Request request) {
        // Tag the request as belonging to this queue and add it to the set of current requests.
        request.setRequestQueue( this);
        synchronized ( mCurrentRequests) {
            mCurrentRequests.add(request);
        }

        // Process requests in the order they are added.
        request.setSequence(getSequenceNumber());
        request.addMarker( "add-to-queue");

        // If the request is uncacheable, skip the cache queue and go straight to the network.
        if (!request.shouldCache()) {
            mNetworkQueue.add(request);
            return request;
        }

        // Insert request into stage if there's already a request with the same cache key in flight.
        synchronized ( mWaitingRequests) {
            String cacheKey = request.getCacheKey();
            if ( mWaitingRequests.containsKey(cacheKey)) {
                // There is already a request in flight. Queue up.
                Queue> stagedRequests = mWaitingRequests .get(cacheKey);
                if (stagedRequests == null) {
                    stagedRequests = new LinkedList>();
                }
                stagedRequests.add(request);
                mWaitingRequests.put(cacheKey, stagedRequests);
                if (VolleyLog. DEBUG) {
                    VolleyLog. v("Request for cacheKey=%s is in flight, putting on hold.", cacheKey);
                }
            } else {
                // Insert 'null' queue for this cacheKey, indicating there is now a request in
                // flight.
                mWaitingRequests.put(cacheKey, null);
                mCacheQueue.add(request);
            }
            return request;
        }
    }
這裡首先將請求加入mCurrentRequests,這個mCurrentRequests是一個HashSet,它保存了所有需要處理的Request,主要為了提供cancel的入口。如果該請求不應該被緩存則直接加入mNetworkQueue,然後返回。request.shouldCache()在默認情況下,每條請求都是可以緩存的,當然我們也可以調用Request的setShouldCache(false)方法來改變這一默認行為。
接下來判斷該請求是否有相同的請求正在被處理,如果有則加入mWaitingRequests;如果沒有,則加入mWaitingRequests.put(cacheKey, null),並將request加入到CacheQueue中。
有了隊列,我們就來看看線程是如何執行的。先看CacheDispatcher。
public class CacheDispatcher extends Thread {

    private static final boolean DEBUG = VolleyLog.DEBUG;

    /** The queue of requests coming in for triage. */
    private final BlockingQueue> mCacheQueue;

    /** The queue of requests going out to the network. */
    private final BlockingQueue> mNetworkQueue;

    /** The cache to read from. */
    private final Cache mCache;

    /** For posting responses. */
    private final ResponseDelivery mDelivery;

    /** Used for telling us to die. */
    private volatile boolean mQuit = false;

    /**
     * Creates a new cache triage dispatcher thread.  You must call {@link #start()}
     * in order to begin processing.
     *
     * @param cacheQueue Queue of incoming requests for triage
     * @param networkQueue Queue to post requests that require network to
     * @param cache Cache interface to use for resolution
     * @param delivery Delivery interface to use for posting responses
     */
    public CacheDispatcher(
            BlockingQueue> cacheQueue, BlockingQueue> networkQueue,
            Cache cache, ResponseDelivery delivery) {
        mCacheQueue = cacheQueue;
        mNetworkQueue = networkQueue;
        mCache = cache;
        mDelivery = delivery;
    }

    /**
     * Forces this dispatcher to quit immediately.  If any requests are still in
     * the queue, they are not guaranteed to be processed.
     */
    public void quit() {
        mQuit = true;
        interrupt();
    }

    @Override
    public void run() {
        if (DEBUG) VolleyLog.v("start new dispatcher");
        Process.setThreadPriority(Process.THREAD_PRIORITY_BACKGROUND);

        // Make a blocking call to initialize the cache.
        mCache.initialize();

        while (true) {
            try {
                // Get a request from the cache triage queue, blocking until
                // at least one is available.
                final Request request = mCacheQueue.take();
                request.addMarker("cache-queue-take");

                // If the request has been canceled, don't bother dispatching it.
                if (request.isCanceled()) {
                    request.finish("cache-discard-canceled");
                    continue;
                }

                // Attempt to retrieve this item from cache.
                Cache.Entry entry = mCache.get(request.getCacheKey());
                if (entry == null) {
                    request.addMarker("cache-miss");
                    // Cache miss; send off to the network dispatcher.
                    mNetworkQueue.put(request);
                    continue;
                }

                // If it is completely expired, just send it to the network.
                if (entry.isExpired()) {
                    request.addMarker("cache-hit-expired");
                    request.setCacheEntry(entry);
                    mNetworkQueue.put(request);
                    continue;
                }

                // We have a cache hit; parse its data for delivery back to the request.
                request.addMarker("cache-hit");
                Response response = request.parseNetworkResponse(
                        new NetworkResponse(entry.data, entry.responseHeaders));
                request.addMarker("cache-hit-parsed");

                if (!entry.refreshNeeded()) {
                    // Completely unexpired cache hit. Just deliver the response.
                    mDelivery.postResponse(request, response);
                } else {
                    // Soft-expired cache hit. We can deliver the cached response,
                    // but we need to also send the request to the network for
                    // refreshing.
                    request.addMarker("cache-hit-refresh-needed");
                    request.setCacheEntry(entry);

                    // Mark the response as intermediate.
                    response.intermediate = true;

                    // Post the intermediate response back to the user and have
                    // the delivery then forward the request along to the network.
                    mDelivery.postResponse(request, response, new Runnable() {
                        @Override
                        public void run() {
                            try {
                                mNetworkQueue.put(request);
                            } catch (InterruptedException e) {
                                // Not much we can do about this.
                            }
                        }
                    });
                }

            } catch (InterruptedException e) {
                // We may have been interrupted because it was time to quit.
                if (mQuit) {
                    return;
                }
                continue;
            }
        }
    }
}
我們要知道CacheDispatcher是硬盤緩存,到此可知Volley也是有二級緩存的。重點看它的run方法。看到while(true)時,我們就知道,它是在不斷的執行的。首先從mCacheQueue中取出緩存,如果沒有取到,就把它加入mNetworkQueue中,再判斷緩存是否過期,如果過期,也放入mNetworkQueue中。否則就取到了可用的緩存了,再調用request.parseNetworkResponse解析從緩存中取出的data和responseHeaders通過mDelivery.postResponse轉發,然後回調到UI線程;我們看下mDelivery.postResponse方法:
 @Override
    public void postResponse(Request request, Response response, Runnable runnable) {
        request.markDelivered();
        request.addMarker("post-response");
        mResponsePoster.execute(new ResponseDeliveryRunnable(request, response, runnable));
    }
主要看ResponseDeliveryRunnable。
 public ResponseDeliveryRunnable(Request request, Response response, Runnable runnable) {
            mRequest = request;
            mResponse = response;
            mRunnable = runnable;
        }

        @SuppressWarnings("unchecked")
        @Override
        public void run() {
            // If this request has canceled, finish it and don't deliver.
            if (mRequest.isCanceled()) {
                mRequest.finish("canceled-at-delivery");
                return;
            }

            // Deliver a normal response or error, depending.
            if (mResponse.isSuccess()) {
                mRequest.deliverResponse(mResponse.result);
            } else {
                mRequest.deliverError(mResponse.error);
            }

            // If this is an intermediate response, add a marker, otherwise we're done
            // and the request can be finished.
            if (mResponse.intermediate) {
                mRequest.addMarker("intermediate-response");
            } else {
                mRequest.finish("done");
            }

            // If we have been provided a post-delivery runnable, run it.
            if (mRunnable != null) {
                mRunnable.run();
            }
       }
在它的run方法中,如果訪問成功會調用mRequest.deliverResponse(mResponse.result)方法,到這裡就很明了了,因為每個request子類中都要重寫deliverResponse,最後我們再在這個方法中將響應的數據回調到Response.Listener的onResponse()方法中就可以了。以StringRequest為例:
 @Override
    protected void deliverResponse(String response) {
        mListener.onResponse (response);
    }
分析完緩存,我們來看下網絡加載。它是在NetworkDispatcher線程中實現的。
public class NetworkDispatcher extends Thread {
    /** The queue of requests to service. */
    private final BlockingQueue> mQueue;
    /** The network interface for processing requests. */
    private final Network mNetwork;
    /** The cache to write to. */
    private final Cache mCache;
    /** For posting responses and errors. */
    private final ResponseDelivery mDelivery;
    /** Used for telling us to die. */
    private volatile boolean mQuit = false;

    /**
     * Creates a new network dispatcher thread.  You must call {@link #start()}
     * in order to begin processing.
     *
     * @param queue Queue of incoming requests for triage
     * @param network Network interface to use for performing requests
     * @param cache Cache interface to use for writing responses to cache
     * @param delivery Delivery interface to use for posting responses
     */
    public NetworkDispatcher(BlockingQueue> queue,
            Network network, Cache cache,
            ResponseDelivery delivery) {
        mQueue = queue;
        mNetwork = network;
        mCache = cache;
        mDelivery = delivery;
    }
 @Override
    public void run() {
        Process.setThreadPriority(Process. THREAD_PRIORITY_BACKGROUND);
        Request request;
        while ( true) {
            try {
                // Take a request from the queue.
                request = mQueue.take();
            } catch (InterruptedException e) {
                // We may have been interrupted because it was time to quit.
                if ( mQuit) {
                    return;
                }
                continue;
            }

            try {
                request.addMarker( "network-queue-take" );

                // If the request was cancelled already, do not perform the
                // network request.
                if (request.isCanceled()) {
                    request.finish( "network-discard-cancelled" );
                    continue;
                }

                addTrafficStatsTag(request);

                // Perform the network request.
                NetworkResponse networkResponse = mNetwork.performRequest(request);
                request.addMarker( "network-http-complete" );

                // If the server returned 304 AND we delivered a response already,
                // we're done -- don't deliver a second identical response.
                if (networkResponse. notModified && request.hasHadResponseDelivered()) {
                    request.finish( "not-modified");
                    continue;
                }

                // Parse the response here on the worker thread.
                Response response = request.parseNetworkResponse(networkResponse);
                request.addMarker( "network-parse-complete" );

                // Write to cache if applicable.
                // TODO: Only update cache metadata instead of entire record for 304s.
                if (request.shouldCache() && response. cacheEntry != null ) {
                    mCache.put(request.getCacheKey(), response.cacheEntry );
                    request.addMarker( "network-cache-written" );
                }

                // Post the response back.
                request.markDelivered();
                mDelivery.postResponse(request, response);
            } catch (VolleyError volleyError) {
                parseAndDeliverNetworkError(request, volleyError);
            } catch (Exception e) {
                VolleyLog. e(e, "Unhandled exception %s", e.toString());
                mDelivery.postError(request, new VolleyError(e));
            }
        }
    }
}
首先取出請求;然後通過mNetwork.performRequest(request)處理我們的請求,拿到NetworkResponse。看下performRequest方法:
 public NetworkResponse performRequest(Request request) throws VolleyError {
        long requestStart = SystemClock.elapsedRealtime();
        while (true) {
            HttpResponse httpResponse = null;
            byte[] responseContents = null;
            Map responseHeaders = new HashMap();
            try {
                // Gather headers.
                Map headers = new HashMap();
                addCacheHeaders(headers, request.getCacheEntry());
                httpResponse = mHttpStack.performRequest(request, headers);
                StatusLine statusLine = httpResponse.getStatusLine();
                int statusCode = statusLine.getStatusCode();
                responseHeaders = convertHeaders(httpResponse.getAllHeaders());
                // Handle cache validation.
                if (statusCode == HttpStatus.SC_NOT_MODIFIED) {
                    return new NetworkResponse(HttpStatus.SC_NOT_MODIFIED,
                            request.getCacheEntry() == null ? null : request.getCacheEntry().data,
                            responseHeaders, true);
                }
                // Some responses such as 204s do not have content.  We must check.
                if (httpResponse.getEntity() != null) {
                  responseContents = entityToBytes(httpResponse.getEntity());
                } else {
                  // Add 0 byte response as a way of honestly representing a
                  // no-content request.
                  responseContents = new byte[0];
                }
                // if the request is slow, log it.
                long requestLifetime = SystemClock.elapsedRealtime() - requestStart;
                logSlowRequests(requestLifetime, request, responseContents, statusLine);
                if (statusCode < 200 || statusCode > 299) {
                    throw new IOException();
                }
                return new NetworkResponse(statusCode, responseContents, responseHeaders, false);
            } catch (Exception e) {
                ……
            }
        }
    }
上面方法主要是網絡請求的一些細節,所以如果要修改請求的細節就要到此處修改(後面會講到)。
在這裡服務器會返回的數據組裝成一個NetworkResponse對象進行返回。在NetworkDispatcher中收到了NetworkResponse這個返回值後又會調用Request的parseNetworkResponse()方法來解析NetworkResponse中的數據,再將數據寫入到緩存。parseNetworkResponse的實現是交給Request的子類來完成的,不同種類的Request解析的方式不同。如json與gson就有區別。最後與CacheDispatcher一樣調用mDelivery.postResponse(request, response)返回回調,這裡就不再分析了。
到這裡volley的源碼就分析完了,總結一下:
volley跟httpClient不一樣,它是不會自動添加cookie頭的。但是cookie在應用中卻很重要,它會保證登陸後的操作都處於一個會話中,有效的增加了安全性。那麼如何在volley中自動添加cookie呢。
首先在新建Appliaction,當成全局的Application,然後在裡面編寫在http頭參數中識別出cookie和添加cookie到Http頭代碼。
/**
     * Checks the response headers for session cookie and saves it
     * if it finds it.
     * @param headers Response Headers.
     */
    public static final void checkSessionCookie(Map headers) {
        Log.e("TAG", "checkSessionCookie->headers:" + headers);

        if (headers.containsKey(GlobalParams.SET_COOKIE_KEY) && headers.get(GlobalParams.SET_COOKIE_KEY).startsWith(GlobalParams.SESSION_COOKIE)) {
            String cookie = headers.get(GlobalParams.SET_COOKIE_KEY);
            if (cookie.length() > 0) {
                //形如Set-Cookie:JSESSIONID=18D6BCC01453C6EB39BB0C4208F389EE; Path=/smdb
                //進行解析,取出JSESSIONID的value
                String[] splitCookie = cookie.split(";");
                String[] splitSessionId = splitCookie[0].split("=");
                cookie = splitSessionId[1];
                Editor prefEditor = preferences.edit();
                prefEditor.putString(GlobalParams.SESSION_COOKIE, cookie);
                prefEditor.commit();
            }
        }else {
            if (null != httpclient.getCookieStore()) {
                List cookies = httpclient.getCookieStore().getCookies();
                for (Cookie cookie : cookies) {
                    if ("JSESSIONID".equals(cookie.getName())) {//取得session的value
                        String sessionId = cookie.getValue();
                        Editor prefEditor = preferences.edit();
                        prefEditor.putString(GlobalParams.SESSION_COOKIE, sessionId);
                        prefEditor.commit();
                        break;
                    }
                }
                if (!cookies.isEmpty()) {
                    for (int i = 0; i < cookies.size(); i++) {
                        cookie = cookies.get(i);//保存cookie的信息使得HttpClient和WebView共享同一個cookie
                    }
                }
            }
        }
    }
接著就要在Request的子類中合適地方添加頭信息,哪個地方合適。我們來看下HurlStack的performRequest方法。
@Override
    public HttpResponse performRequest(Request request, Map additionalHeaders)
            throws IOException, AuthFailureError {
        String url = request.getUrl();
        HashMap map = new HashMap();
        map.putAll(request.getHeaders());
        map.putAll(additionalHeaders);
        if (mUrlRewriter != null) {
            String rewritten = mUrlRewriter.rewriteUrl(url);
            if (rewritten == null) {
                throw new IOException("URL blocked by rewriter: " + url);
            }
            url = rewritten;
        }
        URL parsedUrl = new URL(url);
        HttpURLConnection connection = openConnection(parsedUrl, request);
        for (String headerName : map.keySet()) {
            connection.addRequestProperty(headerName, map.get(headerName));
        }
        setConnectionParametersForRequest(connection, request);
        // Initialize HttpResponse with data from the HttpURLConnection.
        ProtocolVersion protocolVersion = new ProtocolVersion("HTTP", 1, 1);
        int responseCode = connection.getResponseCode();
        if (responseCode == -1) {
            // -1 is returned by getResponseCode() if the response code could not be retrieved.
            // Signal to the caller that something was wrong with the connection.
            throw new IOException("Could not retrieve response code from HttpUrlConnection.");
        }
        StatusLine responseStatus = new BasicStatusLine(protocolVersion,
                connection.getResponseCode(), connection.getResponseMessage());
        BasicHttpResponse response = new BasicHttpResponse(responseStatus);
        response.setEntity(entityFromConnection(connection));
        for (Entry> header : connection.getHeaderFields().entrySet()) {
            if (header.getKey() != null) {
                Header h = new BasicHeader(header.getKey(), header.getValue().get(0));
                response.addHeader(h);
            }
        }
        return response;
    }
重點看到map.putAll(request.getHeaders());所以我們考慮到如果要給它添加頭信息可以在request的getHeaders()方法中添加。至此我們以StringRequest為例,重寫一個類叫MyStringRequest:
public class MyStringRequest extends StringRequest {

    private final Map mParams;
    /**
     * @param method
     * @param url
     * @param params
     *            A {@link HashMap} to post with the request. Null is allowed
     *            and indicates no parameters will be posted along with request.
     * @param listener
     * @param errorListener
     */
    public MyStringRequest(int method, String url, Map params, Listener listener,
            ErrorListener errorListener) {
        super(method, url, listener, errorListener);
        mParams = params;
    }

    @Override
    protected Map getParams() {
        return mParams;
    }

    /* (non-Javadoc)
     * @see com.android.volley.toolbox.StringRequest#parseNetworkResponse(com.android.volley.NetworkResponse)
     */
    @Override
    protected Response parseNetworkResponse(NetworkResponse response) {
        // since we don't know which of the two underlying network vehicles
        // will Volley use, we have to handle and store session cookies manually
        Log.e("TAG", "parseNetworkResponse->response.headers:" + response.headers);
        GlobalApplication.checkSessionCookie(response.headers);
        return super.parseNetworkResponse(response);
    }

    /* (non-Javadoc)
     * @see com.android.volley.Request#getHeaders()
     */
    @Override
    public Map getHeaders() throws AuthFailureError {
        Map headers = super.getHeaders();
            if (headers == null || headers.equals(Collections.emptyMap())) {
                headers = new HashMap();
            }
            GlobalApplication.addSessionCookie(headers);
        return headers;
    }

}
在parseNetworkResponse中調用checkSessionCookie解析頭信息中的cookie,然後重寫getHeaders方法,調用addSessionCookie添加cookie。
網絡訪問經常要用到重定向,雖說在客戶端中用得比較少。那Volley能不能進行自動重定向,答案是可以的,重要修改下源碼。既然要重定向,那就要在請求返回的進行判斷,毫無疑問要在BasicNetwork的performRequest中修改,先看下修改後的代碼:
 @Override
    public NetworkResponse performRequest(Request request) throws VolleyError {
        long requestStart = SystemClock.elapsedRealtime();
        while (true) {
            HttpResponse httpResponse = null;
            byte[] responseContents = null;
            Map responseHeaders = new HashMap();
            try {
                // Gather headers.
                Map headers = new HashMap();
                addCacheHeaders(headers, request.getCacheEntry());
                httpResponse = mHttpStack.performRequest(request, headers);
                StatusLine statusLine = httpResponse.getStatusLine();
                int statusCode = statusLine.getStatusCode();

                responseHeaders = convertHeaders(httpResponse.getAllHeaders());
                // Handle cache validation.
                if (statusCode == HttpStatus.SC_NOT_MODIFIED) {
                    return new NetworkResponse(HttpStatus.SC_NOT_MODIFIED,
                            request.getCacheEntry() == null ? null : request.getCacheEntry().data,
                            responseHeaders, true);
                }

                // Handle moved resources
                //Line143-148為解決301/302重定向問題增加的代碼。
                //參考見https://github.com/elbuild/volley-plus/commit/4a65a4099d2b1d942f4d51a6df8734cf272564eb#diff-b4935f77d9f815bb7e0dba85e55dc707R150
                if (statusCode == HttpStatus.SC_MOVED_PERMANENTLY || statusCode == HttpStatus.SC_MOVED_TEMPORARILY) {
                    String newUrl = responseHeaders.get("Location");
                    request.setRedirectUrl(newUrl);
                }

                // Some responses such as 204s do not have content.  We must check.
                if (httpResponse.getEntity() != null) {
                  responseContents = entityToBytes(httpResponse.getEntity());
                } else {
                  // Add 0 byte response as a way of honestly representing a
                  // no-content request.
                  responseContents = new byte[0];
                }

                // if the request is slow, log it.
                long requestLifetime = SystemClock.elapsedRealtime() - requestStart;
                logSlowRequests(requestLifetime, request, responseContents, statusLine);

                if (statusCode < 200 || statusCode > 299) {
                    throw new IOException();
                }
                return new NetworkResponse(statusCode, responseContents, responseHeaders, false);
            } catch (SocketTimeoutException e) {
                attemptRetryOnException("socket", request, new TimeoutError());
            } catch (ConnectTimeoutException e) {
                attemptRetryOnException("connection", request, new TimeoutError());
            } catch (MalformedURLException e) {
                throw new RuntimeException("Bad URL " + request.getUrl(), e);
            } catch (IOException e) {
                int statusCode = 0;
                NetworkResponse networkResponse = null;
                if (httpResponse != null) {
                    statusCode = httpResponse.getStatusLine().getStatusCode();
                } else {
                    throw new NoConnectionError(e);
                }
                //Line143-148為解決301/302重定向問題增加的代碼。
                if (statusCode == HttpStatus.SC_MOVED_PERMANENTLY ||
                        statusCode == HttpStatus.SC_MOVED_TEMPORARILY) {
                    VolleyLog.e("Request at %s has been redirected to %s", request.getOriginUrl(), request.getUrl());
                } else {
                    VolleyLog.e("Unexpected response code %d for %s", statusCode, request.getUrl());
                }
                if (responseContents != null) {
                    networkResponse = new NetworkResponse(statusCode, responseContents,
                            responseHeaders, false);
                    if (statusCode == HttpStatus.SC_UNAUTHORIZED ||
                            statusCode == HttpStatus.SC_FORBIDDEN) {
                        attemptRetryOnException("auth",
                                request, new AuthFailureError(networkResponse));
                    } else if (statusCode == HttpStatus.SC_MOVED_PERMANENTLY ||
                                statusCode == HttpStatus.SC_MOVED_TEMPORARILY) {
                        //else if語句為解決301/302重定向問題增加的代碼。設置重連請求。
                        attemptRetryOnException("redirect",
                                request, new AuthFailureError(networkResponse));
                    } else {
                        // TODO: Only throw ServerError for 5xx status codes.
                        throw new ServerError(networkResponse);
                    }
                } else {
                    throw new NetworkError(networkResponse);
                }
            }
        }
    }
其實重點添加了以下的代碼:
 if (statusCode == HttpStatus.SC_MOVED_PERMANENTLY || statusCode == HttpStatus.SC_MOVED_TEMPORARILY) {
                    String newUrl = responseHeaders.get("Location");
                    request.setRedirectUrl(newUrl);
                }
上面的代碼就是判斷返回code是否是301或302,如果是就獲取重定向的Url,再設置重定向,很簡單。到此Volley常見的擴展功能就講完了。
源碼解析的文章都會有點長,寫完也要有耐心。繼續堅持。
 Android熱補丁動態修復實踐
Android熱補丁動態修復實踐 前言 好幾個月之前關於Android App熱補丁修復火了一把,源於QQ空間團隊的一篇文章安卓App熱補丁動態修復技術介紹,然後各大
 百度導航Android版問題集
百度導航Android版問題集軟硬件環境Macbook Pro MGX 72Android Studio 1.4酷比魔方7寸平板百度導航SDK 3.0.0運行導航Demo
 Apktool(3)——Apktool的使用,apktool使用
Apktool(3)——Apktool的使用,apktool使用一.apktool的作用 安卓應用apk文件不僅僅是包含有resource和編譯的java代碼的zip文件
 Android Studio創建AVD,
Android Studio創建AVD,Android Studio是專門為Android開發設計的IDE,比Eclipse開發Android更加方便、快捷。 安裝And