編輯:關於android開發
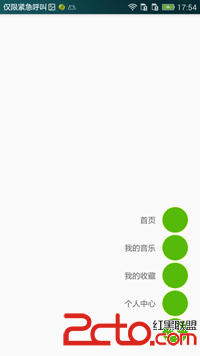
最近用上了印象筆記,覺得android 版的底部導航欄挺不錯的,好多應用裡面都有用到,想著自己動手實現一下,不多說,先上圖:


要完成這樣的效果。需要自定義ViewGroup.
1、onMeasure(測量過程)
2、onLayout(布局)
3、添加動畫
onMeasure(測量過程)
@Override
    protected void onMeasure(int widthMeasureSpec, int heightMeasureSpec) {

        int count = getChildCount();
        for (int i = 0; i
onLayout(布局)
 @Override
    protected void onLayout(boolean changed, int l, int t, int r, int b) {
        View btn_main = getChildAt(getChildCount()-1);
        int left = 0;int top = 0;
        if (changed){
            for (int i = getChildCount()-1 ;i >= 0;i--){
                View viewChild  = getChildAt(i);
                int width = viewChild.getMeasuredWidth();
                int height = viewChild.getMeasuredHeight();
                left = getMeasuredWidth()- width;
                top = getMeasuredHeight() - height-distance;
                viewChild.layout(left,top,getMeasuredWidth(),getMeasuredHeight());
                distance += getDisension(100);
            }
            btn_main.setOnClickListener(this);
            changeState(currentState);
        }
    }
添加動畫
public void openTranslateAnimation(View view){
        distance = 0;
        RotateAnimation animation = new RotateAnimation(0f,45f, Animation.RELATIVE_TO_SELF,
                0.5f,Animation.RELATIVE_TO_SELF,0.5f);
        animation.setDuration(500);
        animation.setFillAfter(true);
        view.startAnimation(animation);
        for (int i = getChildCount()-2;i>= 0; i--){
            View childView = getChildAt(i);
            view.setVisibility(View.VISIBLE);
            TranslateAnimation translate = new TranslateAnimation(
                    Animation.RELATIVE_TO_SELF, 0, Animation.RELATIVE_TO_SELF, 0,
                    Animation.RELATIVE_TO_SELF, 0.35f, Animation.RELATIVE_TO_SELF, 0);
            translate.setDuration(100);
            translate.setStartOffset(10*offset);
            translate.setFillAfter(true);
            childView.startAnimation(translate);
            offset++;
        }
    }

    public void closeTranslateAnimation(View view){
        distance = 0;
        RotateAnimation animation = new RotateAnimation(45f,0, Animation.RELATIVE_TO_SELF,
                0.5f,Animation.RELATIVE_TO_SELF,0.5f);
        animation.setDuration(500);
        animation.setFillAfter(true);
        view.startAnimation(animation);
        for (int i = getChildCount()-2;i>= 0; i--){
            View childView = getChildAt(i);
            view.setVisibility(View.VISIBLE);
            TranslateAnimation translate = new TranslateAnimation(
                    Animation.RELATIVE_TO_SELF, 0, Animation.RELATIVE_TO_SELF, 0,
                    Animation.RELATIVE_TO_SELF, 0, Animation.RELATIVE_TO_SELF, 0.35f);
            translate.setDuration(100);
            translate.setStartOffset(50*offset);
            childView.startAnimation(translate);
            offset++;
        }
    }
看一下主布局:
<code class=" hljs java"><code class=" hljs xml"><com.xby.fm.view.stackmenu android:layout_width="match_parent" android:layout_height="match_parent" android:layout_marginright="20dp" android:layout_marginbottom="20dp">

        <linearlayout android:layout_width="wrap_content" android:layout_height="wrap_content" android:orientation="horizontal" android:gravity="center">
            <textview android:layout_width="wrap_content" android:layout_height="wrap_content" android:paddingright="10dp" android:text="首頁">

            <imageview android:layout_width="wrap_content" android:layout_height="wrap_content" android:src="@mipmap/ic_menu_item">
        </imageview></textview></linearlayout>

        <linearlayout android:layout_width="wrap_content" android:layout_height="wrap_content" android:orientation="horizontal" android:gravity="center">
            <textview android:layout_width="wrap_content" android:layout_height="wrap_content" android:paddingright="10dp" android:text="我的音樂">

            <imageview android:layout_width="wrap_content" android:layout_height="wrap_content" android:src="@mipmap/ic_menu_item">
        </imageview></textview></linearlayout>

        <linearlayout android:layout_width="wrap_content" android:layout_height="wrap_content" android:orientation="horizontal" android:gravity="center">
            <textview android:layout_width="wrap_content" android:layout_height="wrap_content" android:paddingright="10dp" android:text="我的收藏">

            <imageview android:layout_width="wrap_content" android:layout_height="wrap_content" android:src="@mipmap/ic_menu_item">
        </imageview></textview></linearlayout>

        <linearlayout android:layout_width="wrap_content" android:layout_height="wrap_content" android:orientation="horizontal" android:gravity="center">
            <textview android:layout_width="wrap_content" android:layout_height="wrap_content" android:paddingright="10dp" android:text="個人中心">

            <imageview android:layout_width="wrap_content" android:layout_height="wrap_content" android:src="@mipmap/ic_menu_item">
        </imageview></textview></linearlayout>


            <imageview android:layout_width="wrap_content" android:layout_height="wrap_content" android:src="@mipmap/ic_main_menu">
    </imageview></com.xby.fm.view.stackmenu></code></code>
比較簡單,上一下git地址:StackMenu
 Android學習指南之十九:Android Notification(通知)詳解
Notification(通知)使你的應用程序能夠在不使用Activity的情
 Activity與Service進行數據交互,activityservice
Activity與Service進行數據交互,activityserviceAndroid啟動Service有兩種方法,一種是startService,一種是bindSe
 狀態開關按鈕(ToggleButton)及按鈕(Swich)的使用,togglebuttonswich
狀態開關按鈕(ToggleButton)及按鈕(Swich)的使用,togglebuttonswich 狀態開關按鈕(Toggle
 三種方式獲得手機屏幕的寬和高,三種方式手機屏幕
三種方式獲得手機屏幕的寬和高,三種方式手機屏幕 主要代碼: 1 package com.km.screeninfo; 2 3
 Android Studio教程--給Android Studio安裝Genymotion插件,androidgenymotion
Android Studio教程--給Android Studio安裝G