編輯:關於android開發
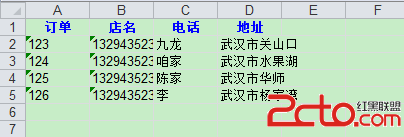
都說程序員不爽產品經理,其實有的時候遇到一些奇葩的後台開發人員也會很不順心。最近項目有這樣一個要求,要生成一個excel然後發郵件給客戶。結果後台人員直接把這個功能扔給客戶端,理由是後台不好實現。聽到這也就只能自己實現了(分分鐘就想來個螺旋王扣它頭上)。這篇博客講下如下在android中生成excel表並存到本地。先看下生成後的效果圖:

首先我們要先造下測試數據,這裡我把數據寫死在一個常量類Const中,如下:
public class Const {
    public interface OrderInfo{
        public static final String[][] orderOne = new String[][] {{ "123", "九龍", "13294352311",
            "武漢市關山口" },{ "124", "咱家", "13294352312",
            "武漢市水果湖" },{ "125", "陳家", "13294352315",
            "武漢市華師" },{ "126", "李", "13294352316",
            "武漢市楊家灣" }};
    }
}
理論上這些數據是從後台讀過來的。
本文模擬打印訂單的信息,所以這裡還需要一個訂單Model類:
public class Order implements Serializable {

    public String id;

    public String restPhone;

    public String restName;

    public String receiverAddr;


    public Order(String id,String restPhone, String restName, String receiverAddr) {
        this.id = id;
        this.restPhone = restPhone;
        this.restName = restName;

        this.receiverAddr = receiverAddr;
    }
}
接下來我們要判斷一下內存卡是否存在,內存是否足夠大。先獲取指定目錄下內存的大小:
    /** 獲取SD可用容量 */
    private static long getAvailableStorage(Context context) {
        String root = context.getExternalFilesDir(null).getPath();
        StatFs statFs = new StatFs(root);
        long blockSize = statFs.getBlockSize();
        long availableBlocks = statFs.getAvailableBlocks();
        long availableSize = blockSize * availableBlocks;
        // Formatter.formatFileSize(context, availableSize);
        return availableSize;
    }
這裡用到的路徑是getExternalFilesDir,它指定的是SDCard/Android/data/你的應用的包名/files/ 目錄這個目錄,它用來放一些長時間保存的數據,當應用被卸載時,會同時會刪除。類似這種情況的還有getExternalCacheDir方法,只是它一般用來存放臨時文件。之後通過StatFs來計算出可用容量的大小。
接下來在寫入excel前對內存進行判斷,如下:
if(!Environment.getExternalStorageState().equals(Environment.MEDIA_MOUNTED)&&getAvailableStorage()>1000000) {
            Toast.makeText(context, "SD卡不可用", Toast.LENGTH_LONG).show();
            return;
        }
        File file;
        File dir = new File(context.getExternalFilesDir(null).getPath());
        file = new File(dir, fileName + ".xls");
        if (!dir.exists()) {
            dir.mkdirs();
        }
如果內存卡不存在或內存小於1M,不進行寫入,然後創建相應的文件夾並起名字。接下來重點看下如何寫入excel。
WritableWorkbook wwb;
        OutputStream os = new FileOutputStream(file);
        wwb = Workbook.createWorkbook(os);
添加sheet表
WritableSheet sheet = wwb.createSheet("訂單", 0);
添加excel表頭
String[] title = { "訂單", "店名", "電話", "地址" };
Label label;
        for (int i = 0; i < title.length; i++) {
            // Label(x,y,z) 代表單元格的第x+1列,第y+1行, 內容z
                        // 在Label對象的子對象中指明單元格的位置和內容
            label = new Label(i, 0, title[i], getHeader());
            // 將定義好的單元格添加到工作表中
            sheet.addCell(label);
        }
這裡表頭信息我寫死了。表的一個單元格對應一個Label,如label(0,0,”a”)代表第一行第一列所在的單元格信息為a。getHeader()是自定義的樣式,它返回一個 WritableCellFormat 。來看看如何自定義樣式:
    public static WritableCellFormat getHeader() {
        WritableFont font = new WritableFont(WritableFont.TIMES, 10,
                WritableFont.BOLD);// 定義字體
        try {
            font.setColour(Colour.BLUE);// 藍色字體
        } catch (WriteException e1) {
            e1.printStackTrace();
        }
        WritableCellFormat format = new WritableCellFormat(font);
        try {
            format.setAlignment(jxl.format.Alignment.CENTRE);// 左右居中
            format.setVerticalAlignment(jxl.format.VerticalAlignment.CENTRE);// 上下居中
             format.setBorder(Border.ALL, BorderLineStyle.THIN,
             Colour.BLACK);// 黑色邊框
             format.setBackground(Colour.YELLOW);// 黃色背景
        } catch (WriteException e) {
            e.printStackTrace();
        }
        return format;
    }
看上面代碼就很清楚了,通過獲得WritableFont 來自定義字體的一些樣式,如顏色大小等,通過WritableCellFormat 來設置文本框的樣式,可以設置邊框底色等。具體的可以查api文檔,這裡只給出例子。
添加excel內容。
for (int i = 0; i < exportOrder.size(); i++) {
            Order order = exportOrder.get(i);

            Label orderNum = new Label(0, i + 1, order.id);
            Label restaurant = new Label(1, i + 1, order.restName);
            Label nameLabel = new Label(2,i+1,order.restPhone);
            Label address = new Label(3, i + 1, order.receiverAddr);

            sheet.addCell(orderNum);
            sheet.addCell(restaurant);
            sheet.addCell(nameLabel);
            sheet.addCell(address);
            Toast.makeText(context, "寫入成功", Toast.LENGTH_LONG).show();

        }
這就再簡單不過了,就是獲取order信息然後一個個寫入。
這個demo布局很簡單就是一個按鈕點擊來生成excel,這裡就不貼出來了,MainActivity的代碼如下:
protected void onCreate(Bundle savedInstanceState) {
        super.onCreate(savedInstanceState);
        setContentView(R.layout.activity_main);

        int length = Const.OrderInfo.orderOne.length;
        for(int i = 0;i < length;i++){
            Order order = new Order( Const.OrderInfo.orderOne[i][0],  Const.OrderInfo.orderOne[i][1],  Const.OrderInfo.orderOne[i][2],  Const.OrderInfo.orderOne[i][3]);
            orders.add(order);
        }
        btn = (Button)super.findViewById(R.id.btn);
        btn.setOnClickListener(new OnClickListener() {

            @Override
            public void onClick(View v) {
                // TODO Auto-generated method stub
                try {
                    ExcelUtil.writeExcel(MainActivity.this,
                            orders, "excel_"+new Date().toString());
                } catch (Exception e) {
                    // TODO Auto-generated catch block
                    e.printStackTrace();
                }

            }
        });
    }
這裡我把上面生成excel的代碼封裝到一個工具類ExcelUtil中,以後使用就直接調用 。MainActivity就是將數組組裝到Order中調用ExcelUtil來寫入。到此android實現excel功能就實現了。
 android:Activity啟動模式之standard
android:Activity啟動模式之standard 先看一下standard啟動模式的說明: 默認啟動模式,每次激活Activity都會創建Activity實
 Android開發文摘集合1,android文摘集合
Android開發文摘集合1,android文摘集合作者:張明雲 原標題:Android 開發中,有哪些坑需要注意? 作者github主頁:zmywly8866.gith
 Android特效專輯(九)——仿微信雷達搜索好友特效,邏輯清晰實現簡單
Android特效專輯(九)——仿微信雷達搜索好友特效,邏輯清晰實現簡單 Android特效專輯(九)——仿微信雷達搜索好友特效,邏輯清晰實現
 新聞客戶端應用項目源碼,客戶端項目源碼
新聞客戶端應用項目源碼,客戶端項目源碼 基於百度數據,一個非常好用的新聞客戶端。 <ignore_js_op> 源