編輯:關於android開發
這個效果做起來好像沒什麼意義,如果不加監聽回調 圖片就能直接替代。寫這篇博客的目的是鍛煉一下思維能力,以更好的面多各種自定義view需求。
本文是和代碼同步寫的。也就是說在寫文章的時候才敲的代碼。這樣會顯得文章有些許混亂。但是我想這樣記錄下來,一個自定義view的真正的制作過程,是一點一點,一步步跟著思路的改變,完善的。不可能一下子就做出一個完整的view。。技術也是這樣,不可能一步登天。都是一步一步的積累。
另外,每一篇博客都是建立在之前博客的基礎知識上的,如果你剛接觸自定義view。可以來說說自定義view簡單學習的方式這裡看我以前的文章。記錄了我學習自定義view的過程,而且前幾篇博客或多或少犯了一些錯誤。這裡我並不想改正博文中的錯誤,因為些錯誤是大家經常會犯的,後來的博客都有指出這些錯誤,以及不再犯,這是一個學習的過程。所以我想把錯誤的經歷記錄下來。等成為高手 回頭看看當年的自己是多麼菜。。也會有成就感。。
老規矩效果圖如下:

首先畫一個六邊形,畫之前來計算一下六邊形的相關知識:
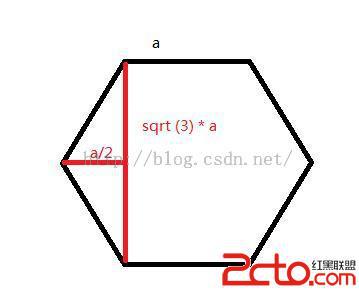
假設一個正六邊形的邊長為a ,因為每個角都是120° 所以可得高為根號三a ,如圖所示。
有了這些信息我們就可以繪制一個六邊形出來,如下:
 float height = (float) (Math.sqrt(3)*mLength);
        mPath.moveTo(mLength/2,0);
        mPath.lineTo(0,height/2);
        mPath.lineTo(mLength/2,height);
        mPath.lineTo((float) (mLength*1.5),height);
        mPath.lineTo(2*mLength,height/2);
        mPath.lineTo((float) (mLength*1.5),0);
        mPath.lineTo(mLength/2,0);
        mPath.close();

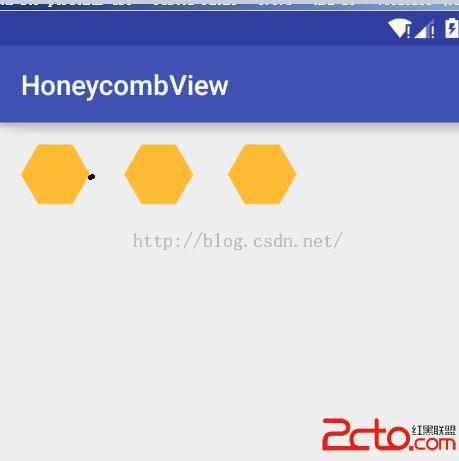
然後將其根據一個偏移量進行平移,就可以用循環繪制出多個六邊形
這裡offset是偏移量,緊挨著的話應該是偏移一個六邊形的寬,寬由上圖可知為 a/2+a+a/2 即 2a;
 for(int i = 0 ; i < 3;i++) {
            int offset = mLength * 2 * i;
            mPath.moveTo(mLength / 2 + offset, 0);
            mPath.lineTo(0 + offset, height / 2);
            mPath.lineTo(mLength / 2 + offset, height);
            mPath.lineTo((float) (mLength * 1.5) + offset, height);
            mPath.lineTo(2 * mLength + offset, height / 2);
            mPath.lineTo((float) (mLength * 1.5)+offset, 0);
            mPath.lineTo(mLength / 2+offset, 0);
            mPath.close();
        }

這不對啊,很奇怪啊。。 底下空出來的一個三角形放不下我們的第二行啊。。
那麼怎麼辦呢。。 加大offset! 加大多少呢。。 應該多增加一個邊長。。這樣就正好留空了。 來試試

現在來准備畫第二行....
發現我們之前path的坐標都是相對寫死的。。 所以要回過頭改一下,改成給定一個起點,就可以繪制出一個六邊形,經過計算,得出下圖
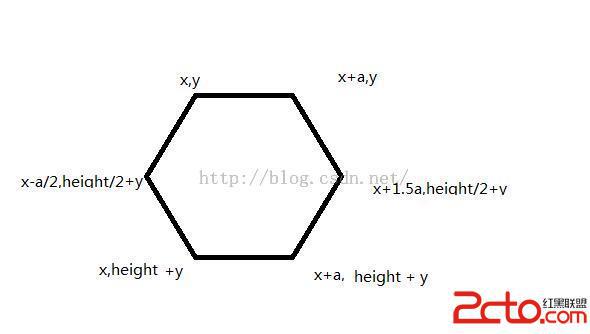
這裡a代表邊長。
改完之後的代碼是:
 float height = (float) (Math.sqrt(3)*mLength);
        for(int i = 0 ; i < 3;i++) {

            //橫坐標偏移量
            int offset = mLength * 3 * i ;
            //左上角的x
            int x = mLength/2 + offset;
            int y = 0;

            //根據左上角一點 繪制整個正六邊形
            mPath.moveTo(x, y);
            mPath.lineTo(x -mLength/2, height / 2 + y);
            mPath.lineTo(x, height+y);
            mPath.lineTo(x + mLength, height +y);
            mPath.lineTo((float) (x + 1.5*mLength), height / 2+y);
            mPath.lineTo(x + mLength, y);
            mPath.lineTo(x, y);
            mPath.close();
        }
然後來畫第二行,第二行起點的path應該在這裡
坐標是: 2a , height/2 這裡的偏移量不變。
首先將畫path的方法提取出來(as快捷鍵ctrl + alt + m)
 //根據左上角一點 繪制整個正六邊形
    private void getPath(float height, float x, float y) {
        mPath.moveTo(x, y);
        mPath.lineTo(x -mLength/2, height / 2 + y);
        mPath.lineTo(x, height+y);
        mPath.lineTo(x + mLength, height +y);
        mPath.lineTo((float) (x + 1.5*mLength), height / 2+y);
        mPath.lineTo(x + mLength, y);
        mPath.lineTo(x, y);
        mPath.close();
    }
然後再給個循環,來繪制第二行的六邊形
        for(int i = 0;i<2;i++){

            float offset = mLength * 3 * i ;
            float x = mLength*2 + offset;
            float y = height/2;

            getPath(height,x,y);

        }

        canvas.drawPath(mPath,mPaint);
得到如下的效果。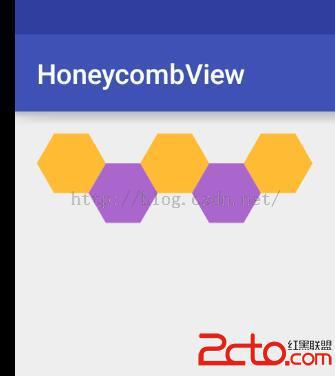
現在ondraw的全部代碼如下:
  @Override
    protected void onDraw(Canvas canvas) {
        mPaint.setColor(Color.parseColor("#FFBB33"));
        //正六邊形的高
        float height = (float) (Math.sqrt(3)*mLength);
        for(int i = 0 ; i < 3;i++) {

            //橫坐標偏移量
            float offset = mLength * 3 * i ;
            //左上角的x
            float x = mLength/2 + offset;
            float y = 0;

            getPath(height, x, y);
        }

        canvas.drawPath(mPath,mPaint);
        mPath.reset();

        mPaint.setColor(Color.parseColor("#AA66CC"));

        for(int i = 0;i<2;i++){

            float offset = mLength * 3 * i ;
            float x = mLength*2 + offset;
            float y = height/2;

            getPath(height,x,y);


        }

        canvas.drawPath(mPath,mPaint);
    }
  //每行的個數
    private int mColumnsCount = 3;

    //行數
    private int mLineCount = 3;
 for (int j = 0; j < mLineCount; j++) {
         if(j%2 == 0)  繪制奇數行 else 繪制偶數行

}
現在整個ondraw如下。
@Override
    protected void onDraw(Canvas canvas) {
        //正六邊形的高
        float height = (float) (Math.sqrt(3) * mLength);

        for (int j = 0; j < mLineCount; j++) {
            if (j % 2 == 0) {
                mPaint.setColor(Color.parseColor("#FFBB33"));

                for (int i = 0; i < mColumnsCount; i++) {

                    //橫坐標偏移量
                    float offset = mLength * 3 * i;
                    //左上角的x
                    float x = mLength / 2 + offset;
                    float y = j * height / 2;

                    getPath(height, x, y);


                }
                canvas.drawPath(mPath, mPaint);
                mPath.reset();
            } else {

                mPaint.setColor(Color.parseColor("#AA66CC"));

                for (int i = 0; i < mColumnsCount; i++) {

                    float offset = mLength * 3 * i;
                    float x = mLength * 2 + offset;
                    float y = (height / 2) * j;

                    getPath(height, x, y);


                }

                canvas.drawPath(mPath, mPaint);
                mPath.reset();
            }


        }


    }
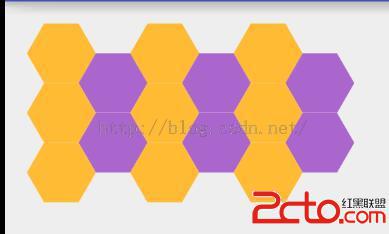
好像顏色一樣就不好看了。。那我們來動態改變一下顏色..
添加一個屬性list來存放color
private ArrayList mColorList;
 mColorList = new ArrayList<>();

        mColorList.add(Color.parseColor("#33B5E5"));

        mColorList.add(Color.parseColor("#AA66CC"));

        mColorList.add(Color.parseColor("#99CC00"));

        mColorList.add(Color.parseColor("#FFBB33"));

        mColorList.add(Color.parseColor("#FF4444"));
在循環中,取出顏色值
 for (int j = 0; j < mLineCount; j++) {

            mPaint.setColor(mColorList.get(j));
效果如下:
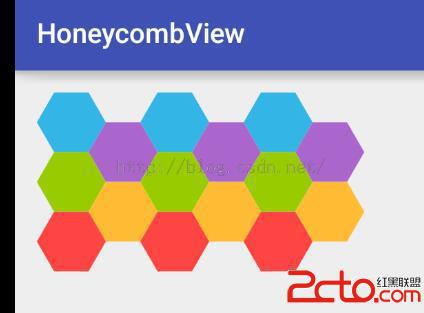
嗯。。看起來像一點樣子了。。。 給中間加點文字吧。。
先給每個蜂窩編號
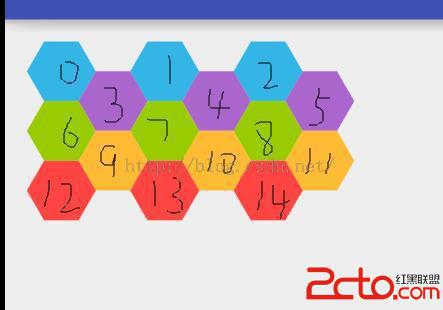
按上面的循環 j為行數 i為列數
研究規律發現 編號等於 j*3 + i
我們有六邊形左上角的坐標xy 可以輕易的計算出中心坐標
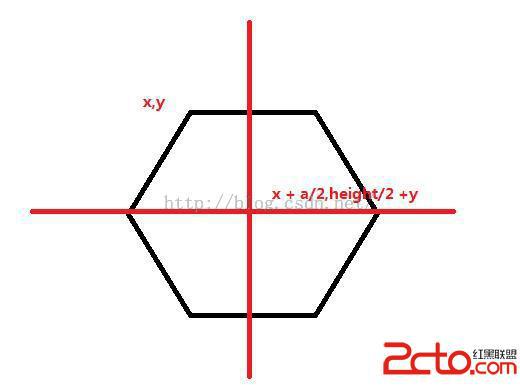
這些都有了。開一個list存放中間的文字:
    //存放文字的list
    private ArrayList mTextList ;
在初始化的時候給添加點數據
mTextList = new ArrayList<>();
for(int i =0;i
繪制文字: 這裡要注意他和path的繪制順序,如果path後繪制則會覆蓋掉文字 float txtLength = mTextPaint.measureText(mTextList.get(txtId));
canvas.drawText(mTextList.get(txtId),x+mLength/2-txtLength/2,y+height/2+5, mTextPaint);
下面是全部的ondraw
@Override
protected void onDraw(Canvas canvas) {
//正六邊形的高
float height = (float) (Math.sqrt(3) * mLength);
for (int j = 0; j < mLineCount; j++) {
mPaint.setColor(mColorList.get(j));
if (j % 2 == 0) {
// mPaint.setColor(Color.parseColor("#FFBB33"));
for (int i = 0; i < mColumnsCount; i++) {
int txtId = j*3 +i;
//橫坐標偏移量
float offset = mLength * 3 * i;
//左上角的x
float x = mLength / 2 + offset;
float y = j * height / 2;
mPath.reset();
getPath(height, x, y);
canvas.drawPath(mPath, mPaint);
float txtLength = mTextPaint.measureText(mTextList.get(txtId));
canvas.drawText(mTextList.get(txtId),x+mLength/2-txtLength/2,y+height/2+5, mTextPaint);
}
} else {
// mPaint.setColor(Color.parseColor("#AA66CC"));
for (int i = 0; i < mColumnsCount; i++) {
int txtId = j*3 +i;
float offset = mLength * 3 * i;
float x = mLength * 2 + offset;
float y = (height / 2) * j;
mPath.reset();
getPath(height, x, y);
canvas.drawPath(mPath, mPaint);
float txtLength = mTextPaint.measureText(mTextList.get(txtId));
canvas.drawText(mTextList.get(txtId),x+mLength/2-txtLength/2,y+height/2+5, mTextPaint);
}
}
}
}
現在的效果圖如下:

好,那現在讓他靈活一點。添加各種set方法,比如行數啊 列數啊 邊長啊 文字內容啊 顏色啊之類的。
/**
* 設置列數
* @param mColumnsCount
*/
public void setColumnsCount(int mColumnsCount) {
this.mColumnsCount = mColumnsCount;
invalidate();
}
/**
* 設置行數
* @param mLineCount
*/
public void setLineCount(int mLineCount) {
this.mLineCount = mLineCount;
invalidate();
}
/**
* 設置文本數據
*/
public void setTextList(ArrayList textList) {
mTextList.clear();
mTextList.addAll(textList);
invalidate();
}
/**
* 設置顏色數據
* @param colorList
*/
public void setColorList(ArrayList colorList) {
mColorList.clear();
mColorList.addAll(colorList);
invalidate();
}
然後 你有沒有忘記測量呢? 只要把最外面的矩形大小給他就行
@Override
protected void onMeasure(int widthMeasureSpec, int heightMeasureSpec) {
int widthSize = MeasureSpec.getSize(widthMeasureSpec);
int widthMode = MeasureSpec.getMode(widthMeasureSpec);
int heightSize = MeasureSpec.getSize(heightMeasureSpec);
int heightMode = MeasureSpec.getMode(heightMeasureSpec);
if(widthMode == MeasureSpec.AT_MOST){
widthSize = (int) ((3f*mColumnsCount+0.5f) *mLength);
}else{
// throw new IllegalStateException("only support wrap_content");
}
if(heightMode == MeasureSpec.AT_MOST){
heightSize = (int) ((mLineCount/2f +0.5f) * (Math.sqrt(3) * mLength));
}else{
// throw new IllegalStateException("only support wrap_content");
}
setMeasuredDimension(widthSize,heightSize);
}
這下使用wrap_content 來看看view的大小:
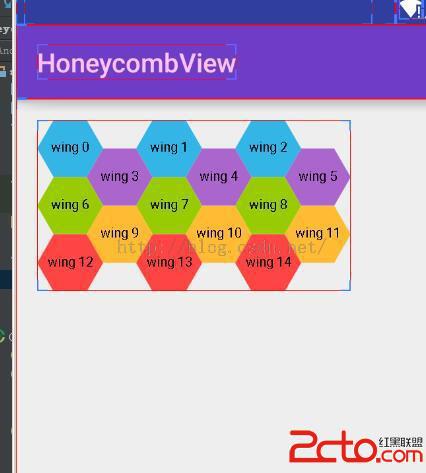
嗯。。測量也對著。。。 這裡我只實現了wrap_content 大家可以以及擴展 讓他支持EXACTLY
這樣 一個蜂窩煤的view 就完成了。。。但是好像沒鳥用的樣子。。因為沒有交互的話。。圖片完全可以代替。所以這次就先遺留一個問題,事件的處理。其實邏輯也不是很復雜,就是判斷觸摸點 是否在Path內,如果action_up的時候在,分開編號,按照編號進行回調即可,這個問題,准備下篇博客解決,請大家繼續關注我的博客 蟹蟹!。
本項目地址:點擊打開鏈接
 閱讀《Android 從入門到精通》(12)——自動完成文本框
閱讀《Android 從入門到精通》(12)——自動完成文本框 自動完成文本框(AutoCompleteTextView) java.lang.Object; andro
 win通過dos配置注冊列表
win通過dos配置注冊列表由於服務器數量眾多,需求是配置環境變量,為了不被累屎,為了減輕壓力所以有了這篇文章!嘿嘿……需求如圖: _<)~~~~ )1、注冊表設置win
 Android安全專項-Apk加固淺析
Android安全專項-Apk加固淺析 0x00 原理部分我不獻丑了,上面3篇文章說的很清楚,我直接實戰,講述從0開始如何最終實現加固的整個過程,踩了不少坑。 0x01
 Android:應用寶省流量更新
Android:應用寶省流量更新 應用寶省流量更新介紹 應用寶省流量更新(SDK),是應用寶提供給開發者輕松實現應用省流量更新的功能,可以幫助開發者縮短更新過程,提高應用