編輯:關於android開發
Okio庫是一個由square公司開發的,它補充了java.io和java.nio的不足,以便能夠更加方便,快速的訪問、存儲和處理你的數據。而OkHttp的底層也使用該庫作為支持。而在開發中,使用該庫可以大大給你帶來方便。
目前,Okio的最新版本是1.6.0,gradle的引用如下
compile 'com.squareup.okio:okio:1.6.0'
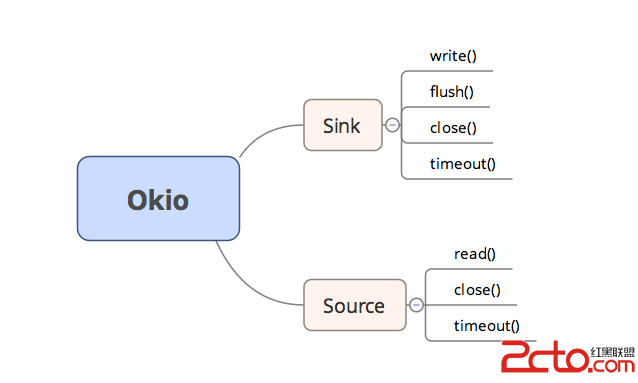
Okio中有兩個關鍵的接口,Sink和Source,這兩個接口都繼承了Closeable接口;而Sink可以簡單的看做OutputStream,Source可以簡單的看做InputStream。而這兩個接口都是支持讀寫超時設置的。結構圖如下

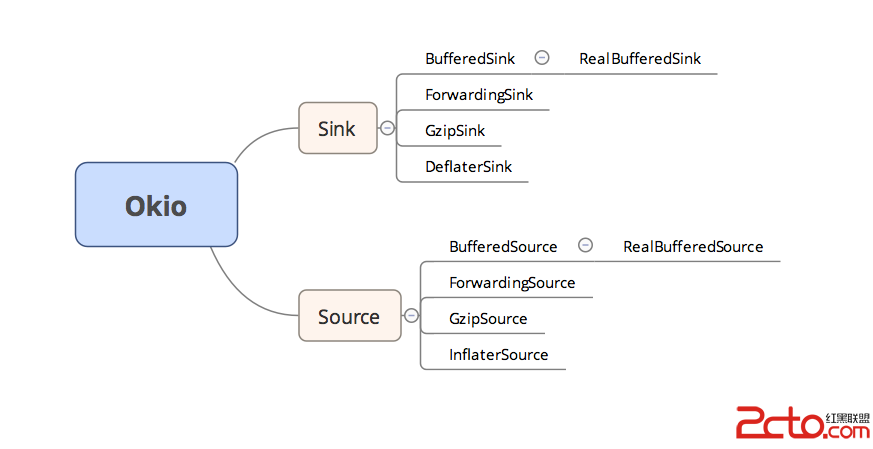
它們各自有一個支持緩沖區的子類接口,BufferedSink和BufferedSource,而BufferedSink有一個實現類RealBufferedSink,BufferedSource有一個實現類RealBufferedSource;此外,Sink和Source它門還各自有一個支持gzip壓縮的實現類GzipSink和GzipSource;一個具有委托功能的抽象類ForwardingSink和ForwardingSource;還有一個實現類便是InflaterSource和DeflaterSink,這兩個類主要用於壓縮,為GzipSink和GzipSource服務;整體的結構圖如下

BufferedSink中定義了一系列寫入緩存區的方法,比如write方法寫byte數組,writeUtf8寫字符串,還有一些列的writeByte,writeString,writeShort,writeInt,writeLong,writeDecimalLong等等方法;
BufferedSource定義的方法和BufferedSink極為相似,只不過一個是寫一個是讀,基本上都是一一對應的,如readUtf8,readByte,readString,readShort,readInt等等等等。這兩個接口中的方法有興趣的點源碼進去看就可以了。
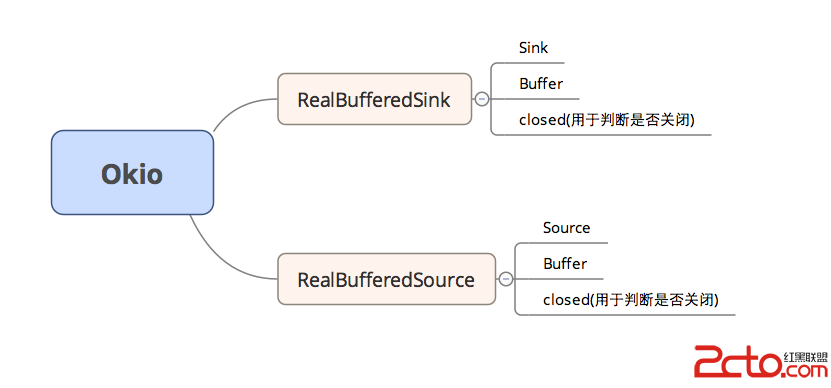
而這兩個支持緩沖區的接口的實現類RealBufferedSink和RealBufferedSource都是通過包裝一個Sink+Buffer或者Source+Buffer來進行實現的。如下圖所示

拿RealBufferedSink來舉例,實際調用的write的一系列方法,都是直接的對成員變量buffer進行的操作,當寫入buffer成功後,最後會調用一個方法將buffer中的內容寫入到sink中去,我們隨便拿一個方法看一下
    public BufferedSink writeLong(long v) throws IOException {

        if(this.closed) {

            throw new IllegalStateException("closed");

        } else {

            this.buffer.writeLong(v);

            return this.emitCompleteSegments();

        }

    }
可以看到,首先會判斷closed成員變量是否是標記著關閉,如果已經關閉了則扔出一個異常,否則將內容寫入到buffer,寫入完成後調用了一個emitCompleteSegments的方法,該方法中做了什麼呢,沒錯,就是將buffer中的內容寫入到sink成員變量中去,然後將自身返回。
    public BufferedSink emitCompleteSegments() throws IOException {

        if(this.closed) {

            throw new IllegalStateException("closed");

        } else {

            long byteCount = this.buffer.completeSegmentByteCount();

            if(byteCount > 0L) {

                this.sink.write(this.buffer, byteCount);

            }

            return this;

        }

    }
這兩個實現類的內部的所有方法都是類似的,這裡不一一展開。
而這一切的背後都是一個叫做Buffer的類在支持著緩沖區,Buffer是BufferedSink和BufferedSource的實現類,因此它既可以用來讀數據,也可以用來寫數據,其內部使用了一個Segment和SegmentPool,維持著一個鏈表,其循環利用的機制和Android中Message的利用機制是一模一樣的。
final class SegmentPool {

    static final long MAX_SIZE = 65536L;

    static Segment next;

    static long byteCount;


    private SegmentPool() {

    }


    static Segment take() {

        Class var0 = SegmentPool.class;

        synchronized(SegmentPool.class) {

            if(next != null) {

                Segment result = next;

                next = result.next;

                result.next = null;

                byteCount -= 2048L;

                return result;

            }

        }


        return new Segment();

    }


    static void recycle(Segment segment) {

        if(segment.next == null && segment.prev == null) {

            if(!segment.shared) {

                Class var1 = SegmentPool.class;

                synchronized(SegmentPool.class) {

                    if(byteCount + 2048L <= 65536L) {

                        byteCount += 2048L;

                        segment.next = next;

                        segment.pos = segment.limit = 0;

                        next = segment;

                    }

                }

            }

        } else {

            throw new IllegalArgumentException();

        }

    }

}
內部一個成員變量next指向鏈表下一個元素,take方法首先判斷池中是否存在可用的,存在則返回,不存在則new一個,而recycle則是將不再使用的Segment重新扔到池中去。從而達到一個Segment池的作用。
而Okio暴露給外部使用的類便是Okio這個類,其內部有大量的靜態方法,包括通過一個Source獲得BufferedSource,通過一個Sink獲得一個BufferedSink。這個過程很簡單,我們調用Okio的buffer方法即可返回我們需要的,如下
Okio.buffer(sink)

Okio.buffer(source)
但是上面兩個方法需要傳遞一個Sink或者Source,那麼這個Sink和Source又是如何獲得的呢。其實方法也在Okio這個類中。我們可以調用sink方法獲得一個Sink,調用source方法獲得一個Source,而數據的來源或者目的可以是一個File,一個輸入或者輸出流,一個Socket鏈接等等。如下
Okio.sink(new File("***"));

Okio.sink(new FileOutputStream(new File("***")));

Okio.sink(new Socket("***",8888));


Okio.source(new File("***"));

Okio.source(new FileInputStream(new File("***")));

Okio.source(new Socket("****",8888));
這樣你可能還不過瘾,那麼讓我們連起來應用一下,現在我們從本地讀一個文件,讀完後再往另一個文件中寫入內容。
public static void main(String[] args) {

    Source source = null;

    BufferedSource bufferedSource = null;

    try {

        File file = new File("resources/test.txt");

        source = Okio.source(file);

        bufferedSource = Okio.buffer(source);

        String content = bufferedSource.readUtf8();

        System.out.println(content);

    } catch (FileNotFoundException e) {

        e.printStackTrace();

    } catch (IOException e) {

        e.printStackTrace();

    } finally {

        closeQuietly(bufferedSource);

    }


    Sink sink = null;

    BufferedSink bufferedSink = null;

    try {

        File dest = new File("resources/dest.txt");

        sink = Okio.sink(dest);

        bufferedSink = Okio.buffer(sink);

        bufferedSink.writeUtf8("11111111111");

    } catch (FileNotFoundException e) {

        e.printStackTrace();

    } catch (IOException e) {

        e.printStackTrace();

    } finally {

        closeQuietly(bufferedSink);

    }


}


public static void closeQuietly(Closeable closeable) {

    if (closeable != null) {

        try {

            closeable.close();

        } catch (RuntimeException rethrown) {

            throw rethrown;

        } catch (Exception ignored) {

        }

    }

}
或許有時候網絡請求中,我們需要使用到Gzip的功能,那麼,我們可以簡單的使用一下gzip的功能
public static void main(String[] args) {

    Sink sink = null;

    BufferedSink bufferedSink = null;

    GzipSink gzipSink=null;

    try {

        File dest = new File("resources/gzip.txt");

        sink = Okio.sink(dest);

        gzipSink=new GzipSink(sink);

        bufferedSink = Okio.buffer(gzipSink);

        bufferedSink.writeUtf8("android vs ios");

    } catch (FileNotFoundException e) {

        e.printStackTrace();

    } catch (IOException e) {

        e.printStackTrace();

    } finally {

        closeQuietly(bufferedSink);

    }


    Source source = null;

    BufferedSource bufferedSource = null;

    GzipSource gzipSource=null;

    try {

        File file = new File("resources/gzip.txt");

        source = Okio.source(file);

        gzipSource=new GzipSource(source);

        bufferedSource = Okio.buffer(gzipSource);

        String content = bufferedSource.readUtf8();

        System.out.println(content);

    } catch (FileNotFoundException e) {

        e.printStackTrace();

    } catch (IOException e) {

        e.printStackTrace();

    } finally {

        closeQuietly(bufferedSource);

    }


}


public static void closeQuietly(Closeable closeable) {

    if (closeable != null) {

        try {

            closeable.close();

        } catch (RuntimeException rethrown) {

            throw rethrown;

        } catch (Exception ignored) {

        }

    }

}
驗證是否正確的方法便是查看該寫入的文件是否是亂碼,以及讀出來是否是原來的字符串。
對比一下原來的gzip壓縮與解壓縮的方式,你就會發現還是簡單了不少的
public class GzipUtil {

    /**

     * GZIP壓縮

     *

     * @param data

     * @return

     */

    public static byte[] gzip(byte[] data) throws Exception {


        if (data == null || data.length == 0) {

            return null;

        }


        ByteArrayOutputStream out = new ByteArrayOutputStream();

        GZIPOutputStream zos;


        BufferedInputStream bis = new BufferedInputStream(new ByteArrayInputStream(data));


        byte[] buf = new byte[512];

        int len;


        try {

            zos = new GZIPOutputStream(out);


            while ((len = bis.read(buf)) != -1) {

                zos.write(buf, 0, len);

                zos.flush();

            }


            bis.close();

            zos.close();


            return out.toByteArray();

        } finally {

            if (out != null) {

                try {

                    out.close();

                } catch (Exception e2) {

                }

            }

        }

    }


    /**

     * Gzip解壓縮

     * @param b

     * @return

     */

    public static byte[] unGzip(byte[] b) {


        if (b == null || b.length == 0) {

            return null;

        }


        ByteArrayOutputStream out = new ByteArrayOutputStream();

        ByteArrayInputStream in = new ByteArrayInputStream(b);


        try {

            GZIPInputStream gunzip = new GZIPInputStream(in);

            byte[] buffer = new byte[256];

            int n;


            while ((n = gunzip.read(buffer)) >= 0) {

                out.write(buffer, 0, n);

            }


            return out.toByteArray();

        } catch (IOException e) {

            Log.e(WDCore.getInstance().getConfiguration().getLogTag(), "uncompress error", e);

        } finally {

            try {

                if (out != null) {

                    out.close();

                }

                if (in != null) {

                    in.close();

                }

            } catch (Exception e2) {

            }

        }


        return null;

    }


}
此外還有一個ByteString類,這個類可以用來做各種變化,它將byte轉會為String,而這個String可以是utf8的值,也可以是base64後的值,也可以是md5的值,也可以是sha256的值,總之就是各種變化,最後取得你想要的值。
總之,在合適的地方適當使用一下Okio這個庫,一定能給你開發帶來諸多便利,何樂而不為呢!
 Android系統四層架構分享,android四層架構
Android系統四層架構分享,android四層架構Android系統四層架構 個人網站:http://www.51pansou.com Android視頻下載:And
 activity切換動畫特效,activity切換特效
activity切換動畫特效,activity切換特效效果圖: 結構圖: 測試代碼: 布局: 1 <?xml version=1.
 自定義Dialog寬度占滿屏幕,dialog寬度
自定義Dialog寬度占滿屏幕,dialog寬度 一、自定義Dialog繼承Dialog public class MyDialog extends Dialog {
 Volley,volley框架
Volley,volley框架 一 網絡請求 1.get方式請求數據 // 1 創建一個請求隊列 RequestQueue requestQueue = Vo