編輯:關於android開發
首頁在AndroidManifest.xml中添加訪問數據庫權限
<uses-sdk android:minSdkVersion="7" />
<uses-permission android:name="android.permission.INTERNET" />
在src中新建一個連接webservice的類,名字隨意,這裡叫做“HttpConnSoap”。基本上這個類是固定的,要改的大多數就是webservice端口地址,具體代碼如下:
package com.example.hospital;//名字要改成自己的包名
import java.io.IOException;
import java.io.InputStream;
import java.io.OutputStream;
import java.net.HttpURLConnection;
import java.net.URL;
import java.util.ArrayList;
import java.util.List;
import org.xmlpull.v1.XmlPullParser;
import android.util.Xml;
public class HttpConnSoap {
public ArrayList<String> GetWebServre(String methodName,ArrayList<String> Parameters,ArrayList<String>ParValues)
{
ArrayList<String> Values=new ArrayList<String>();
String ServerUrl="http://10.0.2.2:8093/Service1.asmx";//網友要改的大多數就是這裡。
//String soapAction="http://tempuri.org/LongUserId1";
String soapAction="http://tempuri.org/"+methodName;
String data="";
String soap = "<?xml version=\"1.0\" encoding=\"utf-8\"?>"
+ "<soap:Envelope xmlns:xsi=\"http://www.w3.org/2001/XMLSchema-instance\" xmlns:xsd=\"http://www.w3.org/2001/XMLSchema\" xmlns:soap=\"http://schemas.xmlsoap.org/soap/envelope/\">"
+"<soap:Body />";
String tps,vps,ts;
String mreakString="";
mreakString="<"+methodName+" xmlns=\"http://tempuri.org/\">";
for ( int i = 0; i < Parameters.size(); i++) {
tps=Parameters.get(i).toString();
//設置該方法的參數為.net webService中的參數名稱
vps=ParValues.get(i).toString();
ts="<"+tps+">"+vps+"</"+tps+">";
mreakString=mreakString+ts;
}
mreakString=mreakString+"</"+methodName+">";
/*
+"<HelloWorld xmlns=\"http://tempuri.org/\">"
+"<x>string11661</x>"
+"<SF1>string111</SF1>"
+ "</HelloWorld>"
*/
String soap2="</soap:Envelope>";
String requestData=soap+mreakString+soap2;
System.out.println(requestData);
try{
URL url =new URL(ServerUrl);
HttpURLConnection con=(HttpURLConnection)url.openConnection();
byte[] bytes=requestData.getBytes("utf-8");
con.setDoInput(true);
con.setDoOutput(true);
con.setUseCaches(false);
con.setConnectTimeout(8000);// 設置超時時間
con.setRequestMethod("POST");
con.setRequestProperty("Content-Type", "text/xml;charset=utf-8");
con.setRequestProperty("SOAPAction",soapAction);
con.setRequestProperty("Content-Length",""+bytes.length);
OutputStream outStream=con.getOutputStream();
outStream.write(bytes);
outStream.flush();
outStream.close();
InputStream inStream=con.getInputStream();
//data=parser(inStream);
//System.out.print("11");
Values= inputStreamtovaluelist(inStream,methodName);
//System.out.println(Values.size());
return Values;
}
catch(Exception e)
{
System.out.print("2221");
return null;
}
}
public ArrayList<String> inputStreamtovaluelist (InputStream in,String MonthsName) throws IOException {
StringBuffer out = new StringBuffer();
String s1="";
byte[] b = new byte[4096];
ArrayList<String> Values=new ArrayList<String>();
Values.clear();
for (int n; (n = in.read(b)) != -1;) {
s1=new String(b, 0, n);
out.append(s1);
}
System.out.println(out);
String[] s13=s1.split("><");
String ifString=MonthsName+"Result";
String TS="";
String vs="";
Boolean getValueBoolean=false;
for(int i=0;i<s13.length;i++){
TS=s13[i];
System.out.println(TS);
int j,k,l;
j=TS.indexOf(ifString);
k=TS.lastIndexOf(ifString);
if (j>=0)
{
System.out.println(j);
if (getValueBoolean==false)
{
getValueBoolean=true;
}
else {
}
if ((j>=0)&&(k>j))
{
System.out.println("FFF"+TS.lastIndexOf("/"+ifString));
//System.out.println(TS);
l=ifString.length()+1;
vs=TS.substring(j+l,k-2);
//System.out.println("fff"+vs);
Values.add(vs);
System.out.println("退出"+vs);
getValueBoolean=false;
return Values;
}
}
if (TS.lastIndexOf("/"+ifString)>=0)
{
getValueBoolean=false;
return Values;
}
if ((getValueBoolean)&&(TS.lastIndexOf("/"+ifString)<0)&&(j<0))
{
k=TS.length();
//System.out.println(TS);
vs=TS.substring(7,k-8);
//System.out.println("f"+vs);
Values.add(vs);
}
}
return Values;
}
}
需要新建一個數據庫訪問類,通過HttpConnSoap這個類和底層數據庫進行通信,操作。這裡新建的方法要和你新建webservice時一直,我的webservice是用vs2010,.net 3.5框架搭建的。這裡列舉兩個方法,寫法大概就是這樣的,網友寫的時候要根據自己的需求來寫就好了。
public class DBUtil
{
static boolean feeflag=false;
ArrayList<String> arrayList=new ArrayList<String>();
ArrayList<String> brrayList=new ArrayList<String>();
ArrayList<String> crrayList=new ArrayList<String>();
HttpConnSoap Soaptest=new HttpConnSoap();
public static Connection getConnection()
{
Connection con=null;
try
{
System.out.println("111");
Class.forName("org.gjt.mm.mysql.Driver");
System.out.println("222");
con=DriverManager.getConnection("jdbc:mysql://192.168.0.100:3306/test?useUnicode=true&characterEncoding=UTF-8","root","123456");
System.out.println("333");
}
catch(Exception e)
{
System.out.println("444");
e.printStackTrace();
}
return con;
}
//查詢學生信息
public String[] selectStu(String StuNO)
{
String ss[]=new String[8];
String result=null;
arrayList.clear();
brrayList.clear();
crrayList.clear();
arrayList.add("StuNO");
brrayList.add(StuNO);
crrayList=Soaptest.GetWebServre("selectStu", arrayList, brrayList);
ss[0]=crrayList.get(0);
ss[1]=crrayList.get(1);
ss[2]=crrayList.get(2);
ss[3]=crrayList.get(3);
ss[4]=crrayList.get(4);
ss[5]=crrayList.get(5);
ss[6]=crrayList.get(6);
ss[7]=crrayList.get(7);
return ss;
}
public List<HashMap<String, String>> selectStuAll() {
List<HashMap<String, String>> list = new ArrayList<HashMap<String, String>>();
arrayList.clear();
brrayList.clear();
crrayList.clear();
crrayList = Soaptest.GetWebServre("selectStuAll", arrayList, brrayList);
/*HashMap<String, String> tempHash = new HashMap<String, String>();
tempHash.put("S_Name", "姓名");
tempHash.put("S_Age", "年齡");
tempHash.put("S_Sex", "性別");
list.add(tempHash);*/
for (int j = 0; j < crrayList.size(); j += 3) {
HashMap<String, String> hashMap = new HashMap<String, String>();
hashMap.put("S_Name", crrayList.get(j));
hashMap.put("S_Age", crrayList.get(j + 1));
hashMap.put("S_Sex", crrayList.get(j + 2));
list.add(hashMap);
}
return list;
}
}
下面就是Android程序中調用了,這裡用listview顯示數據。
private ListView listView;
private DBUtil dbUtil;
private SimpleAdapter adapter;
private void setListView() {
List<HashMap<String, String>> list = new ArrayList<HashMap<String, String>>();
list = dbUtil.selectStuAll();
adapter = new SimpleAdapter(
DayList.this,
list,
R.layout.adapter,
new String[] { "S_Name", "S_Age", "S_Sex" },
new int[] { R.id.textView1, R.id.textView2, R.id.textView3 });
listView.setAdapter(adapter);
}
 界面優化處理技術之(三)登錄框表格組件優化處理,表格組件
界面優化處理技術之(三)登錄框表格組件優化處理,表格組件 在res下drawable下創建xml文件 代碼: 1 <?xml version=1.0 encodi
 Android Studio創建AVD,
Android Studio創建AVD,Android Studio是專門為Android開發設計的IDE,比Eclipse開發Android更加方便、快捷。 安裝And
 算法—2.插入排序,算法插入排序
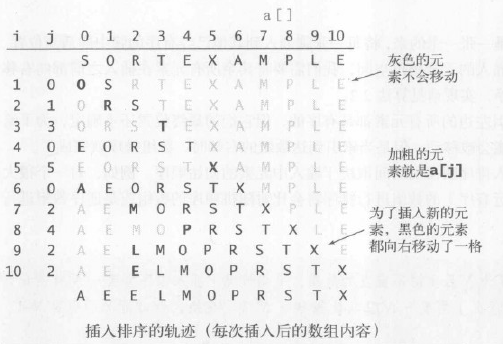
算法—2.插入排序,算法插入排序1.基本思想 通常人們整理橋牌的方法是一張一張的來,將每一張牌插入到其他已經有序的牌中的適當位置。在計算機的實現中,為了給要插入的元素騰出
 Adapter模式實戰-重構鴻洋的Android建行圓形菜單
Adapter模式實戰-重構鴻洋的Android建行圓形菜單 對於很多開發人員來說,炫酷的UI效果是最吸引他們注意力的,很多人也因為這些炫酷的效果而去學習一些比較知名