編輯:Android編程入門
一、運行時的狀態
遇到一個這樣的要求:“不進行掃描操作,怎麼對指定的免密碼WIFI進行連接(之前沒有連接過)”,於是動手寫了一個Demo,如圖所示未連接成功時的狀態,第一個編輯框讓用戶輸入SSID,第二個編輯框輸入密碼,密碼可以根據實例情況輸入,也可以不輸入密碼,因為有些Wifi免密碼。這裡的免密碼不是指可以破解wifi密碼。注意圖片中手機頂部的wifi圖標,是沒有的,說明此時並沒有打開手機的wifi。在手機上運行狀態如下所示:
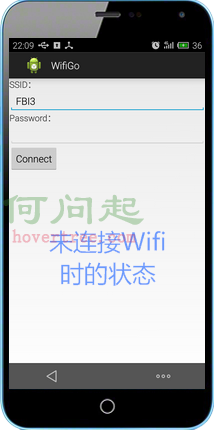
輸入SSID,點擊連接後的狀態,當手機的wifi沒有打開時,程序將自動打開wifi,打開後再連接指定的wifi。
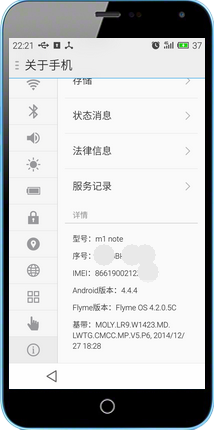
測試的手機信息如下:

二、功能實現
2.1、項目結構如下所示:
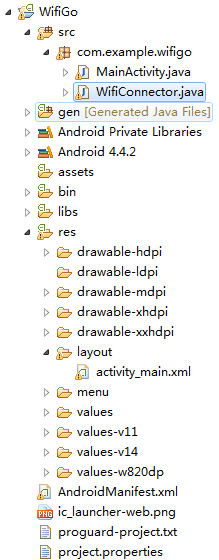
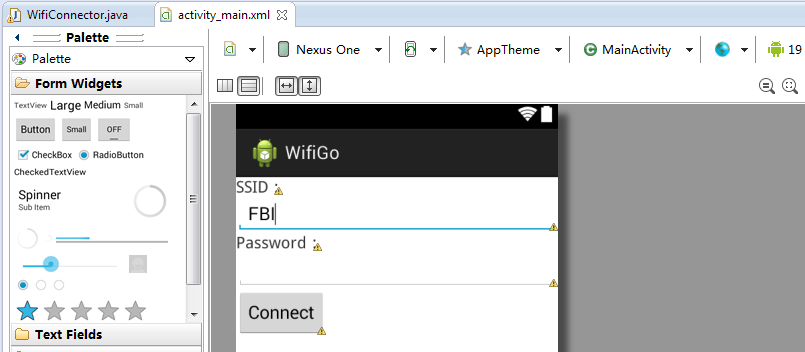
2.2、頁面布局activity_main.xml文件如下所示:
<LinearLayout xmlns:android="http://schemas.android.com/apk/res/android"
    android:layout_width="fill_parent"
    android:layout_height="fill_parent"
    android:orientation="vertical" >

    <TextView
        android:id="@+id/txtSSID"
        android:layout_width="wrap_content"
        android:layout_height="wrap_content"
        android:text="SSID:"
        android:textSize="@dimen/activity_horizontal_margin" />

    <EditText
        android:id="@+id/editSSID"
        android:layout_width="match_parent"
        android:layout_height="wrap_content"
        android:ems="10"
        android:text="FBI" >

        <requestFocus />
    </EditText>

    <TextView
        android:id="@+id/TextView01"
        android:layout_width="wrap_content"
        android:layout_height="wrap_content"
        android:text="Password:"
        android:textSize="@dimen/activity_horizontal_margin" />

    <EditText
        android:id="@+id/editPwd"
        android:layout_width="match_parent"
        android:layout_height="wrap_content"
        android:ems="10"
        android:text="" />

    <Button
        android:id="@+id/btnConnect"
        android:layout_width="wrap_content"
        android:layout_height="wrap_content"
        android:text="Connect" />

    <TextView
        android:id="@+id/txtMessage"
        android:layout_width="wrap_content"
        android:layout_height="wrap_content"
        android:text="" />

</LinearLayout>
2.3、清單文件AndroidManifest.xml內容如下,中間添加了對wifi訪問的用戶權限部分非常重要
<?xml version="1.0" encoding="utf-8"?>
<manifest xmlns:android="http://schemas.android.com/apk/res/android"
    package="com.example.wifigo"
    android:versionCode="1"
    android:versionName="1.0" >

    <uses-sdk
        android:minSdkVersion="14"
        android:targetSdkVersion="19" />

    <uses-permission android:name="android.permission.CHANGE_NETWORK_STATE" >
    </uses-permission>
    <uses-permission android:name="android.permission.CHANGE_WIFI_STATE" >
    </uses-permission>
    <uses-permission android:name="android.permission.ACCESS_NETWORK_STATE" >
    </uses-permission>
    <uses-permission android:name="android.permission.ACCESS_WIFI_STATE" >
    </uses-permission>

    <application
        android:allowBackup="true"
        android:icon="@drawable/ic_launcher"
        android:label="@string/app_name"
        android:theme="@style/AppTheme" >
        <activity
            android:name=".MainActivity"
            android:label="@string/app_name" >
            <intent-filter>
                <action android:name="android.intent.action.MAIN" />

                <category android:name="android.intent.category.LAUNCHER" />
            </intent-filter>
        </activity>
    </application>

</manifest>
2.4、Wifi連接管理類WifiConnector.java,有不少是參考熱心網友的博客,謝謝了!
package com.example.wifigo;

import java.util.List;

import android.net.wifi.*;
import android.net.wifi.WifiConfiguration.AuthAlgorithm;
import android.net.wifi.WifiConfiguration.KeyMgmt;
import android.os.Handler;
import android.os.Message;
import android.text.TextUtils;
import android.util.Log;

public class WifiConnector {
    Handler mHandler;
    WifiManager wifiManager;

    /**
     * 向UI發送消息
     * @param info 消息
     */
    public void sendMsg(String info) {
        if (mHandler != null) {
            Message msg = new Message();
            msg.obj = info;
            mHandler.sendMessage(msg);// 向Handler發送消息
        } else {
            Log.e("wifi", info);
        }
    }

    //WIFICIPHER_WEP是WEP ,WIFICIPHER_WPA是WPA,WIFICIPHER_NOPASS沒有密碼
    public enum WifiCipherType {
        WIFICIPHER_WEP, WIFICIPHER_WPA, WIFICIPHER_NOPASS, WIFICIPHER_INVALID
    }

    // 構造函數
    public WifiConnector(WifiManager wifiManager) {
        this.wifiManager = wifiManager;
    }

    // 提供一個外部接口,傳入要連接的無線網
    public void connect(String ssid, String password, WifiCipherType type) {
        Thread thread = new Thread(new ConnectRunnable(ssid, password, type));
        thread.start();
    }

    // 查看以前是否也配置過這個網絡
    private WifiConfiguration isExsits(String SSID) {
        List<WifiConfiguration> existingConfigs = wifiManager
                .getConfiguredNetworks();
        for (WifiConfiguration existingConfig : existingConfigs) {
            if (existingConfig.SSID.equals("\"" + SSID + "\"")) {
                return existingConfig;
            }
        }
        return null;
    }

    private WifiConfiguration createWifiInfo(String SSID, String Password,
            WifiCipherType Type) {
        WifiConfiguration config = new WifiConfiguration();
        config.allowedAuthAlgorithms.clear();
        config.allowedGroupCiphers.clear();
        config.allowedKeyManagement.clear();
        config.allowedPairwiseCiphers.clear();
        config.allowedProtocols.clear();
        config.SSID = "\"" + SSID + "\"";
        // nopass
        if (Type == WifiCipherType.WIFICIPHER_NOPASS) {
            config.allowedKeyManagement.set(WifiConfiguration.KeyMgmt.NONE);
        }
        // wep
        if (Type == WifiCipherType.WIFICIPHER_WEP) {
            if (!TextUtils.isEmpty(Password)) {
                if (isHexWepKey(Password)) {
                    config.wepKeys[0] = Password;
                } else {
                    config.wepKeys[0] = "\"" + Password + "\"";
                }
            }
            config.allowedAuthAlgorithms.set(AuthAlgorithm.OPEN);
            config.allowedAuthAlgorithms.set(AuthAlgorithm.SHARED);
            config.allowedKeyManagement.set(KeyMgmt.NONE);
            config.wepTxKeyIndex = 0;
        }
        // wpa
        if (Type == WifiCipherType.WIFICIPHER_WPA) {
            config.preSharedKey = "\"" + Password + "\"";
            config.hiddenSSID = true;
            config.allowedAuthAlgorithms
                    .set(WifiConfiguration.AuthAlgorithm.OPEN);
            config.allowedGroupCiphers.set(WifiConfiguration.GroupCipher.TKIP);
            config.allowedKeyManagement.set(WifiConfiguration.KeyMgmt.WPA_PSK);
            config.allowedPairwiseCiphers
                    .set(WifiConfiguration.PairwiseCipher.TKIP);
            // 此處需要修改否則不能自動重聯
            // config.allowedProtocols.set(WifiConfiguration.Protocol.WPA);
            config.allowedGroupCiphers.set(WifiConfiguration.GroupCipher.CCMP);
            config.allowedPairwiseCiphers
                    .set(WifiConfiguration.PairwiseCipher.CCMP);
            config.status = WifiConfiguration.Status.ENABLED;
        }
        return config;
    }

    // 打開wifi功能
    private boolean openWifi() {
        boolean bRet = true;
        if (!wifiManager.isWifiEnabled()) {
            bRet = wifiManager.setWifiEnabled(true);
        }
        return bRet;
    }

    class ConnectRunnable implements Runnable {
        private String ssid;

        private String password;

        private WifiCipherType type;

        public ConnectRunnable(String ssid, String password, WifiCipherType type) {
            this.ssid = ssid;
            this.password = password;
            this.type = type;
        }

        @Override
        public void run() {
            try {
                // 打開wifi
                openWifi();
                sendMsg("opened");
                Thread.sleep(200);
                // 開啟wifi功能需要一段時間(我在手機上測試一般需要1-3秒左右),所以要等到wifi
                // 狀態變成WIFI_STATE_ENABLED的時候才能執行下面的語句
                while (wifiManager.getWifiState() == WifiManager.WIFI_STATE_ENABLING) {
                    try {
                        // 為了避免程序一直while循環,讓它睡個100毫秒檢測……
                        Thread.sleep(100);
                    } catch (InterruptedException ie) {
                    }
                }

                WifiConfiguration wifiConfig = createWifiInfo(ssid, password,
                        type);
                //
                if (wifiConfig == null) {
                    sendMsg("wifiConfig is null!");
                    return;
                }

                WifiConfiguration tempConfig = isExsits(ssid);

                if (tempConfig != null) {
                    wifiManager.removeNetwork(tempConfig.networkId);
                }

                int netID = wifiManager.addNetwork(wifiConfig);
                boolean enabled = wifiManager.enableNetwork(netID, true);
                sendMsg("enableNetwork status enable=" + enabled);
                boolean connected = wifiManager.reconnect();
                sendMsg("enableNetwork connected=" + connected);
                sendMsg("連接成功!");
            } catch (Exception e) {
                // TODO: handle exception
                sendMsg(e.getMessage());
                e.printStackTrace();
            }
        }
    }

    private static boolean isHexWepKey(String wepKey) {
        final int len = wepKey.length();

        // WEP-40, WEP-104, and some vendors using 256-bit WEP (WEP-232?)
        if (len != 10 && len != 26 && len != 58) {
            return false;
        }

        return isHex(wepKey);
    }

    private static boolean isHex(String key) {
        for (int i = key.length() - 1; i >= 0; i--) {
            final char c = key.charAt(i);
            if (!(c >= '0' && c <= '9' || c >= 'A' && c <= 'F' || c >= 'a'
                    && c <= 'f')) {
                return false;
            }
        }

        return true;
    }
}
2.5、MainActivity.java代碼,完成接收用戶的輸入與調用wifi連接功能,如下所示:
package com.example.wifigo;

import com.example.wifigo.WifiConnector.WifiCipherType;

import android.app.Activity;
import android.content.Context;
import android.net.wifi.WifiManager;
import android.os.Bundle;
import android.os.Handler;
import android.os.Message;
import android.view.Menu;
import android.view.MenuItem;
import android.view.View;
import android.widget.Button;
import android.widget.EditText;
import android.widget.TextView;
import android.widget.Toast;

public class MainActivity extends Activity {

    Button btnConnect;
    WifiManager wifiManager;
    WifiConnector wac;
    TextView textView1;
    EditText editPwd;
    EditText editSSID;
    @Override
    protected void onCreate(Bundle savedInstanceState) {
        super.onCreate(savedInstanceState);
        setContentView(R.layout.activity_main);

        btnConnect = (Button) findViewById(R.id.btnConnect);
        textView1 = (TextView) findViewById(R.id.txtMessage);
        wifiManager = (WifiManager) getSystemService(Context.WIFI_SERVICE);
        wac = new WifiConnector(wifiManager);

         editPwd=(EditText) findViewById(R.id.editPwd);
         editSSID=(EditText) findViewById(R.id.editSSID);

        wac.mHandler = new Handler() {
            @Override
            public void handleMessage(Message msg) {
                // 操作界面
                textView1.setText(textView1.getText()+"\n"+msg.obj+"");
                super.handleMessage(msg);
            }
        };
        btnConnect.setOnClickListener(new Button.OnClickListener() {

            @Override
            public void onClick(View v) {
                try {
                    wac.connect(editSSID.getText().toString(), editPwd.getText().toString(),
                            editPwd.getText().toString().equals("")?WifiCipherType.WIFICIPHER_NOPASS:WifiCipherType.WIFICIPHER_WPA);
                } catch (Exception e) {
                    textView1.setText(e.getMessage());
                }

            }
        });
    }

    @Override
    public boolean onCreateOptionsMenu(Menu menu) {
        // Inflate the menu; this adds items to the action bar if it is present.
        getMenuInflater().inflate(R.menu.main, menu);
        return true;
    }

    @Override
    public boolean onOptionsItemSelected(MenuItem item) {
        // Handle action bar item clicks here. The action bar will
        // automatically handle clicks on the Home/Up button, so long
        // as you specify a parent activity in AndroidManifest.xml.
        int id = item.getItemId();
        if (id == R.id.action_settings) {
            return true;
        }
        return super.onOptionsItemSelected(item);
    }
}
2.6、小結
時間比較緊,代碼比較粗糙,這畢竟只是一個demo,如果您需要使用在商業項目中這可能只具有拋磚引玉的作用了;另外測試時發現如果手機的wifi沒有打開,依靠程序打開時程序會崩潰,後面發現有可能是打開wifi時需要一段時間,所以代碼中增加了一些人為的延時操作,盡量用更加優雅的辦法替代;我使用一台Android 4.x.x的meizu note 1手機和一個DLink DIR-600N的老路由器測試沒有問題,使用自己的筆記本電腦作熱點,帶密碼連接沒有問題,這不代表在其它環境下就正常了。
2.7、參考示例:
下載示例源碼
 Android中的Semaphore
信號量,了解過操作系統的人都知道,信號量是用來做什麼的···在Android中,已經提供了Semaphore來幫助我們使用~那麼
 Android自定義SurfaceView實現雪花效果
實現雪花的效果其實也可以通過自定義View的方式來實現的(SurfaceView也是繼承自View的),而且操作上也相對簡單一些,當然也有一些
 Android圖片輪播控件編寫過程
1. 輪播控件的組成部分 我們以知乎日報Android客戶端的輪播控件為例,分析一下輪播控件的主要組成: &
 Android之Activity的生命周期
PS:寫一發關於Activity的生命周期,也算是面試的重點內容. 學習內容:1.Activity的生命周期2.面對多種情況的時候Activity的生命周期3.