編輯:Android編程入門
黑盒測試:測試邏輯業務
白盒測試:測試邏輯方法
方法測試:function test
單元測試:unit test
集成測試:integration test
系統測試:system test
冒煙測試:smoke test
壓力測試:pressure test
在清單文件中指定指令集
<instrumentation
android:name="android.test.InstrumentationTestRunner"
//指定該測試框架要測試哪一個項目
android:targetPackage="com.itheima.junit"
></instrumentation>
定義使用的類庫
<uses-library android:name="android.test.runner"/>//創建OpenHelper對象
MyOpenHelper oh = new MyOpenHelper(getContext(), "person.db", null, 1);
//獲得數據庫對象,如果數據庫不存在,先創建數據庫,後獲得,如果存在,則直接獲得
SQLiteDatabase db = oh.getWritableDatabase();getWritableDatabase():打開可讀寫的數據庫
getReadableDatabase():在磁盤空間不足時打開只讀數據庫,否則打開可讀寫數據庫
在創建數據庫時創建表
public void onCreate(SQLiteDatabase db) {
    // TODO Auto-generated method stub
    db.execSQL("create table person (_id integer primary key autoincrement, name char(10), phone char(20), money integer(20))");
}insert into person (name, phone, money) values ('張三', '159874611', 2000);
delete from person where name = '李四' and _id = 4;
update person set money = 6000 where name = '李四';
select name, phone from person where name = '張三';
    //插入
    db.execSQL("insert into person (name, phone, money) values (?, ?, ?);", new Object[]{"張三", 15987461, 75000});
    //查找
    Cursor cs = db.rawQuery("select _id, name, money from person where name = ?;", new String[]{"張三"});
測試方法執行前會調用此方法
protected void setUp() throws Exception {
    super.setUp();
    //                  獲取虛擬上下文對象
    oh = new MyOpenHelper(getContext(), "people.db", null, 1);
}插入
//以鍵值對的形式保存要存入數據庫的數據
ContentValues cv = new ContentValues();
cv.put("name", "劉能");
cv.put("phone", 1651646);
cv.put("money", 3500);
//返回值是改行的主鍵,如果出錯返回-1
long i = db.insert("person", null, cv);
刪除
//返回值是刪除的行數
int i = db.delete("person", "_id = ? and name = ?", new String[]{"1", "張三"});
修改
ContentValues cv = new ContentValues();
cv.put("money", 25000);
int i = db.update("person", cv, "name = ?", new String[]{"趙四"});
查詢
//arg1:要查詢的字段
//arg2:查詢條件
//arg3:填充查詢條件的占位符
Cursor cs = db.query("person", new String[]{"name", "money"}, "name = ?", new String[]{"張三"}, null, null, null);
while(cs.moveToNext()){
    //                          獲取指定列的索引值
    String name = cs.getString(cs.getColumnIndex("name"));
    String money = cs.getString(cs.getColumnIndex("money"));
    System.out.println(name + ";" + money);
}保證多條SQL語句要麼同時成功,要麼同時失敗
最常見案例:銀行轉賬
事務api
try {
    //開啟事務
    db.beginTransaction();
    ...........
    //設置事務執行成功
    db.setTransactionSuccessful();
} finally{
    //關閉事務
    //如果此時已經設置事務執行成功,則sql語句生效,否則不生效
    db.endTransaction();
}任意插入一些數據
定義業務bean:Person.java
讀取數據庫的所有數據
Cursor cs = db.query("person", null, null, null, null, null, null);
while(cs.moveToNext()){
    String name = cs.getString(cs.getColumnIndex("name"));
    String phone = cs.getString(cs.getColumnIndex("phone"));
    String money = cs.getString(cs.getColumnIndex("money"));
    //把讀到的數據封裝至Person對象
    Person p = new Person(name, phone, money);
    //把person對象保存至集合中
    people.add(p);
}
把集合中的數據顯示至屏幕
 LinearLayout ll = (LinearLayout) findViewById(R.id.ll);
 for(Person p : people){
     //創建TextView,每條數據用一個文本框顯示
     TextView tv = new TextView(this);
     tv.setText(p.toString());
     //把文本框設置為ll的子節點
     ll.addView(tv);
 }
分頁查詢
Cursor cs = db.query("person", null, null, null, null, null, null, "0, 10");就是用來顯示一行一行的條目的
MVC架構
M:model模型層,要顯示的數據 ————people集合
V:view視圖層,用戶看到的界面 ————ListView
c:control控制層,操作數據如何顯示 ————adapter對象
每一個條目都是一個View對象
必須實現的兩個方法
第一個
//系統調用此方法,用來獲知模型層有多少條數據
public int getCount() {
    return people.size();
}
第二個
//系統調用此方法,獲取要顯示至ListView的View對象
//position:是return的View對象所對應的數據在集合中的位置
public View getView(int position, View convertView, ViewGroup parent) {
    System.out.println("getView方法調用" + position);
    TextView tv = new TextView(MainActivity.this);
    //拿到集合中的元素
    Person p = people.get(position);
    tv.setText(p.toString());
    //把TextView的對象返回出去,它會變成ListView的條目
    return tv;
}
屏幕上能顯示多少個條目,getView方法就會被調用多少次,屏幕向下滑動時,getView會繼續被調用,創建更多的View對象顯示至屏幕
當條目劃出屏幕時,系統會把該條目緩存至內存,當該條目再次進入屏幕,系統在重新調用getView時會把緩存的條目作為convertView參數傳入,但是傳入的條目不一定是之前被緩存的該條目,即系統有可能在調用getView方法獲取第一個條目時,傳入任意一個條目的緩存
創建對話框構建器對象,類似工廠模式
AlertDialog.Builder builder = new Builder(this);設置標題和正文
builder.setTitle("警告");
builder.setMessage("若練此功,必先自宮");
設置確定和取消按鈕
builder.setPositiveButton("現在自宮", new OnClickListener() {

    @Override
    public void onClick(DialogInterface dialog, int which) {
        // TODO Auto-generated method stub
        Toast.makeText(MainActivity.this, "恭喜你自宮成功,現在程序退出", 0).show();
    }
});

builder.setNegativeButton("下次再說", new OnClickListener() {

    @Override
    public void onClick(DialogInterface dialog, int which) {
        // TODO Auto-generated method stub
        Toast.makeText(MainActivity.this, "若不自宮,一定不成功", 0).show();
    }
});
使用構建器創建出對話框對象
AlertDialog ad = builder.create();
ad.show(); AlertDialog.Builder builder = new Builder(this);
builder.setTitle("選擇你的性別");定義單選選項
final String[] items = new String[]{
        "男",
        "女"
};
//-1表示默認誰也不選中
//點擊偵聽的導包要注意別導錯
builder.setSingleChoiceItems(items, -1, new OnClickListener() {

    //dialog:觸發這個方法的對話框
    //which:用戶所選的條目的下標
    @Override
    public void onClick(DialogInterface dialog, int which) {
        Toast.makeText(MainActivity.this, "您選擇了" + items[which], 0).show();
        //關閉對話框
        dialog.dismiss();
    }
});
//可以直接用構建器顯示對話框
builder.show(); AlertDialog.Builder builder = new Builder(this);
builder.setTitle("請選擇你覺得帥的人");定義多選的選項,因為可以多選,所以需要一個boolean數組來記錄哪些選項被選了
final String[] items = new String[]{
        "吳彥祖",
        "吳亦凡",
        "劉德華",
        "古天樂"
};
//默認只選中第一個條目
final boolean[] checkedItems = new boolean[]{
        true,
        false,
        false,
        false,
};
builder.setMultiChoiceItems(items, checkedItems, new OnMultiChoiceClickListener() {

    //which:用戶點擊條目的下標
    //isChecked:用於判斷用戶點擊該條目是選中還是取消
    @Override
    public void onClick(DialogInterface dialog, int which, boolean isChecked) {
        checkedItems[which] = isChecked;
    }
});
//設置一個確定按鈕
builder.setPositiveButton("確定", new OnClickListener() {

    @Override
    public void onClick(DialogInterface dialog, int which) {
        StringBuffer sb = new StringBuffer();
        for(int i = 0;i < items.length; i++){
            sb.append(checkedItems[i] ? items[i] + " " : "");
        }
        Toast.makeText(MainActivity.this, sb.toString(), 0).show();
    }
});
builder.show(); Android學習筆記之ConnectivityManager+NetWorkInfo
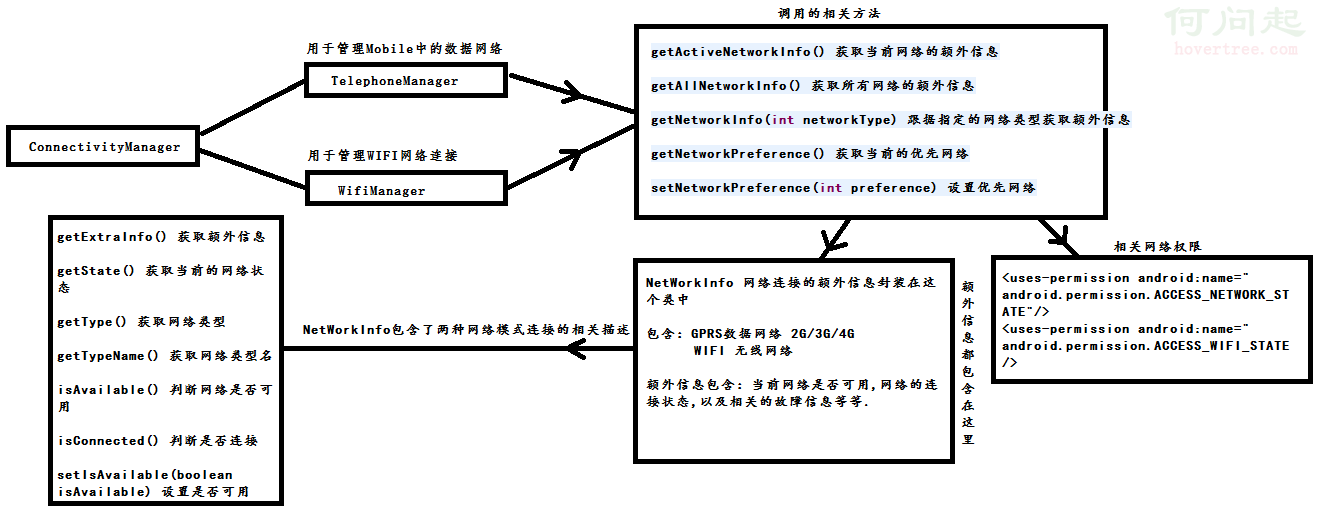
PS:眼看就要開學了,該收收心了. 學習內容:1.ConnecivityManager2.NetWorkInfo Connectivit
 Android 從本地圖庫或拍照後裁剪圖片並設置頭像
在QQ和微信等應用都會有設置頭像,一般都是從本地圖庫選取或相機拍照,然後再截圖自己喜歡的部分,然後設置。最後一步把截取好的圖片再保存到本地,來保存頭像。為了大家使用方便,
 android基礎---->NDK的使用
NDK的發布,使“Java+C”的開發方式終於轉正,成為官方支持的開發方式。NDK將是Android平台支持C開發的開端,今天我們開始ndk的學習
 Android圖片加載庫的理解
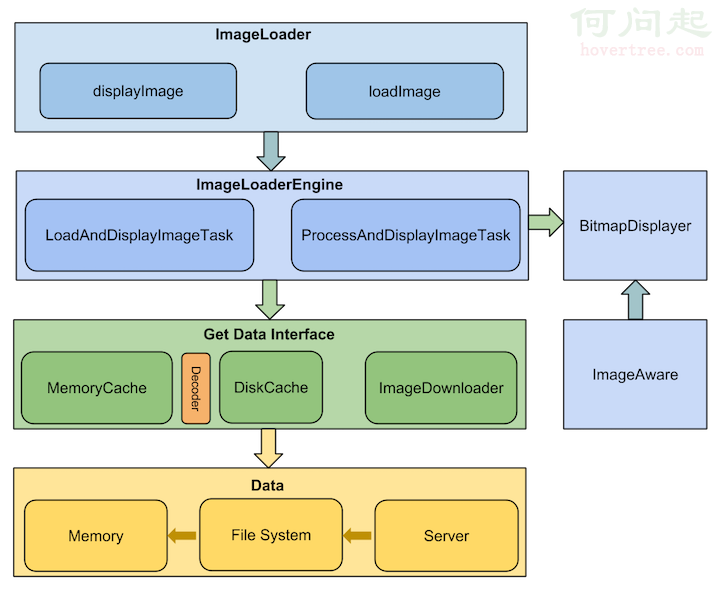
前言 這是“基礎自測”系列的第三篇文章,以Android開發需要熟悉的20個技術點為切入點,本