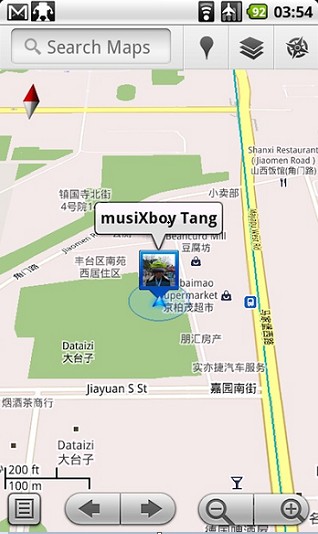
Google Map(谷歌地圖)是Google公司提供的電子地圖服務。包括了三種視圖:矢量地圖、衛星圖片、地形地圖。對於Android系統來說,可以利用Google提供的地圖服務來開發自己的一些應用。Google Map的服務體現在兩個方面:地圖API和位置API。使用Android Maps API(地圖API)和Android Location API(定位API)可以輕松實現實用而且強大的功能。
我的位置:“我的位置”在地圖上顯示你的當前位置(通常在 1000 米范圍之內)。即使沒有 GPS,你也可以確定自己的位置。谷歌手機地圖還支持內置 GPS,也可以鏈接到藍牙GPS 傳感器,以便更准確地確定用戶的位置。“我的位置”功能是通過識別你附近無線發射塔的信息廣播而確定你的位置的。
地圖和衛星視圖:谷歌手機地圖向你提供所查看地區的地圖和衛星視圖,其界面的使用感覺與你在台式機上相同。 可沿其中一個方向滾動,以查看地圖上的更多內容;或使用快捷鍵進行縮放。
商戶列表:借助於Google 的本地搜索引擎,可以按名稱(如“星巴克”)或類型(如“咖啡”)搜索商家,查看商店的營業時間和評分,然後,只需點擊一下即可撥通感興趣的商家的電話。有了“我的位置”功能,甚至都不需要輸入當前位置即可方便地找到附近的商家。
駕車路線:可以很方便地獲得駕車路線,其中會清楚地標明每次轉彎。有了“我的位置”功能,甚至都不需要輸入出發點。
公交換乘:查看公交和地鐵線路,確定轉車路線,制定你在全球 80 多個城市的出行計劃。“公交換乘”功能目前適用於黑莓、Windows Mobile、S60 和其他支持 Java 的手機。
路況信息:Google 地圖中的公路會根據實時路況數據,以綠色、黃色或紅色顯示。
收藏夾:為你常去的地方加上書簽,以便能在地圖上非常方便地返回到這些地方。

1. 首先先要獲取你的debug keystore位置:
打開Eclipse--->Windows---> preferences--->Android--->Build
查看默認的debug keystore位置,我的是C:\Documents and Settings\sdhbk\.android\debug.keystore
2.
D:\android-sdk-windows-1.5_r1\tools>keytool -list -alias androiddebugkey -keystore "C:\Documents and Settings\sdhbk\.android\debug.keystore" -storepass android -keypass android
androiddebugkey, 2009-7-25, PrivateKeyEntry,
認證指紋 (MD5): DA:D5:6E:C2:80:D1:0F:0D:F8:2A:58:6A:74:7C:CE:2D
3.
打開http://code.google.com/intl/zh-CN/android/maps-api-signup.html,填入你的認證指紋(MD5)即可獲得apiKey了,結果顯示如下:
感謝您注冊 Android 地圖 API 密鑰!
您的密鑰是:
XXXXXXXXXXXXXXXXXXXXXXXXXXXXXXXXXXXXXXXX
4. 使用得到的apiKey:
在layout中加入MapView
XML/HTML代碼
- <com.google.android.maps.MapView
- android:id="@+id/mapview"
- android:layout_width="fill_parent"
- android:layout_height="fill_parent"
- android:apiKey="0jOkQ80oD1JL9C6HAja99uGXCRiS2CGjKO_bc_g" />
或者
XML/HTML代碼
- <view android:id="@+id/mv"
- class="com.google.android.maps.MapView"
- android:layout_width="fill_parent"
- android:layout_height="fill_parent"
- android:layout_weight="1"
- android:apiKey="0jOkQ80oD1JL9C6HAja99uGXCRiS2CGjKO_bc_g"
- />
5.Android在sdk1.5的預裝的add-on中提供了一個Map擴展庫com.google.android.maps,利用它你就可以 給你的android應用程序增加上強大的地圖功能了。這個庫的位置在Your-SDK_DIR\add-ons\google_apis-3 \libs.
一定要在manifest.xml中設置全相應的權限,比如:
<uses-permission android:name="android.permission.ACCESS_COARSE_LOCATION" />
<uses-permission android:name="android.permission.INTERNET" />
要在manifest.xml中加上要用的maps庫:
XML/HTML代碼
- <manifest xmlns:android="http://schemas.android.com/apk/res/android"
- package="com.example.package.name">
- ...
- <application android:name="MyApplication" >
- <uses-library android:name="com.google.android.maps" />
- ...
- </application>
- ...
- </manifest>
需要說明的是這個庫不是標准的android sdk的內容,你也可以自己從這裡這裡下載並放到你的sdk裡面。
Maps庫分析
Maps庫提供了十幾個類,具體可以參考這裡http://code.google.com/intl/ja/android/add-ons/google-apis/reference/index.html, 包括Mapview,MapController,MapActivity等。
Mapview是用來顯示地圖的view, 它也是派生自android.view.ViewGroup。
地圖可以以不同的形式來顯示出來,如街景模式,衛星模式等,具體方法可以參考:
setSatellite(boolean), setTraffic(boolean), and setStreetView(boolean)
MapView只能被MapActivity來創建,這是因為mapview需要通過後台的線程來連接網絡或者文件系統,而這些線程要由mapActivity來管理。
需要特別說明的一點是,android 1.5中,map的zoom采用了built-in機制,可以通過setBuiltInZoomControls(boolean)來設置是否在地圖上顯示zoom控件。
MapActivity 是一個抽象類,任何想要顯示MapView的activity都需要派生自MapActivity。並且在其派生類的onCreate()中,都要創建一 個MapView實例,可以通過MapView constructor (then add it to a layout View with ViewGroup.addView(View)) 或者通過layout XML來創建。
Google Maps實例分析
最後,按照慣例,還是用一個小程序來演示一下android中地圖功能的開發。主要功能是實現了地圖的縮放,添加了菜單,從而可以手動選擇地圖的顯示模式等。
Step 1: 新建一個android project, 注意這裡要選擇的build target為"Google APIs"。
Step 2: 修改menifest文件:
XML/HTML代碼
- <?xml version="1.0" encoding="utf-8"?>
- <manifest xmlns:android="http://schemas.android.com/apk/res/android"
- package="com.map.prac"
- android:versionCode="1"
- android:versionName="1.0">
- <uses-permission android:name="android.permission.ACCESS_COARSE_LOCATION" />
- <uses-permission android:name="android.permission.INTERNET" />
- <application android:icon="@drawable/icon" android:label="@string/app_name">
- <uses-library android:name="com.google.android.maps" />
- <activity android:name=".MapViewPrac2"
- android:label="@string/app_name">
- <intent-filter>
- <action android:name="android.intent.action.MAIN" />
- <category android:name="android.intent.category.LAUNCHER" />
- </intent-filter>
- </activity>
- </application>
- <uses-sdk android:minSdkVersion="3" />
- </manifest>
Step 3: 修改layout文件,main.xml
XML/HTML代碼
- <?xml version="1.0" encoding="utf-8"?>
- <LinearLayout xmlns:android="http://schemas.android.com/apk/res/android"
- android:id="@+id/main"
- android:layout_width="fill_parent"
- android:layout_height="fill_parent">
- <com.google.android.maps.MapView
- android:id="@+id/map"
- android:layout_width="fill_parent"
- android:layout_height="fill_parent"
- android:enabled="true"
- android:clickable="true"
- android:apiKey="???????????????????????????????????"
- />
- </LinearLayout>
這裡需要將api key中的????????????改成你自己申請到的api key。
Step 4: 修改代碼:
Java代碼
- package com.map.prac;
- import com.google.android.maps.GeoPoint;
- import com.google.android.maps.MapActivity;
- import com.google.android.maps.MapController;
- import com.google.android.maps.MapView;
- import android.app.AlertDialog;
- import android.app.Dialog;
- import android.content.DialogInterface;
- import android.os.Bundle;
- import android.util.Log;
- import android.view.KeyEvent;
- import android.view.Menu;
- import android.view.MenuItem;
- public class MapViewPrac2 extends MapActivity {
- private final String TAG = "MapPrac";
- private MapView mapView = null;
- private MapController mc;
- //Menu items
- final private int menuMode = Menu.FIRST;
- final private int menuExit = Menu.FIRST+1;
- final private int menuCommandList = Menu.FIRST + 2;
- private int chooseItem = 0;
-
- @Override
- public void onCreate(Bundle savedInstanceState) {
- super.onCreate(savedInstanceState);
- setContentView(R.layout.main);
- mapView = (MapView)findViewById(R.id.map);
- mc = mapView.getController();
- mapView.setTraffic(true); //
- mapView.setSatellite(false);
- mapView.setStreetView(true);
- //GeoPoint gp = new GeoPoint((int)(39.269259 * 1000000), (int)(115.255762 * 1000000));//yixian
- GeoPoint gp = new GeoPoint((int)(39.95 * 1000000), (int)(116.37 * 1000000));//beijing
- //mc.animateTo(gp);
- //mc.setZoom(12);
- mc.setCenter(gp);
- //to display zoom control in MapView
- mapView.setBuiltInZoomControls(true);
- }
- @Override
- public boolean onKeyDown(int keyCode, KeyEvent event) {
- // TODO Auto-generated method stub
- Log.i(TAG,"enter onKeyDown");
- return super.onKeyDown(keyCode, event);
- }
- @Override
- public boolean onCreateOptionsMenu(Menu menu) {
- menu.add(0, menuMode, 0, "Map Mode");
- menu.add(0, menuCommandList, 1, "Command List");
- menu.add(0, menuExit, 2, "Exit");
- return super.onCreateOptionsMenu(menu);
- }
- @Override
- public boolean onMenuItemSelected(int featureId, MenuItem item) {
- // TODO Auto-generated method stub
- switch(item.getItemId())
- {
- case menuMode:
- Dialog dMode = new AlertDialog.Builder(this)
- //.setIcon(R.drawable.alert_dialog_icon)
- .setTitle(R.string.alert_dialog_single_choice)
- .setSingleChoiceItems(R.array.select_dialog_items2, chooseItem, new DialogInterface.OnClickListener() {
- public void onClick(DialogInterface dialog, int whichButton) {
- Log.i(TAG, "choose button is "+ whichButton);
- chooseItem = whichButton;
-
- }
- })
- .setPositiveButton(R.string.alert_dialog_ok, new DialogInterface.OnClickListener() {
- public void onClick(DialogInterface dialog, int whichButton) {
-
- Log.i(TAG,"item = "+chooseItem);
- switch(chooseItem)
- {
- case 0:
- mapView.setSatellite(false);
- break;
- case 1:
- mapView.setSatellite(true);
- break;
- case 2:
- mapView.setTraffic(true);
- break;
- case 3:
- mapView.setStreetView(true);
- break;
- default:
- break;
- }
- }
- })
- .setNegativeButton(R.string.alert_dialog_cancel, new DialogInterface.OnClickListener() {
- public void onClick(DialogInterface dialog, int whichButton) {
-
- }
- })
- .create();
- dMode.show();
- break;
- case menuCommandList:
- //create the dialog
- Dialog d = new AlertDialog.Builder(this)
- .setTitle(R.string.select_dialog)
- .setItems(R.array.select_dialog_items, new DialogInterface.OnClickListener() {
- public void onClick(DialogInterface dialog, int which) {
-
- String[] items = getResources().getStringArray(R.array.select_dialog_items);
-
- Log.i(TAG,"you choose is: " + items[which]);
- }
- })
- .create();
- //show the dialog
- d.show();
- break;
- case menuExit:
- finish();
- break;
- default:
- break;
- }
- return super.onMenuItemSelected(featureId, item);
- }
- @Override
- protected boolean isRouteDisplayed() {
- // TODO Auto-generated method stub
- return false;
- }
- }
關於google map的用法還有待各位Android開發人員在實際開發中的總結!
轉自:無線時代

 Android加載Spinner
 Android登錄實例
 Android筆記之:CM9源碼下載與編譯的應用
 基於App自適應draw9patch不失真背景的方法詳解