編輯:Android開發實例
Android SDK本身提供了一種默認創建菜單的機制。但通過這種機制創建的菜單雖然從功能上很完備,但在界面效果上實在是有點“土”。對於一個擁有絢麗界面的程序配上一個有點“土”的菜單,會使用戶感覺很怪,甚至會使絢麗的界面大打折扣。實際上,對於如此靈活和強大的Android系統,修改菜單的樣式只是小菜一碟。為程序加入漂亮菜單的方法很多。在本節先介紹一種比較常用的方法,就是通過onKeyDown事件方法和PopupWindow實現自定義的菜單。至於通過這種技術能否設計出絢麗的菜單效果,那就要看我們的設 計、美學、心理學功底了。
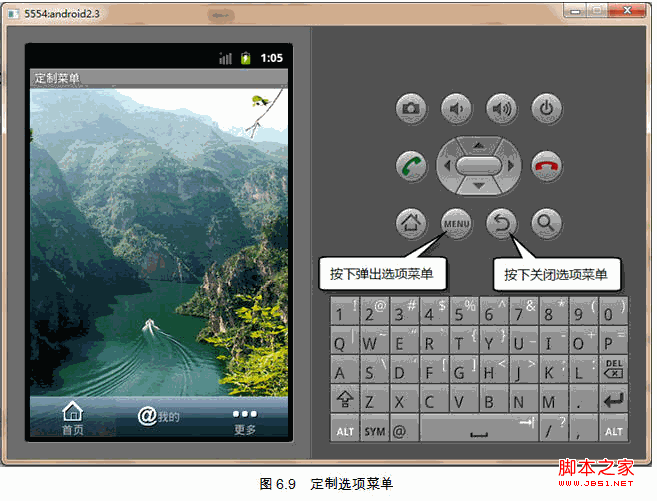
通過6.1.1節介紹的選項菜單可以知道。通過按手機的“Menu”鍵(是手機上的硬按鍵,不同手機“Menu”鍵所在的位置會不同),可以彈出選項菜單,再按“Back”鍵,選項菜單會關閉。那麼要想模擬選項菜單的彈出和關閉效果,只需要監聽這兩個鍵的按下事件即可。並且在“Menu”鍵按下時使用PopupWindow彈出一個窗口作為模擬的選項菜單。下面先來看看如圖6.9所示的模擬選項菜單的效果。
從圖6.9可以看出,在界面的下方顯示了3個菜單項:“首頁”、“我的”和“更多”。其中“我的”菜單項的文字和圖像是左右水平排列,而另兩個菜單項上的文字和圖像是上下垂直排列。實際上,這種效果由一個普通的布局文件(menu_layout.xml)完成的,代碼如下:
代碼如下:
<?xml version="1.0"encoding="utf-8"?>
<LinearLayoutxmlns:android="http://schemas.android.com/apk/res/android"
android:orientation="horizontal"android:layout_width="fill_parent"
android:layout_height="wrap_content"android:gravity="bottom">
<!-- 第一個菜單項:“首頁” -->
<LinearLayout android:id="@+id/home"android:orientation="vertical"
android:layout_width="fill_parent"android:layout_height="wrap_content"
android:background="@drawable/button_normal_translucent"
android:layout_weight="1">
<ImageView android:layout_width="fill_parent"
android:layout_height="wrap_content"android:src="@drawable/home"
android:paddingTop="5dp" />
<TextView android:layout_width="fill_parent"
android:layout_height="wrap_content"android:text="首頁"
android:gravity="center" />
</LinearLayout>
<!-- 第二個菜單項:“我的” -->
<LinearLayout android:orientation="horizontal"
android:layout_width="fill_parent" android:layout_height="wrap_content"
android:background="@drawable/button_normal"android:layout_weight="1"
android:gravity="center">
<ImageView android:layout_width="wrap_content"
android:layout_height="wrap_content" android:src="@drawable/mine"/>
<TextView android:layout_width="wrap_content"
android:layout_height="wrap_content" android:text="我的" />
</LinearLayout>
<!-- 第三個菜單項
<LinearLayout android:orientation="vertical"
android:layout_width="fill_parent"
android:layout_height="wrap_content" android:background="@drawable/button_normal"
android:layout_weight="1">
<ImageView android:layout_width="fill_parent"
android:layout_height="wrap_content"android:src="@drawable/more"
android:paddingTop="18dp" />
<TextView android:layout_width="fill_parent"
android:layout_height="wrap_content" android:text="更多"
android:gravity="center"android:paddingTop="5dp"/>
</LinearLayout>
</LinearLayout>
在編寫上面代碼之前,別忘了准備幾個相關的圖像,例如,本例使用了5個圖像。其中button_normal_translucent.png用於“首頁”菜單項的背景(半透明效果),button_normal.png用於“我的”和“更多”菜單項的背景。home.png、mine.png和more.png分別用於這三個菜單項的圖像。
下面來編寫監聽“menu”和“back”鍵按下動作的代碼。按下“back”鍵要處理的任務有如下兩個。
如果選項菜單已經彈出,關閉選項菜單。如果選項菜單未彈出,或已經被關閉,直接關閉當前的Activity,也就是調用finish方法。為了區分上面兩個任務,在程序中設置了一個int類型狀態變量(state),當state為1時表示選項菜單已彈出,state為2時表示選項菜單未彈出。下面我們看一下完整的實現代碼。
代碼如下:
package mobile.android.ch06.custom.menu;
import android.app.Activity;
import android.os.Bundle;
import android.view.Gravity;
import android.view.KeyEvent;
import android.view.View;
import android.view.View.OnClickListener;
import android.widget.PopupWindow;
import android.widget.Toast;
public class Main extends Activity
{
privatePopupWindow pop;
privateView layout;
private int state = 2; //狀態變量,1:選項菜單已彈出,2:選項菜單未彈出
@Override
publicvoid onCreate(Bundle savedInstanceState)
{
super.onCreate(savedInstanceState);
setContentView(R.layout.main);
}
@Override
publicboolean onKeyDown(int keyCode, KeyEvent event)
{
switch (keyCode)
{
case KeyEvent.KEYCODE_MENU: // 按下“menu”鍵的動作
// 選項菜單已彈出,不再彈出新的窗口
if (state == 1)
return false;
// 裝載選項菜單布局文件
layout =getLayoutInflater().inflate(R.layout.menu_layout, null);
// 創建PopupWindow對象,並在指定位置彈出用於顯示菜單的窗口
pop = new PopupWindow(layout,getWindowManager()
.getDefaultDisplay().getWidth(), getWindowManager()
.getDefaultDisplay().getHeight());
// 設置彈出窗口的位置
pop.showAtLocation(layout,Gravity.BOTTOM, 0, 0);
View home = layout.findViewById(R.id.home);
// 為“首頁”菜單項添加單擊事件
home.setOnClickListener(new OnClickListener()
{
@Override
public void onClick(View view)
{
Toast.makeText(Main.this, "單擊定制菜單.", Toast.LENGTH_LONG).show();
// 單擊“首頁”菜單項後,關閉選項菜單
pop.dismiss();
// 重新設置狀態變量
state = 2;
}
});
// 彈出選項菜單後,將狀態變量設為1,表示選項菜單已彈出
state = 1;
return false;
case KeyEvent.KEYCODE_BACK: // 按下“back”鍵的動作
if (state == 1)
{
// 如果選項菜單已彈出,關閉它
pop.dismiss();
// 將狀態變量設為選項菜單已關閉
state = 2;
}
else if (state == 2)
{
// 如果選項菜單還沒有顯示,或已經關閉,則直接關閉當前的Activity
finish();
}
return false;
}
// 除“menu”和“back”按下事件外,仍需調用Activity類的onKeyDown方法來響應其他鍵的按下事件
return super.onKeyDown(keyCode, event);
}
}
在編寫上面代碼時應注意如下幾點。
 帶你實現開發者頭條(五) RecyclerView下拉刷新上拉加載
一 、前言 1.我們的目標 把RecyclerView下拉刷新上拉加載更多加入到我們的開發者頭條APP中。 2.效果圖 3.實現步驟 &b
 Android加載Spinner
可以顯示在的Android任務,通過加載進度條的進展。進度條有兩種形狀。加載欄和加載微調(spinner)。在本章中,我們將討論微調(spinner)。Spinner 用
 Android中實現TCP和UDP傳輸實例
TCP和UDP在網絡傳輸中非常重要,在Android開發中同樣重要。 首先我們來看一下什麼是TCP和UDP。 什麼是TCP? TCP:Transmission C
 Android MediaPlayer(多媒體播放)
Android提供了許多方法來控制播放的音頻/視頻文件和流。其中該方法是通過一類稱為MediaPlayer。Android是提供MediaPlayer類訪問內置的媒體播放