編輯:Android開發實例
可以顯示在的Android任務,通過加載進度條的進展。進度條有兩種形狀。加載欄和加載微調(spinner)。在本章中,我們將討論微調(spinner)。
Spinner 用於顯示的那些任務的完成的總時間是未知的進展。為了使用它只需要在XML這樣定義它。
<ProgressBar android:id="@+id/progressBar1" style="?android:attr/progressBarStyleLarge" android:layout_width="wrap_content" android:layout_height="wrap_content" android:layout_centerHorizontal="true" />
定義它的XML之後,必須得到在java文件通過ProgressBar類的引用。它的語法如下:
private ProgressBar spinner; spinner = (ProgressBar)findViewById(R.id.progressBar1);
之後可以使它消失,並通過setVisibility方法需要時將其帶回。它的語法如下:
spinner.setVisibility(View.GONE); spinner.setVisibility(View.VISIBLE);
除了這些方法,還有在進度類中定義的其他方法,可以使用更有效地處理微調(Spinner )。
這裡有一個例子演示如何使用進度條來處理微調。它創建了一個基本的應用程序,它可以打開微調點擊按鈕。
為了試驗這個例子,可以在實際設備或模擬器運行此程序。
以下是修改主活動文件的內容src/com.yiibai.spinner/MainActivity.java.
package com.example.spinner; import android.app.Activity; import android.os.Bundle; import android.view.Menu; import android.view.View; import android.widget.ProgressBar; public class MainActivity extends Activity { private ProgressBar spinner; @Override protected void onCreate(Bundle savedInstanceState) { super.onCreate(savedInstanceState); setContentView(R.layout.activity_main); spinner = (ProgressBar)findViewById(R.id.progressBar1); spinner.setVisibility(View.GONE); } public void load(View view){ spinner.setVisibility(View.VISIBLE); } @Override public boolean onCreateOptionsMenu(Menu menu) { // Inflate the menu; this adds items to the action bar if it is present. getMenuInflater().inflate(R.menu.main, menu); return true; } }
以下是經修改 res/layout/activity_main.xml. 的內容
<RelativeLayout xmlns:android="http://schemas.android.com/apk/res/android" xmlns:tools="http://schemas.android.com/tools" android:layout_width="match_parent" android:layout_height="match_parent" android:paddingBottom="@dimen/activity_vertical_margin" android:paddingLeft="@dimen/activity_horizontal_margin" android:paddingRight="@dimen/activity_horizontal_margin" android:paddingTop="@dimen/activity_vertical_margin" tools:context=".MainActivity" > <Button android:id="@+id/button1" android:layout_width="wrap_content" android:layout_height="wrap_content" android:layout_alignParentTop="true" android:layout_centerHorizontal="true" android:layout_marginTop="103dp" android:onClick="load" android:text="@string/hello_world" /> <ProgressBar android:id="@+id/progressBar1" style="?android:attr/progressBarStyleLarge" android:layout_width="wrap_content" android:layout_height="wrap_content" android:layout_below="@+id/button1" android:layout_centerHorizontal="true" /> </RelativeLayout>
以下是res/values/string.xml.的內容
<?xml version="1.0" encoding="utf-8"?> <resources> <string name="app_name">Spinner</string> <string name="action_settings">Settings</string> <string name="hello_world">load spinner</string> </resources>
以下是AndroidManifest.xml 文件的內容.
<?xml version="1.0" encoding="utf-8"?> <manifest xmlns:android="http://schemas.android.com/apk/res/android" package="com.yiibai.spinner" android:versionCode="1" android:versionName="1.0" > <uses-sdk android:minSdkVersion="8" android:targetSdkVersion="17" /> <application android:allowBackup="true" android:icon="@drawable/ic_launcher" android:label="@string/app_name" android:theme="@style/AppTheme" > <activity android:name="com.yiibai.spinner.MainActivity" android:label="@string/app_name" > <intent-filter> <action android:name="android.intent.action.MAIN" /> <category android:name="android.intent.category.LAUNCHER" /> </intent-filter> </activity> </application> </manifest>
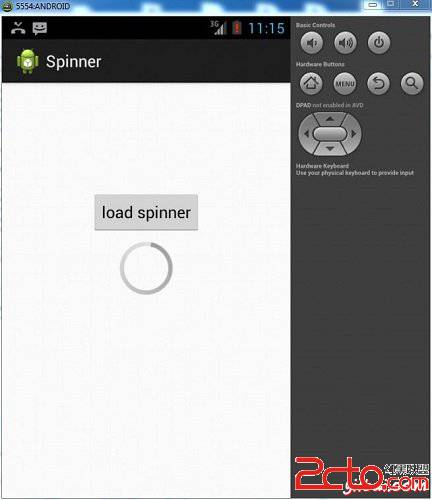
讓我們試著來運行修改加載微調的應用。假設已經創建了AVD環境設置。安裝程序在AVD上並啟動它,如果一切設置和應用程序都沒有問題,它會顯示以下仿真器窗口:
現在點擊負載微調按鈕打開加載微調。這顯示在下面的圖片:

 Android撥號盤 支持T9搜索和號碼搜索等撥號盤案例
之前做通訊錄軟件,其中在做撥號盤的時候一直為怎麼實現T9輸入煩惱,上網找了很多帖子,都沒有滿意的答案。不過最後終於是實現了,看社區內好像也有不少朋友需要,在此分享
 Java4Android開發教程(五)java的基本數據類型特征
java的數據類型分為基本數據類型和引用數據類型。 基本數據類型分為數值型、字符型(char)、布爾型(boolean) 數值型變量
 Android筆記之:App調試的幾個命令的實踐與分析
在Android的應用開發中,我們會用到各種代碼調試;其實在Android的開發之後,我們可能會碰到一些隨機的問題,如cpu過高,內存洩露等,我們無法簡單的進行代
 Android筆記之:App列表之下拉刷新的使用
Android的ListView是應用最廣的一個組件,功能強大,擴展性靈活(不局限於ListView本身一個類),前面的文章有介紹分組,拖拽,3D立體,游標,圓角