編輯:Android開發實例
從上面的例子可以看出,定義上style與定義theme基本相同,只是使用的地方不同,還有就是在一些標簽的使用上: style 作用於view,theme作用於application或者Activity。 一個使用的例子:
- <?xml version="1.0" encoding="utf-8"?>
- <resources>
- <!-- 定義style -->
- <style name="myTextStyle" mce_bogus="1"> <item name="android:textSize">20px</item>
- <item name="android:textColor">#EC9237</item>
- </style>
- <style name="myTextStyle2" mce_bogus="1"> <item name="android:textSize">14px</item>
- <item name="android:textColor">#FF7F7C</item>
- </style>
- <!-- 定義theme -->
- <style name="myTheme" mce_bogus="1"> <item name="android:windowNoTitle">true</item>
- <item name="android:textSize">14px</item>
- <item name="android:textColor">#FFFF7F7C</item>
- </style>
- </resources>
本例中既使用了style也使用了theme,這就會造成沖突,在處理沖突時我個人實驗後得出的結論是 style的優先級要高於theme。 需要注意的一個標簽就是android:autoLink 定義它之後具有他的view會顯示為藍色帶下劃線的文本 ,並且當單擊這個超鏈接的時候會調用系統的浏覽器,啟動網頁,同時android的不支持html的格式。
- <?xml version="1.0" encoding="utf-8"?>
- <LinearLayout xmlns:android="http://schemas.android.com/apk/res/android"
- android:id="@+id/linear"
- android:orientation="vertical"
- android:layout_width="fill_parent"
- android:layout_height="fill_parent"
- >
- <TextView
- style="@style/myTextStyle"
- android:layout_width="fill_parent"
- android:layout_height="wrap_content"
- android:gravity="center_vertical|center_horizontal"
- android:text="@string/hello"
- />
- <TextView
- style="@style/myTextStyle2"
- android:layout_width="fill_parent"
- android:layout_height="wrap_content"
- android:gravity="center_vertical|center_horizontal"
- android:text="www.google.cn"
- android:autoLink="all"
- />
- </LinearLayout>
在代碼中使用theme: setTheme()函數就調用了自定義的theme 在AndroidManifest.xml中應用Theme: 為了在當前所有的Activity當中使用Theme,可以打開AndroidManifest.xml 文件,編輯<application>標簽,讓其包含android:theme屬性,值是一個主題的名字,例如:<application android:theme=”@style/NewTheme”>。 如果只是想讓程序當中的某個Activity擁有這個Theme,那麼可以修改<activity>標簽。Android中提供了幾種內置的資源,有好幾種Theme你可以切換而不用自己寫。比如可以用對話框Theme來讓你的Activity看起來像一個對話框。在manifest中定義,例如:<activity android:theme=”@android:style/Theme.Dialog”> 如果喜歡一個Theme,但是想做一些輕微的改變,只需要將這個Theme添加為parent。Android SDK為我們提供了很多現成的Theme,比如:我們修改Theme.Dialog Theme,繼承Theme.Dialog來生成一個新的Theme。<style parent=”@android:style/Theme.Dialog” 繼承了Theme.Dialog後,我們可以按照我們的要求來調整Theme。我們可以修改在Theme.Dialog中定義的每個item元素的值,然後我們 在Android Manifest 文件中使用NewDialogTheme而不是 Theme.Dialog。 style 與 theme在用法上的區別 (note that in this case style is not prefixed with the android: namespace; it is a custom local style and not one provided by the platform). Styles can be taken one step further and used as themes. While a style refers to a set of attributes applied to a single View element, themes refer to a set of attributes being applied to an entire screen. Themes can be defined in exactly the same <style> and <item> structure as styles are. To apply a theme you simply associate a style with an entire Activity, such as: android:theme="@android:style/[stylename]". 轉自http://blog.csdn.net/zhqingyun163/archive/2009/11/06/4774979.aspx
- @Override
- public void onCreate(Bundle savedInstanceState) {
- super.onCreate(savedInstanceState);
- setTheme(R.style.myTheme);
- setContentView(R.layout.main);
- }
 Android加載Spinner
可以顯示在的Android任務,通過加載進度條的進展。進度條有兩種形狀。加載欄和加載微調(spinner)。在本章中,我們將討論微調(spinner)。Spinner 用
 android的編譯和運行過程深入分析
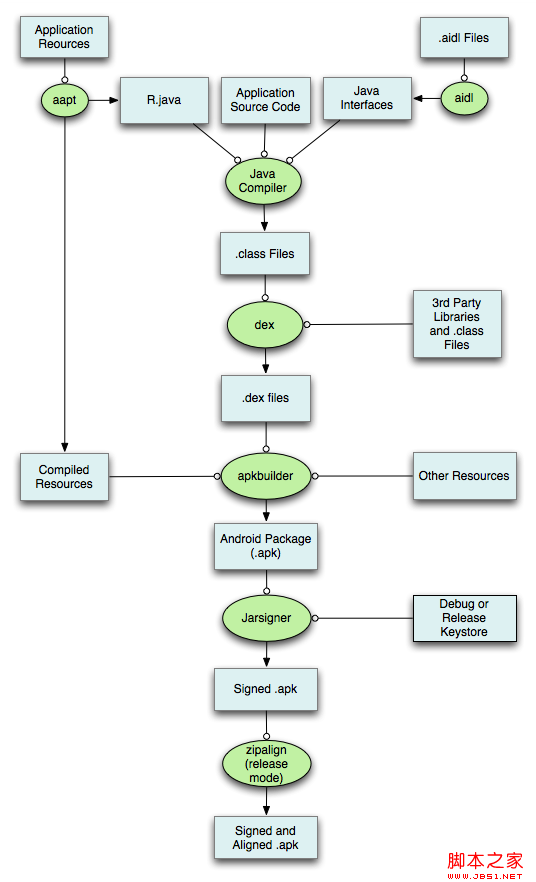
首先來看一下使用Java語言編寫的Android應用程序從源碼到安裝包的整個過程,示意圖如下,其中包含編譯、鏈接和簽名等: (1)使用aapt工具生成R.jav
 Android登錄實例
登錄應用程序的屏幕,詢問憑據登錄到一些特定的應用。可能需要登錄到Facebook,微博等本章介紹了,如何創建一個登錄界面,以及如何管理安全問題和錯誤嘗試。首先,必須定義兩
 Android MediaPlayer(多媒體播放)
Android提供了許多方法來控制播放的音頻/視頻文件和流。其中該方法是通過一類稱為MediaPlayer。Android是提供MediaPlayer類訪問內置的媒體播放