編輯:Android資訊
下載文件,幾乎是所有APP都會用到的功能!算了,還是不廢話了,直接開寫吧。。。
完成一個下載任務只需要4行代碼,什麼斷點續傳,大文件下載,通知欄進度顯示….都不需要你操心。
//創建下載任務,downloadUrl就是下載鏈接
DownloadManager.Request request = new DownloadManager.Request(Uri.parse(downloadUrl));
//指定下載路徑和下載文件名
request.setDestinationInExternalPublicDir("/download/", fileName);
//獲取下載管理器
DownloadManager downloadManager= (DownloadManager) mContext.getSystemService(Context.DOWNLOAD_SERVICE);
//將下載任務加入下載隊列,否則不會進行下載
downloadManager.enqueue(request);
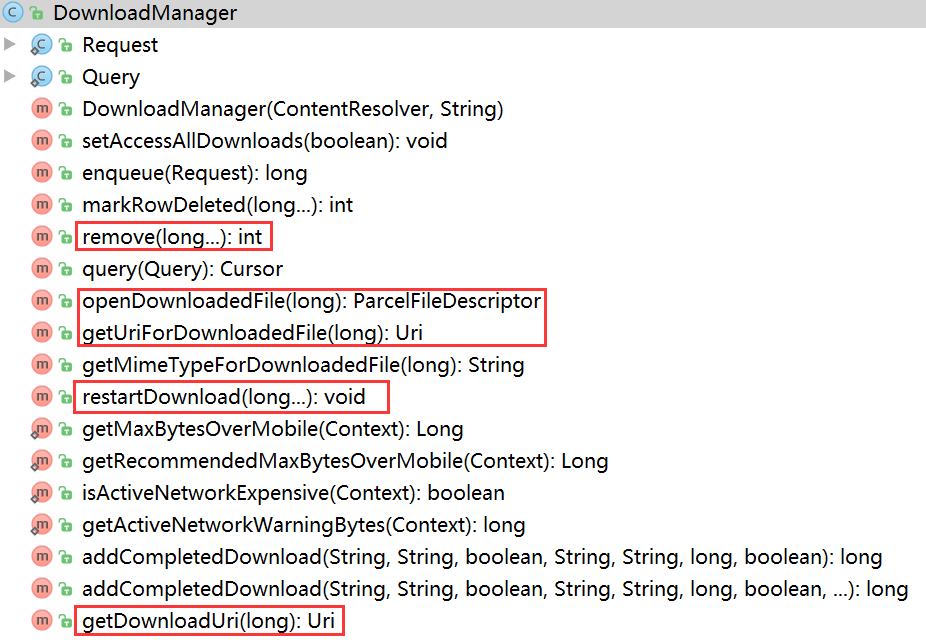
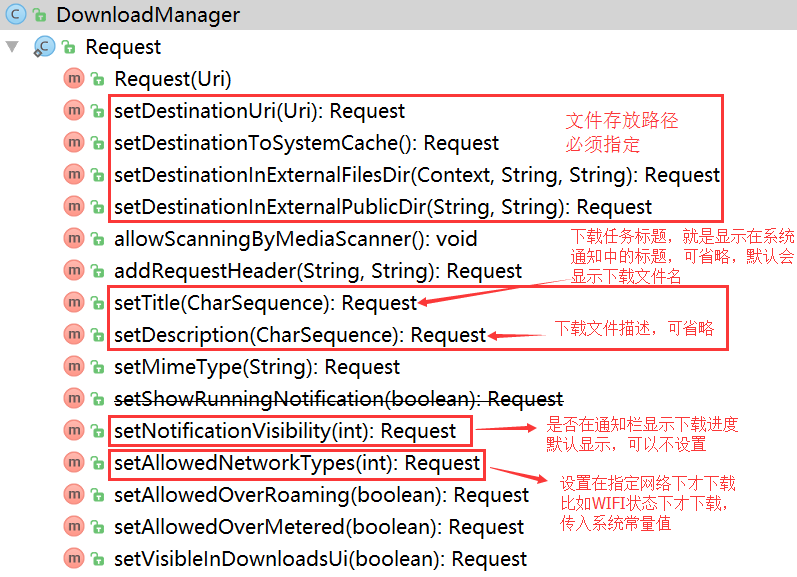
讓我們看DownloadManager的源碼,提供了這麼多方法

DownloadManager的方法

DownloadManager.Request的方法
方法差不多就這些,已經比較全了,可以滿足我們絕大部分的使用場景。
接下來我們就以APP應用內更新為例,講一下這些方法的使用
1.首先我們梳理下APP應用內更新的邏輯

APP應用內更新
2.接下來看具體實現,上代碼
//使用系統下載器下載
private void downloadAPK(String versionUrl, String versionName) {
        //創建下載任務
        DownloadManager.Request request = new DownloadManager.Request(Uri.parse(versionUrl));
        request.setAllowedOverRoaming(false);//漫游網絡是否可以下載

        //設置文件類型,可以在下載結束後自動打開該文件
        MimeTypeMap mimeTypeMap = MimeTypeMap.getSingleton();
        String mimeString = mimeTypeMap.getMimeTypeFromExtension(MimeTypeMap.getFileExtensionFromUrl(versionUrl));
        request.setMimeType(mimeString);

        //在通知欄中顯示,默認就是顯示的
        request.setNotificationVisibility(DownloadManager.Request.VISIBILITY_VISIBLE);
        request.setVisibleInDownloadsUi(true);

        //sdcard的目錄下的download文件夾,必須設置
        request.setDestinationInExternalPublicDir("/download/", versionName);
        //request.setDestinationInExternalFilesDir(),也可以自己制定下載路徑

        //將下載請求加入下載隊列
        downloadManager = (DownloadManager) mContext.getSystemService(Context.DOWNLOAD_SERVICE);
        //加入下載隊列後會給該任務返回一個long型的id,
        //通過該id可以取消任務,重啟任務等等,看上面源碼中框起來的方法
        mTaskId = downloadManager.enqueue(request);

        //注冊廣播接收者,監聽下載狀態
        mContext.registerReceiver(receiver,
                new IntentFilter(DownloadManager.ACTION_DOWNLOAD_COMPLETE));
    }
接下來是廣播接收器
    //廣播接受者,接收下載狀態
    private BroadcastReceiver receiver = new BroadcastReceiver() {
        @Override
        public void onReceive(Context context, Intent intent) {
            checkDownloadStatus();//檢查下載狀態
        }
    };
檢查下載狀態
 //檢查下載狀態
    private void checkDownloadStatus() {
        DownloadManager.Query query = new DownloadManager.Query();
        query.setFilterById(mTaskId);//篩選下載任務,傳入任務ID,可變參數
        Cursor c = downloadManager.query(query);
        if (c.moveToFirst()) {
            int status = c.getInt(c.getColumnIndex(DownloadManager.COLUMN_STATUS));
            switch (status) {
                case DownloadManager.STATUS_PAUSED:
                    MLog.i(">>>下載暫停");
                case DownloadManager.STATUS_PENDING:
                    MLog.i(">>>下載延遲");
                case DownloadManager.STATUS_RUNNING:
                    MLog.i(">>>正在下載");
                    break;
                case DownloadManager.STATUS_SUCCESSFUL
                    MLog.i(">>>下載完成");
                    //下載完成安裝APK
                    //downloadPath = Environment.getExternalStoragePublicDirectory(Environment.DIRECTORY_DOWNLOADS).getAbsolutePath() + File.separator + versionName;
                    installAPK(new File(downloadPath));
                    break;
                case DownloadManager.STATUS_FAILED:
                    MLog.i(">>>下載失敗");
                    break;
            }
        }
    }
安裝APK
    //下載到本地後執行安裝
    protected void installAPK(File file) {
        if (!file.exists()) return;
        Intent intent = new Intent(Intent.ACTION_VIEW);
        Uri uri = Uri.parse("file://" + file.toString());
        intent.setDataAndType(uri, "application/vnd.android.package-archive");
        //在服務中開啟activity必須設置flag,後面解釋
        intent.setFlags(Intent.FLAG_ACTIVITY_NEW_TASK);
        mContext.startActivity(intent);
    }
到此就完成了應用內更新APP的代碼,但是有一些坑需要注意!
1.雖然下載什麼的不需要自己操心了,但是建議還是將整個上面四段代碼放在Service中執行,因為放在Activity中時,當用戶按home鍵後,即使下載完了,也不會彈出安裝界面
2.建議使用startService的方式啟動Service,這樣不會與Activity生命周期綁定,保證下載完後能順利安裝。
3.Service使用完後要及時地停掉!
 如何在 Android 應用中使用 FontAwesome 圖標
這篇教程中,我將向你演示如何在安卓項目中使用 FontAwesome 圖標集合。FontAwesome 可以節省許多時間,原因如下: 首先,你不需要擔心不同手機上
 面向開發者的最佳 Android 庫列表
軟件庫的存在使得Android編碼更方便快捷。在如此多 Android庫中,我們該如何尋找最合適的一款呢?下面我們做了一個列表供你參考。 動畫(Animatio
 為什麼 Android 中不建議使用 Enums
關於Android性能優化中一個常見的建議是不要在你的代碼中使用Enums,就連 Android官網 上都強烈建議不要使用。 Why Android中當你的Ap
 Android ListView收縮與展開的封裝實現
常有這種需求,即ListView中數據較多(不涉及分頁),如果都展開,數據量較多,體驗不好,所以需要提供用戶查看更多、收縮數據的交互 截圖如下: 如圖所示,點擊