編輯:Android資訊
有時,原生控件不能滿足我們對於外觀和功能的需求,這時候可以自定義控件來定制外觀或功能;有時,原生控件可以通過復雜的編碼實現想要的功能,這時候可以自定義控件來提高代碼的可復用性。
下面我通過我在github上開源的Android-CalendarView項目為例,來介紹一下自定義控件的方法。該項目中自定義的控件類名是CalendarView。這個自定義控件覆蓋了一些自定義控件時常需要重寫的一些方法。
為了支持本控件既能使用xml布局文件聲明,也可在java文件中動態創建,實現了三個構造函數。
public CalendarView(Context context, AttributeSet attrs, int defStyle);
public CalendarView(Context context, AttributeSet attrs);
public CalendarView(Context context);
可以在參數列表最長的第一個方法中寫上你的初始化代碼,下面兩個構造函數調用第一個即可。
public CalendarView(Context context, AttributeSet attrs) {
    this(context, attrs, 0);
}
public CalendarView(Context context) {
    this(context, null);
}
那麼在構造函數中做了哪些事情呢?
讀取布局文件中可能設置的自定義屬性(該日歷控件僅自定義了一個mode參數來表示日歷的模式)。代碼如下。只要在attrs.xml中自定義了屬性,就會自動創建一些R.styleable下的變量。
TypedArray typedArray = context.obtainStyledAttributes(attrs, R.styleable.CalendarView);
mode = typedArray.getInt(R.styleable.CalendarView_mode, Constant.MODE_SHOW_DATA_OF_THIS_MONTH);
然後附上res目錄下values目錄下的attrs.xml文件,需要在此文件中聲明你自定義控件的自定義參數。
<?xml version="1.0" encoding="utf-8"?>
<resources>
    <declare-styleable name="CalendarView">
        <attr name="mode" format="integer" />
    </declare-styleable>
</resources>
如字體的顏色、尺寸,控件各個部分尺寸。
對於日歷來說,需要能夠判斷對應於當前的年月,日歷中的每個單元格是否合法,以及若合法,其表示的day的值是多少。未設定年月之前先用當前時間來初始化。實現如下。
/**
 * calculate the values of date[] and the legal range of index of date[]
 */
private void initial() {
    int dayOfWeek = calendar.get(Calendar.DAY_OF_WEEK);
    int monthStart = -1;
    if(dayOfWeek >= 2 && dayOfWeek <= 7){
        monthStart = dayOfWeek - 2;
    }else if(dayOfWeek == 1){
        monthStart = 6;
    }
    curStartIndex = monthStart;
    date[monthStart] = 1;
    int daysOfMonth = daysOfCurrentMonth();
    for (int i = 1; i < daysOfMonth; i++) {
        date[monthStart + i] = i + 1;
    }
    curEndIndex = monthStart + daysOfMonth;
    if(mode == Constant.MODE_SHOW_DATA_OF_THIS_MONTH){
        Calendar tmp = Calendar.getInstance();
        todayIndex = tmp.get(Calendar.DAY_OF_MONTH) + monthStart - 1;
    }
}
其中date[]是一個整型數組,長度為42,因為一個日歷最多需要6行來顯示(6*7=42),curStartIndex和curEndIndex決定了date[]數組的合法下標區間,即前者表示該月的第一天在date[]數組的下標,後者表示該月的最後一天在date[]數組的下標。
監聽控件的觸摸事件。
該方法對控件的寬和高進行測量。CalendarView覆蓋了View類的onMeasure()方法,因為某個月的第一天可能是星期一到星期日的任何一個,而且每個月的天數不盡相同,因此日歷控件的行數會有多變化,也導致控件的高度會有變化。因此需要根據當前的年月計算控件顯示的高度(寬度設為屏幕寬度即可)。實現如下。
@Override
protected void onMeasure(int widthMeasureSpec, int heightMeasureSpec) {
    widthMeasureSpec = View.MeasureSpec.makeMeasureSpec(screenWidth, View.MeasureSpec.EXACTLY);
    heightMeasureSpec = View.MeasureSpec.makeMeasureSpec(measureHeight(), View.MeasureSpec.EXACTLY);
    setMeasuredDimension(widthMeasureSpec, heightMeasureSpec);
    super.onMeasure(widthMeasureSpec, heightMeasureSpec);
}
其中screenWidth是構造函數中已經獲取的屏幕寬度,measureHeight()則是根據年月計算控件所需要的高度。實現如下,已經寫了非常詳細的注釋。
/**
 * calculate the total height of the widget
 */
private int measureHeight(){
    /**
     * the weekday of the first day of the month, Sunday's result is 1 and Monday 2 and Saturday 7, etc.
     */
    int dayOfWeek = calendar.get(Calendar.DAY_OF_WEEK);
    /**
     * the number of days of current month
     */
    int daysOfMonth = daysOfCurrentMonth();
    /**
     * calculate the total lines, which equals to 1 (head of the calendar) + 1 (the first line) + n/7 + (n%7==0?0:1)
     * and n means numberOfDaysExceptFirstLine
     */
    int numberOfDaysExceptFirstLine = -1;
    if(dayOfWeek >= 2 && dayOfWeek <= 7){
        numberOfDaysExceptFirstLine = daysOfMonth - (8 - dayOfWeek + 1);
    }else if(dayOfWeek == 1){
        numberOfDaysExceptFirstLine = daysOfMonth - 1;
    }
    int lines = 2 + numberOfDaysExceptFirstLine / 7 + (numberOfDaysExceptFirstLine % 7 == 0 ? 0 : 1);
    return (int) (cellHeight * lines);
}
該方法實現對控件的繪制。其中drawCircle給定圓心和半徑繪制圓,drawText是給定一個坐標x,y繪制文字。
/**
 * render
 */
@Override
protected void onDraw(Canvas canvas) {
	super.onDraw(canvas);
	/**
	 * render the head
	 */
	float baseline = RenderUtil.getBaseline(0, cellHeight, weekTextPaint);
	for (int i = 0; i < 7; i++) {
		float weekTextX = RenderUtil.getStartX(cellWidth * i + cellWidth * 0.5f, weekTextPaint, weekText[i]);
		canvas.drawText(weekText[i], weekTextX, baseline, weekTextPaint);
	}
	if(mode == Constant.MODE_CALENDAR){
		for (int i = curStartIndex; i < curEndIndex; i++) {
			drawText(canvas, i, textPaint, "" + date[i]);
		}
	}else if(mode == Constant.MODE_SHOW_DATA_OF_THIS_MONTH){
		for (int i = curStartIndex; i < curEndIndex; i++) {
			if(i < todayIndex){
				if(data[date[i]]){
					drawCircle(canvas, i, bluePaint, cellHeight * 0.37f);
					drawCircle(canvas, i, whitePaint, cellHeight * 0.31f);
					drawCircle(canvas, i, blackPaint, cellHeight * 0.1f);
				}else{
					drawCircle(canvas, i, grayPaint, cellHeight * 0.1f);
				}
			}else if(i == todayIndex){
				if(data[date[i]]){
					drawCircle(canvas, i, bluePaint, cellHeight * 0.37f);
					drawCircle(canvas, i, whitePaint, cellHeight * 0.31f);
					drawCircle(canvas, i, blackPaint, cellHeight * 0.1f);
				}else{
					drawCircle(canvas, i, grayPaint, cellHeight * 0.37f);
					drawCircle(canvas, i, whitePaint, cellHeight * 0.31f);
					drawCircle(canvas, i, blackPaint, cellHeight * 0.1f);
				}
			}else{
				drawText(canvas, i, textPaint, "" + date[i]);
			}
		}
	}
}
需要說明的是,繪制文字時的這個x表示開始位置的x坐標(文字最左端),這個y卻不是文字最頂端的y坐標,而應傳入文字的baseline。因此若想要將文字繪制在某個區域居中部分,需要經過一番計算。本項目將其封裝在了RenderUtil類中。實現如下。
/**
 * get the baseline to draw between top and bottom in the middle
 */
public static float getBaseline(float top, float bottom, Paint paint){
	Paint.FontMetrics fontMetrics = paint.getFontMetrics();
	return (top + bottom - fontMetrics.bottom - fontMetrics.top) / 2;
}
/**
 *	get the x position to draw around the middle
 */
public static float getStartX(float middle, Paint paint, String text){
	return middle - paint.measureText(text) * 0.5f;
}
控件需要自定義一些監聽器,以在控件發生了某種行為或交互時提供一個外部接口來處理一些事情。本項目的CalendarView提供了兩個接口,OnRefreshListener和OnItemClickListener,均為自定義的接口。onItemClick只傳了day一個參數,年和月可通過CalendarView對象的getYear和getMonth方法獲取。
interface OnItemClickListener{
	void onItemClick(int day);
}
interface OnRefreshListener{
	void onRefresh();
}
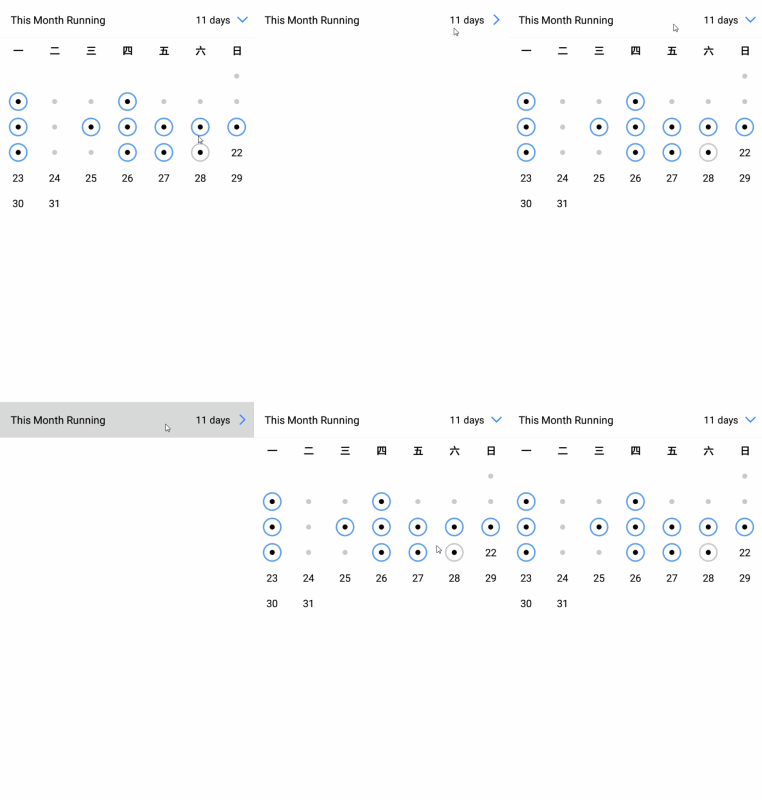
先介紹一下兩種mode,CalendarView提供了兩種模式,第一種普通日歷模式,日歷每個位置簡單顯示了day這個數字,第二種本月計劃完成情況模式,繪制了一些圖形來表示本月的某一天是否完成了計劃(模仿自悅跑圈,用一個圈表示本日跑了步)。
OnRefreshListener用於刷新日歷數據後進行回調。兩種模式定義了不同的刷新方法,都對OnRefreshListener進行了回調。refresh0用於第一種模式,refresh1用於第二種模式。
/**
 * used for MODE_CALENDAR
 * legal values of month: 1-12
 */
@Override
public void refresh0(int year, int month) {
	if(mode == Constant.MODE_CALENDAR){
		selectedYear = year;
		selectedMonth = month;
		calendar.set(Calendar.YEAR, selectedYear);
		calendar.set(Calendar.MONTH, selectedMonth - 1);
		calendar.set(Calendar.DAY_OF_MONTH, 1);
		initial();
		invalidate();
		if(onRefreshListener != null){
			onRefreshListener.onRefresh();
		}
	}
}

/**
 * used for MODE_SHOW_DATA_OF_THIS_MONTH
 * the index 1 to 31(big month), 1 to 30(small month), 1 - 28(Feb of normal year), 1 - 29(Feb of leap year)
 * is better to be accessible in the parameter data, illegal indexes will be ignored with default false value
 */
@Override
public void refresh1(boolean[] data) {
	/**
	 * the month and year may change (eg. Jan 31st becomes Feb 1st after refreshing)
	 */
	if(mode == Constant.MODE_SHOW_DATA_OF_THIS_MONTH){
		calendar = Calendar.getInstance();
		selectedYear = calendar.get(Calendar.YEAR);
		selectedMonth = calendar.get(Calendar.MONTH) + 1;
		calendar.set(Calendar.DAY_OF_MONTH, 1);
		for(int i = 1; i <= daysOfCurrentMonth(); i++){
			if(i < data.length){
				this.data[i] = data[i];
			}else{
				this.data[i] = false;
			}
		}
		initial();
		invalidate();
		if(onRefreshListener != null){
			onRefreshListener.onRefresh();
		}
	}
}
OnItemClickListener用於響應點擊了日歷上的某一天這個事件。點擊的判斷在onTouch方法中實現。實現如下。在同一位置依次接收到ACTION_DOWN和ACTION_UP兩個事件才認為完成了點擊。
@Override
public boolean onTouch(View v, MotionEvent event) {
	float x = event.getX();
	float y = event.getY();
	switch (event.getAction()) {
		case MotionEvent.ACTION_DOWN:
			if(coordIsCalendarCell(y)){
				int index = getIndexByCoordinate(x, y);
				if(isLegalIndex(index)) {
					actionDownIndex = index;
				}
			}
			break;
		case MotionEvent.ACTION_UP:
			if(coordIsCalendarCell(y)){
				int actionUpIndex = getIndexByCoordinate(x, y);
				if(isLegalIndex(actionUpIndex)){
					if(actionDownIndex == actionUpIndex){
						actionDownIndex = -1;
						int day = date[actionUpIndex];
						if(onItemClickListener != null){
							onItemClickListener.onItemClick(day);
						}
					}
				}
			}
			break;
	}
	return true;
}
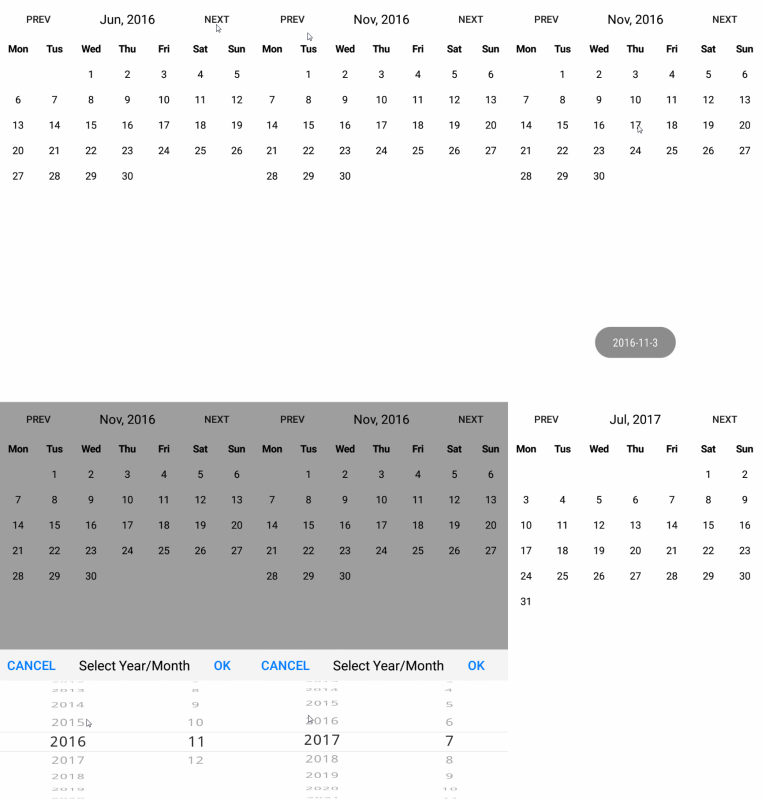
日歷控件demo效果圖如下,分別為普通日歷模式和本月計劃完成情況模式。


需要說明的是CalendarView控件部分只包括日歷頭與下面的日歷,該控件上方的是其他控件,這裡僅用作展示一種使用方法,你完全可以自定義這部分的樣式。
此外,日歷頭的文字支持多種選擇,比如周一有四種表示:一、周一、星期一、Mon。此外還有其他一些控制樣式的接口,詳情見github項目主頁。
github項目主頁: Android-CalendarView
 Android Studio 簽名打包過程圖解
前言 本篇博客紀錄使用Android Studio對項目進行簽名打包,跟Eclipse大同小異,讀者朋友注意其中到差別。 第一步 創建簽名文件 第二步 填寫
 關於Android開發的40條優化建議
以下是開始Android編程的好方法: 1、找一些與你想開發的功能類似的代碼; 2、調整它,嘗試讓它變成你想要的; 3、回顧開發中遇到的問題 4、使用StackO
 給初學者的 6 個 Android 加密工具
越來越多的黑客盯上了移動應用,每天都會增加,因為移動應用中有黑客感興趣的東西,如用戶數據。硬編碼(Hard-coded,注,固定寫死,不能修改的)安全秘鑰,SD
 我的 Android 開發實戰經驗總結
以前一直想寫一篇總結 Android 開發經驗的文章,估計當時的我還達不到某種水平,所以思路跟不上,下筆又捉襟見肘。近日,思路較為明朗,於是重新操起鍵盤開始碼字一