編輯:Android資訊
相信Android的開發者對於適配問題都比較苦惱,Google官方雖然給出了一系列的建議,但是想要單純使用這些建議將設備很輕松的做好,還是相當困難的。個人也比較關注適配的問題,之前也發了幾篇關於適配的文章,大致有:
ok,我大致說一下,沒看過的先看完這篇,再考慮看不看以上幾篇,本篇的靈感是來自以上幾篇,但是適配的方便程度、以及效果遠比上面幾篇效果要好。
既然靈感來源於上述幾篇,就大體介紹下:
可以看到都存在一些問題,或多或少都需要進行一些額外的工作,然而我希望適配是這樣的:
假設我們拿到一張設計圖:
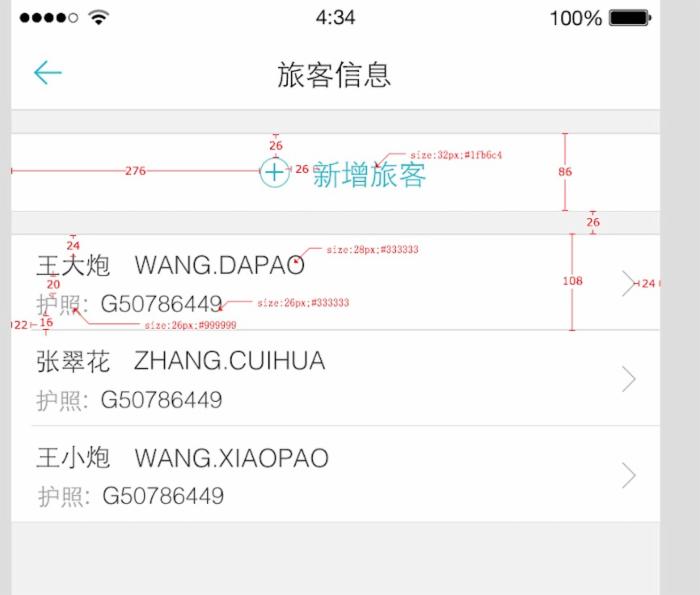
這樣的設計圖開發中很常見吧,有些公司可能需要自己去測量。
按照我們的思想:
布局直接抄設計圖上的尺寸
對於,新增旅客我們的布局文庫應該這麼寫:
Java
RelativeLayout
android:layout_width="match_parent"
android:layout_height="86px"
android:layout_marginTop="26px"
android:background="#ffffffff">

ImageView
    android:id="@+id/id_tv_add"
    android:layout_width="34px"
    android:layout_height="34px"
    android:layout_gravity="center_vertical"
    android:layout_marginLeft="276px"
    android:layout_marginTop="26px"
    android:src="@mipmap/add"
    />

TextView
    android:layout_width="wrap_content"
    android:layout_height="wrap_content"
    android:layout_centerVertical="true"
    android:layout_marginLeft="26px"
    android:layout_toRightOf="@id/id_tv_add"
    android:text="新增旅客"
    android:textColor="#1fb6c4"
    android:textSize="32px"
    />
RelativeLayout>
RelativeLayout
android:layout_width="match_parent"
android:layout_height="86px"
android:layout_marginTop="26px"
android:background="#ffffffff">

ImageView
    android:id="@+id/id_tv_add"
    android:layout_width="34px"
    android:layout_height="34px"
    android:layout_gravity="center_vertical"
    android:layout_marginLeft="276px"
    android:layout_marginTop="26px"
    android:src="@mipmap/add"
    />

TextView
    android:layout_width="wrap_content"
    android:layout_height="wrap_content"
    android:layout_centerVertical="true"
    android:layout_marginLeft="26px"
    android:layout_toRightOf="@id/id_tv_add"
    android:text="新增旅客"
    android:textColor="#1fb6c4"
    android:textSize="32px"
    />
RelativeLayout>
來張組合圖,感受一下:
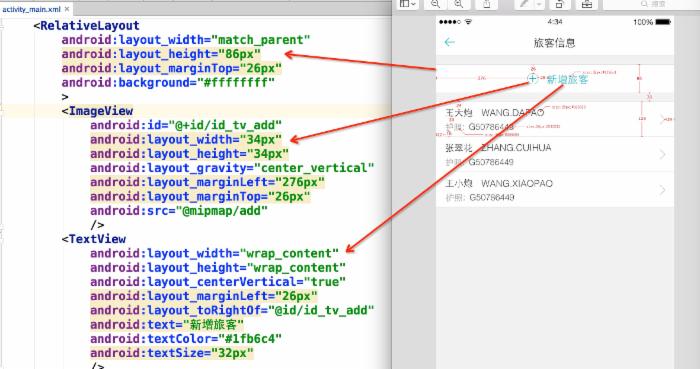
感受完了,想一想,按照這種方式去寫布局你說爽不爽。
ok,那麼對於Item的布局文件,就是這麼寫:
Java
RelativeLayout
    android:layout_width="match_parent"
    android:layout_height="108px"
    android:layout_marginTop="26px"
    android:background="#ffffffff"
    >

    TextView
        android:layout_width="wrap_content"
        android:layout_height="wrap_content"
        android:layout_marginLeft="22px"
        android:layout_marginTop="16px"
        android:text="王大炮 WANG.DAPAO"
        android:textColor="#333"
        android:textSize="28px"
        />
    TextView
        android:layout_width="wrap_content"
        android:layout_height="wrap_content"
        android:layout_alignParentBottom="true"
        android:layout_marginBottom="16px"
        android:layout_marginLeft="22px"
        android:text="護照:G50786449"
        android:textColor="#999"
        android:textSize="26px"
        />

RelativeLayout>
RelativeLayout
    android:layout_width="match_parent"
    android:layout_height="108px"
    android:layout_marginTop="26px"
    android:background="#ffffffff"
    >

    TextView
        android:layout_width="wrap_content"
        android:layout_height="wrap_content"
        android:layout_marginLeft="22px"
        android:layout_marginTop="16px"
        android:text="王大炮 WANG.DAPAO"
        android:textColor="#333"
        android:textSize="28px"
        />
    TextView
        android:layout_width="wrap_content"
        android:layout_height="wrap_content"
        android:layout_alignParentBottom="true"
        android:layout_marginBottom="16px"
        android:layout_marginLeft="22px"
        android:text="護照:G50786449"
        android:textColor="#999"
        android:textSize="26px"
        />

RelativeLayout>
看到這,我相信,你現在最大的疑問就是:你用的px,px能完成適配?搞笑吧?
那麼首先說一下:這個px並不代表1像素,我在內部會進行百分比化處理,也就是說:720px高度的屏幕,你這裡填寫72px,占據10%;當這個布局文件運行在任何分辨率的手機上,這個72px都代表10%的高度,這就是本庫適配的原理。
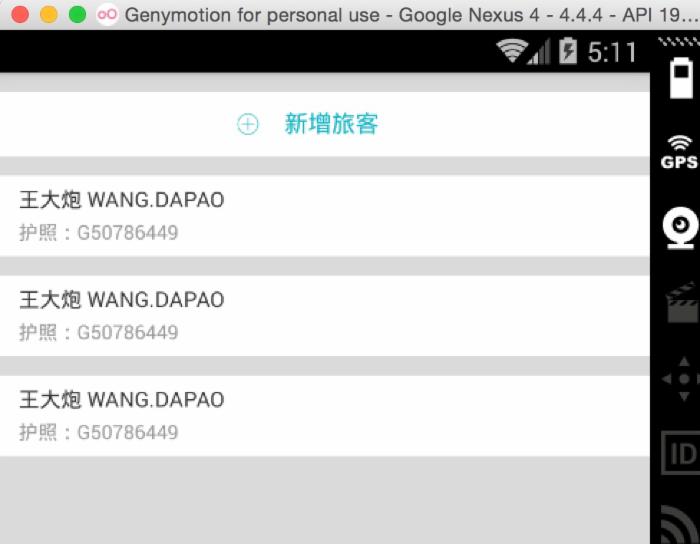
接下來:看下不同分辨率下的效果:
768*1280,Andriod 4.4.4
480*800,Android 2.3.7
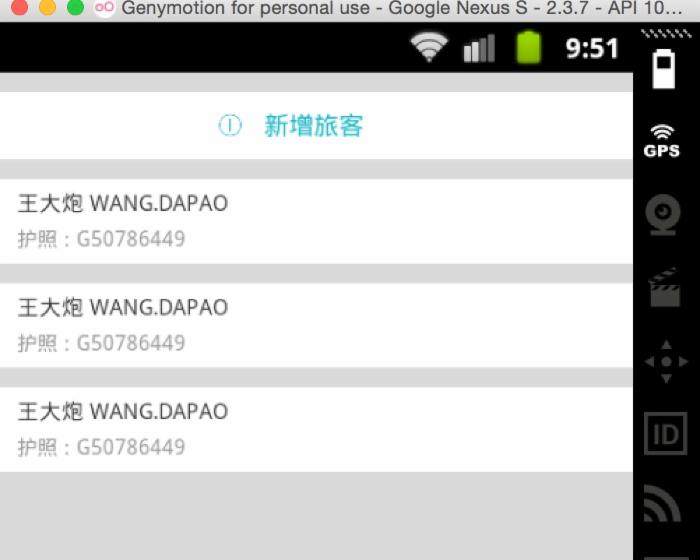
上述兩個機器的分辨率差距相當大了,按照百分比的規則,完美實現了適配,最為重要的是:
接下來說下用法。
本庫的地址: https://github.com/hongyangAndroid/AndroidAutoLayout
將 autolayout 引入
Java
meta-data android:name="design_width" android:value="768">meta-data>
meta-data android:name="design_height" android:value="1280">meta-data>
meta-dataandroid:name="design_width"android:value="768">meta-data>
meta-dataandroid:name="design_height"android:value="1280">meta-data>
對於eclipse的伙伴,只有去copy源碼了~~
在你的項目的AndroidManifest中注明你的設計稿的尺寸。
Java
meta-data android:name="design_width" android:value="768">meta-data>
meta-data android:name="design_height" android:value="1280">meta-data>
meta-dataandroid:name="design_width"android:value="768">meta-data>
meta-dataandroid:name="design_height"android:value="1280">meta-data>
ok,非常簡單的兩部即可引入項目,然後,然後干嘛?
然後就按照上個章節的編寫方式開始玩耍吧~
ok,上面是最簡單的用法,當然你也可以不去繼承AutoLayoutActivity來使用。
AutoLayoutActivity的用法實際上是完成了一件事:
如果你不想繼承AutoLayoutActivity,那麼你就得像Google的百分比庫一樣,去用AutoXXXLayout代替系統原有的XXXLayout。當然,你可以放心的是,所有的系統屬性原有的屬性都會支持,不過根布局上就不支持px的自動百分比化了,但是一般根布局都是MATCH_PARENT,而上述的方式,根布局也是可以直接px的百分比化的。
大家都知道,寫布局文件的時候,不能實時的去預覽效果,那麼體驗真的是非常的不好,也在很大程度上降低開發效率,所以下面教大家如何用好,用對PreView(針對該庫)。
首先,你要記得你設計稿的尺寸,比如768 * 1280
然後在你的PreView面板,選擇分辨率一致的設備:
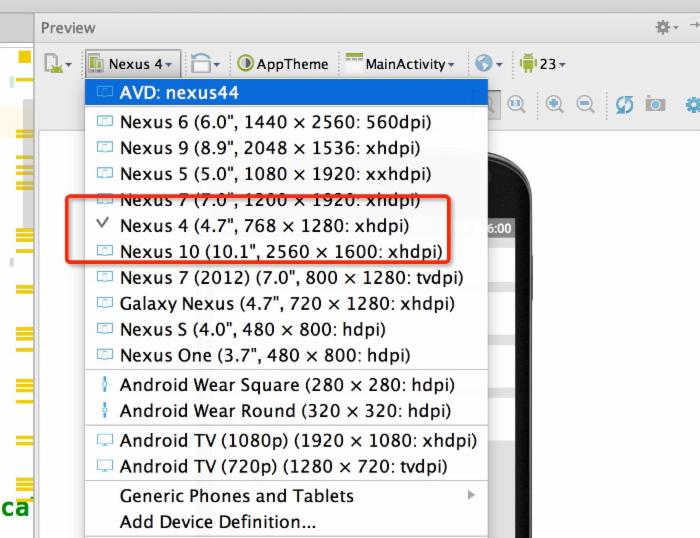
然後你就可以看到最為精確的預覽了:
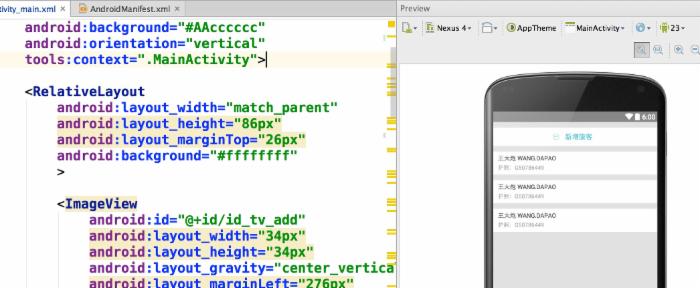
兩個注意事項:
TextView這個控件呢,可能和設計稿上會有一些出入,並非是此庫的原因,而是與生俱來的特性。
比如:
Java
TextView
 textSize="32px"
 layout_height="wrap_contnt"
 />
TextView
textSize="32px"
layout_height="wrap_contnt"
/>
你去運行肯定不是32px的高度,文字的上下方都會有一定的空隙。如何你將高度寫死,也會發現文字顯示不全。
恩,所以呢,靈活應對這個問題,對於存在字體標識很精確的值,你可以選擇:對於TextView與其他控件的上下邊距呢,盡可能的稍微寫小一點。
其實我上面的例子,幾乎都是TextView,所有我在編寫Item裡面的時候,也有意縮小了一下marginTop值等。不過,對於其他控件是不存在這樣的問題的。
ps:因為TextView的上述問題:所以對於居中,雖然可以使用本庫通過編寫margin_left,margin_top等很輕松的完成居中。但是為了精確起見,還是建議使用gravity,centerInXXX等屬性完成。
由於該庫的特點,布局文件中寬高上的1px是不相等的,於是如果需要寬高保持一致的情況,布局中使用屬性:
app:layout_auto_basewidth=”height”,代表height上編寫的像素值參考寬度。
app:layout_auto_baseheight=”width”,代表width上編寫的像素值參考高度。
如果需要指定多個值參考寬度即:
app:layout_auto_basewidth="height|padding"
用|隔開,類似gravity的用法,取值為:
如果某個Activity需要將狀態欄區域作為實際的內容區域時,那麼可用高度會變大,你所要做的只有一件事:讓這個Activity實現UseStatusBar接口(僅僅作為標識左右,不需要實現任何方法),當然你肯定要自己開啟windowTranslucentStatus或者設置FLAG_TRANSLUCENT_STATUS。
注意:僅僅是改變狀態欄顏色,並不需要實現此接口,因為並沒有實際上增加可用高度。
通過本庫的方式去編寫代碼,可以在很大程序上使用margin,也就是說,對於View的位置非常好控制,從而能夠減少非常多的嵌套,甚至任何一個復雜的界面做到無嵌套。
以及,幾乎不需要去使用RelativeLayout的規則了,比如rightOf,完全可以由marginLeft完成,其他的rule同理。
對於LinearLayout的weight,幾乎也不需要使用了,比如屏幕寬度720px,想要四個控件橫向均分,完全可以寫layout_width=”180px”
我相信通過上述的介紹,你已經了解的本庫適配的做法,而且可以說是我見過的最方便的適配方案,最大化的減輕了適配的負擔,甚至比你不適配時編寫UI都方便。目前本庫,已經嘗試用於項目中,盡可能去發現一些潛在的問題。
本庫的地址: https://github.com/hongyangAndroid/AndroidAutoLayout ,歡迎各位一起完善,讓適配問題消失在我們的痛苦中。
ok,最後,只有去體驗了,才能發現優點和缺點~~
 Android仿新浪微博加#話題的EditText實現
需求 產品上線了,項目差不多算是穩定下來了,接下來就是一個個的版本迭代了。這周又增加了幾個新功能,其中一個就是題目中講的,要仿新浪微博(如下圖)的輸入框裡的文字效
 在Android App中集成Google登錄
本文由碼農網 – 小峰原創翻譯,轉載請看清文末的轉載要求,歡迎參與我們的付費投稿計劃! 今天,幾乎所有的web和移動app都自帶谷歌和Facebook登錄
 Android的.so文件詳細解讀
早期的Android系統幾乎只支持ARMv5的CPU架構,你知道現在它支持多少種嗎?7種! Android系統目前支持以下七種不同的CPU架構:ARMv5,ARM
 Android UI控件系列:TabWidget(切換卡)
Tab選項卡類似與電話本的界面,通過多個標簽切換不同的內容,要實現這個效果,首先要知道TabHost,它是一個用來存放多個Tab標簽的容器,每一個Tab都可以對應