編輯:Android資訊
對話框是Android中不可或缺的,在使用對話框的時候,需要使用AlertDialog.Builder類。當然處理系統默認的對話框外,還可以自定義對話框,如果對話框設置了按鈕,那麼要對其進行事件監聽OnClickListener。
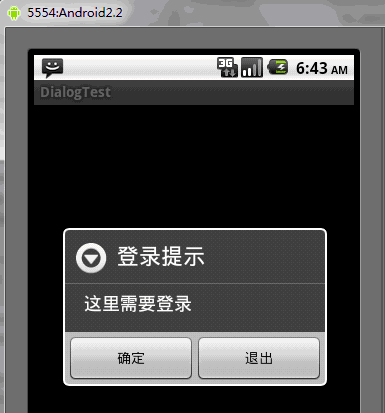
下面的是一個用AlertDialog.Builder類和自定義的對話框的實例,當點擊確定時,轉移到登陸對話框,當輸入用戶名和密碼後,轉移到登陸進度對話框
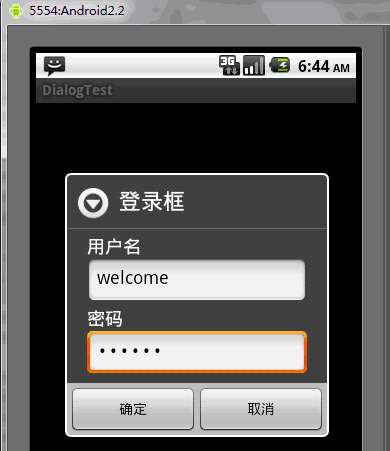
這裡的自定義對話框是由兩個TextView和兩個EditText組成,也就是那個登錄對話框,自定義對話框的布局文件是dialog.xml文件,見下面
另外呢,使用AlertDialog來創建對話框,需要了解一下幾個方法
setTitle();給對話框設置標題
setIcon();給對話框設置圖標
setMessage();設置對話框的提示信息
setItems();設置對話框要顯示的一個list,一般用於顯示幾個命令時
setSingleChoiceItems();設置對話框顯示一個單選的List
setMultiChoiceItems();設置對話框顯示一系列的復選框
setPositiveButton();給對話框添加”yes”按鈕
setNegativeButton();給對話框添加”no”按鈕
DialogTest.java
package org.hualang.dialog;

import android.app.Activity;
import android.app.AlertDialog;
import android.app.Dialog;
import android.app.ProgressDialog;
import android.content.DialogInterface;
import android.os.Bundle;
import android.view.LayoutInflater;
import android.view.View;

public class DialogTest extends Activity {
    /** Called when the activity is first created. */
        ProgressDialog mydialog;
    @Override
    public void onCreate(Bundle savedInstanceState) {
        super.onCreate(savedInstanceState);
        setContentView(R.layout.main);
        Dialog dialog=new AlertDialog.Builder(DialogTest.this)
        .setTitle("登錄提示")//設置標題
        .setMessage("這裡需要登錄")//設置對話框顯示內容
        .setPositiveButton("確定", //設置確定按鈕
        new DialogInterface.OnClickListener() {
                        @Override
                        public void onClick(DialogInterface dialog, int which) {
                                //點擊確定轉向登錄對話框
                                LayoutInflater factory=LayoutInflater.from(DialogTest.this);
                                //得到自定義對話框
                                final View DialogView=factory.inflate(R.layout.dialog, null);
                                //創建對話框
                                AlertDialog dlg=new AlertDialog.Builder(DialogTest.this)
                                .setTitle("登錄框")
                                .setView(DialogView)//設置自定義對話框樣式
                                .setPositiveButton("確定",
                                new DialogInterface.OnClickListener() {//設置監聽事件

                                        @Override
                                        public void onClick(DialogInterface dialog, int which) {
                                                // 輸入完成後點擊“確定”開始登錄
                                                mydialog=ProgressDialog.show(DialogTest.this, "請稍等...", "正在登錄...",true);
                                                new Thread()
                                                {
                                                        public void run()
                                                        {
                                                                try
                                                                {
                                                                        sleep(3000);
                                                                }catch(Exception e)
                                                                {
                                                                        e.printStackTrace();
                                                                }finally
                                                                {
                                                                        //登錄結束,取消mydialog對話框
                                                                        mydialog.dismiss();
                                                                }
                                                        }
                                                }.start();
                                        }
                                }).setNegativeButton("取消",//設置取消按鈕
                                        new DialogInterface.OnClickListener() {

                                                @Override
                                                public void onClick(DialogInterface dialog, int which) {
                                                        //點擊取消後退出程序
                                                        DialogTest.this.finish();

                                                }
                                        }).create();//創建對話框
                                dlg.show();//顯示對話框
                        }
                }).setNeutralButton("退出",
                        new DialogInterface.OnClickListener() {

                                @Override
                                public void onClick(DialogInterface dialog, int which) {
                                        // 點擊退出後退出程序
                                        DialogTest.this.finish();
                                }
                        }).create();//創建按鈕
        //顯示對話框
        dialog.show();
    }
}
dialog.xml
<?xml version="1.0" encoding="utf-8"?>
<LinearLayout xmlns:android="http://schemas.android.com/apk/res/android"
    android:orientation="vertical"
    android:layout_width="fill_parent"
    android:layout_height="fill_parent"
    >
<TextView
        android:id="@+id/username"
    android:layout_width="wrap_content"
    android:layout_height="wrap_content"
    android:layout_marginLeft="20dip"
    android:layout_marginRight="20dip"
    android:text="用戶名"
    android:gravity="left"
    android:textAppearance="?android:attr/textAppearanceMedium"
    />
<EditText
        android:id="@+id/username"
        android:layout_width="fill_parent"
        android:layout_height="wrap_content"
        android:layout_marginLeft="20dip"
        android:layout_marginRight="20dip"
        android:scrollHorizontally="true"
        android:autoText="false"
        android:capitalize="none"
        android:gravity="fill_horizontal"
        android:textAppearance="?android:attr/textAppearanceMedium"
/>
<TextView
        android:id="@+id/password"
        android:layout_width="wrap_content"
        android:layout_height="wrap_content"
        android:layout_marginLeft="20dip"
        android:layout_marginRight="20dip"
        android:text="密碼"
        android:gravity="left"
        android:textAppearance="?android:attr/textAppearanceMedium"
/>
<EditText
        android:id="@+id/password"
        android:layout_width="fill_parent"
        android:layout_height="wrap_content"
        android:layout_marginLeft="20dip"
        android:layout_marginRight="20dip"
        android:scrollHorizontally="true"
        android:autoText="false"
        android:capitalize="none"
        android:gravity="fill_horizontal"
        android:password="true"
        android:textAppearance="?android:attr/textAppearanceMedium"

/>
</LinearLayout>
運行結果如下:
點擊確定後,會跳轉到登陸對話框,這個登錄對話框是自定義的對話框
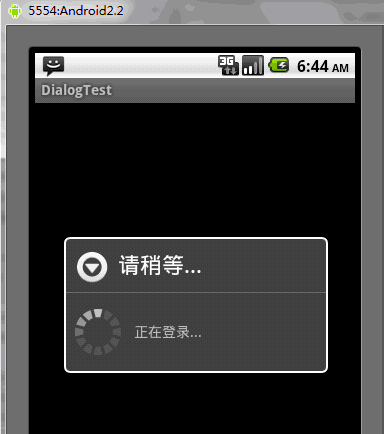
輸入用戶名和密碼後,點擊確定後,進入帶進度條的對話框中,這裡的帶進度條的對話框是系統默認的,並且用現成控制,3秒後就結束該對話框,並跳轉到相應的Activity中
補充內容:
1、Inflater英文意思是膨脹,在android中是擴展的意思。
LayoutInflater的作用類似於 findViewById(),不同點是LayoutInflater是用來找layout文件夾下的xml布局文件,並且實例化!而 findViewById()是找具體某一個xml下的具體 widget控件(如:Button,TextView等)。 它可以有很多地方可以使用,如BaseAdapter的getView中,自定義Dialog中取得view中的組件widget等等。
2、AlertDialog.Builder是警告對話框的意思
3、單位
px:是屏幕的像素點
in:英寸
mm:毫米
pt:磅,1/72 英寸
dp:一個基於density的抽象單位,如果一個160dpi的屏幕,1dp=1px
dip:等同於dp
sp:同dp相似,但還會根據用戶的字體大小偏好來縮放。
建議使用sp作為文本的單位,其它用dip
4、dialog.xml說明
①android:layout_marginLeft=”20dip”
margin是邊的意思,上面這句話是說該控件距離左邊20個dip。同樣
android:layout_marginRight=”20dip”就是該控件距離父控件右邊20dip
②android:gravity=”left”:表示該控件的text文本顯示在左邊
③android:layout_gravity=”center”:表示該控件位於父控件的中間
④android:textAppearance的使用
對於能夠顯示文字的控件(如TextView EditText RadioButton Button CheckBox等),你有時需要控制字體的大小。Android平台定義了三種字體大小。
“?android:attr/textAppearanceLarge”
“?android:attr/textAppearanceMedium”
“?android:attr/textAppearanceSmall”
使用方法為:
android:textAppearance=”?android:attr/textAppearanceLarge”
android:textAppearance=”?android:attr/textAppearanceMedium”
android:textAppearance=”?android:attr/textAppearanceSmall”
或
style=”?android:attr/textAppearanceLarge”
style=”?android:attr/textAppearanceMedium”
style=”?android:attr/textAppearanceSmall”
⑤ android:scrollHorizontally=”true”:設置文本超出TextView的寬度的情況下,是否出現橫拉條
⑥android:autoText=”false”:如果設置,將自動執行輸入值的拼寫糾正。此處無效果,在顯示輸入法並輸入的時候起作用。此處設置為false,則為關閉子動能
⑦android:capitalize=”none”:設置英文字母大寫類型。此處無效果,需要彈出輸入法才能看得到
⑧android:password=”true”:以小點”.”顯示文本,用於輸入密碼時
 Android中Handler Runnable與Thread的區別詳解
Android中Handler可以異步控制Runnable,那麼這樣做於Android中的Thread有什麼區別呢?本文將通過多個角度來講解這個問題,讀完此文,相
 Android Studio ndk-Jni開發詳解
Java Native Interface (JNI)標准是java平台的一部分,它允許Java代碼和其他語言寫的代碼進行交互。JNI 是本地編程接口,它使得在
 FaceBook推出的Android圖片加載庫Fresco
在Android設備上面,快速高效的顯示圖片是極為重要的。過去的幾年裡,我們在如何高效的存儲圖像這方面遇到了很多問題。圖片太大,但是手機的內存卻很小。每一個像素的
 一個 2 年 Android 開發者的 18 條忠告
我仍記得2014年我決定做安卓開發的那天,這是我一生中做出的最好決定之一。到現在已經有2年半了, 最初的時候,並沒有人告訴我如何做才是正確的。我犯了很多錯誤,浪費