編輯:關於Android編程
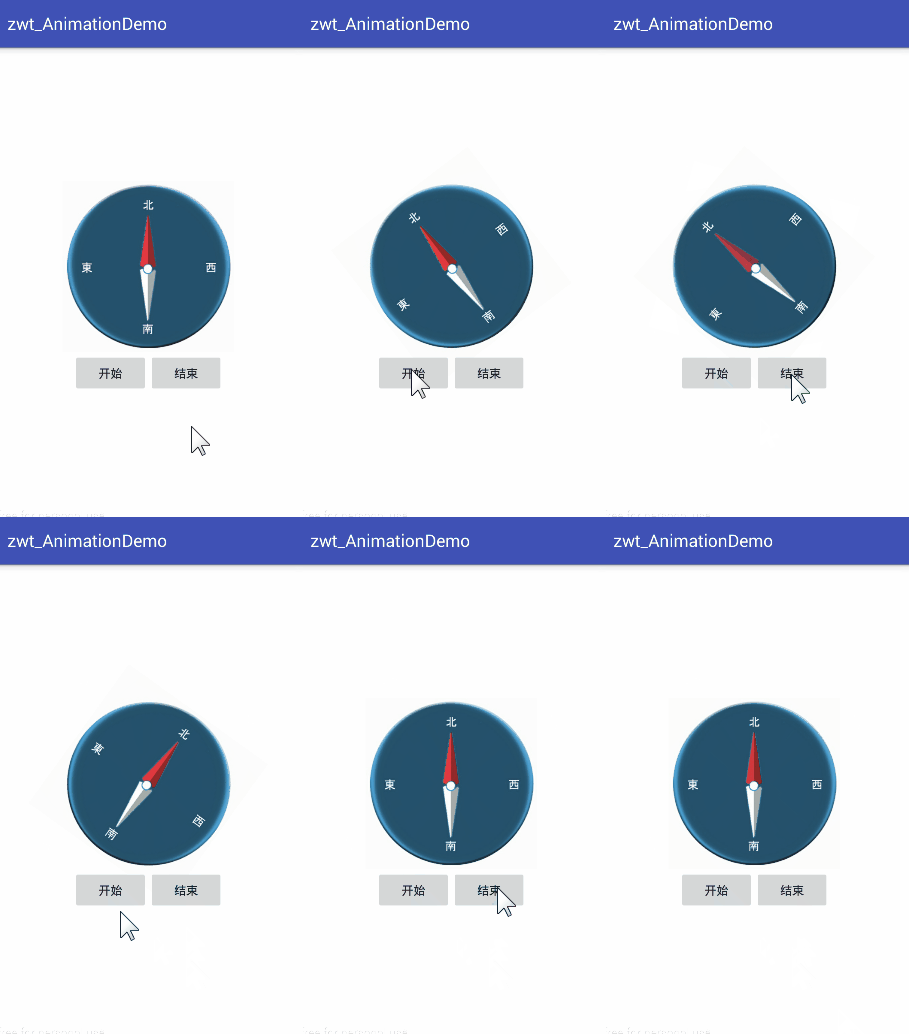
使用自定義Animation,實現View的左右搖擺效果,如圖所示:

代碼很簡單,直接上源碼
activity_maini.xml布局文件:
<?xml version="1.0" encoding="utf-8"?>
<LinearLayout
  xmlns:android="http://schemas.android.com/apk/res/android"
  android:layout_width="match_parent"
  android:layout_height="match_parent"
  android:background="#ffffff"
  android:gravity="center"
  android:orientation="vertical">

  <!--圖片-->
  <ImageView
    android:id="@+id/iv_dial"
    android:layout_width="200dp"
    android:layout_height="200dp"
    android:src="@drawable/img"/>

  <!--控制按鈕-->
  <LinearLayout
    android:layout_width="match_parent"
    android:layout_height="wrap_content"
    android:layout_gravity="bottom"
    android:gravity="center"
    android:orientation="horizontal">

    <Button
      android:id="@+id/btn_start"
      android:layout_width="wrap_content"
      android:layout_height="wrap_content"
      android:text="開始"/>

    <Button
      android:id="@+id/btn_end"
      android:layout_width="wrap_content"
      android:layout_height="wrap_content"
      android:text="結束"/>

  </LinearLayout>

</LinearLayout>
也可以用其它的View控件替代ImageView,都是可以實現搖擺效果的
主界面MainActivity
/**
 * 主界面
 * Created by zhuwentao on 2016-08-08.
 */
public class MainActivity extends AppCompatActivity implements View.OnClickListener{

  /** 表盤圖片 */
  private ImageView mDialIv;

  /** 開始按鈕 */
  private Button mStartBtn;

  /** 結束按鈕 */
  private Button mEndBtn;

  @Override
  protected void onCreate(Bundle savedInstanceState) {
    super.onCreate(savedInstanceState);
    setContentView(R.layout.activity_main);
    initUI();
    initListener();
  }

  /**
   * 初始化UI
   */
  private void initUI() {
    mDialIv = (ImageView) findViewById(R.id.iv_dial);
    mStartBtn = (Button) findViewById(R.id.btn_start);
    mEndBtn = (Button) findViewById(R.id.btn_end);
  }

  /**
   * 初始化監聽
   */
  private void initListener() {
    mStartBtn.setOnClickListener(this);
    mEndBtn.setOnClickListener(this);
  }

  @Override
  public void onClick(View v) {
    switch (v.getId()) {
      case R.id.btn_start:
        showAnimation();
        break;
      case R.id.btn_end:
        mDialIv.clearAnimation();
        break;
    }
  }

  /**
   * 設置動畫
   */
  private void showAnimation() {
    // 獲取自定義動畫實例
    CustomRotateAnim rotateAnim = CustomRotateAnim.getCustomRotateAnim();
    // 一次動畫執行1秒
    rotateAnim.setDuration(1000);
    // 設置為循環播放
    rotateAnim.setRepeatCount(-1);
    // 設置為勻速
    rotateAnim.setInterpolator(new LinearInterpolator());
    // 開始播放動畫
    mDialIv.startAnimation(rotateAnim);
  }
}
setRepeatCount()設置的是重復播放動畫的次數,-1是為了讓它循環播放,setRepeatCount(0)代表的是執行一次,setRepeatCount(1)代表重復1次,即動畫執行2次。
setInterpolator()方法是設置插值器,用來指定動畫的效果,這裡使用系統提供的LinearInterpolator()勻速變化效果。
自定義的CustomRotateAnim動畫需要繼承Animation,這裡只要實現它的initialize()和applyTransformation()方法就好
/**
 * 左右搖擺動畫
 * Created by zhuwentao on 2016-08-08.
 */
public class CustomRotateAnim extends Animation {

  /** 控件寬 */
  private int mWidth;

  /** 控件高 */
  private int mHeight;

  /** 實例 */
  private static CustomRotateAnim rotateAnim;

  /**
   * 獲取動畫實例
   * @return 實例
   */
  public static CustomRotateAnim getCustomRotateAnim() {
    if (null == rotateAnim) {
      rotateAnim = new CustomRotateAnim();
    }
    return rotateAnim;
  }

  @Override
  public void initialize(int width, int height, int parentWidth, int parentHeight) {
    this.mWidth = width;
    this.mHeight = height;
    super.initialize(width, height, parentWidth, parentHeight);
  }

  @Override
  protected void applyTransformation(float interpolatedTime, Transformation t) {
    // 左右搖擺
    t.getMatrix().setRotate((float)(Math.sin(interpolatedTime*Math.PI*2)*50), mWidth/2, mHeight/2);
    super.applyTransformation(interpolatedTime, t);
  }
}
initialize(int width, int height, int parentWidth, int parentHeight)中,width和height代表指定播放動畫的View空間寬高,parentWidth和parentHeight代表該View控件所在的父控件寬高。
我們需要使用當前View的寬高來確定搖擺的旋轉點,所以在initialize中獲取View控件的寬高。
applyTransformation()方法是動畫具體的實現方法,在系統繪制動畫時會反復調用這個方法,每調用一次applyTransformation()方法,其中的interpolatedTime參數都會改變一次,值從0到1遞增,當interpolatedTime的值為1時則動畫結束。
Transformatio類是一個變換的矩陣,通過改變該矩陣就可以實現各種復雜的效果。
復寫這個方法,在裡面就可以實現我們自定義的動畫效果了。
 Android編程實現點擊鏈接打開APP功能示例
本文實例講述了Android編程實現點擊鏈接打開APP功能。分享給大家供大家參考,具體如下:在Android中點擊鏈接打開APP是一個很常見的需求。例如,電商為用戶發送優
 Android系統應用開發(五)android 輸入法類說明
源碼裡面有3套輸入法,位置:Z:\myandroid\packages\inputmethodsopenwnn是一家日本公司開發的開源輸入法框架,涉及中文、日文、韓文。目
 Android使用RecyclerView和CardView,實現知乎日報精致布局
在寫博客園客戶端的時候,突然想到,弄個知乎日報風格的簡單清爽多好!不需要那麼多繁雜的信息干擾視野。先貼上效果圖,左邊是知乎日報的,右邊是本方案的 本文所使用的ide是an
 android的Drawable詳解
Drawable簡介Drawable有很多種,用來表示一種圖像的概念,但他們又不完全是圖像,他們是用過顏色構建出來的各種圖像的表現形式。Drawable一般都是通過xml