編輯:關於Android編程
PS:最近看到很多人都開始寫年終總結了,時間過得飛快,又到年底了,又老了一歲。
學習內容:
1.進度條
2.縮放
3.ControllerBuilder,ControllerListener,PostProcesser,Image Request
4.漸進式JPEG與動圖的顯示
最近這兩天把Fresco的官方文檔算是看了個差不多,就剩下Fresco的基本原理還有結合okHttp等類庫如何使用的問題,雖然官方文檔給出的功能比較的多,比如說自定義View,縮略圖顯示等等,這些我也基本就看了個大概,覺得實際需求應該沒有那麼高的要求,因此有些東西我這裡就不介紹了,詳細的情況可以參考官方文檔,我這裡只是針對一些使用情況比較多的功能進行一個簡單的介紹。
1.進度條
進度條也算是Fresco的一個功能,Fresco內部本身提供了一個ProgressBarDrawable類,效果其實就是一個矩形的藍色進度條,當圖片處於加載狀態時,進度條會跟著進行加載,當圖片加載完畢之後,那麼進度條也隨之消失,但是這個進度並不是實時更新的,如果我們想要精確的加載進度,那麼我們需要重寫內部的方法。
class CustomProgressBar extends Drawable{

 @Override
 protected boolean onLevelChange(int level) {
  //doSomething
  return super.onLevelChange(level);
 }

}
自定義進度條我們就需要實現onLevelChange方法,這裡只做一個簡單的介紹,如果大家想自定義進度條,那麼可以參照ProgressBarDrawable去重寫一個進度條,個人感覺這個功能一般般,與其在加載圖片的時候使用進度條,不如使用ProgressBarImage屬性為圖片加載時設置一個進度圖片,同時還支持旋轉屬性。
2.縮放
DraweeView的縮放和ImageView的縮放類型基本上是相同的,fitXY,centerCrop,唯一與ImageView有區別的就是,他不支持matrix屬性,但是追加了一個focusCrop屬性來替代matrix屬性,這裡在設置屬性的時候,xml使用fresco:actualScaleType來設置DraweeView的縮放屬性或者是使用GenericDraweeHierarchy屬性去設置。
GenericDraweeHierarchyBuilder progressHierarchyBuilder = new GenericDraweeHierarchyBuilder(getResources());
GenericDraweeHierarchy progressHierarchy = progressHierarchyBuilder
    .setProgressBarImage(new ProgressBarDrawable(), ScalingUtils.ScaleType.CENTER_INSIDE)
    .build();
progressImageDraweeView.setHierarchy(progressHierarchy);
這裡不要使用setScaleType()或者是在xml中android:scaleType設置縮放屬性,這是無效的。官方給出focusCrop去替代matrix是有一定道理的,雖然說效果會比matrix要好,不過到底效果如何這個確實無法評判。先說說這個屬性的具體作用。
我們在實際需求中可能會遇到這樣的情況,在顯示人臉圖片的時候,盡量的將圖片居中顯示,以前我也遇到過這個需求,不過當時是用matrix屬性實現的,服務器會傳遞給我們人臉的重心坐標位置,然後客戶端需要根據人臉重心位置將圖像進行平移,同時需要將圖片進行縮放,是用matrix的話就需要使用matrix.postScale()和matrix.postTranslate()兩個方法去實現。簡單貼一下當時的處理方式。
@Override
public void onLoadingComplete(String s, View view, Bitmap bitmap) {
 float bitmapWidth = bitmap.getWidth();
 float bitmapHeight = bitmap.getHeight();
 Scale[o] = (params[o].height / bitmapHeight >= params[o].width / bitmapWidth) ? params[o].height / bitmapHeight : params[o].width / bitmapWidth;
 float scaleBitmapWidth = Scale[o] * bitmapWidth;
 float scaleBitmapHeight = Scale[o] * bitmapHeight;
 Matrix matrix = new Matrix();
 matrix.postScale(Scale[o], Scale[o]);
 if (scaleBitmapWidth > scaleBitmapHeight) { //寬度圖
  if (imagedata.get(o).getFace_center_x() == 0 && imagedata.get(o).getFace_center_y() == 0) {
   if(scaleBitmapWidth - params[o].width < 0.5 * scaleBitmapWidth - params[o].width / 2){
    matrix.postTranslate( params[o].width - scaleBitmapWidth ,0);
   }else{
    matrix.postTranslate(-(0.5f * scaleBitmapWidth - params[o].width / 2), 0);
   }
  } else {
   if(scaleBitmapWidth - params[o].width < scaleBitmapWidth * imagedata.get(o).getFace_center_x() - params[o].width / 2) {
    matrix.postTranslate(params[o].width - scaleBitmapWidth, 0);
   } else {
    if (scaleBitmapWidth * imagedata.get(o).getFace_center_x() - params[o].width / 2 < 0) {
     matrix.postTranslate(0, 0);
    } else {
     matrix.postTranslate(-(scaleBitmapWidth * imagedata.get(o).getFace_center_x() - params[o].width / 2), 0);
    }
   }
  }
 } else { //高度圖
  if (imagedata.get(o).getFace_center_x() == 0 && imagedata.get(o).getFace_center_y() == 0) {
   if(scaleBitmapHeight - params[o].height < 0.5 * scaleBitmapHeight - params[o].height / 2){
    matrix.postTranslate(0, params[o].height - scaleBitmapHeight);
   }else{
    matrix.postTranslate(0,-(0.5f * scaleBitmapHeight - params[o].height / 2));
   }
  } else {
   if (scaleBitmapHeight - params[o].height < scaleBitmapHeight * imagedata.get(o).getFace_center_y() - params[o].height / 2) {
    matrix.postTranslate(0, params[o].height - scaleBitmapHeight);
   } else {
    if (scaleBitmapHeight * imagedata.get(o).getFace_center_y() - params[o].height / 2 < 0) {
     matrix.postTranslate(0, 0);
    } else {
     matrix.postTranslate(0, -(scaleBitmapHeight * imagedata.get(o).getFace_center_y() - params[o].height / 2));
    }
   }
  }
 }
 vh.image[o].setImageMatrix(matrix);
}
這格式整的真蛋疼,這就是當時我們實際的項目需求,當時是一個GridView,其中一行有三張圖片,需要同時對三張圖片進行控制,如果是人像圖片,那麼需要將頭像平移到中央,如果不是人像圖片,那麼就顯示中央位置就可以了,當時實現的還是挺麻煩的,對寬度圖和高度圖進行了一個判斷,因為圖片分為寬度圖和高度圖,那麼在計算縮放比例的時候,就需要對二者進行判斷,縮放比例的計算 = 實際顯示的尺寸 / 圖片真正的尺寸,由於圖片的不同,我們需要取二者的最大值來設置縮放比例,才不會導致出現縮放過度的問題,同時平移的尺寸不能過度。
舉個例子,比如說我們ImageView的實際顯示寬度是100,我們對圖片進行了縮放,縮放之後圖片的寬度是110,那麼我們可以平移的最大距離就是10個單位,不能超過10個單位,否則顯示的時候就會出現問題。並且我們需要將圖片盡可能的居中顯示,也就是說盡可能的使圖片損失的單位要小一點,那麼我們就只能講圖片平移5個單位,也就是說,左右兩邊各損失5個單位,這樣的顯示要比完全偏向一邊損失10個單位要好得多。這裡可以看到使用matrix還是挺復雜的,也是這裡的代碼是可以進行優化的,但是優化完之後其實還是比較的麻煩。
如果我們使用Fresco的focusCrop屬性的話,那麼事情就會變得很簡單。
fresco:actualImageScaleType="focusCrop"
xml中設置縮放類型為focusCrop,然後在Java代碼中設置:
PointF focusPoint;
// your app populates the focus point
mSimpleDraweeView
 .getHierarchy()
 .setActualImageFocusPoint(focusPoint);
這裡focusPoint就是我們中心點的相對位置,float類型,(0.5,0.5)就相當於centerCrop中央位置,(1.0,1.0)也就是圖片的最下角位置,這樣如果在顯示人像圖片的時候問題就非常的輕松了,只需要傳遞頭像重心的相對位置,那麼Fresco就會自動的以坐標點為顯示中心。看起來好像確實是蠻簡單的。
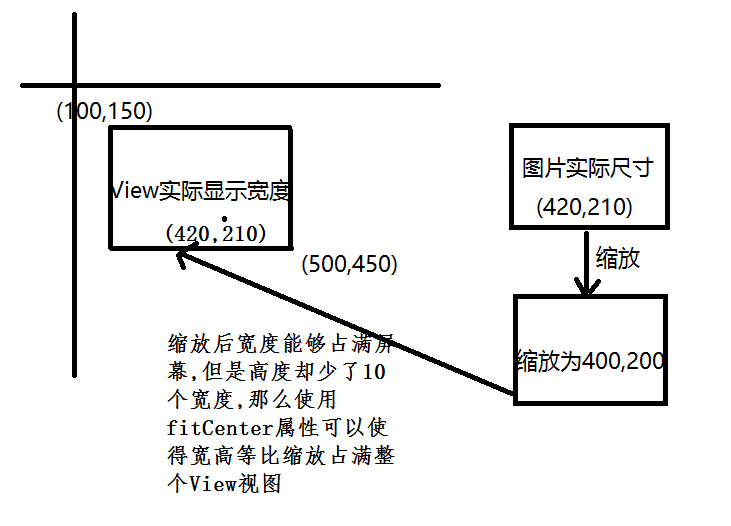
有時候現有的 ScaleType 不符合你的需求,我們允許你通過實現 ScalingUtils.ScaleType 來拓展它,這個接口裡面只有一個方法:getTransform,它會基於以下參數來計算轉換矩陣,簡單解釋一下官方給出的例子。

官方的例子其實就是這樣,給了一個實際的View顯示尺寸,然後給了一個圖片的顯示尺寸,如果直接將圖片鋪上去,那麼圖片確實可以顯示完整但是卻損失了一些像素點,那麼這時需要對寬度進行縮放,將圖片縮放為400,那麼這時橫向就能夠完全的顯示在屏幕上了,但是高度卻變低了圖片從210變成了200,然而實際顯示的高度為300,這時使用fitCenter保持寬高比,縮小或者放大,使得圖片完全顯示在顯示邊界內,且寬或高契合顯示邊界。居中顯示。總體差不多就是這個意思。但是自我感覺沒什麼意義,高度確實縮放了,但是寬度也縮放了,那麼寬度還是會損失像素的。只不過是放大後的像素而已。
這裡就是官方給出的例子,這裡min表示的最小才對,官方翻譯為最大的一個。沒太具體的研究下面的方法,感覺和使用matrix差不多,但是確實是簡化了不少。
public static abstract class AbstractScaleType implements ScaleType {
 @Override
 public Matrix getTransform(Matrix outTransform, Rect parentRect, int childWidth, int childHeight, float focusX, float focusY) {
  // 取寬度和高度需要縮放的倍數中最小的一個
  final float sX = (float) parentRect.width() / (float) childWidth;
  final float sY = (float) parentRect.height() / (float) childHeight;
  float scale = Math.min(scaleX, scaleY);

  // 計算為了均分空白區域,需要偏移的x、y方向的距離
  float dx = parentRect.left + (parentRect.width() - childWidth * scale) * 0.5f;
  float dy = parentRect.top + (parentRect.height() - childHeight * scale) * 0.5f;

  // 最後我們應用它
  outTransform.setScale(scale, scale);
  outTransform.postTranslate((int) (dx + 0.5f), (int) (dy + 0.5f));
  return outTransform;
 }
}
3.ControllerBuilder,ControllerListener,PostProcesser,Image Request
ControllerBuilder是用來構建Controller的,上一次已經簡單的介紹過Controller,主要是控制器,設置圖片的uri,能否重新加載等等,那麼ControllerBuilder就是使用build模式來構建Controller的。
ControllerListener則是用來控制下載的監聽事件的,如果我們需要在圖片下載完成或者之後需要設置一切屬性,那麼ControllerListener可以幫助我們實現這個功能。但是這個監聽事件中是無法修改圖片的,如果我們需要修改圖片,那麼就需要使用到PostProcesser後處理器去修改圖片。ImageRequest用於配置更多的屬性。也可以設置相關的uri,是否支持漸進式加載,或者設置後處理器。可以看到這幾者是存在必然的聯系的,因此將這三個功能放在一起進行介紹。
這裡我們為gif圖片設置了一個ControllerListener,如果圖片獲取成功,並且圖片存在動畫效果,那麼播放動畫效果,否則toast消息。
 ControllerListener controllerListener = new BaseControllerListener(){

  @Override
  public void onFinalImageSet(String id, Object imageInfo, Animatable animatable) {
   if(animatable!=null){
    animatable.start();
   }
  }

  @Override
  public void onFailure(String id, Throwable throwable) {
   Toast.makeText(context,"圖片加載失敗",Toast.LENGTH_SHORT).show();
  }

 };

 DraweeController gifController = Fresco.newDraweeControllerBuilder()
    .setUri(Uri.parse("http://img.huofar.com/data/jiankangrenwu/shizi.gif"))
    .setOldController(gifImageView.getController())
    .setControllerListener(controllerListener)
    .build();
 gifImageView.setController(gifController);
理解起來都比較的簡單。那麼這裡再使用後處理器簡單處理一下。
 Postprocessor redMeshPostProcessor = new BasePostprocessor() {
  @Override
  public void process(Bitmap bitmap) {
   for (int x = 0; x < bitmap.getWidth(); x+=2) {
    for (int y = 0; y < bitmap.getHeight(); y+=2) {
     bitmap.setPixel(x, y, Color.TRANSPARENT);
    }
   }
  }

  @Override
  public String getName() {
   return super.getName();
  }
 };
 ImageRequest processorImageRequest = ImageRequestBuilder
   .newBuilderWithSource(Uri.parse("http://avatar.csdn.net/4/E/8/1_y1scp.jpg"))
   .setPostprocessor(redMeshPostProcessor)
   .build();
 DraweeController processorController = Fresco.newDraweeControllerBuilder()
   .setImageRequest(processorImageRequest)
   .setOldController(processImageView.getController())
   .build();
 processImageView.setController(processorController);
這裡為圖片上繪制了一些小圓點,同時這個屬性的設置需要使用ImageRequest來進行配置後處理器。
ImageRequest的最低請求級別
1.檢查內存緩存,有如,立刻返回。這個操作是實時的。
2.檢查未解碼的圖片緩存,如有,解碼並返回。
3.檢查磁盤緩存,如果有加載,解碼,返回。
4.下載或者加載本地文件。調整大小和旋轉(如有),解碼並返回。對於網絡圖來說,這一套流程下來是最耗時的。
setLowestPermittedRequestLevel允許設置一個最低請求級別,請求級別和上面對應地有以下幾個取值:
如果你需要立即取到一個圖片,或者在相對比較短時間內取到圖片,否則就不顯示的情況下,這非常有用。
4.漸進式JPEG的設置,動圖顯示。
漸進式JPEG表示的是當我們加載一張圖片的時候,如果網絡比較緩慢,那麼圖片會從模糊到清晰漸漸呈現,這被稱之為漸進式JPEG。具體的使用如下:
  /**
   * 設置漸進式JPEG Config
   * */
  ProgressiveJpegConfig config = new ProgressiveJpegConfig() {
   @Override
   public int getNextScanNumberToDecode(int scanNumber) {
    return 0;
   }

   @Override
   public QualityInfo getQualityInfo(int scanNumber) {
    return null;
   }
  };
  /**
   * 直接控制ImagePipeline Config
   * */
  ImagePipelineConfig imagePipelineConfig = ImagePipelineConfig.newBuilder(context)
    .setProgressiveJpegConfig(config)
    .setDownsampleEnabled(true)
    .build();
  /**
   * 初始化使得Fresco支持漸進式JPEG的加載
   * */
  Fresco.initialize(this,imagePipelineConfig);
初始化的時候需要做這些配置,否則圖片是不會呈現漸進式JPEG的。
ImageRequest request = ImageRequestBuilder.newBuilderWithSource(Uri.parse("http://pooyak.com/p/progjpeg/jpegload.cgi"))
  .setProgressiveRenderingEnabled(true) //設置支持漸進式JPEG
  .build();
DraweeController progressiveJPEGController = Fresco.newDraweeControllerBuilder()
  .setImageRequest(request)
  .setOldController(progressiveJpegImageView.getController())
  .build();
progressiveJpegImageView.setController(progressiveJPEGController);
動圖顯示其實沒什麼可說的,Controller也不需要做過多的配置。
DraweeController gifController = Fresco.newDraweeControllerBuilder()
    .setUri(Uri.parse("http://img.huofar.com/data/jiankangrenwu/shizi.gif"))
    .setAutoPlayAnimations(true) //使動畫自動播放
    .setOldController(gifImageView.getController())
    .build();
gifImageView.setController(gifController);
只需要setAutoPlayAnimations()設置為true就可以在加載後自動進行播放,如果希望手動進行控制,那麼就用ControllerListener進行控制或者直接用controller訪問animations來完成。
Animatable animatable = mSimpleDraweeView.getController().getAnimatable();
if (animatable != null) {
 animatable.start();
 // later
 animatable.stop();
}
注意:動圖設置在高版本的Fresco需要引入gradle,使其支持動畫屬性。
compile 'com.facebook.fresco:animated-gif:0.14.0'
最後放置一個Demo:Demo下載。
以上就是本文的全部內容,希望對大家的學習有所幫助,也希望大家多多支持本站。
 Android 百度地圖sdk3.2下 離線地圖包的導入
前段時間用百度地圖,在使用離線地圖包導入的時候發現一個問題,從百度官網下載的離線包無法導入,但是用百度地圖的demo可以下載離線包使用,當時對方式沒什麼要求,能用就行,就
 android為ListView每個Item上面的按鈕添加事件
本文介紹了ListView給每個Item上面的按鈕添加事件,具體如下:1.先看下效果圖:在這裡僅供測試,我把數據都寫死了,根據需要可以自己進行修改,此外實現ListVie
 Android上用模板方法模式實現具有自動重用View功能的Adapter
ListView和GridView簡介 在Android App的開發中, ListView和GridView等控件是使用非常頻繁的控件。 這兩個控件的特點是使用數據
 Android百日程序:使用Intent回傳結果
本章使用Intent,回傳需要的結果; 流程: 主頁讀取用戶名並顯示出來。 1 啟動主頁圖: 2 啟動第二個activity 3 輸入用戶名: 4 回傳到主頁