編輯:關於Android編程
前言
之前寫了一篇Android-實現底部彈出PopupWindow並讓背景逐漸變暗,介紹利用Handler動態改變背景透明度從而達到變暗的效果。現在補充一種方法,使用動畫來實現相同的效果。
ValueAnimator 和 Interpolator
今天的主角就是這倆,關於ValueAnimator和Interpolator(插值器)的概念請各位自行補充,這裡主要講述怎麼用到我們這裡來(因為我也不很懂(捂臉))。
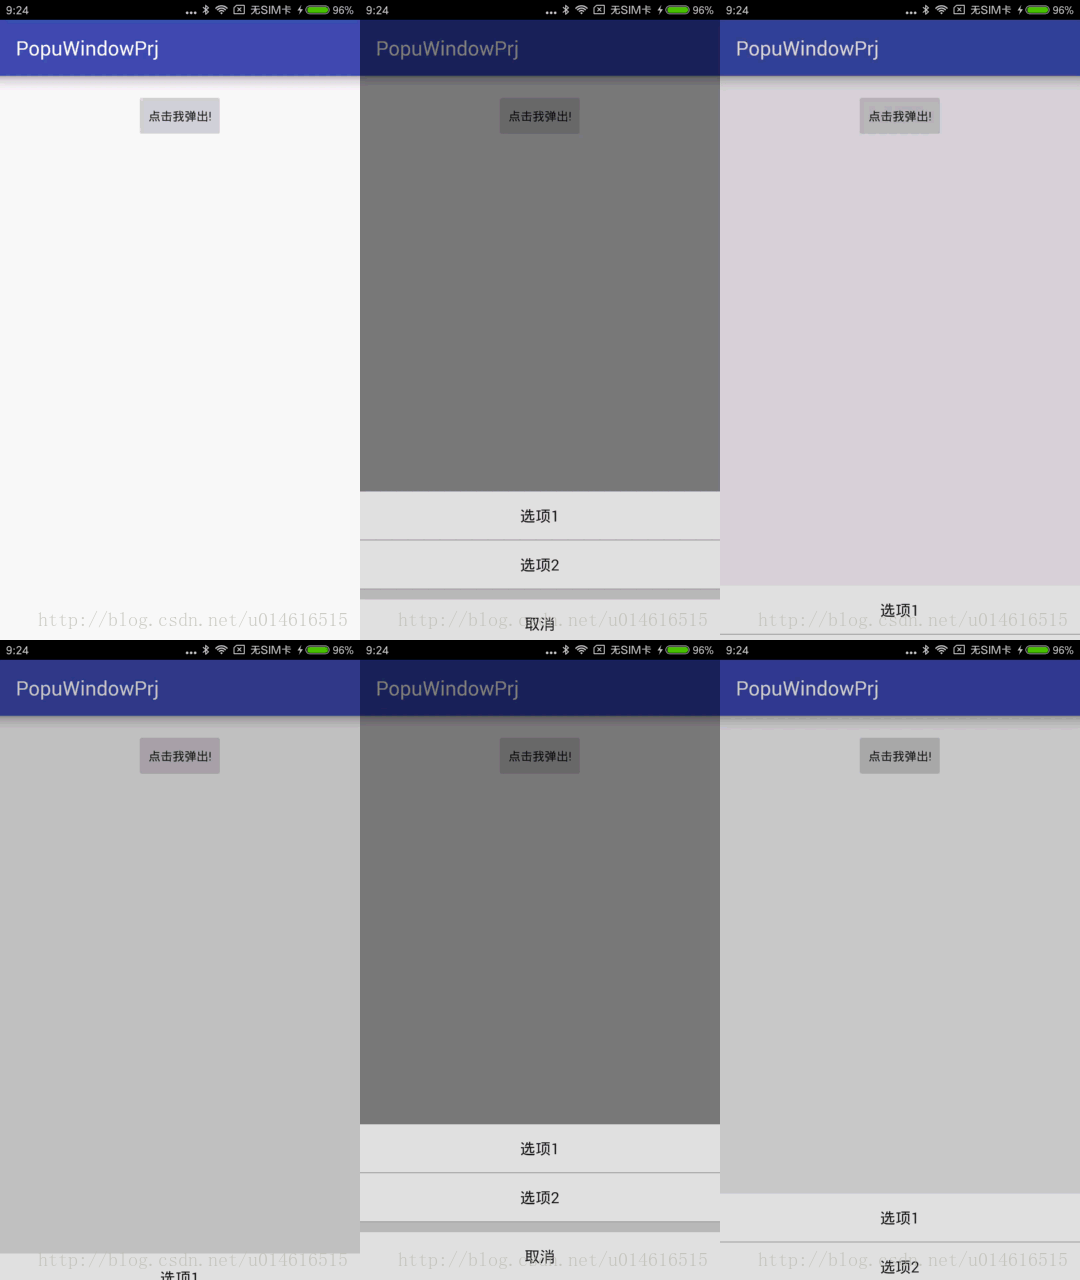
效果
跟之前沒有太大區別,只是為了演示變暗、變亮的過程 ↓

代碼
AnimUtil.java
/**
 * 動畫工具類
 * UpdateListener: 動畫過程中通過添加此監聽來回調數據
 * EndListener: 動畫結束的時候通過此監聽器來做一些處理
 */
public class AnimUtil {

  private ValueAnimator valueAnimator;
  private UpdateListener updateListener;
  private EndListener endListener;
  private long duration;
  private float start;
  private float end;
  private Interpolator interpolator = new LinearInterpolator();

  public AnimUtil() {
    duration = 1000; //默認動畫時常1s
    start = 0.0f;
    end = 1.0f;
    interpolator = new LinearInterpolator();// 勻速的插值器
  }


  public void setDuration(int timeLength) {
    duration = timeLength;
  }

  public void setValueAnimator(float start, float end, long duration) {

    this.start = start;
    this.end = end;
    this.duration = duration;

  }

  public void setInterpolator(Interpolator interpolator) {
    this.interpolator = interpolator;
  }

  public void startAnimator() {
    if (valueAnimator != null){
      valueAnimator = null;
    }
    valueAnimator = ValueAnimator.ofFloat(start, end);
    valueAnimator.setDuration(duration);
    valueAnimator.setInterpolator(interpolator);
    valueAnimator.addUpdateListener(new ValueAnimator.AnimatorUpdateListener() {
      @Override
      public void onAnimationUpdate(ValueAnimator valueAnimator) {

        if (updateListener == null) {
          return;
        }

        float cur = (float) valueAnimator.getAnimatedValue();
        updateListener.progress(cur);
      }
    });
    valueAnimator.addListener(new Animator.AnimatorListener() {
      @Override
      public void onAnimationStart(Animator animator) {}
      @Override
      public void onAnimationEnd(Animator animator) {
        if(endListener == null){
          return;
        }
        endListener.endUpdate(animator);
      }
      @Override
      public void onAnimationCancel(Animator animator) {}

      @Override
      public void onAnimationRepeat(Animator animator) {}
    });
    valueAnimator.start();
  }

  public void addUpdateListener(UpdateListener updateListener) {

    this.updateListener = updateListener;
  }

  public void addEndListner(EndListener endListener){
    this.endListener = endListener;
  }

  public interface EndListener {
    void endUpdate(Animator animator);
  }

  public interface UpdateListener {

    void progress(float progress);
  }

}
MainActivity.java
public class MainActivity extends AppCompatActivity {
  private AnimUtil animUtil;
  private float bgAlpha = 1f;
  private boolean bright = false;
  PopupWindow popupWindow;
  Button button;
  @Override
  protected void onCreate(Bundle savedInstanceState) {
    super.onCreate(savedInstanceState);
    setContentView(R.layout.activity_main);
    animUtil = new AnimUtil();
    button = (Button) findViewById(R.id.btn);
    button.setOnClickListener(new View.OnClickListener() {
      @Override
      public void onClick(View view) {
        bottomwindow(button);
        toggleBright();
      }
    });

  }

  private void toggleBright() {
    //三個參數分別為: 起始值 結束值 時長 那麼整個動畫回調過來的值就是從0.5f--1f的
    animUtil.setValueAnimator(0.5f, 1f, 350);
    animUtil.addUpdateListener(new AnimUtil.UpdateListener() {
      @Override
      public void progress(float progress) {
        //此處系統會根據上述三個值,計算每次回調的值是多少,我們根據這個值來改變透明度
        bgAlpha = bright ? progress : (1.5f - progress);//三目運算,應該挺好懂的。
        backgroundAlpha(bgAlpha);//在此處改變背景,這樣就不用通過Handler去刷新了。
      }
    });
    animUtil.addEndListner(new AnimUtil.EndListener() {
      @Override
      public void endUpdate(Animator animator) {
        //在一次動畫結束的時候,翻轉狀態
        bright = !bright;
      }
    });
    animUtil.startAnimator();
  }

  /***
   * 此方法用於改變背景的透明度,從而達到“變暗”的效果
   */
  private void backgroundAlpha(float bgAlpha) {
    WindowManager.LayoutParams lp = getWindow().getAttributes();
    lp.alpha = bgAlpha; //0.0-1.0
    getWindow().setAttributes(lp);
    getWindow().addFlags(WindowManager.LayoutParams.FLAG_DIM_BEHIND);
  }


  void bottomwindow(View view) {
    if (popupWindow != null && popupWindow.isShowing()) {
      return;
    }
    LinearLayout layout = (LinearLayout) getLayoutInflater().inflate(R.layout.window_popup, null);
    popupWindow = new PopupWindow(layout,
        ViewGroup.LayoutParams.MATCH_PARENT,
        ViewGroup.LayoutParams.WRAP_CONTENT);
    //點擊空白處時,隱藏掉pop窗口
    popupWindow.setFocusable(true);
    popupWindow.setBackgroundDrawable(new BitmapDrawable());

    popupWindow.setAnimationStyle(R.style.Popupwindow);
    int[] location = new int[2];
    view.getLocationOnScreen(location);
    popupWindow.showAtLocation(view, Gravity.LEFT | Gravity.BOTTOM, 0, -location[1]);
    popupWindow.setOnDismissListener(new PopupWindow.OnDismissListener() {
      @Override
      public void onDismiss() {
        toggleBright();
      }
    });
  }
}
代碼很簡單,注釋都寫了。
小結:
對比之前的那種用Handler的方法寫的,這種感覺代碼更簡潔,更容易在多處使用,也算是填坑吧,哈哈。 如果本文埋下了另一個坑,請大家指正,謝謝!
以上就是本文的全部內容,希望對大家的學習有所幫助,也希望大家多多支持本站。
 Android:仿手機QQ好友動態的ListView
1.介紹:本博客使用XListView模仿Android版QQ好友動態的ListView效果。效果截圖如下:效果圖1效果圖2這裡面主要涉及的是ListView的布局問題,
 Android色彩矩陣——ColorMatrix
在Android的開發中,我們少不了對圖片進行處理,其中最常使用的數據結構就是位圖Bitmap,它包含了一張圖片的所有數據。既然是位圖那它就是由一個個像素點組成的。每一個
 初探Google推薦Android圖片加載框架Glide
簡介現在在Android上加載圖片的框架都已經爛大街了,所以我們這裡也不說誰好誰壞,當然也不做比較了,因為得出的結果都是片面的,沒有誰好誰壞只有適不適合需求罷了起因是在泰
 從零開始學android(GridView網格視圖.二十八.)
GridView組件是以網格的形式顯示所有的組件,例如:在制作相冊的時候,所有的圖片都會以相同大小顯示在不同的格子之中,就可以依靠此組件完成,