編輯:關於Android編程
Android Fragment(動態,靜態)碎片詳解
一.Fragment的相關概念(一)Fragment的基礎知識
Fragment是Android3.0新增的概念,中文意思是碎片,它與Activity十分相似,用來在一個 Activity中描述一些行為或一部分用戶界面.使用多個Fragment可以在一個單獨的Activity中建 立多個UI面板,也可以在多個Activity中使用Fragment。
Fragment擁有自己的生命 周期和接收、處理用戶的事件,這樣就不必在Activity寫一堆控件的事件處理的代碼了。更為 重要的是,你可以動態的添加、替換和移除某個Fragment。
一個Fragment必須總是被嵌入到一個Activity中,它的生命周期直接被其所屬的宿主Activity生 命周期影響,它的狀態會隨宿主的狀態變化而變化。 要創建一個Fragment 必須創建一個Fragment的子類,或者繼承自另一個已經存在的 Fragment的子類.並重寫 onCreateView()方法加載UI。
(二)Fragment生命周期
因為Fragment必須嵌入在Acitivity中使用,所以Fragment的生命周期和它所在的Activity是 密切相關的。 如果Activity是暫停狀態,其中所有的Fragment都是暫停狀態;如果Activity是stopped狀 態,這個Activity中所有的Fragment都不能被啟動;如果Activity被銷毀,那麼它其中的所有 Fragment都會被銷毀。 但是,當Activity在活動狀態,可以獨立控制Fragment的狀態,比如加上或者移除 Fragment。 當這樣進行fragment transaction(轉換)的時候,可以把fragment放入Activity的back stack中,這樣用戶就可以進行返回操作。
下面是Activity對象和Fragment對象的全部生命周期的對比圖:
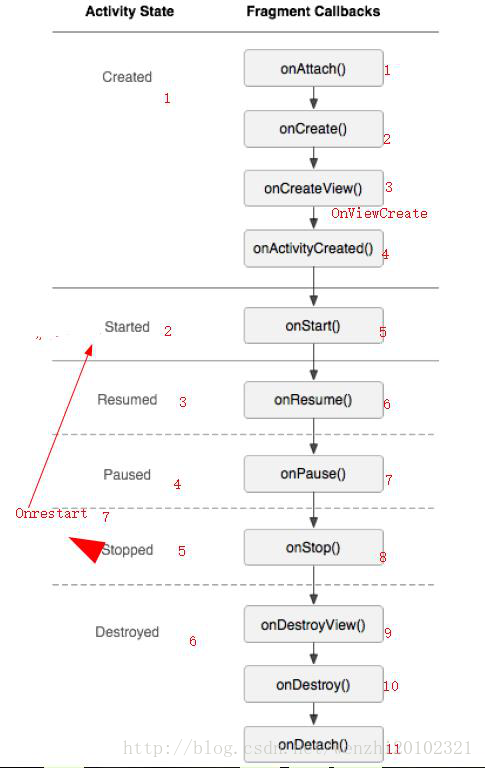
可以看到Activity有七個生命周期,Fragment有十一個生命周期。
(三)Fragment中幾個重要的回調方法說明:1.onAttach(Activity)
當Fragment與Activity發生關聯時調用。
2.onCreateView(LayoutInflater, ViewGroup,Bundle) 創建該Fragment的視圖3.onActivityCreated(Bundle)
當Activity的onCreate方法返回時調用
4.onDestoryView()
與onCreateView相對應,當該Fragment的視圖被移除時調用
5.onDetach()與onAttach相對應
當Fragment與Activity關聯被取消時調用
注意:除了onCreateView,其他的所有方法如果你重寫了,必須調用父類對於該方法的實現,就是Super。。不能去掉。
(四)Fragment家族常用的API1.
Fragment常用的三個類:
(1)android.app.Fragment主要用於定義
(2)Fragment android.app.FragmentManager 主要用於在Activity中操作
(3)Fragment android.app.FragmentTransaction 保證一些列Fragment操作的原子性,熟悉事務這個詞, 一定能明白。
2.獲取FragmentManage的方式:
(1)getFragmentManager()
(2)getSupportFragmentManager //v4包中FragmentActivity
3.FragmentTransaction的操作和方法(1)開啟一個事務
FragmentTransaction transaction = fm.benginTransatcion();
(2)往Activity中添加一個Fragment
transaction.add()
(3)從Activity中移除一個Fragment,如果被移除的Fragment沒有添加到回退棧(回退棧後面會詳細說),這個Fragment實例將會被銷毀。
transaction.remove()
(4)使用另一個Fragment替換當前的,實際上就是remove()然後add()的合體
transaction.replace()
(5)當你的fragment數量固定很少時隱藏當前的Fragment,僅僅是設為不可見,並不會銷毀,多的時候可能出現OOM異常
transaction.hide()
(6)顯示之前隱藏的Fragment
transaction.show()
(7)detach()會將view從UI中移除,和remove()不同,此時fragment的狀態依然由FragmentMa nager維護。(8)attach()重建view視圖,附加到UI上並顯示。(9)transatcion.commit()//提交一個事務
上述,基本是操作Fragment的所有的方式了,在一個事務開啟到提交可以進行多個的添加、 移除、替換等操作。
值得注意的是:如果你喜歡使用Fragment,一定要清楚這些方法,哪個會銷毀視圖,哪個會銷毀實例,哪個僅僅只是隱藏,這樣才能更好的使用它們。
比如:我在FragmentA中的EditText填了一些數據,當切換到FragmentB時,如果希望回到A還能看到數據,則適合你的就是hide和show;也就是說,希望保留用戶操作的面板,你可以使用hide和show,當然了不要使勁在那new實例,最好進行下非null判斷。
再比如:我不希望保留用戶操作,你可以使用remove(),然後add();或者使用replace() 這個和remove,add是相同的效果。
remove和detach有一點細微的區別,在不考慮回退棧的情況下,remove會銷毀整個 Fragment實例,而detach則只是銷毀其視圖結構,實例並不會被銷毀。那麼二者怎麼取捨使用呢?如果你的當前Activity一直存在,那麼在不希望保留用戶操作的時候,你可以優先使用 detach。
二.Activity中添加Fragment
(一)添加Fragment的兩種方法1.方法一(Activity的布局文件中加入標簽) 在XML中配置更加簡單一點,但是靈活性不夠,不能在同一個位置去切換多個不同的 Fragment
<fragment android:id="@+id/myfragment"
android:name="包名.Fragment類名"
android:layout_width="match_parent"
android:layout_height="match_parent" />
注意:fragment必須設置id或者tag,並且需要指定name為類名。
這樣使用就相當於把fragment當作一塊布局來使用了!
2.方法二(使用FragmentTransaction的add()方法加入fragment)(1)獲取到FragmentManager,在Activity中可以直接通過getFragmentManager得到。
FragmentManager fragmentManager = getFragmentManager();//這裡要注意是否是V4包的
(2)開啟一個事務,通過調用beginTransaction方法開啟。
FragmentTransaction fragmentTransaction = fragmentManager.beginTransaction();
(3)向容器內加入Fragment,一般使用add或者replace方法實現,需要傳入容器的id和 Fragment的實例。
fragmentTransaction.replace(Activity設置的布局中的ViewGroup組件id,需要替換的Fragment實例);
//也可以使用三參的方法,傳遞一個Tag
(4)提交事務,調用commit方法提交。
fragmentTransaction.commit();
(二)Fragment回退棧
類似與Android系統為Activity維護一個任務棧,我們也可以通過Activity維護一個回退棧來保 存每次Fragment事務發生的變化。如果你將Fragment任務添加到回退棧,當用戶點擊後退按鈕時,將看到上一次的保存的Fragment。一旦Fragment完全從後退棧中彈出,用戶再次點擊後退鍵,則退出當前Activity。 假設現在我們有兩個Fragment:Fragment01和Fragment02,我們現在從Fragment01的界面跳到Fragment02,然後按Back鍵,發現程序是直接退出了,而不是返回到Fragment01。 如果現在想實現以下功能:從Fragment01的界面跳到Fragment02,然後按Back鍵,會返回到Fragment01,就需要加入回退棧了,FragmentTransaction中提供了一個 addToBackStack()方法,可以將一個事務添加到返回棧中。
1. transaction.add(R.id.right, rightFragment);
2. transaction.addToBackStack(null);
我們在事務提交之前調用了FragmentTransaction的addToBackStack()方法,它可以接受一個名字用於描述返回棧的狀態,一般傳入null即可。
下面是Fragment程序的示例
三.靜態顯示Fragment碎片頁面,並進行兩碎片頁面的數據通信
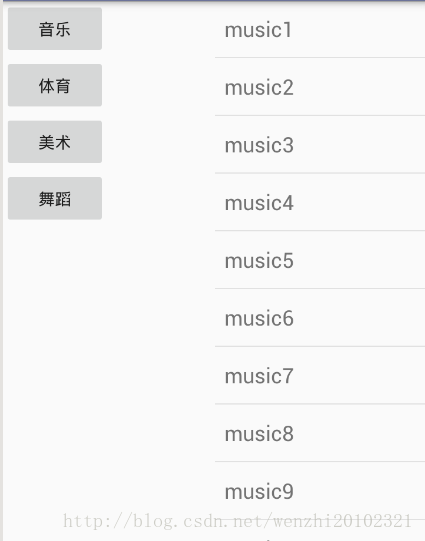
這裡左邊四個按鈕是一個碎片布局,右邊的碎片布局是一個ListView顯示數據。
程序運行後效果:
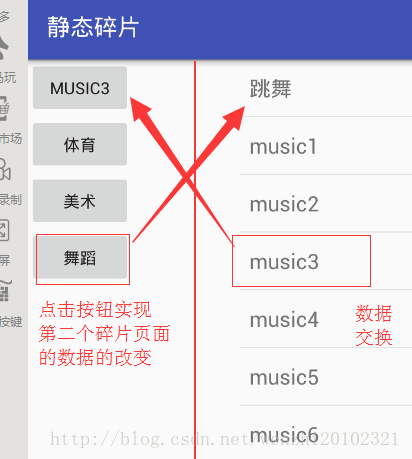
數據交換的後的情況:
設計代碼:
布局文件比較簡單,所以先展示布局文件。再展示java代碼設計。
(一)布局文件activity_main.xml
<?xml version="1.0" encoding="utf-8"?>
<LinearLayout xmlns:android="http://schemas.android.com/apk/res/android"
  android:id="@+id/activity_main"
  android:layout_width="match_parent"
  android:layout_height="match_parent"
  android:orientation="horizontal">

  <fragment
    android:id="@+id/main_frag1"
    android:name="com.example.xmlfragment.FragmentA"
    android:layout_width="0dp"
    android:layout_height="match_parent"
    android:layout_weight="1" />

  <fragment
    android:id="@+id/main_frag2"
    android:name="com.example.xmlfragment.FragmentB"
    android:layout_width="0dp"
    android:layout_height="match_parent"
    android:layout_weight="1" />
</LinearLayout>
這裡設計兩個靜態的碎片文件,使用的是小寫的fragment標簽,裡面必須要有name和id(或tag)屬性。
(二)第一個碎片頁面包含的布局文件fragment_a.xml
<?xml version="1.0" encoding="utf-8"?>
<LinearLayout xmlns:android="http://schemas.android.com/apk/res/android"
  android:layout_width="match_parent"
  android:layout_height="match_parent"
  android:orientation="vertical">

  <Button
    android:id="@+id/music"
    android:layout_width="wrap_content"
    android:layout_height="wrap_content"
    android:text="音樂" />

  <Button
    android:id="@+id/sports"
    android:layout_width="wrap_content"
    android:layout_height="wrap_content"
    android:text="體育" />

  <Button
    android:id="@+id/arts"
    android:layout_width="wrap_content"
    android:layout_height="wrap_content"
    android:text="美術" />

  <Button
    android:id="@+id/dance"
    android:layout_width="wrap_content"
    android:layout_height="wrap_content"
    android:text="舞蹈" />
</LinearLayout>
(三)第二個碎片頁面包含的布局文件fragment_b.xml
<?xml version="1.0" encoding="utf-8"?>
<LinearLayout xmlns:android="http://schemas.android.com/apk/res/android"
  android:layout_width="match_parent"
  android:layout_height="match_parent"
  android:orientation="vertical">

  <ListView
    android:id="@+id/frag2_lv"
    android:layout_width="match_parent"
    android:layout_height="match_parent" />
</LinearLayout>
(四)第一個碎片頁面的java代碼設計:
package com.example.xmlfragment;

import android.os.Bundle;
import android.support.annotation.Nullable;
import android.support.v4.app.Fragment;
import android.view.LayoutInflater;
import android.view.View;
import android.view.ViewGroup;
import android.widget.Button;
import android.widget.Toast;

/**
 * 碎片頁面A的顯示,這裡顯示四個按鈕
 */

public class FragmentA extends Fragment implements View.OnClickListener {
  //布局中的控件
  Button music;
  Button sports;
  Button arts;
  Button dance;


  /**
   * onCreate執行之後執行的方法,一般用於顯示視圖
   */
  @Override
  public View onCreateView(LayoutInflater inflater, @Nullable ViewGroup container, @Nullable Bundle savedInstanceState) {
    //不要super實現的方法,它是返回空值的
    return View.inflate(getActivity(), R.layout.fragment_a, null);
  }

  //這個方法不在Fragment的生命周期裡面
  //但是它會在onCreateView後面執行,裡面的參數View就是上面傳入的view對象
  @Override
  public void onViewCreated(View view, @Nullable Bundle savedInstanceState) {
    super.onViewCreated(view, savedInstanceState);
    //實例化布局上的控件
    music = (Button) view.findViewById(R.id.music);
    sports = (Button) view.findViewById(R.id.sports);
    arts = (Button) view.findViewById(R.id.arts);
    dance = (Button) view.findViewById(R.id.dance);
    //給控件添加監聽事件
    music.setOnClickListener(this);
    sports.setOnClickListener(this);
    arts.setOnClickListener(this);
    dance.setOnClickListener(this);

  }

  //實現監聽的方法
  @Override
  public void onClick(View v) {
    //獲取頁面碎片B的對象,來對頁面碎片B進行操作,這裡不能使用new的方法來創建對象
    FragmentB fragmentB = (FragmentB) getActivity().getSupportFragmentManager().findFragmentById(R.id.main_frag2);
    switch (v.getId()) {
      case R.id.music:
        fragmentB.list.add(0, "音樂");//給頁面B的集合中添加數據
        Toast.makeText(getActivity(), "music", Toast.LENGTH_SHORT).show();
        break;
      case R.id.sports:
        fragmentB.list.add(0, "運動");//給頁面B的集合中添加數據
        Toast.makeText(getActivity(), "sports", Toast.LENGTH_SHORT).show();
        break;
      case R.id.arts:
        fragmentB.list.add(0, "藝術");//給頁面B的集合中添加數據
        Toast.makeText(getActivity(), "arts", Toast.LENGTH_SHORT).show();
        break;
      case R.id.dance:
        fragmentB.list.add(0, "跳舞");//給頁面B的集合中添加數據
        Toast.makeText(getActivity(), "dance", Toast.LENGTH_SHORT).show();
        break;
    }
    fragmentB.adapter.notifyDataSetChanged();//刷新頁面B的數據
  }
}
(五)第二個碎片頁面的java代碼設計
package com.example.xmlfragment;

import android.os.Bundle;
import android.support.annotation.Nullable;
import android.support.v4.app.Fragment;
import android.view.LayoutInflater;
import android.view.View;
import android.view.ViewGroup;
import android.widget.AdapterView;
import android.widget.ArrayAdapter;
import android.widget.ListView;

import java.util.ArrayList;
import java.util.List;

/**
 * 碎片頁面B的顯示,這裡顯示一個ListView數據
 */

public class FragmentB extends Fragment implements AdapterView.OnItemClickListener {

  //定義集合、適配器、ListView
  List<String> list;
  ArrayAdapter<String> adapter;
  ListView listView;

  //數據源的其中一個字符串變量
  String name = "music";


  /**
   * 最先執行,一般是處理於界面無關的數據
   */
  @Override
  public void onCreate(@Nullable Bundle savedInstanceState) {
    super.onCreate(savedInstanceState);
    //實例化list集合
    list = new ArrayList<>();
    //實例化ListView
    //添加數據源
    for (int i = 1; i <= 100; i++) {
      list.add(name + i);
    }
    //實例化Adapter對象
    adapter = new ArrayAdapter<String>(getActivity(), android.R.layout.simple_list_item_activated_1, list);
  }

  /**
   * onCreate執行之後執行的方法,一般用於顯示視圖
   */
  @Override
  public View onCreateView(LayoutInflater inflater, @Nullable ViewGroup container, @Nullable Bundle savedInstanceState) {
    //不要super實現的方法,它是返回空值的
    return View.inflate(getActivity(), R.layout.fragment_b, null);
  }

  /***
   * fragment創建前最後執行的方法
   * 加載視圖上面顯示的數據和默認設置
   */
  @Override
  public void onViewCreated(View view, @Nullable Bundle savedInstanceState) {
    super.onViewCreated(view, savedInstanceState);
    //這裡的View上面加載的ListView
    listView = (ListView) view.findViewById(R.id.frag2_lv);
    //給ListView添加適配器
    listView.setAdapter(adapter);
    //給ListView添加點擊的監聽事件
    listView.setOnItemClickListener(this);
    //獲取碎片A的對象
    fragmentA= (FragmentA) getActivity().getSupportFragmentManager().findFragmentById(R.id.main_frag1);
  }

  /**
   * ListView中點擊對應的條目的回調方法
   */
  FragmentA fragmentA;
  @Override
  public void onItemClick(AdapterView<?> parent, View view, int position, long id) {
    //這裡修改頁面A中的第一個按鈕的文本
    //點擊ListView哪個條目,這個條目的文本都會顯示在第一個按鈕上(實現Fragment之間的通信)
    fragmentA.music.setText(list.get(position));
  }
}
(六)主方法類的java代碼:
package com.example.xmlfragment;

import android.support.v7.app.AppCompatActivity;
import android.os.Bundle;

public class MainActivity extends AppCompatActivity {

  @Override
  protected void onCreate(Bundle savedInstanceState) {
    super.onCreate(savedInstanceState);
    setContentView(R.layout.activity_main);
  }
}
可以看到主方法類裡面什麼都不用設計,只需要把布局顯示出來就可以了,這裡全部的處理都是在fragment碎片中做好了,這就是碎片的好處。
四.動態創建碎片的示例
程序運行後的界面:
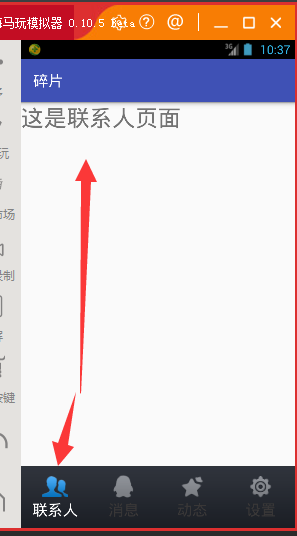
點擊某個按鈕,選擇顯示對應的碎片頁面
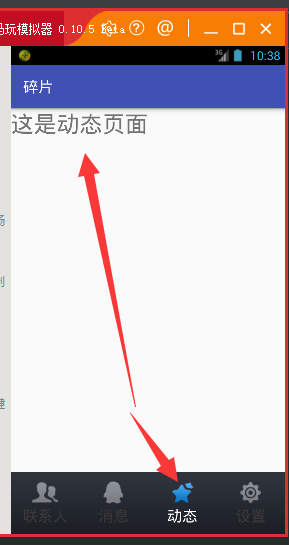
代碼設計:
(一)布局文件設計activity_main.xml
<?xml version="1.0" encoding="utf-8"?>
<RelativeLayout xmlns:android="http://schemas.android.com/apk/res/android"
  xmlns:tools="http://schemas.android.com/tools"
  android:id="@+id/activity_main"
  android:layout_width="match_parent"
  android:layout_height="match_parent"
  tools:context="com.example.fragment.MainActivity">

  <RadioGroup
    android:background="@drawable/tab_bg"
    android:id="@+id/main_rg"
    android:layout_width="match_parent"
    android:layout_height="wrap_content"
    android:layout_alignParentBottom="true"
    android:orientation="horizontal">

    <RadioButton
      android:id="@+id/main_rb1"

      android:drawableTop="@drawable/contact"
      android:textColor="@color/mytextcolors"
      android:text="聯系人" />

    <RadioButton
      android:id="@+id/main_rb2"

      android:drawableTop="@drawable/message"
      android:textColor="@color/mytextcolors"
      android:text="消息" />

    <RadioButton
      android:id="@+id/main_rb3"

      android:drawableTop="@drawable/news"
      android:textColor="@color/mytextcolors"
      android:text="動態" />

    <RadioButton
      android:id="@+id/main_rb4"

      android:drawableTop="@drawable/setting"
      android:textColor="@color/mytextcolors"
      android:text="設置" />


  </RadioGroup>

  <FrameLayout
    android:id="@+id/main_fl"
    android:layout_width="match_parent"
    android:layout_height="match_parent"
    android:layout_above="@id/main_rg"/>

</RelativeLayout>
這裡動態顯示的碎片頁面在先設置一個FrameLayout布局容器來存放碎片頁面。
下面簡單設計碎片頁面。
(二)聯系人頁面碎片
package com.example.fragment;

import android.os.Bundle;
import android.support.annotation.Nullable;
import android.support.v4.app.Fragment;
import android.view.LayoutInflater;
import android.view.View;
import android.view.ViewGroup;
import android.widget.TextView;

/**
 *這是聯系人碎片頁面
 */

public class ContactFragment extends Fragment {
  @Override
  public View onCreateView(LayoutInflater inflater, @Nullable ViewGroup container, @Nullable Bundle savedInstanceState) {
    TextView textView = new TextView(getActivity());
    textView.setText("這是聯系人頁面");
    textView.setTextSize(30);
    return textView;
  }
}
(三)消息頁面碎片
package com.example.fragment;

import android.os.Bundle;
import android.support.annotation.Nullable;
import android.support.v4.app.Fragment;
import android.view.LayoutInflater;
import android.view.View;
import android.view.ViewGroup;
import android.widget.TextView;

/**
 * 這是消息頁面的碎片
 */

public class MessageFragment extends Fragment {
  @Override
  public View onCreateView(LayoutInflater inflater, @Nullable ViewGroup container, @Nullable Bundle savedInstanceState) {
    TextView textView = new TextView(getActivity());
    textView.setText("這是消息頁面");
    textView.setTextSize(30);
    return textView;
  }
}
(四)動態頁面碎片
package com.example.fragment;

import android.os.Bundle;
import android.support.annotation.Nullable;
import android.support.v4.app.Fragment;
import android.view.LayoutInflater;
import android.view.View;
import android.view.ViewGroup;
import android.widget.TextView;

/**
 *這是動態頁面的碎片
 */

public class NewsFragment extends Fragment {
  @Override
  public View onCreateView(LayoutInflater inflater, @Nullable ViewGroup container, @Nullable Bundle savedInstanceState) {
    TextView textView = new TextView(getActivity());
    textView.setText("這是動態頁面");
    textView.setTextSize(30);
    return textView;
  }
}
(五)動態頁面碎片
package com.example.fragment;

import android.os.Bundle;
import android.support.annotation.Nullable;
import android.support.v4.app.Fragment;
import android.view.LayoutInflater;
import android.view.View;
import android.view.ViewGroup;
import android.widget.TextView;

/**
 *這是動態頁面的碎片
 */

public class NewsFragment extends Fragment {
  @Override
  public View onCreateView(LayoutInflater inflater, @Nullable ViewGroup container, @Nullable Bundle savedInstanceState) {
    TextView textView = new TextView(getActivity());
    textView.setText("這是動態頁面");
    textView.setTextSize(30);
    return textView;
  }
}
上面就是四個碎片頁面的設計,都是比較簡單的頁面設計,其實也是可以像Activity一樣設計成一個很復雜頁面的顯示。
(六)主方法類,重點理解
package com.example.fragment;

import android.os.Bundle;
import android.support.v4.app.Fragment;
import android.support.v4.app.FragmentTransaction;
import android.support.v7.app.AppCompatActivity;
import android.widget.FrameLayout;
import android.widget.RadioGroup;

public class MainActivity extends AppCompatActivity implements RadioGroup.OnCheckedChangeListener {

  //定義布局內的控件
  RadioGroup radioGroup;
  FrameLayout frameLayout;
  //定義四個存放碎片的數組
  Fragment[] fragment = new Fragment[4];

  @Override
  protected void onCreate(Bundle savedInstanceState) {
    super.onCreate(savedInstanceState);
    setContentView(R.layout.activity_main);
    initView();
    radioGroup.check(R.id.main_rb1);
    //顯示第一個碎片頁面
    showFragment(0);
  }

  /**
   * 顯示碎片頁面的方法
   * 這裡是要重點理解的地方
   * 這裡要添加和移除的操作都有,而且還有進行一定的判斷
   */
  //定義一個當前點擊的游標值,默認是-1,說明還沒有點
  int currentIndex = -1;

  private void showFragment(int i) {
    //如果點擊的頁面是剛才顯示的頁面,就什麼都不做
    if (i == currentIndex) {
      return;
    }

    //處理碎片,顯示、移除等等
    //這裡要用碎片的事務來完成
    FragmentTransaction transaction = getSupportFragmentManager().beginTransaction();
    //如果用戶打開已經打開過一個Fragment頁面,再打開其他頁面後,要先把原來的頁面移除
    if (currentIndex != -1) {
      //移除碎片
      transaction.hide(fragment[currentIndex]);
    }
    //顯示新的碎片
    if (fragment[i] == null) {
      //創建碎片
      CreateFragment(i);
      //使用事務顯示碎片
      //第一個參數是碎片要顯示的布局的位置的ID號
      //第二個參數是顯示的碎片的對象
      transaction.add(R.id.main_fl, fragment[i]);
    } else {
      //如果碎片曾經顯示過就顯示出來就可以了
      transaction.show(fragment[i]);
      // transaction.addToBackStack(null);
    }

    //保存用戶點擊的游標值
    currentIndex = i;
    //最後提交事務,把碎片放置到位
    transaction.commit();
  }


  //初始化數據
  private void initView() {
    //實例化數據
    radioGroup = (RadioGroup) findViewById(R.id.main_rg);
    frameLayout = (FrameLayout) findViewById(R.id.main_fl);
    //給GroupButton設置監聽事件
    radioGroup.setOnCheckedChangeListener(this);

  }

  /**
   * 按鈕選擇後觸發的方法
   */
  @Override
  public void onCheckedChanged(RadioGroup group, int checkedId) {
    //點擊哪一個按鈕就顯示哪一個碎片
    //這裡的checkedID不是0、1、2、3這種數值,而是布局裡面對應的控件的ID值
    switch (checkedId) {
      case R.id.main_rb1:
        showFragment(0);
        break;
      case R.id.main_rb2:
        showFragment(1);
        break;
      case R.id.main_rb3:
        showFragment(2);
        break;
      case R.id.main_rb4:
        showFragment(3);
        break;
    }

  }

  /**
   * 創建碎片頁面對象的方法
   */
  private void CreateFragment(int i) {
    //如果碎片是第一次點開,就要創建碎片
    switch (i) {
      case 0:
        fragment[i] = new ContactFragment();
        break;
      case 1:
        fragment[i] = new MessageFragment();
        break;
      case 2:
        fragment[i] = new NewsFragment();
        break;
      case 3:
        fragment[i] = new SettingFragment();
        break;
    }


  }
}
程序運行後就可以顯示界面了。這就是動態創建碎片的示例。
五.動態創建碎片和靜態創建碎片的對比:
很多人都會有疑問:動態創建和靜態創建碎片有什麼區別?
其實主要是應用場合的區別,並且我們也要知道它們的創建的區別。
(一)碎片靜態創建和動態創建的區別1.靜態創建碎片
在布局內創建fragment標簽,並且標簽內有屬性:name和id(或tag),其中id或tag是一個唯一標識,是用來找到這個碎片對象用的;而name是繼承了Fragment的自定義類,使用包名+類名設置。
靜態創建的碎片一旦創建它就在這個Activity頁面的固定位置了。
2.動態創建碎片
要在布局文件內先創建層布局容器標簽FrameLayout,動態創建的碎片頁面都是顯示在這個容器裡面的。這裡控制碎片改變是在所依賴的Activity頁面的代碼當中來控制。都是通過事務來顯示或隱藏碎片,達到碎片切換的效果。
(二)靜態碎片和動態碎片的應用場合1.靜態碎片的應用場合
靜態碎片的應用場合是多個頁面都會出現這種布局,並且它的事件處理是一樣的。
比如下面兩個頁面:
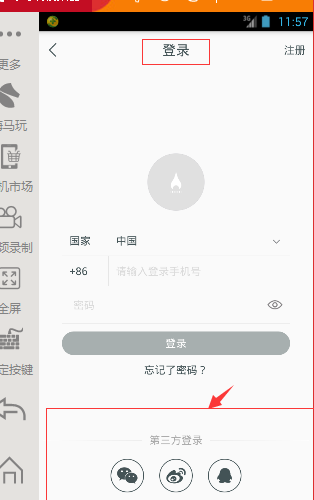
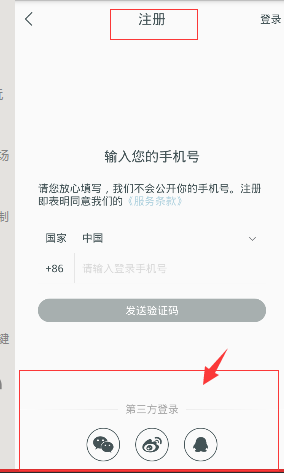
上面兩不同的頁面中,最下方的顯示都是一樣的,並且點擊某個按鈕跳轉到的頁面都是一樣的,這時就需要用靜態的碎片。
使用方法:只要把這個靜態標簽的fragment放到這兩頁面的底部就可以了。
對於上面兩個頁面但是如果你不用使用碎片,就需要在兩個頁面都設置這幾個控件,並且它們的點擊事件的處理,都要在兩個頁面的Activity中重新做。這就降低了代碼的復用性。
靜態碎片是固定的,但是它的事件處理都是已經寫好了的,都在自定義的Fragment類中,你使用的使用只要復制靜態的xml代碼就可以了。
在開發中,如果是多個頁面有相同的一些小布局,這時使用靜態碎片就非常必要了。
2.動態碎片的應用場合
動態碎片的應用場合應該是比較容易就看出來的,就是某一個頁面,通過幾個按鈕實現頁面中局部畫面的切換。
最常見的應用場合:
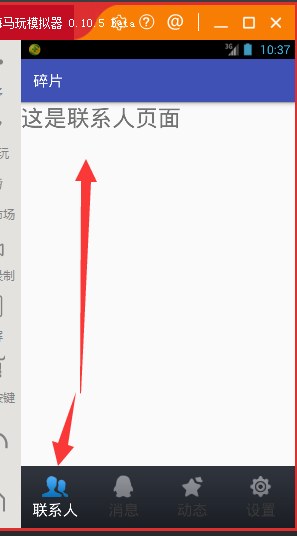
這裡在同一個Activity中可以顯示多個頁面,並且頁面之間可以實現簡單的切換,這就是動態創建碎片的應用。
在實際開發中,上面的頁面還要實現左右滑動來切換頁面,這就需要ViewPager,使用ViewPager能非常方便的實現頁面的切換,並且不需要事務處理。這個知識點後面總結。
最後簡單說一下:
其實碎片就像一個Activity,它也是可以顯示很多頁面數據,並且可以實現頁面的跳轉,數據的傳遞。但是它是不用在AndroidManifest中注冊的。
碎片頁面的跳轉到其他Activity頁面也是使用startActivity或StartActivityForResult。
數據傳遞也是可以通過Intent來攜帶數據。
感謝閱讀,希望能幫助到大家,謝謝大家對本站的支持!
 學習Android Studio開發工具之Activity2(&Fragment)
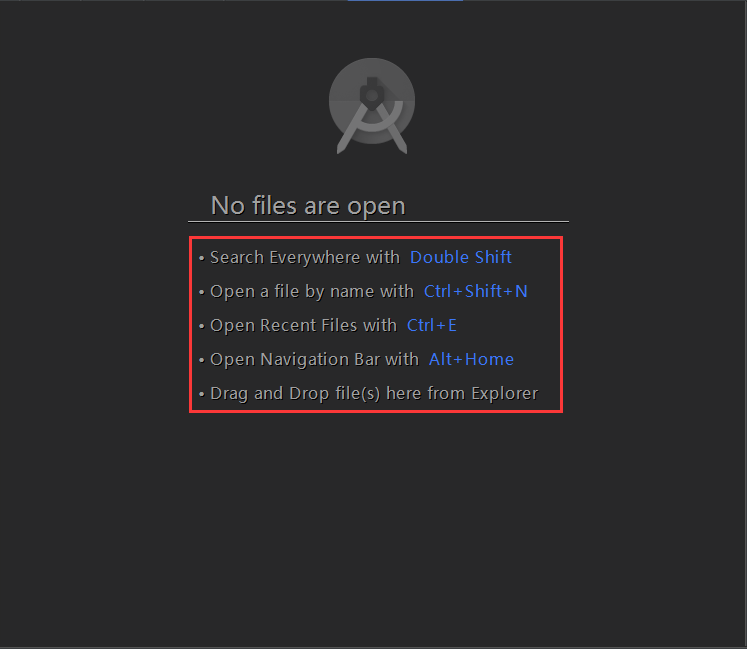
開篇先介紹幾個放在眼前卻經常忽視的快捷鍵如圖:展現出android Studio超強的搜索能力,提高大工程的開發維護效率。雙擊Shift按鍵效果Ctrl+Shift+N
 自定義控件知識儲備-View的繪制流程
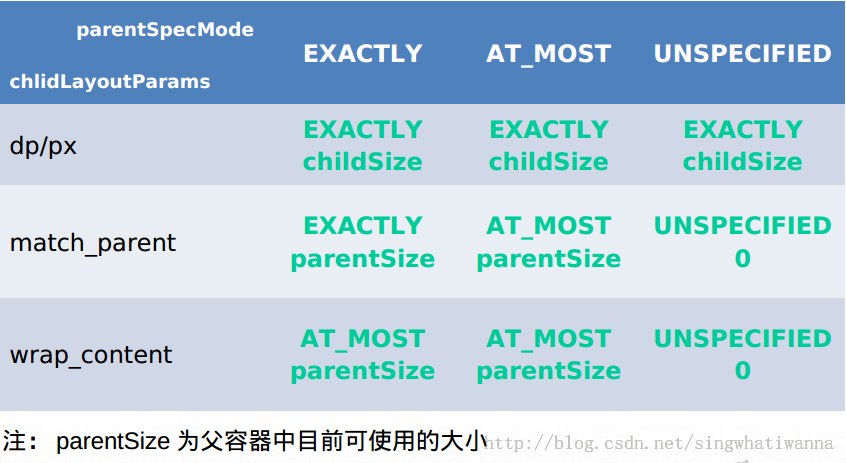
在自定義控件這個學習系列裡,首先寫篇文章記錄一下View的繪制流程,壓壓驚:-P。也為以後的自定義控件實踐打個基礎。雖然講解View工作流程的文章很多,其中不乏很多精品文
 Android AccessibilityService實現微信搶紅包插件
在你的手機更多設置或者高級設置中,我們會發現有個無障礙的功能,很多人不知道這個功能具體是干嘛的,其實這個功能是為了增強用戶界面以幫助殘障人士,或者可能暫時無法與設備充分交
 Android屏幕截圖詳解
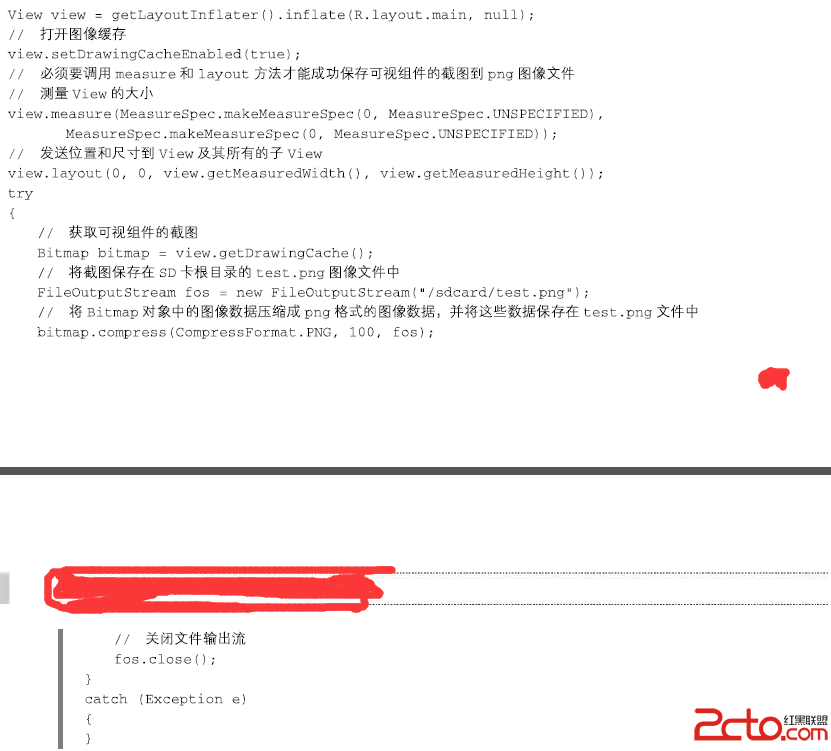
Android屏幕截圖功能實現這裡介紹兩種方式: 第一種 截取整個屏幕實現方式三種 ImageView imgV = (ImageView) findVie