編輯:關於Android編程
歡迎大家來學習本節內容,前幾節我們已經學習了其他幾種自定義控件,分別是Andriod 自定義控件之音頻條及 Andriod 自定義控件之創建可以復用的組合控件還沒有學習的同學請先去學習下,因為本節將使用到上幾節所講述的內容。
在學習新內容之前,我們先來弄清楚兩個問題:
1 . 什麼是ViewGroup?
ViewGroup是一種容器。它包含零個或以上的View及子View。
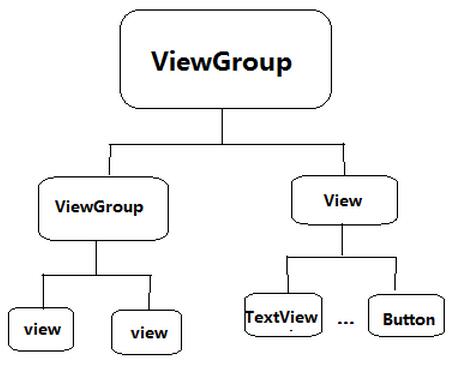
2 . ViewGroup有什麼作用?
ViewGroup內部可以用來存放多個View控件,並且根據自身的測量模式,來測量View子控件,並且決定View子控件的位置。這在下面會逐步講解它是怎麼測量及決定子控件大小和位置的。
ok,弄清楚了這兩個問題,那麼下面我們來學習下自定義ViewGroup吧。
首先和之前幾節一樣,先來繼承ViewGroup,並重寫它們的構造方法。
public class CustomViewGroup extends ViewGroup{
 public CustomViewGroup(Context context) {
 this(context,null);
 }

 public CustomViewGroup(Context context, AttributeSet attrs) {
 this(context, attrs,0);
 }

 public CustomViewGroup(Context context, AttributeSet attrs, int defStyleAttr) {
 super(context, attrs, defStyleAttr);
 }
}
在上面兩個問題,我們知道,ViewGroup它是一個容器,它是用來存放和管理子控件的,並且子控件的測量方式是根據它的測量模式來進行的,所以我們必須重寫它的onMeasure(),在該方法中進行對子View的大小進行測量,代碼如下:
 @Override
 protected void onMeasure(int widthMeasureSpec, int heightMeasureSpec) {
 super.onMeasure(widthMeasureSpec, heightMeasureSpec);
 int childCount = getChildCount();
 for(int i = 0 ; i < childCount ; i ++){
  View children = getChildAt(i);
  measureChild(children,widthMeasureSpec,heightMeasureSpec);
 }
 }
其上代碼,我們重寫了onMeasure(),在方法裡面,我們首先先獲取ViewGroup中的子View的個數,然後遍歷它所有的子View,得到每一個子View,調用measureChild()放來,來對子View進行測量。剛才提到子View的測量是根據ViewGroup所提供的測量模式來進行來,所以在measureChild()方法中,把ViewGroup的widthMeasureSpec 和 heightMeasureSpec和子View一起傳進去了,我們可以跟進去看看是不是和我們所說的一樣。
measureChild()方法源碼:
 protected void measureChild(View child, int parentWidthMeasureSpec,
  int parentHeightMeasureSpec) {
 final LayoutParams lp = child.getLayoutParams();

 final int childWidthMeasureSpec = getChildMeasureSpec(parentWidthMeasureSpec,
  mPaddingLeft + mPaddingRight, lp.width);
 final int childHeightMeasureSpec = getChildMeasureSpec(parentHeightMeasureSpec,
  mPaddingTop + mPaddingBottom, lp.height);

 child.measure(childWidthMeasureSpec, childHeightMeasureSpec);
 }
measureChild()源碼方法裡面很好理解,它首先得到子View的LayoutParams,然後根據ViewGroup傳遞進來的寬高屬性值和自身的LayoutParams 的寬高屬性值及自身padding屬性值分別調用getChildMeasureSpec()方法獲取到子View的測量。由該方法我們也知道ViewGroup中在測量子View的大小時,測量結果分別是由父節點的測量模式和子View本身的LayoutParams及padding所決定的。
下面我們再來看看getChildMeasureSpec()方法的源碼,看看它是怎麼獲取測量結果的。
getChildMeasureSpec()方法源碼:
 public static int getChildMeasureSpec(int spec, int padding, int childDimension) {
 int specMode = MeasureSpec.getMode(spec);
 int specSize = MeasureSpec.getSize(spec);

 int size = Math.max(0, specSize - padding);

 int resultSize = 0;
 int resultMode = 0;

 switch (specMode) {
 // Parent has imposed an exact size on us
 case MeasureSpec.EXACTLY:
  if (childDimension >= 0) {
  resultSize = childDimension;
  resultMode = MeasureSpec.EXACTLY;
  } else if (childDimension == LayoutParams.MATCH_PARENT) {
  // Child wants to be our size. So be it.
  resultSize = size;
  resultMode = MeasureSpec.EXACTLY;
  } else if (childDimension == LayoutParams.WRAP_CONTENT) {
  // Child wants to determine its own size. It can't be
  // bigger than us.
  resultSize = size;
  resultMode = MeasureSpec.AT_MOST;
  }
  break;

 // Parent has imposed a maximum size on us
 case MeasureSpec.AT_MOST:
  if (childDimension >= 0) {
  // Child wants a specific size... so be it
  resultSize = childDimension;
  resultMode = MeasureSpec.EXACTLY;
  } else if (childDimension == LayoutParams.MATCH_PARENT) {
  // Child wants to be our size, but our size is not fixed.
  // Constrain child to not be bigger than us.
  resultSize = size;
  resultMode = MeasureSpec.AT_MOST;
  } else if (childDimension == LayoutParams.WRAP_CONTENT) {
  // Child wants to determine its own size. It can't be
  // bigger than us.
  resultSize = size;
  resultMode = MeasureSpec.AT_MOST;
  }
  break;

 // Parent asked to see how big we want to be
 case MeasureSpec.UNSPECIFIED:
  if (childDimension >= 0) {
  // Child wants a specific size... let him have it
  resultSize = childDimension;
  resultMode = MeasureSpec.EXACTLY;
  } else if (childDimension == LayoutParams.MATCH_PARENT) {
  // Child wants to be our size... find out how big it should
  // be
  resultSize = View.sUseZeroUnspecifiedMeasureSpec ? 0 : size;
  resultMode = MeasureSpec.UNSPECIFIED;
  } else if (childDimension == LayoutParams.WRAP_CONTENT) {
  // Child wants to determine its own size.... find out how
  // big it should be
  resultSize = View.sUseZeroUnspecifiedMeasureSpec ? 0 : size;
  resultMode = MeasureSpec.UNSPECIFIED;
  }
  break;
 }
 return MeasureSpec.makeMeasureSpec(resultSize, resultMode);
 }
該方法也很好理解:首先是獲取父節點(這裡是ViewGroup)的測量模式和測量的大小,並根據測量的大小值與子View自身的padding屬性值相比較取最大值得到一個size的值。
然後根據父節點的測量模式分別再來判定子View的LayoutParams屬性值,根據LayoutParams的屬性值從而獲取到子View測量的大小和模式,知道了ziView的測量模式和大小就能決定子View的大小了。
ok,子View的測量我們已經完全明白了,那麼接下來,我們再來分析一下ViewGroup是怎樣給子View定位的,首先我們也是必須先重寫onLayout()方法,代碼如下:
@Override
 protected void onLayout(boolean changed, int l, int t, int r, int b) {
 int childCount = getChildCount();
 int preHeight = 0;
 for(int i = 0 ; i < childCount ; i ++){
  View children = getChildAt(i);
  int cHeight = children.getMeasuredHeight();
  if(children.getVisibility() != View.GONE){
  children.layout(l, preHeight, r,preHeight += cHeight);
  }
 }
 }
很好理解,給子View定位,首先必須知道有多少個子View才行,所以我們先得到子View的數量,然後遍歷獲取每個子View。其實在定位子View的layout()方法中,系統並沒有給出具體的定位方法,而是給了我們最大的限度來自己定義,下面來看下layout源碼:
public void layout(int l, int t, int r, int b) {
 if ((mPrivateFlags3 & PFLAG3_MEASURE_NEEDED_BEFORE_LAYOUT) != 0) {
  onMeasure(mOldWidthMeasureSpec, mOldHeightMeasureSpec);
  mPrivateFlags3 &= ~PFLAG3_MEASURE_NEEDED_BEFORE_LAYOUT;
 }

 int oldL = mLeft;
 int oldT = mTop;
 int oldB = mBottom;
 int oldR = mRight;

 boolean changed = isLayoutModeOptical(mParent) ?
  setOpticalFrame(l, t, r, b) : setFrame(l, t, r, b);

 if (changed || (mPrivateFlags & PFLAG_LAYOUT_REQUIRED) == PFLAG_LAYOUT_REQUIRED) {
  onLayout(changed, l, t, r, b);
  mPrivateFlags &= ~PFLAG_LAYOUT_REQUIRED;

  ListenerInfo li = mListenerInfo;
  if (li != null && li.mOnLayoutChangeListeners != null) {
  ArrayList<OnLayoutChangeListener> listenersCopy =
   (ArrayList<OnLayoutChangeListener>)li.mOnLayoutChangeListeners.clone();
  int numListeners = listenersCopy.size();
  for (int i = 0; i < numListeners; ++i) {
   listenersCopy.get(i).onLayoutChange(this, l, t, r, b, oldL, oldT, oldR, oldB);
  }
  }
 }

 mPrivateFlags &= ~PFLAG_FORCE_LAYOUT;
 mPrivateFlags3 |= PFLAG3_IS_LAID_OUT;
 }
在上面一段代碼中,最關鍵個就是setFrame(l, t, r, b);這個方法,它主要是來定位子View的四個頂點左右坐標的,然後關鍵的定位方法是在onLayout(changed, l, t, r, b);這個方法中,跟進去看看
 protected void onLayout(boolean changed, int left, int top, int right, int bottom) {
 }
一看嚇一跳,空的,哈哈,這也就是我上面說的,系統給了我們最大的自由,讓我們自己根據需求去定義了。
而我這裡是根據子View的高度讓它們豎直順序的排列下來。
 View children = getChildAt(i);
 int cHeight = children.getMeasuredHeight();
 if(children.getVisibility() != View.GONE){
 children.layout(l, preHeight, r,preHeight += cHeight);
定義一個記錄上一個View的高度的變量,每次遍歷以後都讓它加上當前的View高度,由此就可以豎直依次地排列了每個子View,從而實現了子View的定義。
好了,講了這麼多,現在來看看效果吧,我們就拿之前做的自定義View作為它的子View吧:
custom_viewgroup.xml文件:
<?xml version="1.0" encoding="utf-8"?>
<com.sanhuimusic.mycustomview.view.CustomViewGroup
 android:background="#999999"
 xmlns:android="http://schemas.android.com/apk/res/android"
 xmlns:custom="http://schemas.android.com/apk/res-auto"
 android:id="@+id/customViewGroup"
 android:layout_width="match_parent"
 android:layout_height="match_parent">
 <com.sanhuimusic.mycustomview.view.CompositeViews
 android:background="#999999"
 android:id="@+id/topBar"
 android:layout_width="wrap_content"
 android:layout_height="wrap_content"
 custom:titleText="@string/titleText"
 custom:titleColor="#000000"
 custom:titleTextSize="@dimen/titleTextSize"
 custom:titleBackground="#999999"
 custom:leftText="@string/leftText"
 custom:leftTextColor="#FFFFFF"
 custom:leftBackground="#666666"
 custom:leftTextSize="@dimen/leftTextSize"
 custom:rightText="@string/rightText"
 custom:rightTextColor="#FFFFFF"
 custom:rightBackground="#666666"
 custom:rightTextSize="@dimen/rightTextSize"
 />
 <com.sanhuimusic.mycustomview.view.AudioBar
 android:layout_width="match_parent"
 android:layout_height="wrap_content"
 />
</com.sanhuimusic.mycustomview.view.CustomViewGroup>
MainActivity:
public class MainActivity extends AppCompatActivity {
 private CompositeViews topBar;
 private Context mContext;
 private CustomViewGroup mViewGroupContainer;
 @Override
 protected void onCreate(Bundle savedInstanceState) {
 super.onCreate(savedInstanceState);
 setContentView(R.layout.custom_viewgroup);
 mContext = this;
 init();
 }

 private void init() {
 mViewGroupContainer = (CustomViewGroup) findViewById(R.id.customViewGroup);
 topBar = (CompositeViews)findViewById(R.id.topBar);
 topBar.setOnTopBarClickListener(new CompositeViews.TopBarClickListener(){
  @Override
  public void leftClickListener() {
  ToastUtil.makeText(MainActivity.this,"您點擊了返回鍵",Toast.LENGTH_SHORT).show();
  }
  @Override
  public void rightClickListener() {
  ToastUtil.makeText(MainActivity.this,"您點擊了搜索鍵",Toast.LENGTH_SHORT).show();
  }
 });
 }
}
效果圖:
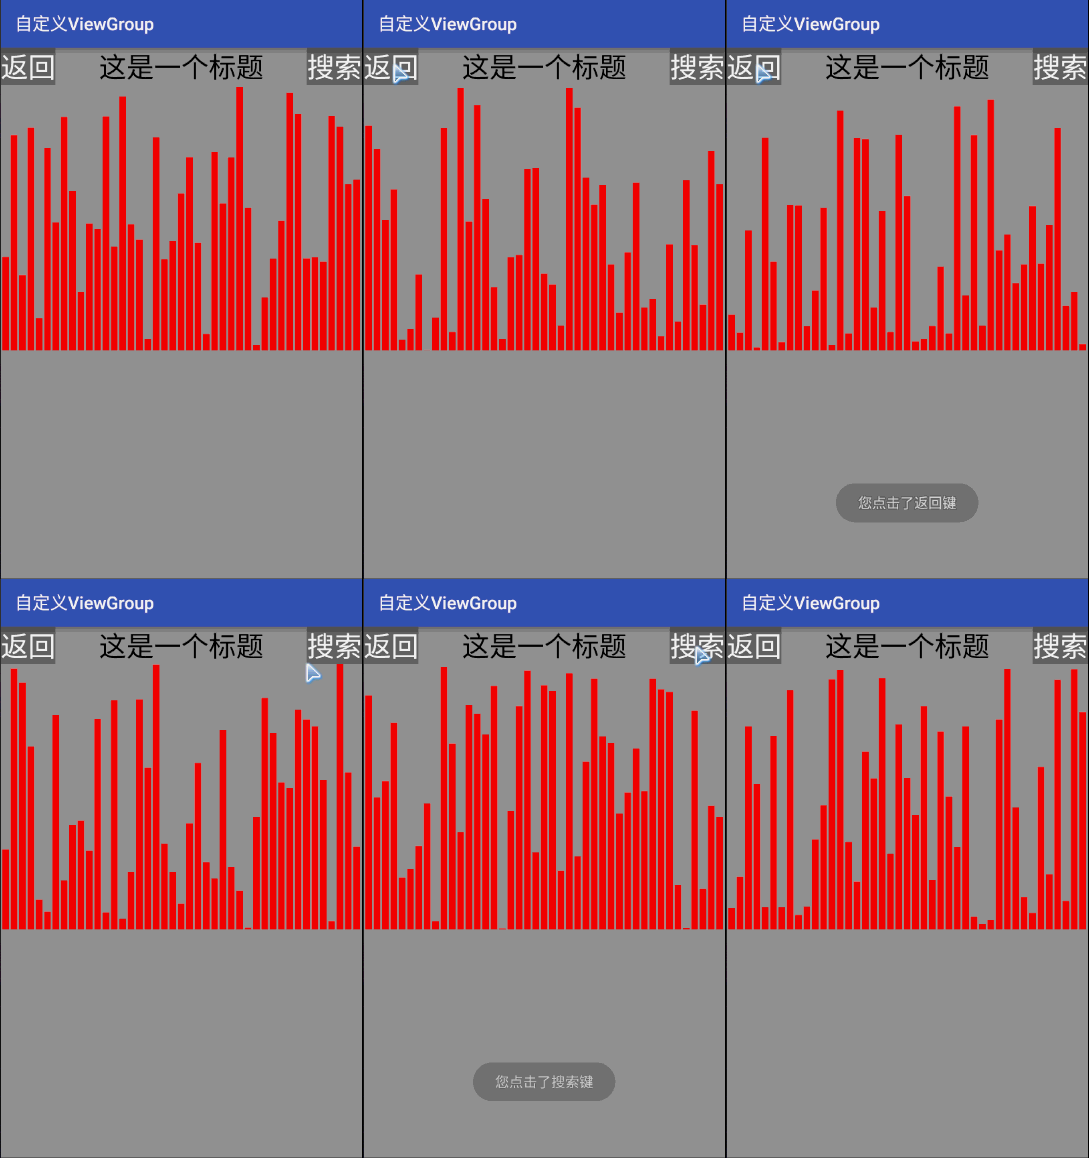
哈哈,是不是每個子View都按照我們所說的豎直依次排列下來了呢。正開心呢,然後突然冒出來一個想法,學習過Andriod 自定義控件之音頻條這篇文章的你,會記得當時在定義全新的View時會遇到當我們的布局文件使用的是wrap_content時,View是不直接支持的,需要我們特殊的處理才能正確支持,而我們現在的 ViewGroup是不是也是這樣的呢,趕快嘗試一下。一嘗試,壞了,果然不支持wrap_content。
所以,在自定義ViewGroup時,我們必須要注意以下幾個問題:
1. 必須讓ViewGroup支持wrap_content的情景下的布局。
2. 也需要支持本身的padding屬性。
好,下面我們來一點一點的完善它。
1 . 我們讓它先支持wrap_content。
這需要我們在onMeasure()方法中多出一些必要的改動。讓它支持自身wrap_content那就需要我們對它驚醒測量,根據測量方式獲取到測量大小,然後再調用setMeasuredDimension()決定顯示大小。
@Override
 protected void onMeasure(int widthMeasureSpec, int heightMeasureSpec) {
 super.onMeasure(widthMeasureSpec, heightMeasureSpec);
 int childCount = getChildCount();
 for(int i = 0 ; i < childCount ; i ++){
  View children = getChildAt(i);
  measureChild(children,widthMeasureSpec,heightMeasureSpec);
 }

 /**
  * 讓它支持自身wrap_content
  */
 int widthSpecMode = MeasureSpec.getMode(widthMeasureSpec);
 int widthSpecSize = MeasureSpec.getSize(widthMeasureSpec);
 int heightSpecMode = MeasureSpec.getMode(heightMeasureSpec);
 int heightSpecSize = MeasureSpec.getSize(heightMeasureSpec);
 int mWidth = 0;
 int mHeight = 0;
 int mMaxWidth = 0;
 if(widthSpecMode == MeasureSpec.AT_MOST && heightSpecMode == MeasureSpec.AT_MOST){
  for(int i = 0 ; i < childCount ; i ++){
  View children = getChildAt(i);
  mWidth += children.getMeasuredWidth();
  mHeight += children.getMeasuredHeight();
  }
  setMeasuredDimension(mWidth, mHeight);
 } else if(widthSpecMode == MeasureSpec.AT_MOST){
  for(int i = 0 ; i < childCount ; i ++){
  View children = getChildAt(i);
  mMaxWidth = Math.max(mMaxWidth,children.getMeasuredWidth());
  }
  setMeasuredDimension(mMaxWidth,heightSpecSize);
 } else if(heightSpecMode == MeasureSpec.AT_MOST){
  for(int i = 0 ; i < childCount ; i ++){
  View children = getChildAt(i);
  mHeight += children.getMeasuredHeight();
  }
  setMeasuredDimension(widthSpecSize,mHeight);
 }
 }
我們再原來的基礎上添加了可以支持wrap_content的代碼,然後根據具體的情況進行獲取大小。分為三種情況:
好,來看看是否可以達到我們的要求。
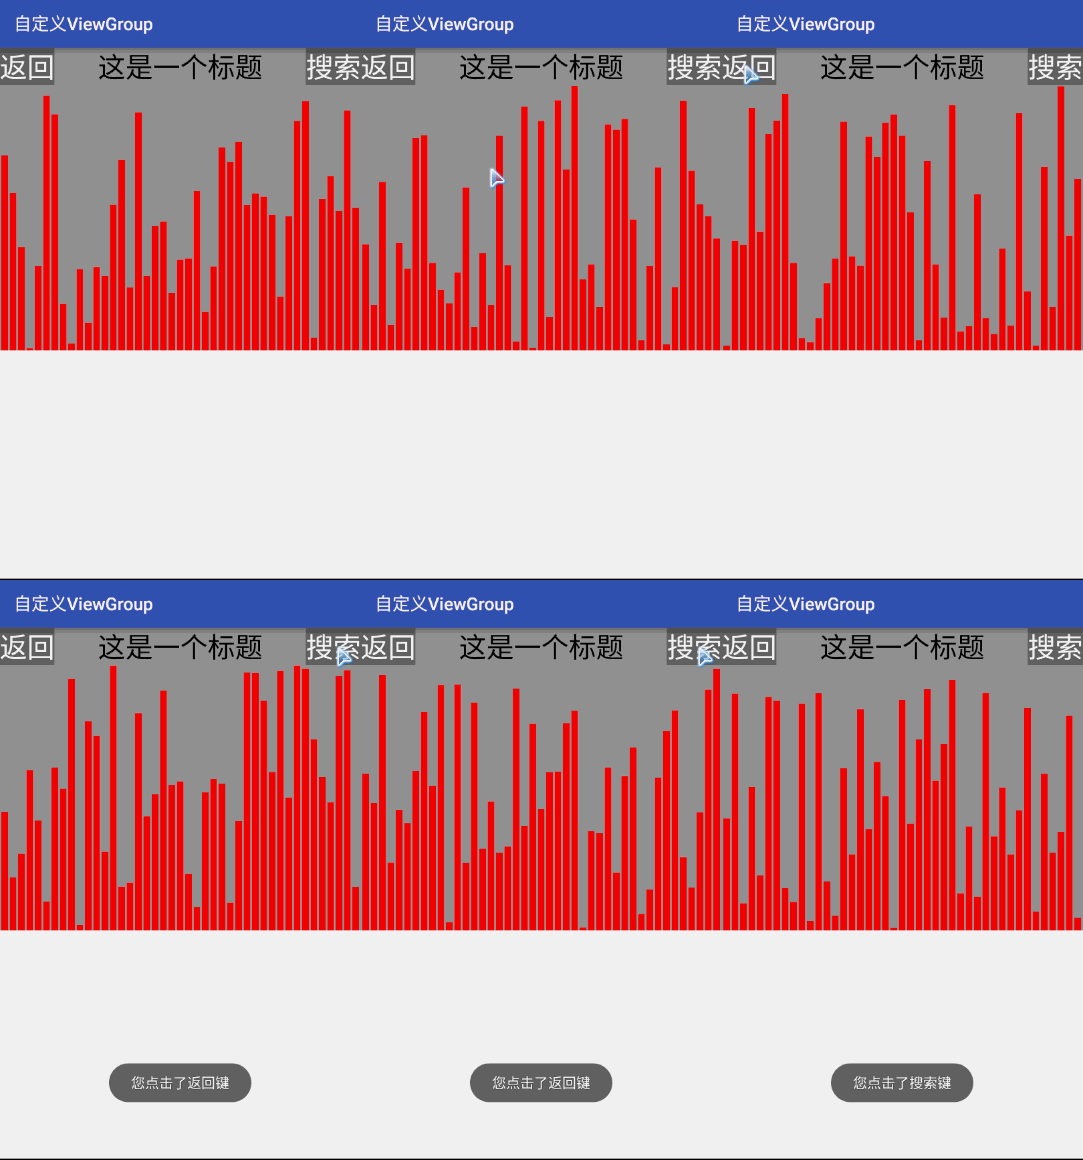
顯然已達到目標。
2 . 需要支持本身的padding屬性。
首先我們先獲取到padding值,如下:
leftPadding = getPaddingLeft();
topPadding = getPaddingTop();
rightPadding = getPaddingRight();
bottomPadding = getPaddingBottom();
然後分別在設置大小的地方給加上這些屬性值,如下:
if(widthSpecMode == MeasureSpec.AT_MOST && heightSpecMode == MeasureSpec.AT_MOST){
  for(int i = 0 ; i < childCount ; i ++){
  View children = getChildAt(i);
  mWidth += children.getMeasuredWidth();
  mHeight += children.getMeasuredHeight();
  }
  setMeasuredDimension(mWidth + leftPadding + rightPadding, mHeight
  + topPadding + bottomPadding);
 } else if(widthSpecMode == MeasureSpec.AT_MOST){
  for(int i = 0 ; i < childCount ; i ++){
  View children = getChildAt(i);
  mMaxWidth = Math.max(mMaxWidth,children.getMeasuredWidth());
  }
  setMeasuredDimension(mMaxWidth + leftPadding + rightPadding, heightSpecSize + topPadding + bottomPadding);
 } else if(heightSpecMode == MeasureSpec.AT_MOST){
  for(int i = 0 ; i < childCount ; i ++){
  View children = getChildAt(i);
  mHeight += children.getMeasuredHeight();
  }
  setMeasuredDimension(widthSpecSize + leftPadding + rightPadding, mHeight + topPadding + bottomPadding);
 }
最後在onlayout()方法中給添加屬性值:
@Override
 protected void onLayout(boolean changed, int l, int t, int r, int b) {
 int childCount = getChildCount();
 int preHeight = topPadding;
 for(int i = 0 ; i < childCount ; i ++){
  View children = getChildAt(i);
  int cHeight = children.getMeasuredHeight();
  if(children.getVisibility() != View.GONE){
  children.layout(l + leftPadding, preHeight, r + rightPadding, preHeight += cHeight);
  }
 }
 }
代碼很簡單,不再讓preHeight = 0 了,而是直接設置為topPadding,最後在layout中也把屬性值添加進來,看看結果。
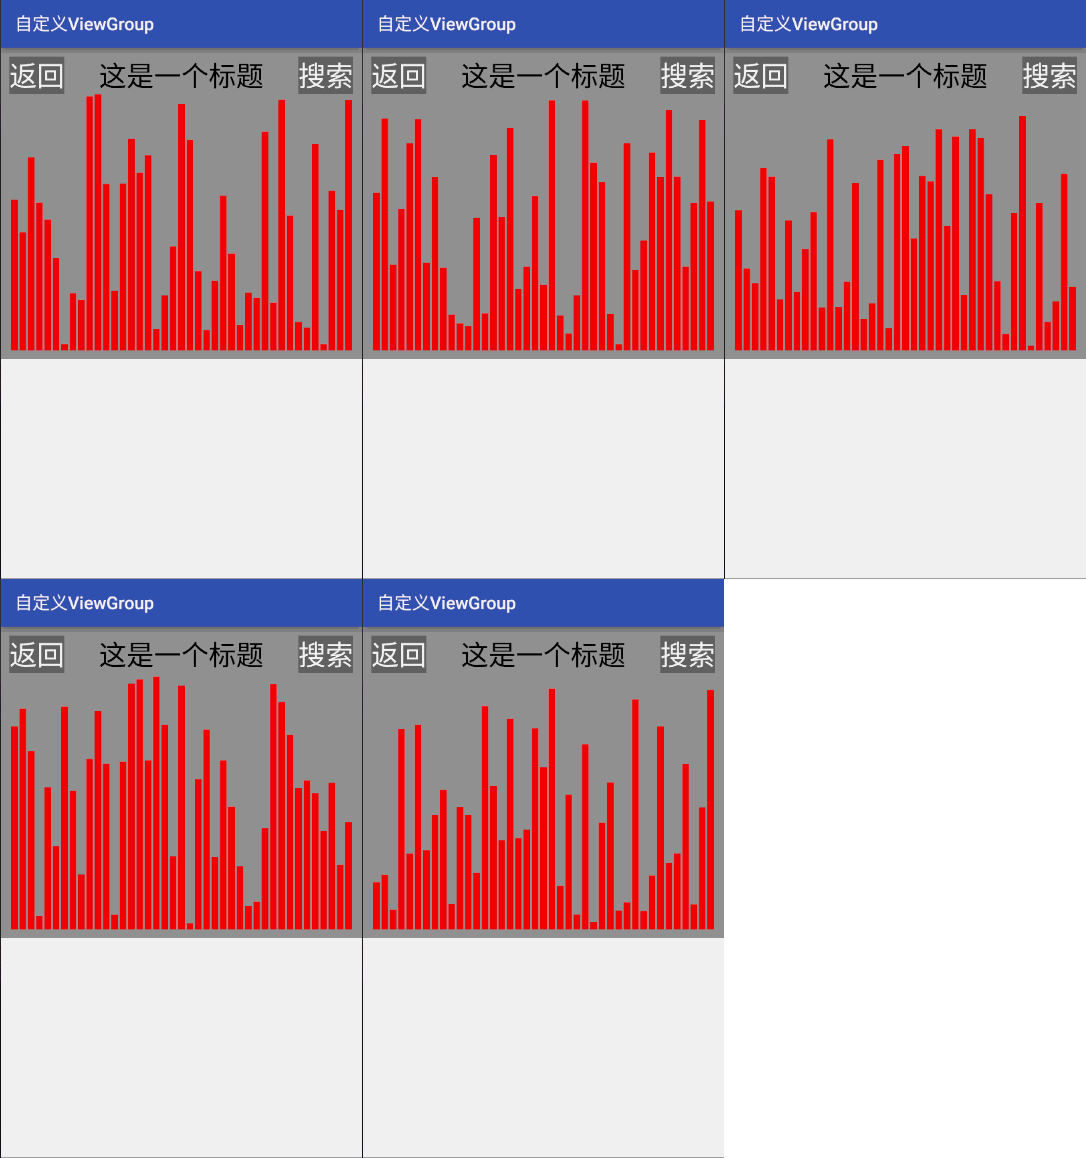
其實除了以上兩個問題需要注意的,還有其他也是需要關注的,比如說是支持子View的margin屬性等,大致和解決padding屬性一樣的思路,大家可以嘗試實現下。
好了,整個自定義ViewGroup的內容都講完了,當然我們只是講述了UI的顯示,並沒有談及到功能的添加和實現。從上面可以看出,自定義ViewGroup要比自定義View復雜很多,但是只要一步一步的來完善還是可以實現不同的UI展示的。
從這幾節自定義控件學習中,大家一定學到了很多知識,然後對自定義控件也不是那麼怕了,同時也可以實現自己想要的各種UI啦,接下來我會總結下自定義控件中所需要使用的其他技術和知識下,讓大家更好的加深印象。
好,今天就學習到這裡吧,happy!
以上就是本文的全部內容,希望對大家的學習有所幫助,也希望大家多多支持本站。
 Android編程動態加載布局實例詳解【附demo源碼】
本文實例講述了Android編程動態加載布局的方法。分享給大家供大家參考,具體如下:由於前段時間項目需要,需要在一個頁面上加載根據不同的按鈕加載不同的布局頁面,當時想到用
 Android之Http通信——1.初識Http協議
Android之Http通信——1.初識Http協議Android之Http通信1初識Http協議 引言 正文 Http是什麼鬼 名詞解析 Htt
 Android編程: 界面組成、事件監聽器
學習知識:界面組成、事件監聽器====界面組成====1.用戶界面的基本組件叫做View,都是繼承android.view.View類,Android裡面預定義很多基本的
 靠譜助手怎麼輸入中文
手機上輸入中文相當容易,但是在靠譜助手這個電腦上的安卓模擬器要怎麼輸入中文呢?電腦上直接輸入中文根本沒反應啊?靠譜助手模擬器輸入中文需要安裝拼音輸入法。經小