編輯:關於Android編程
PopupWindow是Android上自定義彈出窗口,使用起來很方便。
PopupWindow的構造函數為
復制代碼 代碼如下:public PopupWindow(View contentView, int width, int height, boolean focusable)
contentView為要顯示的view,width和height為寬和高,值為像素值,也可以是MATCHT_PARENT和WRAP_CONTENT。
focusable為是否可以獲得焦點,這是一個很重要的參數,也可以通過public void setFocusable(boolean focusable)來設置,如果focusable為false,在一個Activity彈出一個PopupWindow,按返回鍵,由於PopupWindow沒有焦點,會直接退出Activity。如果focusable為true,PopupWindow彈出後,所有的觸屏和物理按鍵都有PopupWindows處理。
如果PopupWindow中有Editor的話,focusable要為true。
下面實現一個簡單的PopupWindow
主界面的layout為:
<RelativeLayout xmlns:android="http://schemas.android.com/apk/res/android"
 xmlns:tools="http://schemas.android.com/tools"
 android:id="@+id/layout_main"
 android:layout_width="match_parent"
 android:layout_height="match_parent"
 android:paddingBottom="@dimen/activity_vertical_margin"
 android:paddingLeft="@dimen/activity_horizontal_margin"
 android:paddingRight="@dimen/activity_horizontal_margin"
 android:paddingTop="@dimen/activity_vertical_margin"
 tools:context=".MainActivity" >

 <Button
  android:id="@+id/btn_test_popupwindow"
  android:layout_width="wrap_content"
  android:layout_height="wrap_content"
  android:layout_centerInParent="true"
  android:text="@string/app_name" />

</RelativeLayout>
PopupWindow的layout為:
<?xml version="1.0" encoding="utf-8"?>
<RelativeLayout xmlns:android="http://schemas.android.com/apk/res/android"
 android:layout_width="wrap_content"
 android:layout_height="wrap_content"
 android:background="#000000" >

 <TextView
  android:layout_width="wrap_content"
  android:layout_height="80dp"
  android:text="@string/app_name"
  android:textColor="#ffffffff"
  android:layout_centerInParent="true"
  android:gravity="center"/>

</RelativeLayout>
Activity的代碼為:
public class MainActivity extends Activity {

 private Button mButton;
 private PopupWindow mPopupWindow;

 @Override
 protected void onCreate(Bundle savedInstanceState) {
  super.onCreate(savedInstanceState);
  setContentView(R.layout.activity_main);

  View popupView = getLayoutInflater().inflate(R.layout.layout_popupwindow, null);

  mPopupWindow = new PopupWindow(popupView, LayoutParams.MATCH_PARENT, LayoutParams.WRAP_CONTENT, true);
  mPopupWindow.setTouchable(true);
  mPopupWindow.setOutsideTouchable(true);
  mPopupWindow.setBackgroundDrawable(new BitmapDrawable(getResources(), (Bitmap) null));

  mButton = (Button) findViewById(R.id.btn_test_popupwindow);
  mButton.setOnClickListener(new OnClickListener() {

   @Override
   public void onClick(View v) {
    mPopupWindow.showAsDropDown(v);
   }
  });
 }
}
這三行代碼
mPopupWindow.setTouchable(true);
mPopupWindow.setOutsideTouchable(true);
mPopupWindow.setBackgroundDrawable(new BitmapDrawable(getResources(), (Bitmap) null));
的作用是點擊空白處的時候PopupWindow會消失。
mPopupWindow.showAsDropDown(v);
這一行代碼將PopupWindow以一種向下彈出的動畫的形式顯示出來
public void showAsDropDown(View anchor, int xoff, int yoff)
這個函數的第一個參數為一個View,我們這裡是一個Button,那麼PopupWindow會在這個Button下面顯示,xoff,yoff為顯示位置的偏移。
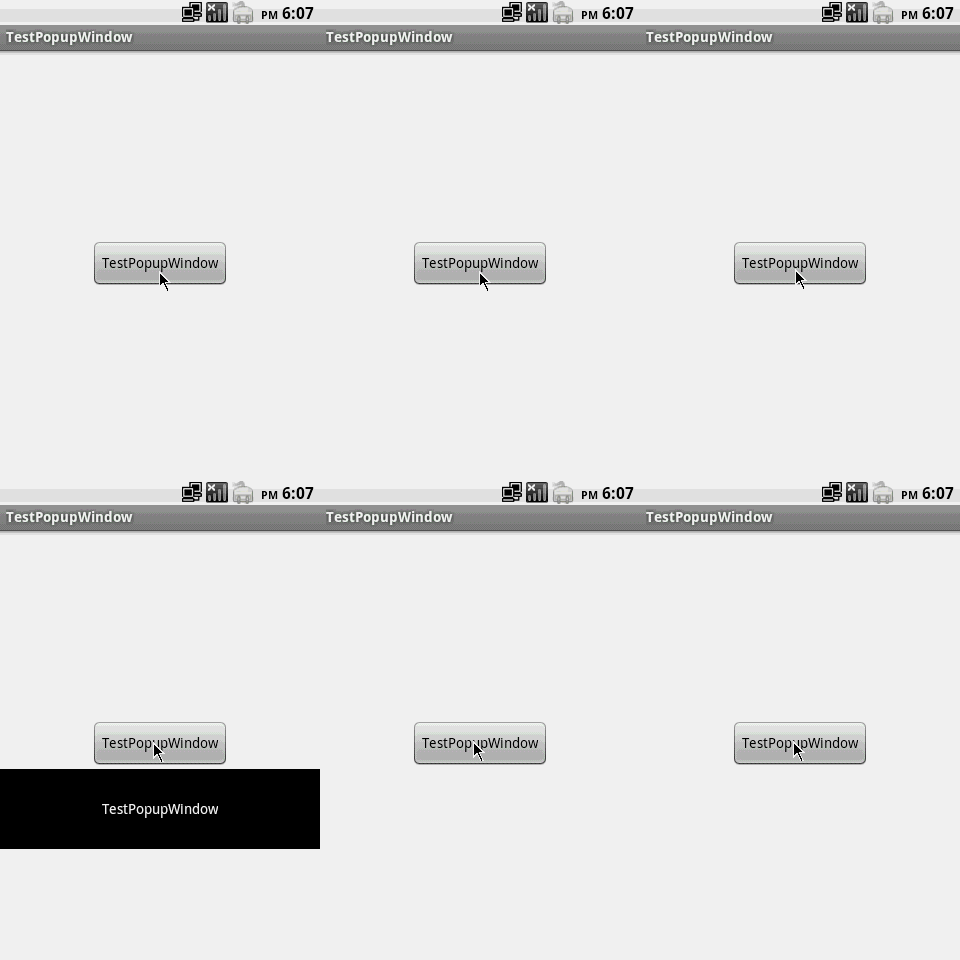
點擊按鈕,就會顯示出PopupWindow

很多時候我們把PopupWindow用作自定義的菜單,需要一個從底部向上彈出的效果,這就需要為PopupWindow添加動畫。
在工程res下新建anim文件夾,在anim文件夾先新建兩個xml文件
menu_bottombar_in.xml
<?xml version="1.0" encoding="utf-8"?>
<set xmlns:android="http://schemas.android.com/apk/res/android" >

 <translate
  android:duration="250"
  android:fromYDelta="100.0%"
  android:toYDelta="0.0" />

</set>
menu_bottombar_out.xml
<?xml version="1.0" encoding="utf-8"?>
<set xmlns:android="http://schemas.android.com/apk/res/android" >

 <translate
  android:duration="250"
  android:fromYDelta="0.0"
  android:toYDelta="100%" />

</set>
在res/value/styles.xml添加一個sytle
 <style name="anim_menu_bottombar">
  <item name="android:windowEnterAnimation">@anim/menu_bottombar_in</item>
  <item name="android:windowExitAnimation">@anim/menu_bottombar_out</item>
 </style>
Acivity修改為
public class MainActivity extends Activity {

 private PopupWindow mPopupWindow;

 @Override
 protected void onCreate(Bundle savedInstanceState) {
  super.onCreate(savedInstanceState);
  setContentView(R.layout.activity_main);

  View popupView = getLayoutInflater().inflate(R.layout.layout_popupwindow, null);

  mPopupWindow = new PopupWindow(popupView, LayoutParams.MATCH_PARENT, LayoutParams.WRAP_CONTENT, true);
  mPopupWindow.setTouchable(true);
  mPopupWindow.setOutsideTouchable(true);
  mPopupWindow.setBackgroundDrawable(new BitmapDrawable(getResources(), (Bitmap) null));

  mPopupWindow.getContentView().setFocusableInTouchMode(true);
  mPopupWindow.getContentView().setFocusable(true);
  mPopupWindow.getContentView().setOnKeyListener(new OnKeyListener() {
   @Override
   public boolean onKey(View v, int keyCode, KeyEvent event) {
    if (keyCode == KeyEvent.KEYCODE_MENU && event.getRepeatCount() == 0
      && event.getAction() == KeyEvent.ACTION_DOWN) {
     if (mPopupWindow != null && mPopupWindow.isShowing()) {
      mPopupWindow.dismiss();
     }
     return true;
    }
    return false;
   }
  });
 }

 @Override
 public boolean onKeyDown(int keyCode, KeyEvent event) {
  if (keyCode == KeyEvent.KEYCODE_MENU && event.getRepeatCount() == 0) {
   if (mPopupWindow != null && !mPopupWindow.isShowing()) {
    mPopupWindow.showAtLocation(findViewById(R.id.layout_main), Gravity.BOTTOM, 0, 0);
   }
   return true;
  }
  return super.onKeyDown(keyCode, event);
 }
}
這樣點擊菜單鍵會彈出自定義的PopupWindow,點擊空白處或者返回鍵、菜單鍵,PopupWindow會消失。
文章如果有不對的地方,希望大家理解。
以上就是本文的全部內容,希望對大家的學習有所幫助,也希望大家多多支持本站。
 實現輪轉廣告帶底部指示的自定義ViewPager控件
有許多博客和開源項目都致力於這項工作,但是他們的工作大都是為了制作類似於啟動頁的效果,ViewPager全屏顯示,或者自己可操作的屬性難以滿足要求,因此我想把ViewPa
 微信小視頻怎麼壓縮|微信小視頻壓縮方法
微信小視頻壓縮教程: 眾所周知把視頻壓縮到一兆以內可以通過某種方法上傳到微信朋友圈。 一種是通過手機壓縮,另一種是通過電腦壓縮,電腦壓縮效果比較好的有丸
 Android rom解包打包工具
eMMC主要是針對手機和平板電腦等產品的內嵌式存儲器,由於其在封裝中集成了一個控制器,且提供標准接口並管理閃存等優勢,越來越受到Android手機廠商的青睐,以eMMC為
 Android Crash框架Recovery
優點:擺脫原始的Crash界面處理缺點:無法自定義界面實現自定義Ui介紹:“Recovery”幫助你自動處理程序在運行時的Crash,它含有以下幾
 Android藍牙開發,報BluetoothAdapter﹕ Can't create handler inside thread that has not called Looper.prepare
這個錯誤翻譯的意思是:不能在沒有Looper.prepare的線程裡面創