編輯:關於Android編程
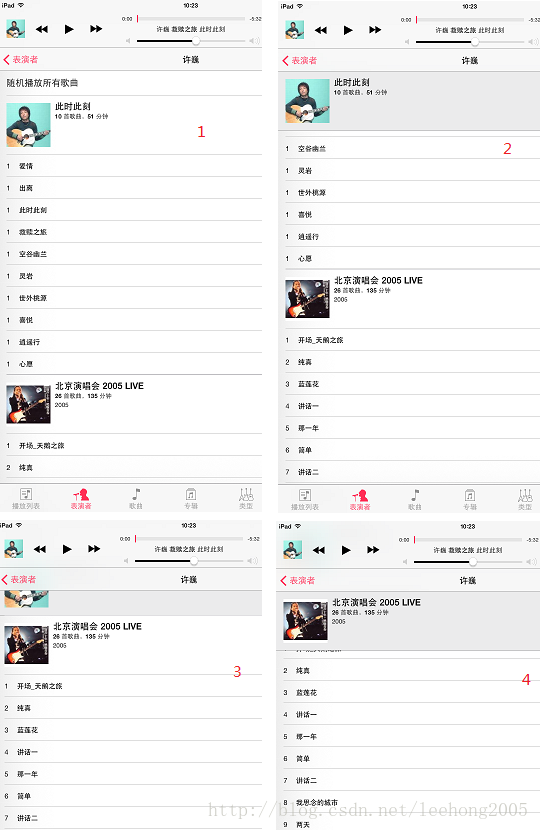
之前在使用iOS時,看到過一種分組的View,每一組都有一個Header,在上下滑動的時候,會有一個懸浮的Header,這種體驗覺得很不錯,請看下圖:

上圖中標紅的1,2,3,4四張圖中,當向上滑動時,仔細觀察灰色條的Header變化,當第二組向上滑動時,會把第一組的懸浮Header擠上去。
這種效果在Android是沒有的,iOS的SDK就自帶這種效果。這篇文章就介紹如何在Android實現這種效果。
1、懸浮Header的實現
其實Android自帶的聯系人的App中就有這樣的效果,我也是把他的類直接拿過來的,實現了PinnedHeaderListView這麼一個類,擴展於ListView,核心原理就是在ListView的最頂部繪制一個調用者設置的Header View,在滑動的時候,根據一些狀態來決定是否向上或向下移動Header View(其實就是調用其layout方法,理論上在繪制那裡作一些平移也是可以的)。下面說一下具體的實現:
1.1、PinnedHeaderAdapter接口
這個接口需要ListView的Adapter來實現,它定義了兩個方法,一個是讓Adapter告訴ListView當前指定的position的數據的狀態,比如指定position的數據可能是組的header;另一個方法就是設置Header View,比如設置Header View的文本,圖片等,這個方法是由調用者去實現的。
/**
 * Adapter interface. The list adapter must implement this interface.
 */
public interface PinnedHeaderAdapter {

  /**
   * Pinned header state: don't show the header.
   */
  public static final int PINNED_HEADER_GONE = 0;

  /**
   * Pinned header state: show the header at the top of the list.
   */
  public static final int PINNED_HEADER_VISIBLE = 1;

  /**
   * Pinned header state: show the header. If the header extends beyond
   * the bottom of the first shown element, push it up and clip.
   */
  public static final int PINNED_HEADER_PUSHED_UP = 2;

  /**
   * Computes the desired state of the pinned header for the given
   * position of the first visible list item. Allowed return values are
   * {@link #PINNED_HEADER_GONE}, {@link #PINNED_HEADER_VISIBLE} or
   * {@link #PINNED_HEADER_PUSHED_UP}.
   */
  int getPinnedHeaderState(int position);

  /**
   * Configures the pinned header view to match the first visible list item.
   *
   * @param header pinned header view.
   * @param position position of the first visible list item.
   * @param alpha fading of the header view, between 0 and 255.
   */
  void configurePinnedHeader(View header, int position, int alpha);
}
1.2、如何繪制Header View
這是在dispatchDraw方法中繪制的:
@Override
protected void dispatchDraw(Canvas canvas) {
  super.dispatchDraw(canvas);
  if (mHeaderViewVisible) {
    drawChild(canvas, mHeaderView, getDrawingTime());
  }
}
1.3、配置Header View
核心就是根據不同的狀態值來控制Header View的狀態,比如PINNED_HEADER_GONE(隱藏)的情況,可能需要設置一個flag標記,不繪制Header View,那麼就達到隱藏的效果。當PINNED_HEADER_PUSHED_UP狀態時,可能需要根據不同的位移來計算Header View的移動位移。下面是具體的實現:
public void configureHeaderView(int position) {
  if (mHeaderView == null || null == mAdapter) {
    return;
  }

  int state = mAdapter.getPinnedHeaderState(position);
  switch (state) {
    case PinnedHeaderAdapter.PINNED_HEADER_GONE: {
      mHeaderViewVisible = false;
      break;
    }

    case PinnedHeaderAdapter.PINNED_HEADER_VISIBLE: {
      mAdapter.configurePinnedHeader(mHeaderView, position, MAX_ALPHA);
      if (mHeaderView.getTop() != 0) {
        mHeaderView.layout(0, 0, mHeaderViewWidth, mHeaderViewHeight);
      }
      mHeaderViewVisible = true;
      break;
    }

    case PinnedHeaderAdapter.PINNED_HEADER_PUSHED_UP: {
      View firstView = getChildAt(0);
      int bottom = firstView.getBottom();
       int itemHeight = firstView.getHeight();
      int headerHeight = mHeaderView.getHeight();
      int y;
      int alpha;
      if (bottom < headerHeight) {
        y = (bottom - headerHeight);
        alpha = MAX_ALPHA * (headerHeight + y) / headerHeight;
      } else {
        y = 0;
        alpha = MAX_ALPHA;
      }
      mAdapter.configurePinnedHeader(mHeaderView, position, alpha);
      if (mHeaderView.getTop() != y) {
        mHeaderView.layout(0, y, mHeaderViewWidth, mHeaderViewHeight + y);
      }
      mHeaderViewVisible = true;
      break;
    }
  }
}
1.4、onLayout和onMeasure
在這兩個方法中,控制Header View的位置及大小
@Override
protected void onMeasure(int widthMeasureSpec, int heightMeasureSpec) {
  super.onMeasure(widthMeasureSpec, heightMeasureSpec);
  if (mHeaderView != null) {
    measureChild(mHeaderView, widthMeasureSpec, heightMeasureSpec);
    mHeaderViewWidth = mHeaderView.getMeasuredWidth();
    mHeaderViewHeight = mHeaderView.getMeasuredHeight();
  }
}

@Override
protected void onLayout(boolean changed, int left, int top, int right, int bottom) {
  super.onLayout(changed, left, top, right, bottom);
  if (mHeaderView != null) {
    mHeaderView.layout(0, 0, mHeaderViewWidth, mHeaderViewHeight);
    configureHeaderView(getFirstVisiblePosition());
  }
}
好了,到這裡,懸浮Header View就完了,各位可能看不到完整的代碼,只要明白這幾個核心的方法,自己寫出來,也差不多了。
2、ListView Section實現
有兩種方法實現ListView Section效果:
方法一:
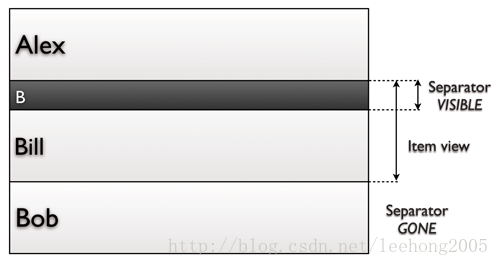
每一個ItemView中包含Header,通過數據來控制其顯示或隱藏,實現原理如下圖:
優點:
1,實現簡單,在Adapter.getView的實現中,只需要根據數據來判斷是否是header,不是的話,隱藏Item view中的header部分,否則顯示。
2,Adapter.getItem(int n)始終返回的數據是在數據列表中對應的第n個數據,這樣容易理解。
3,控制header的點擊事件更加容易
缺點:
1、使用更多的內存,第一個Item view中都包含一個header view,這樣會費更多的內存,多數時候都可能header都是隱藏的。
方法二:
使用不同類型的View:重寫getItemViewType(int)和getViewTypeCount()方法。
優點:
1,允許多個不同類型的item
2,理解更加簡單
缺點:
1,實現比較復雜
2,得到指定位置的數據變得復雜一些
到這裡,我的實現方式是選擇第二種方案,盡管它的實現方式要復雜一些,但優點比較明顯。
3、Adapter的實現
這裡主要就是說一下getPinnedHeaderState和configurePinnedHeader這兩個方法的實現
private class ListViewAdapter extends BaseAdapter implements PinnedHeaderAdapter {

  private ArrayList<Contact> mDatas;
  private static final int TYPE_CATEGORY_ITEM = 0;
  private static final int TYPE_ITEM = 1;

  public ListViewAdapter(ArrayList<Contact> datas) {
    mDatas = datas;
  }

  @Override
  public boolean areAllItemsEnabled() {
    return false;
  }

  @Override
  public boolean isEnabled(int position) {
    // 異常情況處理
    if (null == mDatas || position < 0|| position > getCount()) {
      return true;
    }

    Contact item = mDatas.get(position);
    if (item.isSection) {
      return false;
    }

    return true;
  }

  @Override
  public int getCount() {
    return mDatas.size();
  }

  @Override
  public int getItemViewType(int position) {
    // 異常情況處理
    if (null == mDatas || position < 0|| position > getCount()) {
      return TYPE_ITEM;
    }

    Contact item = mDatas.get(position);
    if (item.isSection) {
      return TYPE_CATEGORY_ITEM;
    }

    return TYPE_ITEM;
  }

  @Override
  public int getViewTypeCount() {
    return 2;
  }

  @Override
  public Object getItem(int position) {
    return (position >= 0 && position < mDatas.size()) ? mDatas.get(position) : 0;
  }

  @Override
  public long getItemId(int position) {
    return 0;
  }

  @Override
  public View getView(int position, View convertView, ViewGroup parent) {
    int itemViewType = getItemViewType(position);
    Contact data = (Contact) getItem(position);
    TextView itemView;

    switch (itemViewType) {
    case TYPE_ITEM:
      if (null == convertView) {
        itemView = new TextView(SectionListView.this);
        itemView.setLayoutParams(new AbsListView.LayoutParams(ViewGroup.LayoutParams.MATCH_PARENT,
            mItemHeight));
        itemView.setTextSize(16);
        itemView.setPadding(10, 0, 0, 0);
        itemView.setGravity(Gravity.CENTER_VERTICAL);
        //itemView.setBackgroundColor(Color.argb(255, 20, 20, 20));
        convertView = itemView;
      }

      itemView = (TextView) convertView;
      itemView.setText(data.toString());
      break;

    case TYPE_CATEGORY_ITEM:
      if (null == convertView) {
        convertView = getHeaderView();
      }
      itemView = (TextView) convertView;
      itemView.setText(data.toString());
      break;
    }

    return convertView;
  }

  @Override
  public int getPinnedHeaderState(int position) {
    if (position < 0) {
      return PINNED_HEADER_GONE;
    }

    Contact item = (Contact) getItem(position);
    Contact itemNext = (Contact) getItem(position + 1);
    boolean isSection = item.isSection;
    boolean isNextSection = (null != itemNext) ? itemNext.isSection : false;
    if (!isSection && isNextSection) {
      return PINNED_HEADER_PUSHED_UP;
    }

    return PINNED_HEADER_VISIBLE;
  }

  @Override
  public void configurePinnedHeader(View header, int position, int alpha) {
    Contact item = (Contact) getItem(position);
    if (null != item) {
      if (header instanceof TextView) {
        ((TextView) header).setText(item.sectionStr);
      }
    }
  }
}
在getPinnedHeaderState方法中,如果第一個item不是section,第二個item是section的話,就返回狀態PINNED_HEADER_PUSHED_UP,否則返回PINNED_HEADER_VISIBLE。
在configurePinnedHeader方法中,就是將item的section字符串設置到header view上面去。
【重要說明】
Adapter中的數據裡面已經包含了section(header)的數據,數據結構中有一個方法來標識它是否是section。那麼,在點擊事件就要注意了,通過position可能返回的是section數據結構。
數據結構Contact的定義如下:
public class Contact {
  int id;
  String name;
  String pinyin;
  String sortLetter = "#";
  String sectionStr;
  String phoneNumber;
  boolean isSection;
  static CharacterParser sParser = CharacterParser.getInstance();

  Contact() {

  }

  Contact(int id, String name) {
    this.id = id;
    this.name = name;
    this.pinyin = sParser.getSpelling(name);
    if (!TextUtils.isEmpty(pinyin)) {
      String sortString = this.pinyin.substring(0, 1).toUpperCase();
      if (sortString.matches("[A-Z]")) {
        this.sortLetter = sortString.toUpperCase();
      } else {
        this.sortLetter = "#";
      }
    }
  }

  @Override
  public String toString() {
    if (isSection) {
      return name;
    } else {
      //return name + " (" + sortLetter + ", " + pinyin + ")";
      return name + " (" + phoneNumber + ")";
    }
  }
}
完整的代碼
package com.lee.sdk.test.section;

import java.util.ArrayList;

import android.graphics.Color;
import android.os.Bundle;
import android.view.Gravity;
import android.view.View;
import android.view.ViewGroup;
import android.widget.AbsListView;
import android.widget.AdapterView;
import android.widget.AdapterView.OnItemClickListener;
import android.widget.BaseAdapter;
import android.widget.TextView;
import android.widget.Toast;

import com.lee.sdk.test.GABaseActivity;
import com.lee.sdk.test.R;
import com.lee.sdk.widget.PinnedHeaderListView;
import com.lee.sdk.widget.PinnedHeaderListView.PinnedHeaderAdapter;

public class SectionListView extends GABaseActivity {

  private int mItemHeight = 55;
  private int mSecHeight = 25;

  @Override
  protected void onCreate(Bundle savedInstanceState) {
    super.onCreate(savedInstanceState);
    setContentView(R.layout.activity_main);

    float density = getResources().getDisplayMetrics().density;
    mItemHeight = (int) (density * mItemHeight);
    mSecHeight = (int) (density * mSecHeight);

    PinnedHeaderListView mListView = new PinnedHeaderListView(this);
    mListView.setAdapter(new ListViewAdapter(ContactLoader.getInstance().getContacts(this)));
    mListView.setPinnedHeaderView(getHeaderView());
    mListView.setBackgroundColor(Color.argb(255, 20, 20, 20));
    mListView.setOnItemClickListener(new OnItemClickListener() {
      @Override
      public void onItemClick(AdapterView<?> parent, View view, int position, long id) {
        ListViewAdapter adapter = ((ListViewAdapter) parent.getAdapter());
        Contact data = (Contact) adapter.getItem(position);
        Toast.makeText(SectionListView.this, data.toString(), Toast.LENGTH_SHORT).show();
      }
    });

    setContentView(mListView);
  }

  private View getHeaderView() {
    TextView itemView = new TextView(SectionListView.this);
    itemView.setLayoutParams(new AbsListView.LayoutParams(ViewGroup.LayoutParams.MATCH_PARENT,
        mSecHeight));
    itemView.setGravity(Gravity.CENTER_VERTICAL);
    itemView.setBackgroundColor(Color.WHITE);
    itemView.setTextSize(20);
    itemView.setTextColor(Color.GRAY);
    itemView.setBackgroundResource(R.drawable.section_listview_header_bg);
    itemView.setPadding(10, 0, 0, itemView.getPaddingBottom());

    return itemView;
  }

  private class ListViewAdapter extends BaseAdapter implements PinnedHeaderAdapter {

    private ArrayList<Contact> mDatas;
    private static final int TYPE_CATEGORY_ITEM = 0;
    private static final int TYPE_ITEM = 1;

    public ListViewAdapter(ArrayList<Contact> datas) {
      mDatas = datas;
    }

    @Override
    public boolean areAllItemsEnabled() {
      return false;
    }

    @Override
    public boolean isEnabled(int position) {
      // 異常情況處理
      if (null == mDatas || position < 0|| position > getCount()) {
        return true;
      }

      Contact item = mDatas.get(position);
      if (item.isSection) {
        return false;
      }

      return true;
    }

    @Override
    public int getCount() {
      return mDatas.size();
    }

    @Override
    public int getItemViewType(int position) {
      // 異常情況處理
      if (null == mDatas || position < 0|| position > getCount()) {
        return TYPE_ITEM;
      }

      Contact item = mDatas.get(position);
      if (item.isSection) {
        return TYPE_CATEGORY_ITEM;
      }

      return TYPE_ITEM;
    }

    @Override
    public int getViewTypeCount() {
      return 2;
    }

    @Override
    public Object getItem(int position) {
      return (position >= 0 && position < mDatas.size()) ? mDatas.get(position) : 0;
    }

    @Override
    public long getItemId(int position) {
      return 0;
    }

    @Override
    public View getView(int position, View convertView, ViewGroup parent) {
      int itemViewType = getItemViewType(position);
      Contact data = (Contact) getItem(position);
      TextView itemView;

      switch (itemViewType) {
      case TYPE_ITEM:
        if (null == convertView) {
          itemView = new TextView(SectionListView.this);
          itemView.setLayoutParams(new AbsListView.LayoutParams(ViewGroup.LayoutParams.MATCH_PARENT,
              mItemHeight));
          itemView.setTextSize(16);
          itemView.setPadding(10, 0, 0, 0);
          itemView.setGravity(Gravity.CENTER_VERTICAL);
          //itemView.setBackgroundColor(Color.argb(255, 20, 20, 20));
          convertView = itemView;
        }

        itemView = (TextView) convertView;
        itemView.setText(data.toString());
        break;

      case TYPE_CATEGORY_ITEM:
        if (null == convertView) {
          convertView = getHeaderView();
        }
        itemView = (TextView) convertView;
        itemView.setText(data.toString());
        break;
      }

      return convertView;
    }

    @Override
    public int getPinnedHeaderState(int position) {
      if (position < 0) {
        return PINNED_HEADER_GONE;
      }

      Contact item = (Contact) getItem(position);
      Contact itemNext = (Contact) getItem(position + 1);
      boolean isSection = item.isSection;
      boolean isNextSection = (null != itemNext) ? itemNext.isSection : false;
      if (!isSection && isNextSection) {
        return PINNED_HEADER_PUSHED_UP;
      }

      return PINNED_HEADER_VISIBLE;
    }

    @Override
    public void configurePinnedHeader(View header, int position, int alpha) {
      Contact item = (Contact) getItem(position);
      if (null != item) {
        if (header instanceof TextView) {
          ((TextView) header).setText(item.sectionStr);
        }
      }
    }
  }
}
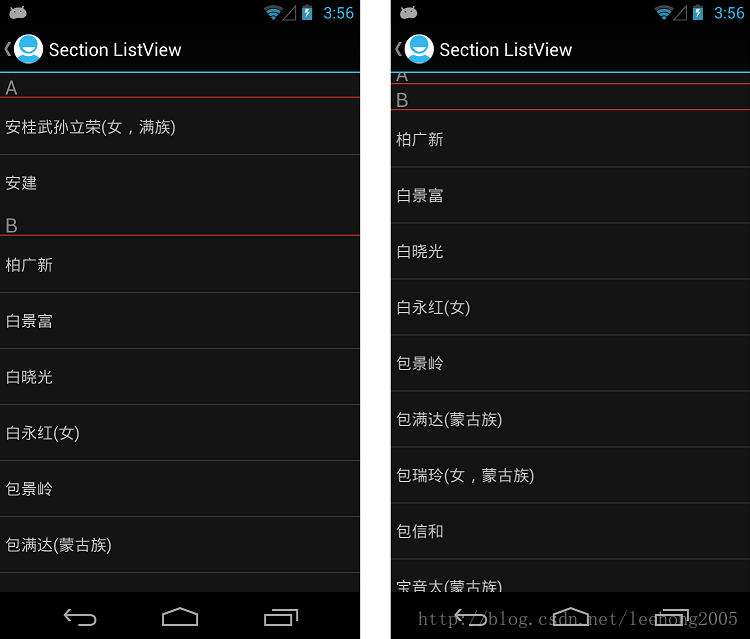
最後來一張截圖:
 以上就是本文的全部內容,希望對大家的學習有所幫助,也希望大家多多支持本站。
 Android中的 事件流----淺析安卓中的動與靜(三) 線程間通訊
任何程序都是靜態代碼,我們把這些靜態代碼打包好,然後放到運行環境當中,通過事件流的驅動使這些代碼運行起來。Android的環境也不例外。靜態的代碼,在動態事件的驅動下,才
 Android性能優化之Splash頁應該這樣設計
目前SplashActivity的設計目前市場上的應用在啟動時基本上都會先啟動一個SplashActivity,作為一個歡迎界面,為什麼這樣設計呢?個人總結有三個優點:1
 Android版手機“QQ桌面”實用的小技巧
騰訊已將手機QQ桌面帶到了安卓手機平台。該版本不僅能關注城市天氣和資訊熱點,還能在桌面就收發QQ消息、定制動態的待機桌面。本期就來看看新版手機QQ桌面是如何
 Android Intent傳遞對象的兩種方法(Serializable,Parcelable)詳細介紹
Android Intent傳遞對象的兩種方法(Serializable,Parcelable)詳細介紹今天要給大家講一下Android中Intent中如何傳遞對象,就我