編輯:關於Android編程
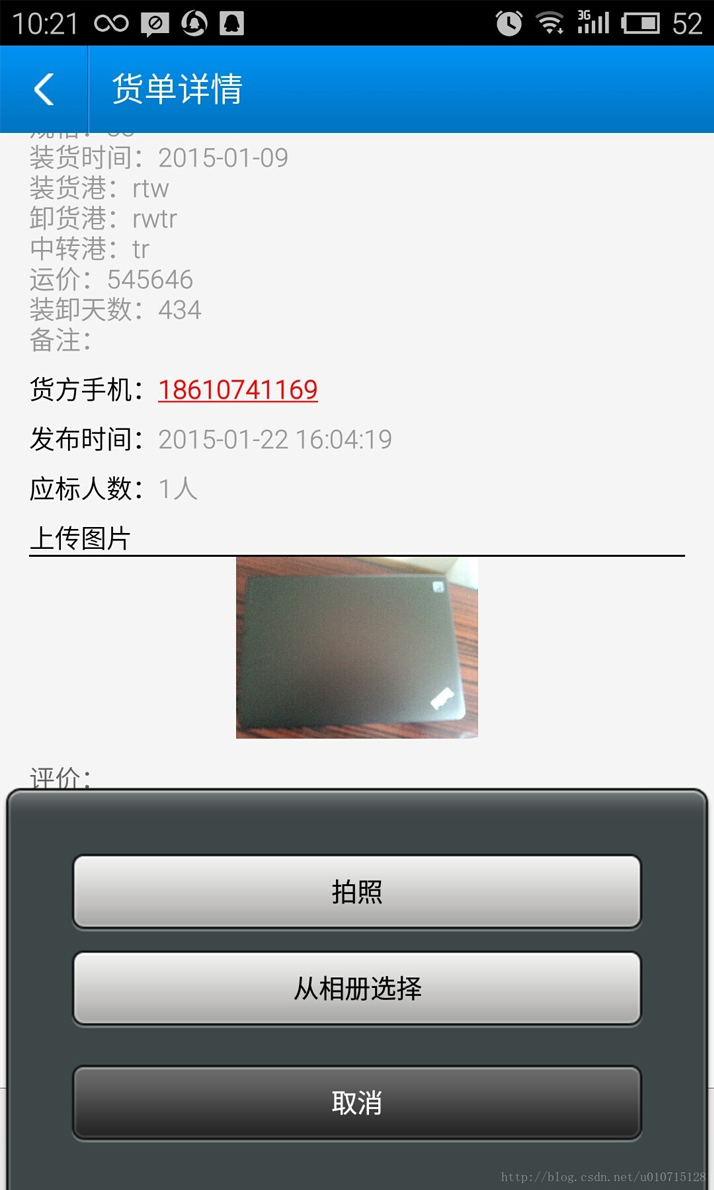
前幾天,我們客戶端這邊收到了市場部的一個需求,需要在我們訂單成交後,我們的客戶端有一個上傳交易憑證的功能,那麼如何在Android實現上傳圖片的這個功能呢?在我進行編碼之前,我先問自己幾個問題。
第一, 圖片是直接選擇圖庫裡的,還是需要拍照和選擇圖片兩個選項?
因為在選擇圖片的時候,會有一個拍照的按鈕,也可以實現拍照的功能。
第二, 需不需要本地緩存?
本地緩存值得是,在我們的圖片上傳後,是否在下次直接顯示,而不是從服務器讀取。
第三,圖片是否需要壓縮?
眾所周知,圖片這種資源,因為體積較大,在網絡上傳輸還是很慢的,所以,我們需要在我們的傳輸時,適當的對文件的大小進行壓縮,那麼就要根據我們自身的需求,按照一定的比例來進行壓縮。
在思考完這幾個問題後,根據我們自己的需求,我們在上傳時有兩個選項的,一個是拍照,一個是選擇圖片,另外我們需要做本地緩存,還有,圖片上傳不需要壓縮。
那麼我們就可以開始實現了,首先在我們的主fragment裡,添加如下代碼,如果你是activity,當然也可以。
做一個ImageView,作為我們上傳的圖像。
 mPic1 = (ImageView) view.findViewById(R.id.ImageView01);
nbsp;  mPic1.setOnClickListener(mPhotoListener);

  private View.OnClickListener mPhotoListener = new View.OnClickListener() {

  @Override
  public void onClick(View v) {
    int id = v.getId();
    if (id == R.id.ImageView01) {
      Intent popupIntent = new Intent(getActivity(), PopupActivity.class);
      mPhotoId = id;
      startActivityForResult(popupIntent, 1);
    }
  }
};
然後,我們跳轉到另外一個PopupActivity,讓我們選擇,
PopupActivity.Java
package com.chuanlaoda.android.activity;

import java.io.DataOutputStream;
import java.io.File;
import java.io.FileInputStream;
import java.io.FileNotFoundException;
import java.io.FileOutputStream;
import java.io.IOException;
import java.io.InputStream;
import java.net.HttpURLConnection;
import java.net.URL;
import java.text.SimpleDateFormat;
import java.util.Calendar;
import java.util.Date;

import android.app.Activity;
import android.app.AlertDialog;
import android.content.ActivityNotFoundException;
import android.content.DialogInterface;
import android.content.Intent;
import android.graphics.Bitmap;
import android.graphics.Bitmap.CompressFormat;
import android.net.Uri;
import android.os.Bundle;
import android.os.Environment;
import android.provider.MediaStore;
import android.util.Log;
import android.view.MotionEvent;
import android.view.View;
import android.view.View.OnClickListener;
import android.widget.Button;
import android.widget.ImageView;
import android.widget.LinearLayout;
import android.widget.Toast;

import com.chuanloada.android.R;

public class PopupActivity extends Activity implements OnClickListener {
  private Button btn_take_photo, btn_pick_photo, btn_cancel;
  private LinearLayout layout;
  private Intent intent;

  private Button showList;
  private Button uploadNow;
  private String mCurrentPhotoPath;
  private Bitmap sourcePic;
  private File dir = null;

  private String picName = null;
  private String uploadFile = null;

  static Uri capturedImageUri=null;
  private Bitmap bitmap = null;

  @Override
  protected void onCreate(Bundle savedInstanceState) {
    super.onCreate(savedInstanceState);
    setContentView(R.layout.popup);
    intent = getIntent();
    btn_take_photo = (Button) this.findViewById(R.id.btn_take_photo);
    btn_pick_photo = (Button) this.findViewById(R.id.btn_pick_photo);
    btn_cancel = (Button) this.findViewById(R.id.btn_cancel);

    layout = (LinearLayout) findViewById(R.id.pop_layout);

    layout.setOnClickListener(new OnClickListener() {

      public void onClick(View v) {
        // TODO Auto-generated method stub
        Toast.makeText(getApplicationContext(), "提示:點擊空白地方可以關閉",
            Toast.LENGTH_SHORT).show();
      }
    });

    btn_cancel.setOnClickListener(this);
    btn_pick_photo.setOnClickListener(this);
    btn_take_photo.setOnClickListener(this);
  }

  @Override
  public boolean onTouchEvent(MotionEvent event) {
    finish();
    return true;
  }

  @Override
  protected void onActivityResult(int requestCode, int resultCode, Intent data) {

    if (resultCode != RESULT_OK) {
      return;
    }
    if (data != null) {
      if (data.getExtras() != null)
      {
        bitmap = (Bitmap) data.getExtras().get("data");
        intent.putExtras(data.getExtras());
        intent.putExtra("uri", capturedImageUri);
        intent.putExtra("requestCode", requestCode);
        intent.putExtra("image", bitmap);
      }

      if (data.getData() != null)
        intent.setData(data.getData());
    }
    setResult(requestCode, intent);
    finish();
  }

  @Override
  public void onClick(View v) {
    switch (v.getId()) {
    case R.id.btn_take_photo:
      dispatchTakePictureIntent();
      break;
    case R.id.btn_pick_photo:
      try {

        Intent intent = new Intent();
        intent.setType("image/*");
        intent.setAction(Intent.ACTION_GET_CONTENT);
        startActivityForResult(intent, 2);
      } catch (ActivityNotFoundException e) {

      }
      break;
    case R.id.btn_cancel:
      finish();
      break;
    default:
      break;
    }
  }

  private File createImageFile() throws IOException {
    // Create an image file name
    String timeStamp = new SimpleDateFormat("yyyyMMdd_HHmmss").format(new Date());
    String imageFileName = "JPEG_" + timeStamp + "_";
    File storageDir = Environment.getExternalStoragePublicDirectory(
        Environment.DIRECTORY_PICTURES);
    File image = File.createTempFile(
      imageFileName, /* prefix */
      ".jpg",     /* suffix */
      storageDir   /* directory */
    );

    // Save a file: path for use with ACTION_VIEW intents
    mCurrentPhotoPath = "file:" + image.getAbsolutePath();
    return image;
  }

  private void dispatchTakePictureIntent() {
    Intent takePictureIntent = new Intent(MediaStore.ACTION_IMAGE_CAPTURE);
    // Ensure that there's a camera activity to handle the intent
    if (takePictureIntent.resolveActivity(getPackageManager()) != null) {
      // Create the File where the photo should go
      File photoFile = null;
      try {
        photoFile = createImageFile();
      } catch (IOException ex) {
        // Error occurred while creating the File
      }
      // Continue only if the File was successfully created
      capturedImageUri = Uri.fromFile(photoFile);
      if (photoFile != null) {
        //takePictureIntent.putExtra(MediaStore.EXTRA_OUTPUT, capturedImageUri);
        startActivityForResult(takePictureIntent, 1);
      }
    }
  }
}
Popup.xml
<?xml version="1.0" encoding="utf-8"?>
<RelativeLayout
  xmlns:android="http://schemas.android.com/apk/res/android"
  android:layout_width="fill_parent"
  android:layout_height="wrap_content"
  android:gravity="center_horizontal"
  android:orientation="vertical"
 >

<LinearLayout
  android:id="@+id/pop_layout"
  android:layout_width="fill_parent"
  android:layout_height="wrap_content"
  android:gravity="center_horizontal"
  android:orientation="vertical"
  android:layout_alignParentBottom="true"
   android:background="@drawable/btn_style_alert_dialog_background"
   >


  <Button
    android:id="@+id/btn_take_photo"
    android:layout_marginLeft="20dip"
    android:layout_marginRight="20dip"
    android:layout_marginTop="20dip"
    android:layout_width="fill_parent"
    android:layout_height="wrap_content"
    android:text="拍照"
    android:background="@drawable/btn_style_alert_dialog_button"
    android:text
     />

  <Button
    android:id="@+id/btn_pick_photo"
    android:layout_marginLeft="20dip"
    android:layout_marginRight="20dip"
    android:layout_marginTop="5dip"
     android:layout_width="fill_parent"
    android:layout_height="wrap_content"
    android:text="從相冊選擇"
     android:background="@drawable/btn_style_alert_dialog_button"
     android:text
     />

  <Button
    android:id="@+id/btn_cancel"
    android:layout_marginLeft="20dip"
    android:layout_marginRight="20dip"
    android:layout_marginTop="15dip"
    android:layout_marginBottom="15dip"
    android:layout_width="fill_parent"
    android:layout_height="wrap_content"
    android:text="取消"
    android:background="@drawable/btn_style_alert_dialog_cancel"
    android:textColor="#ffffff"
    android:text

    />
</LinearLayout>
</RelativeLayout>
接下來就是我們需要在我們的主fragment (或者activity)中添加onActivityResult.
public void onActivityResult(int requestCode, int resultCode, Intent data) {
    photo = (ImageView) mView.findViewById(mPhotoId);
    String pfid=String.valueOf(BusinessDetailsFragment.getPosition(mPhotoId) + 1);
    String gsid=String.valueOf(mBusinessId);
    String cur_date = new SimpleDateFormat("yyyy-MM-dd hh:mm:ss").format(new Date());
    switch (resultCode) {
    case 1:
      if (data != null) {
        Uri mImageCaptureUri = (Uri) data.getExtras().get("uri");
        if (mImageCaptureUri != null) {
          Bitmap image;
          try {
            //image = MediaStore.Images.Media.getBitmap(this.getActivity().getContentResolver(), mImageCaptureUri);
            image = (Bitmap) data.getExtras().get("image");
            String fileFullPath = PhotoAPI.savePicsToSdcard(image, mFileLoc);
            PromptUtils.showProgressDialog(getActivity(), "正在上傳照片");
            mResult = PhotoAPI.uploadFile(gsid, pfid, fileFullPath);
            Cache.addLastPhotoPath(pfid, fileFullPath);
            Cache.addLastPhotoDate(gsid, cur_date);
            PromptUtils.dismissProgressDialog();

            showDialog(mResult);
            if (image != null) {
              photo.setImageBitmap(image);
            }
          } catch (Exception e) {
            e.printStackTrace();
          }
        } else {
          Bundle extras = data.getExtras();
          if (extras != null) {
            Bitmap image = extras.getParcelable("data");
            String fileFullPath = PhotoAPI.savePicsToSdcard(image, mFileLoc);

            PromptUtils.showProgressDialog(getActivity(), "正在上傳照片");
            mResult = PhotoAPI.uploadFile(gsid, pfid, fileFullPath);
            PromptUtils.dismissProgressDialog();
            Cache.addLastPhotoPath(pfid, fileFullPath);
            Cache.addLastPhotoDate(gsid, cur_date);
            showDialog(mResult);
            if (image != null) {
              photo.setImageBitmap(image);
            }
          }
        }
      }
      break;
    case 2:
      if (data != null) {
        Uri mImageCaptureUri = data.getData();
        if (mImageCaptureUri != null) {
          Bitmap image;
          try {
            image = MediaStore.Images.Media.getBitmap(this.getActivity().getContentResolver(), mImageCaptureUri);
            String fileFullPath = getRealPathFromURI(this.getActivity(),mImageCaptureUri);
            PromptUtils.showProgressDialog(getActivity(), "正在上傳照片");
            mResult = PhotoAPI.uploadFile(gsid, pfid, fileFullPath);
            PromptUtils.dismissProgressDialog();
            Cache.addLastPhotoPath(pfid, fileFullPath);
            Cache.addLastPhotoDate(gsid, cur_date);
            showDialog(mResult);
            if (image != null) {
              photo.setImageBitmap(image);
            }
          } catch (Exception e) {
            e.printStackTrace();
          }
        } else {
          Bundle extras = data.getExtras();
          if (extras != null) {
            String fileFullPath = getRealPathFromURI(this.getActivity(),mImageCaptureUri);
            PromptUtils.showProgressDialog(getActivity(), "正在上傳照片");
            mResult = PhotoAPI.uploadFile(gsid, pfid, fileFullPath);
            PromptUtils.dismissProgressDialog();
            Cache.addLastPhotoPath(pfid, fileFullPath);
            Cache.addLastPhotoDate(gsid, cur_date);
            Bitmap image = extras.getParcelable("data");
            if (image != null) {
              photo.setImageBitmap(image);
            }
          }
        }
      }
      break;
    default:
      break;

    }
  }
另外,我們處理圖片上傳的代碼在這裡。
class UploadThread extends Thread {
  private String result = "";
  private String actionUrl;
  private String uploadFile;

  public UploadThread(String gsid, String pfid, String uploadFile) {
    String baseUrl = APIConfig.getAPIHost() + "uploadProof";
    this.actionUrl=baseUrl+"&gsid=" + gsid + "&pfid="+pfid;
    this.uploadFile = uploadFile;
  }

  @Override
  public void run() {
    String end = "\r\n";
    String twoHyphens = "--";
    String boundary = "*****";
    try {

      URL url = new URL(actionUrl);
      HttpURLConnection con = (HttpURLConnection) url.openConnection();
      /* 允許Input、Output,不使用Cache */
      con.setDoInput(true);
      con.setDoOutput(true);
      con.setUseCaches(false);
      /* 設置傳送的method=POST */
      con.setRequestMethod("POST");
      /* setRequestProperty */
      con.setRequestProperty("Connection", "Keep-Alive");
      con.setRequestProperty("Charset", "UTF-8");
      con.setRequestProperty("Content-Type",
          "multipart/form-data;boundary=" + boundary);

      /* 設置DataOutputStream */
      DataOutputStream ds = new DataOutputStream(con.getOutputStream());
      ds.writeBytes(twoHyphens + boundary + end);
      ds.writeBytes("Content-Disposition: form-data; "
          + "name=\"GooddShip\";filename=\"" + uploadFile + "\"" + end);
      ds.writeBytes(end);

      /* 取得文件的FileInputStream */
      FileInputStream fStream = new FileInputStream(uploadFile);

      /* 設置每次寫入1024bytes */
      int bufferSize = 1024;
      byte[] buffer = new byte[bufferSize];

      int length = -1;
      /* 從文件讀取數據至緩沖區 */
      while ((length = fStream.read(buffer)) != -1) {
        /* 將資料寫入DataOutputStream中 */
        ds.write(buffer, 0, length);
      }

      ds.writeBytes(end);
      ds.writeBytes(twoHyphens + boundary + twoHyphens + end);

      /* close streams */
      fStream.close();
      ds.flush();

      /* 取得Response內容 */
      InputStream is = con.getInputStream();
      int ch;
      StringBuffer b = new StringBuffer();
      while ((ch = is.read()) != -1) {
        b.append((char) ch);
      }

      /* Parse JSON */
      JSONObject jObject = new JSONObject(b.toString());
      int code = jObject.getInt("Code");
      String error = jObject.getString("Error");
      String msg = jObject.getString("msg");

      if (code == 1) {
      /* 將Response顯示於Dialog */
        result = "上傳成功";
      } else result = "上傳失敗" + error;
      /* 關閉DataOutputStream */
      ds.close();
    } catch (Exception e) {
      result = "上傳失敗" + e;
    }
  }
然後就可以了,我們最終的效果如下。

以上就是本文的全部內容,希望對大家的學習有所幫助,也希望大家多多支持本站。
 vivo x7怎麼換字體
vivo x7手機怎麼換字體?有部分用戶並不喜歡vivo x7手機系統自帶的字體,想要換成自己喜歡的字體,下面小編就教教大家如何換字體,有需要的朋友就一起來
 Android的下拉刷新/上拉加載控件
事實上之所以會有之前的那篇博文的出現,是起因於前段時間自己在寫一個練手的App時很快就遇到這種需求。其實我們可以發現類似這樣下拉刷新、上拉加載的功能正在變得越來越普遍,可
 Android 自動補全提示輸入AutoCompleteTextView、 MultiAutoCompleteTextView
以在搜索框搜索時,自動補全為例:其中還涉及到一個詞,Tokenizer:分詞器,分解器。上效果圖:MainActivity.java:package com.joan.t
 深入分析Android ViewStub的應用詳解
在開發應用程序的時候,經常會遇到這樣的情況,會在運行時動態根據條件來決定顯示哪個View或某個布局。那麼最通常的想法就是把可能用到的View都寫在上面,先把它們的可見性都