編輯:關於Android編程
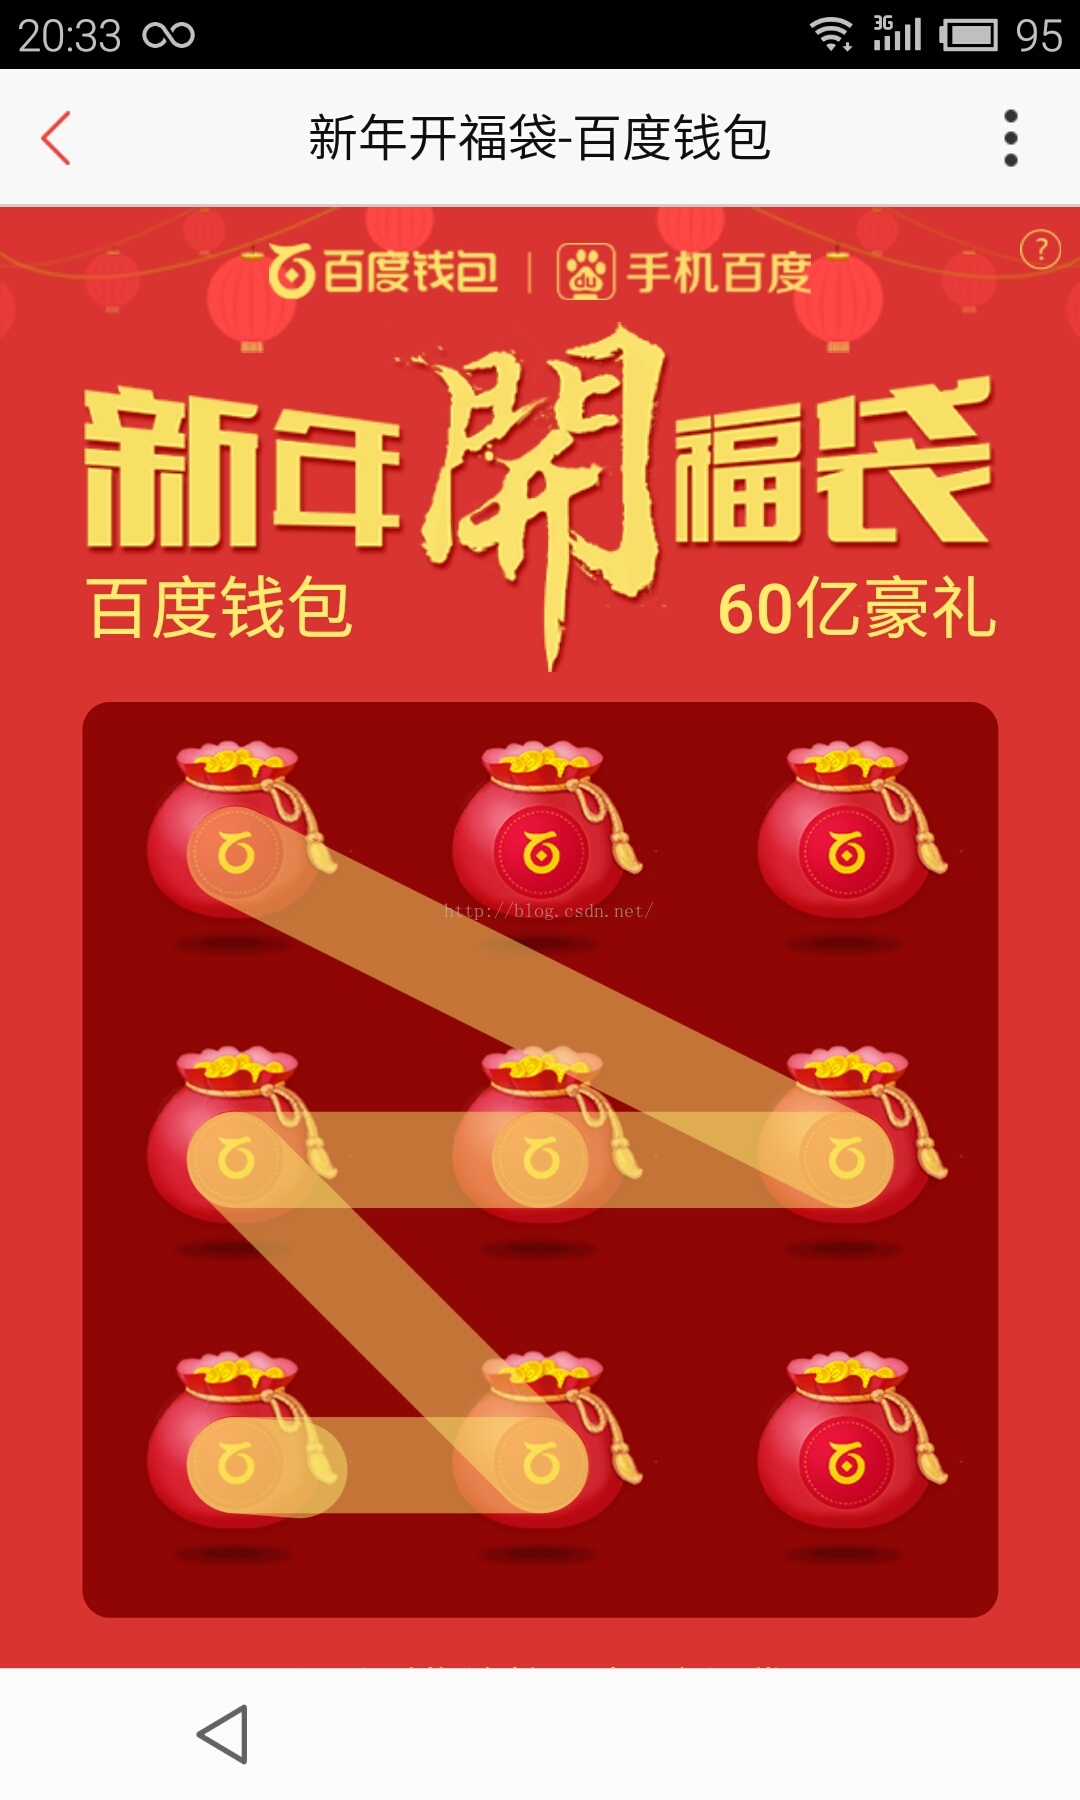
馬上到雙十一,紅包來襲,時間又是充裕,搶紅包的時候意外發現了百度的福袋界面還不錯,想想還要專門寫一篇博文來完成其界面。
當然啦,這其實就是解鎖界面的進化版本。不過其包含的知識點還是挺多的,寫篇博文記錄一下看看具體有哪些技術點啦。看
看百度的效果圖:

1.編程思路
看看界面,不難發現,其就是一個放入九張圖片的容器,繪制其實可以在其上面另創建一個透明View負責繪制線與圓圈。下面我們將介紹一下實現過程。
㈠自定義ViewGroup
我們知道,自定義ViewGroup一定需要實現其onLayout()方法。該方法是設置子View位置與尺寸的時候調用。還有一個onMeasure()方法,該方法是測量view及其內容來確定view的寬度和高度。
㈡存儲其點與圓的位置及繪制參數
當重回界面的時候,是不會保存上一次繪制界面的內容,必須存儲以備重繪時候繪制到界面
㈢簡單的縮放動畫
㈣自定義View實現繪制界面
㈤繪制完成時,清除界面繪制內容,並且保證不連接重復圖片
下面我們將完成這些步驟。
2.自定義ViewGroup
開始的任務就是將九張圖片平均分布到圖片的位置,顯示在手機界面中。其代碼如下:
public class LYJViewGroup extends ViewGroup implements LYJGestureDrawline.OnAnimationCallback{
  /**
   * 每個點區域的寬度
   */
  private int childWidth;
  /***
   * 上下文
   */
  private Context context;
  /***
   * 保存圖片點的位置
   */
  private List<LYJGesturePoint> list;
  /***
   * 創建view使其在ViewGroup之上。
   */
  private LYJGestureView gestureDrawline;
  private int baseNum = 5;
  public LYJViewGroup(Context context) {
    super(context);
    this.context = context;
    this.list = new ArrayList<>();
    DisplayMetrics metric = new DisplayMetrics();
    ((Activity) context).getWindowManager().getDefaultDisplay().getMetrics(metric);
    childWidth = metric.widthPixels / 3;   // 屏幕寬度(像素)
    addChild();
    // 初始化一個可以畫線的view
    gestureDrawline = new LYJGestureView(context, list);
    gestureDrawline.setAnimationCallback(this);
  }
  public void setParentView(ViewGroup parent){
    // 得到屏幕的寬度
    DisplayMetrics metric = new DisplayMetrics();
    ((Activity) context).getWindowManager().getDefaultDisplay().getMetrics(metric);
    int width = metric.widthPixels;
    LayoutParams layoutParams = new LayoutParams(width, width);
    this.setLayoutParams(layoutParams);
    gestureDrawline.setLayoutParams(layoutParams);
    parent.addView(this);
    parent.addView(gestureDrawline);
  }
  @Override
  protected void onLayout(boolean changed, int l, int t, int r, int b) {
    for (int i = 0; i < getChildCount(); i++) {
      //第幾行
      int rowspan = i / 3;
      //第幾列
      int column = i % 3;
      android.view.View v = getChildAt(i);
      v.layout(column * childWidth + childWidth / baseNum, rowspan * childWidth + childWidth / baseNum,
          column * childWidth + childWidth - childWidth / baseNum, rowspan * childWidth + childWidth - childWidth / baseNum);
    }
  }
  @Override
  protected void onMeasure(int widthMeasureSpec, int heightMeasureSpec) {
    super.onMeasure(widthMeasureSpec, heightMeasureSpec);
    // 遍歷設置每個子view的大小
    for (int i = 0; i < getChildCount(); i++) {
      View v = getChildAt(i);
      v.measure(widthMeasureSpec, heightMeasureSpec);
    }
  }

  private void addChild() {
    for (int i = 0; i < 9; i++) {
      ImageView image = new ImageView(context);
      image.setBackgroundResource(R.drawable.marker);
      this.addView(image);
      invalidate();
      // 第幾行
      int rowspan = i / 3;
      // 第幾列
      int column = i % 3;
      // 定義點的左上角與右下角的坐標
      int leftX = column * childWidth + childWidth / baseNum;
      int topY = rowspan * childWidth + childWidth / baseNum;
      int rightX = column * childWidth + childWidth - childWidth / baseNum;
      int bottomY = rowspan * childWidth + childWidth - childWidth / baseNum;
      LYJGesturePoint p = new LYJGesturePoint(leftX, topY, rightX,bottomY,i);
      this.list.add(p);
    }
  }

  @Override
  public void startAnimationImage(int i) {
    Animation animation= AnimationUtils.loadAnimation(getContext(), R.anim.gridlayout_child_scale_anim);
    getChildAt(i).startAnimation(animation);
  }
}
3.自定義點類
顧名思義,就是為了獲取點的相關的屬性,其中基礎屬性圖片左上角坐標與右下角坐標,計算圖片中心位置以便獲取圖片中心點。狀態標記,表示該點是否繪制到圖片。下面是其實體類:
public class LYJGesturePoint {
  private Point pointLeftTop;//左上角坐標
  private Point pointRightBottom;//右下角坐標
  private int centerX;//圖片中心點X坐標
  private int centerY;//圖片中心點Y坐標
  private int pointState;//是否點擊了該圖片

  private int num;

  public int getNum() {
    return num;
  }

  public int getPointState() {
    return pointState;
  }

  public void setPointState(int pointState) {
    this.pointState = pointState;
  }

  public Point getPointLeftTop() {
    return pointLeftTop;
  }

  public Point getPointRightBottom() {
    return pointRightBottom;
  }

  public LYJGesturePoint(int left,int top,int right,int bottom,int i){
    this.pointLeftTop=new Point(left,top);
    this.pointRightBottom=new Point(right,bottom);
    this.num=i;
  }

  public int getCenterX() {
    this.centerX=(this.pointLeftTop.x+this.pointRightBottom.x)/2;
    return centerX;
  }

  public int getCenterY() {
    this.centerY=(this.pointLeftTop.y+this.pointRightBottom.y)/2;
    return centerY;
  }
}

4.自定義圓類

這個類較簡單就三個屬性而已(圓中心點坐標及半徑),代碼如下:

public class LYJCirclePoint {
  private int roundX;//圓中心點X坐標
  private int roundY;//圓中心點Y坐標
  private int radiu;//圓半徑

  public int getRadiu() {
    return radiu;
  }

  public int getRoundX() {
    return roundX;
  }

  public int getRoundY() {
    return roundY;
  }

  public LYJCirclePoint(int roundX,int roundY,int radiu){
    this.roundX=roundX;
    this.roundY=roundY;
    this.radiu=radiu;
  }
}
5.實現自定義繪制類View
代碼如下:
public class LYJGestureView extends android.view.View {
  /***
   * 聲明直線畫筆
   */
  private Paint paint;
  /***
   * 聲明圓圈畫筆
   */
  private Paint circlePaint;
  /***
   * 畫布
   */
  private Canvas canvas;
  /***
   * 位圖
   */
  private Bitmap bitmap;
  /***
   * 裝有各個view坐標的集合,用於判斷點是否在其中
   */
  private List<LYJGesturePoint> list;
  /***
   * 記錄畫過的線
   */
  private List<Pair<LYJGesturePoint, LYJGesturePoint>> lineList;
  /***
   * 記錄畫過的圓
   */
  private List<LYJCirclePoint> circlePoints;
  /**
   * 手指當前在哪個Point內
   */
  private LYJGesturePoint currentPoint;
  /***
   * 手指按下動畫
   */
  private OnAnimationCallback animationCallback;
  public interface OnAnimationCallback{
    public void startAnimationImage(int i);
  }

  public void setAnimationCallback(OnAnimationCallback animationCallback) {
    this.animationCallback = animationCallback;
  }

  public LYJGestureView(Context context, List<LYJGesturePoint> list){
    super(context);
    Log.i(getClass().getName(), "GestureDrawline");
    paint = new Paint(Paint.DITHER_FLAG);// 創建一個畫筆
    circlePaint=new Paint(Paint.DITHER_FLAG);
    DisplayMetrics metric = new DisplayMetrics();
    ((Activity)context).getWindowManager().getDefaultDisplay().getMetrics(metric);
    Log.i(getClass().getName(), "widthPixels" + metric.widthPixels);
    Log.i(getClass().getName(), "heightPixels" + metric.heightPixels);
    bitmap = Bitmap.createBitmap(metric.widthPixels, metric.heightPixels, Bitmap.Config.ARGB_8888); // 設置位圖的寬高
    canvas = new Canvas();
    canvas.setBitmap(bitmap);
    paint.setStyle(Paint.Style.STROKE);// 設置非填充
    paint.setStrokeWidth(20);// 筆寬20像素
    paint.setColor(Color.rgb(245, 142, 33));// 設置默認連線顏色
    paint.setAntiAlias(true);// 不顯示鋸齒
    circlePaint.setStyle(Paint.Style.FILL);
    circlePaint.setStrokeWidth(1);
    circlePaint.setAntiAlias(true);
    circlePaint.setColor(Color.rgb(245, 142, 33));

    this.list = list;
    this.lineList = new ArrayList<>();
    this.circlePoints=new ArrayList<>();
  }

  @Override
  public boolean onTouchEvent(MotionEvent event) {
    switch (event.getAction()){
      case MotionEvent.ACTION_DOWN:
        // 判斷當前點擊的位置是處於哪個點之內
        currentPoint = getPointAt((int) event.getX(), (int) event.getY());
        if (currentPoint != null) {
          currentPoint.setPointState(Constants.POINT_STATE_SELECTED);
          this.animationCallback.startAnimationImage(currentPoint.getNum());
          canvas.drawCircle(currentPoint.getCenterX(), currentPoint.getCenterY(), 20, circlePaint);
          circlePoints.add(new LYJCirclePoint(currentPoint.getCenterX(),currentPoint.getCenterY(),20));
        }
        invalidate();
        break;
      case MotionEvent.ACTION_MOVE:
        clearScreenAndDrawList();
        // 得到當前移動位置是處於哪個點內
        LYJGesturePoint pointAt = getPointAt((int) event.getX(), (int) event.getY());
        if (currentPoint == null && pointAt == null) {//你把手指按在屏幕滑動,如果終點與起點都不圖片那麼返回
          return true;
        } else {// 代表用戶的手指移動到了點上
          if (currentPoint == null) {// 先判斷當前的point是不是為null
            // 如果為空,那麼把手指移動到的點賦值給currentPoint
            currentPoint = pointAt;
            // 把currentPoint這個點設置選中狀態;
            currentPoint.setPointState(Constants.POINT_STATE_SELECTED);
          }
        }
        //如果移動到的點不為圖片區域或者移動到自己的地方,或者該圖片已經為選中狀態,直接畫直線就可以了
        if(pointAt == null || currentPoint.equals(pointAt) || Constants.POINT_STATE_SELECTED == pointAt.getPointState()){
          canvas.drawCircle(currentPoint.getCenterX(), currentPoint.getCenterY(), 20, circlePaint);
          circlePoints.add(new LYJCirclePoint(currentPoint.getCenterX(), currentPoint.getCenterY(), 20));
          canvas.drawLine(currentPoint.getCenterX(), currentPoint.getCenterY(), event.getX(), event.getY(), paint);
        }else{//其他情況畫兩點相連直線,並且保存繪制圓與直線,並調用按下圖片的縮放動畫
          canvas.drawCircle(pointAt.getCenterX(),pointAt.getCenterY(),20,circlePaint);
          circlePoints.add(new LYJCirclePoint(pointAt.getCenterX(), pointAt.getCenterY(), 20));
          this.animationCallback.startAnimationImage(pointAt.getNum());
          pointAt.setPointState(Constants.POINT_STATE_SELECTED);
          canvas.drawLine(currentPoint.getCenterX(), currentPoint.getCenterY(), pointAt.getCenterX(), pointAt.getCenterY(), paint);
          Pair<LYJGesturePoint, LYJGesturePoint> pair = new Pair<>(currentPoint, pointAt);
          lineList.add(pair);
          currentPoint=pointAt;//設置選中點為當前點。
        }
        invalidate();//重繪
        break;
      case MotionEvent.ACTION_UP:
        clearScreenAndDrawList();//防止多出一條沒有終點的直線
        new Handler().postDelayed(new clearLineRunnable(), 1000);//1秒後清空繪制界面
        invalidate();//重繪
        break;
      default:
        break;
    }
    return true;
  }

  class clearLineRunnable implements Runnable {
    public void run() {
      // 清空保存點與圓的集合
      lineList.clear();
      circlePoints.clear();
      // 重新繪制界面
      clearScreenAndDrawList();
      for (LYJGesturePoint p : list) {
        //設置其為初始化不選中狀態
        p.setPointState(Constants.POINT_STATE_NORMAL);
      }
      invalidate();
    }
  }

  /**
   * 通過點的位置去集合裡面查找這個點是包含在哪個Point裡面的
   *
   * @param x
   * @param y
   * @return 如果沒有找到,則返回null,代表用戶當前移動的地方屬於點與點之間
   */
  private LYJGesturePoint getPointAt(int x, int y) {

    for (LYJGesturePoint point : list) {
      // 先判斷點是否在圖片的X坐標內
      int leftX = point.getPointLeftTop().x;
      int rightX = point.getPointRightBottom().x;
      if (!(x >= leftX && x < rightX)) {
        // 如果為假,則跳到下一個對比
        continue;
      }
      //在判斷點是否在圖片的Y坐標內
      int topY = point.getPointLeftTop().y;
      int bottomY = point.getPointRightBottom().y;
      if (!(y >= topY && y < bottomY)) {
        // 如果為假,則跳到下一個對比
        continue;
      }

      // 如果執行到這,那麼說明當前點擊的點的位置在遍歷到點的位置這個地方
      return point;
    }

    return null;
  }

  /**
   * 清掉屏幕上所有的線,然後畫出集合裡面的線
   */
  private void clearScreenAndDrawList() {
    canvas.drawColor(Color.TRANSPARENT, PorterDuff.Mode.CLEAR);
    for (Pair<LYJGesturePoint, LYJGesturePoint> pair : lineList) {
      canvas.drawLine(pair.first.getCenterX(), pair.first.getCenterY(),
          pair.second.getCenterX(), pair.second.getCenterY(), paint);// 畫線
    }
    for(LYJCirclePoint lyjCirclePoint : circlePoints){
      canvas.drawCircle(lyjCirclePoint.getRoundX(),lyjCirclePoint.getRoundY(), lyjCirclePoint.getRadiu(),circlePaint);
    }
  }
  //繪制用bitmap創建出來的畫布
  @Override
  protected void onDraw(Canvas canvas) {
    canvas.drawBitmap(bitmap, 0, 0, null);
  }
}
附上本文源碼:源碼下載
以上就是本文的全部內容,希望對大家的學習有所幫助,也希望大家多多支持本站。
 android 自定義控件實現流式布局
什麼是流式布局呢?也不知道哪個高手把它稱之為流失布局,叫什麼不重要,重要的是要知道怎麼實現,今天就實現下這個功能,先看下圖什麼就知道是什麼是流式布局了,做過電商的app或
 Android - ContactPicker(選擇聯系人) 詳解
ContactPicker(選擇聯系人) 詳解 ContactPicker:用戶可以選擇一個聯系人. 1. 創建ContactP
 Android開發中在TableView上添加懸浮按鈕的方法
如果直接在TableVIewController上貼Button的話會導致這個會隨之滾動,下面解決在TableView上實現位置固定懸浮按鈕的兩種方法: 1.在view
 Android 存儲學習之使用SharedPreference保存文件
上兩節我們都是使用文本文件保存用戶的信息,這明顯是存在漏洞的。同時對文件中的內容不好管理。今天我們學習用SharedPreference保存。sharedPreferen