編輯:關於Android編程
本文實例講述了Android實現的截屏小程序。分享給大家供大家參考,具體如下:
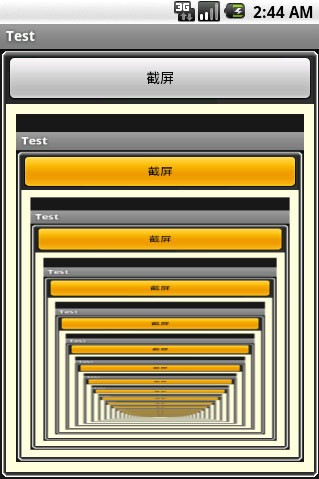
先看截圖,不過這個截屏還不夠完整,頭上的statusbar沒有,呈黑色。

多按了幾次,就成這樣了,呵呵。
package com.test;
import android.app.Activity;
import android.graphics.Bitmap;
import android.graphics.Canvas;
import android.graphics.Bitmap.Config;
import android.os.Bundle;
import android.view.View;
import android.widget.Button;
import android.widget.ImageView;
import android.widget.ImageView.ScaleType;
public class ScreenPrinter extends Activity {
 /** Called when the activity is first created. */
 boolean customTitleSupported;
 public void onCreate(Bundle savedInstanceState) {
 super.onCreate(savedInstanceState);
 setContentView(R.layout.screen_printer);
 Button btn = (Button)findViewById(R.id.btn);
 btn.setOnClickListener(new Button.OnClickListener(){
  public void onClick(View arg0) {
  ImageView im = (ImageView)findViewById(R.id.img);
  Bitmap bmp = Bitmap.createBitmap(320, 480, Config.ARGB_8888);
  View cv = getWindow().getDecorView();
  cv.draw(new Canvas(bmp));
  im.setScaleType(ScaleType.FIT_XY);
  im.setImageBitmap(bmp);
  }});
 }
}
資源文件:
<?xml version="1.0" encoding="utf-8"?>
<LinearLayout xmlns:android="http://schemas.android.com/apk/res/android"
 android:layout_width="fill_parent" android:layout_height="fill_parent"
 android:orientation="vertical"
 android:background="@drawable/border">
 <Button android:layout_width="fill_parent"
 android:layout_height="wrap_content" android:id="@+id/btn"
 android:text="截屏"/>
 <LinearLayout android:layout_width="fill_parent"
 android:layout_height="fill_parent"
 android:layout_weight="1" android:padding="10dip"
 android:background="#ffffdd">
 <ImageView android:id="@+id/img"
 android:layout_width="fill_parent" android:layout_height="fill_parent"/>
 </LinearLayout>
</LinearLayout>
更多關於Android相關內容感興趣的讀者可查看本站專題:《Android圖形與圖像處理技巧總結》、《Android開發入門與進階教程》、《Android調試技巧與常見問題解決方法匯總》、《Android多媒體操作技巧匯總(音頻,視頻,錄音等)》、《Android基本組件用法總結》、《Android視圖View技巧總結》、《Android布局layout技巧總結》及《Android控件用法總結》
希望本文所述對大家Android程序設計有所幫助。
 Android Studio老是提示重啟ADB解決!
有時候你把手機接到電腦上調試時,Android Studio總是提示你重啟ADB,但是你點重啟後,立馬又跳出那個提示重啟的對話框。會再跳出提示對話框是因為你ADB重啟沒有
 Android提高之自定義Menu(TabMenu)實現方法
一般使用過UCWEB-Android版的人都應該對其特殊的menu有一定的印象,把menu做成Tab-Menu(支持分頁的Menu),可以容納比Android傳統的men
 Android自定義豎直方向SeekBar多色進度條
寫在前面因為有這樣的一個場景,需要實現豎直方向的多色進度條,然後在網上也找了下,沒看到符合需要的,於是自定義了一個,效果如下: 具體實現本來想定義水平的,然後旋轉一下,後
 android 環境安裝、helloworld demo 創建運行
android是因為我的興趣而自學的,當初學完java se感覺迫切需要實現下自己的技能,然後看到身邊的手機,就決定學下android編個app玩下。現在斷斷續續倒騰了兩