編輯:關於Android編程
最近想弄一個雙導航功能,查看了許多資料,總算是實現了功能,這邊就算是給自己幾個筆記吧!
先來看看效果
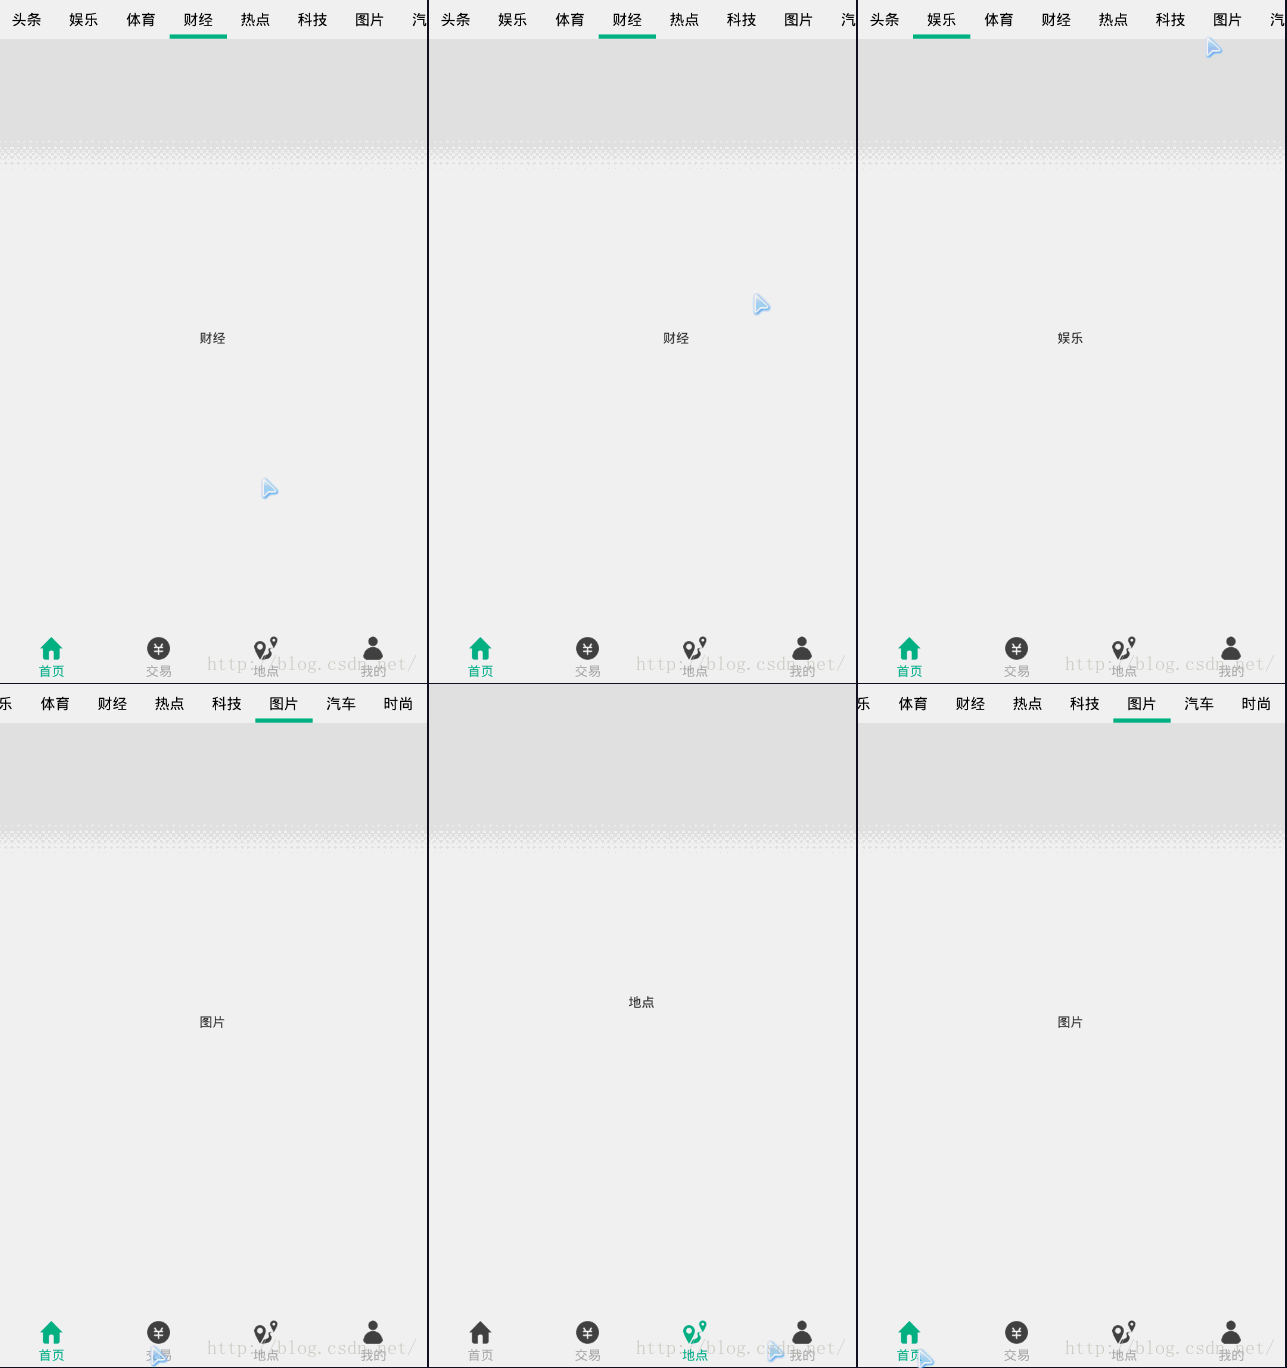
那麼就開始實現了!
底部導航欄我選擇用FragmentTabHost+Fragment來實現,這個方法我覺得挺好用的,代碼量也不多
首先是開始的activity_main.xml
<RelativeLayout xmlns:android="http://schemas.android.com/apk/res/android"
 xmlns:tools="http://schemas.android.com/tools"
 android:layout_width="match_parent"
 android:layout_height="match_parent"
 tools:context="${relativePackage}.${activityClass}" >

 <FrameLayout
 android:id="@+id/main_view"
 android:layout_width="match_parent"
 android:layout_height="match_parent"
 android:layout_above="@+id/main_tab"
 android:layout_alignParentLeft="true"
 android:layout_alignParentTop="true" >

 </FrameLayout>

 <view
 android:id="@+id/main_tab"
 android:layout_width="match_parent"
 android:layout_height="50dp"
 android:layout_alignParentBottom="true"
 android:layout_alignParentLeft="true"
 class="android.support.v4.app.FragmentTabHost" />

</RelativeLayout>
其中我是直接拉的view所以是形成的FragmentTabHost
也可以直接在xml文件裡面寫
<android.support.v4.view.FragmentTabHost >
</android.support.v4.view.FragmentTabHost>
這xml文件就一個view加一個tab view用來顯示碎片,tab用來放置底部按鈕的數量
再來是tab_foot.xml
<?xml version="1.0" encoding="utf-8"?>
<LinearLayout xmlns:android="http://schemas.android.com/apk/res/android"
 android:layout_width="match_parent"
 android:layout_height="match_parent"
 android:background="#F6F6F6"
 android:gravity="center"
 android:orientation="vertical" >

 <ImageView
 android:id="@+id/foot_iv"
 android:layout_width="wrap_content"
 android:layout_height="wrap_content"
 android:src="@drawable/home1" />

 <TextView
 android:id="@+id/foot_tv"
 android:layout_width="wrap_content"
 android:layout_height="wrap_content"
 android:layout_marginTop="3dp"
 android:text="首頁"
 android:textColor="@color/tab_color" />

</LinearLayout>
這是每個底部按鈕的布局設置的xml文件
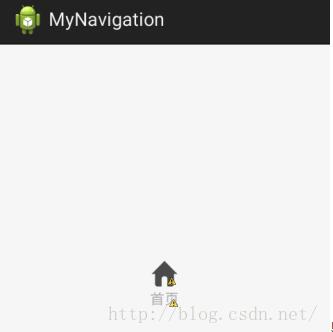
顯示效果。
再來是MainActivity的代碼
package com.gjn.mynavigation;

import android.os.Bundle;
import android.support.v4.app.FragmentActivity;
import android.support.v4.app.FragmentTabHost;
import android.view.LayoutInflater;
import android.view.View;
import android.view.Window;
import android.widget.ImageView;
import android.widget.TabWidget;
import android.widget.TextView;
import android.widget.TabHost.OnTabChangeListener;
import android.widget.TabHost.TabSpec;

public class MainActivity extends FragmentActivity implements OnTabChangeListener {

 private FragmentTabHost mTabHost;
 @Override
 protected void onCreate(Bundle savedInstanceState) {
 super.onCreate(savedInstanceState);
 requestWindowFeature(Window.FEATURE_NO_TITLE);
 setContentView(R.layout.activity_main);

 //初始化FragmentTabHost
 initHost();
 //初始化底部導航欄
 initTab();
 //默認選中
 mTabHost.onTabChanged(TabDb.getTabsTxt()[0]);
 }

 private void initTab() {
 String[] tabs = TabDb.getTabsTxt();
 for (int i = 0; i < tabs.length; i++) {
 //新建TabSpec
 TabSpec tabSpec = mTabHost.newTabSpec(TabDb.getTabsTxt()[i]);
 //設置view
 View view = LayoutInflater.from(this).inflate(R.layout.tabs_foot, null);
 ((TextView) view.findViewById(R.id.foot_tv)).setText(TabDb.getTabsTxt()[i]);
 ((ImageView) view.findViewById(R.id.foot_iv)).setImageResource(TabDb.getTabsImg()[i]);
 tabSpec.setIndicator(view);
 //加入TabSpec
 mTabHost.addTab(tabSpec,TabDb.getFramgent()[i],null);
 }
 }
 /***
 * 初始化Host
 */
 private void initHost() {
 mTabHost = (FragmentTabHost) findViewById(R.id.main_tab);
 //調用setup方法 設置view
 mTabHost.setup(this, getSupportFragmentManager(),R.id.main_view);
 //去除分割線
 mTabHost.getTabWidget().setDividerDrawable(null);
 //監聽事件
 mTabHost.setOnTabChangedListener(this);
 }

 @Override
 public void onTabChanged(String arg0) {
 //從分割線中獲得多少個切換界面
 TabWidget tabw = mTabHost.getTabWidget();
 for (int i = 0; i < tabw.getChildCount(); i++) {
 View v = tabw.getChildAt(i);
 TextView tv = (TextView) v.findViewById(R.id.foot_tv);
 ImageView iv = (ImageView) v.findViewById(R.id.foot_iv);
 //修改當前的界面按鈕顏色圖片
 if (i == mTabHost.getCurrentTab()) {
 tv.setTextColor(getResources().getColor(R.color.tab_light_color));
 iv.setImageResource(TabDb.getTabsImgLight()[i]);
 }else{
 tv.setTextColor(getResources().getColor(R.color.tab_color));
 iv.setImageResource(TabDb.getTabsImg()[i]);
 }
 }
 }
}
其中TabDb類是用來設置導航欄的數據和圖片切換時候的資源
以下是TabDb類
package com.gjn.mynavigation;

public class TabDb {
 /***
 * 獲得底部所有項
 */
 public static String[] getTabsTxt() {
 String[] tabs = {"首頁","交易","地點","我的"};
 return tabs;
 }
 /***
 * 獲得所有碎片
 */
 public static Class[] getFramgent(){
 Class[] cls = {OneFm.class,TwoFm.class,ThreeFm.class,FourFm.class};
 return cls ;
 }
 /***
 * 獲得所有點擊前的圖片
 */
 public static int[] getTabsImg(){
 int[] img = {R.drawable.home1,R.drawable.glod1,R.drawable.xc1,R.drawable.user1};
 return img ;
 }
 /***
 * 獲得所有點擊後的圖片
 */
 public static int[] getTabsImgLight(){
 int[] img = {R.drawable.home2,R.drawable.glod2,R.drawable.xc2,R.drawable.user2};
 return img ;
 }
}
到此,底部導航欄就算是完全實現了。
--------------------------------------------------------------------------------------------------------------------------
現在來實現頂部導航欄,看了許多最後使用了RadioGroup+ViewPager來實現
首先是為第一個碎片設計一個xml布局
fm_one.xml
<?xml version="1.0" encoding="utf-8"?>
<LinearLayout xmlns:android="http://schemas.android.com/apk/res/android"
 android:layout_width="match_parent"
 android:layout_height="match_parent"
 android:orientation="vertical" >

 <HorizontalScrollView
 android:id="@+id/one_hv"
 android:layout_width="match_parent"
 android:layout_height="wrap_content"
 android:scrollbars="none" >

 <RadioGroup
  android:id="@+id/one_rg"
  android:layout_width="match_parent"
  android:layout_height="match_parent"
  android:orientation="horizontal" >
 </RadioGroup>
 </HorizontalScrollView>

 <view
 android:id="@+id/one_view"
 android:layout_width="match_parent"
 android:layout_height="0dp"
 android:layout_weight="1"
 class="android.support.v4.view.ViewPager" />

</LinearLayout>
設置頂部導航欄和顯示view
之後吧導航欄的每個項的布局
tab_rb.xml
<?xml version="1.0" encoding="utf-8"?>
<RadioButton xmlns:android="http://schemas.android.com/apk/res/android"
 android:layout_width="wrap_content"
 android:layout_height="wrap_content"
 android:background="@drawable/tab_rb_selector"
 android:button="@null"
 android:paddingBottom="10dp"
 android:paddingLeft="15dp"
 android:paddingRight="15dp"
 android:paddingTop="10dp"
 android:text="今日" >
</RadioButton>
其中設置selector文件來控制點擊和未點擊的狀態
tab_rb_selector.xml
<?xml version="1.0" encoding="utf-8"?>
<selector xmlns:android="http://schemas.android.com/apk/res/android" >
 <!-- 點擊 -->
 <item android:state_checked="true">
 <layer-list >
  <item >
  <shape android:shape="rectangle">
   <stroke android:width="5dp" android:color="@color/tab_light_color"/>
  </shape>
  </item>
  <item android:bottom="5dp">
  <shape android:shape="rectangle">
   <solid android:color="#fff"/>
  </shape>
  </item>
 </layer-list>
 </item>
 <!-- 默認 -->
 <item >
 <shape >
  <solid android:color="#fafafa"/>
 </shape>
 </item>
</selector>
設置了點擊和默認的時候的顯示狀態
最後來實現OneFm類
package com.gjn.mynavigation;

import java.util.ArrayList;
import java.util.List;

import android.os.Bundle;
import android.support.annotation.Nullable;
import android.support.v4.app.Fragment;
import android.support.v4.view.ViewPager;
import android.support.v4.view.ViewPager.OnPageChangeListener;
import android.util.DisplayMetrics;
import android.view.LayoutInflater;
import android.view.View;
import android.view.ViewGroup;
import android.widget.HorizontalScrollView;
import android.widget.RadioButton;
import android.widget.RadioGroup;
import android.widget.RadioGroup.LayoutParams;
import android.widget.RadioGroup.OnCheckedChangeListener;

public class OneFm extends Fragment implements OnPageChangeListener {

 private View view;
 private RadioGroup rg_;
 private ViewPager vp_;
 private HorizontalScrollView hv_;
 private List<Fragment> newsList = new ArrayList<Fragment>();
 private OneFmAdapter adapter;

 @Override
 public View onCreateView(LayoutInflater inflater,
 @Nullable ViewGroup container, @Nullable Bundle savedInstanceState) {
 if (view == null) {
 //初始化view
 view = inflater.inflate(R.layout.fm_one, container,false);
 rg_ = (RadioGroup) view.findViewById(R.id.one_rg);
 vp_ = (ViewPager) view.findViewById(R.id.one_view);
 hv_ = (HorizontalScrollView) view.findViewById(R.id.one_hv);
 //設置RadioGroup點擊事件
 rg_.setOnCheckedChangeListener(new OnCheckedChangeListener() {

 @Override
 public void onCheckedChanged(RadioGroup group, int id) {
 vp_.setCurrentItem(id);
 }
 });
 //初始化頂部導航欄
 initTab(inflater);
 //初始化viewpager
 initView();
 }
 /*
 * 底部導航欄切換後 由於沒有銷毀頂部設置導致如果沒有重新設置view
 * 導致底部切換後切回頂部頁面數據會消失等bug
 * 以下設置每次重新創建view即可
 */
 ViewGroup parent = (ViewGroup) view.getParent();
 if (parent != null) {
 parent.removeView(view);
 }
 return view;
 }
 /***
 * 初始化viewpager
 */
 private void initView() {
 List<HTab> hTabs = HTabDb.getSelected();
 for (int i = 0; i < hTabs.size(); i++) {
 OneFm1 fm1 = new OneFm1();
 Bundle bundle = new Bundle();
 bundle.putString("name", hTabs.get(i).getName());
 fm1.setArguments(bundle);
 newsList.add(fm1);
 }
 //設置viewpager適配器
 adapter = new OneFmAdapter(getActivity().getSupportFragmentManager(),newsList);
 vp_.setAdapter(adapter);
 //兩個viewpager切換不重新加載
 vp_.setOffscreenPageLimit(2);
 //設置默認
 vp_.setCurrentItem(0);
 //設置viewpager監聽事件
 vp_.setOnPageChangeListener(this);
 }
 /***
 * 初始化頭部導航欄
 * @param inflater
 */
 private void initTab(LayoutInflater inflater) {
 List<HTab> hTabs = HTabDb.getSelected();
 for (int i = 0; i < hTabs.size(); i++) {
 //設置頭部項布局初始化數據
 RadioButton rbButton = (RadioButton) inflater.inflate(R.layout.tab_rb, null);
 rbButton.setId(i);
 rbButton.setText(hTabs.get(i).getName());
 LayoutParams params = new LayoutParams(LayoutParams.WRAP_CONTENT,
 LayoutParams.WRAP_CONTENT);
 //加入RadioGroup
 rg_.addView(rbButton,params);
 }
 //默認點擊
 rg_.check(0);
 }
 @Override
 public void onPageScrollStateChanged(int arg0) {

 }
 @Override
 public void onPageScrolled(int arg0, float arg1, int arg2) {

 }
 @Override
 public void onPageSelected(int id) {
 setTab(id);
 }
 /***
 * 頁面跳轉切換頭部偏移設置
 * @param id
 */
 private void setTab(int id) {
 RadioButton rbButton = (RadioButton) rg_.getChildAt(id);
 //設置標題被點擊
 rbButton.setChecked(true);
 //偏移設置
 int left = rbButton.getLeft();
 int width = rbButton.getMeasuredWidth();
 DisplayMetrics metrics = new DisplayMetrics();
 getActivity().getWindowManager().getDefaultDisplay().getMetrics(metrics);
 int screenWidth = metrics.widthPixels;
 //移動距離= 左邊的位置 + button寬度的一半 - 屏幕寬度的一半
 int len = left + width / 2 - screenWidth / 2;
 //移動
 hv_.smoothScrollTo(len, 0);
 }
}
其中有兩個數據類和一個碎片類
數據類
HTab.java
package com.gjn.mynavigation;

/***
 * 頭部Tab屬性
 *
 */
public class HTab {
 private String name;

 public HTab(String name) {
 super();
 this.setName(name);
 }

 public String getName() {
 return name;
 }

 public void setName(String name) {
 this.name = name;
 }

}
HTabDb.java
package com.gjn.mynavigation;

import java.util.ArrayList;
import java.util.List;

public class HTabDb {
 private static final List<HTab> Selected = new ArrayList<HTab>();
 static{
 Selected.add(new HTab("今日"));
 Selected.add(new HTab("頭條"));
 Selected.add(new HTab("娛樂"));
 Selected.add(new HTab("財經"));
 Selected.add(new HTab("軍事"));
 Selected.add(new HTab("科技"));
 Selected.add(new HTab("時尚"));
 Selected.add(new HTab("體育"));
 }
 /***
 * 獲得頭部tab的所有項
 */
 public static List<HTab> getSelected() {
 return Selected;
 }

}
碎片類
OneFm1.java
 package com.gjn.mynavigation;

import android.os.Bundle;
import android.support.annotation.Nullable;
import android.support.v4.app.Fragment;
import android.view.LayoutInflater;
import android.view.View;
import android.view.ViewGroup;
import android.widget.TextView;

public class OneFm1 extends Fragment {

 private String name;

 @Override
 public void setArguments(Bundle args) {
 name = args.getString("name");
 }

 @Override
 public View onCreateView(LayoutInflater inflater,
 @Nullable ViewGroup container, @Nullable Bundle savedInstanceState) {
 View view = inflater.inflate(R.layout.fragment, container,false);
 ((TextView) view.findViewById(R.id.fm_text)).setText(name);
 return view;
 }

}
這樣就把頂部的導航欄加入到了第一個fragment裡面並且實現了切換功能
最後把fragment.xml貼下,就是每個碎片最默認的顯示頁面罷了
<?xml version="1.0" encoding="utf-8"?>
<LinearLayout xmlns:android="http://schemas.android.com/apk/res/android"
 android:layout_width="match_parent"
 android:layout_height="match_parent"
 android:gravity="center"
 android:orientation="vertical" >

 <TextView
 android:id="@+id/fm_text"
 android:layout_width="wrap_content"
 android:layout_height="wrap_content"
 android:text="Large Text"
 android:textAppearance="?android:attr/textAppearanceLarge" />

</LinearLayout>
總結:
算是一個筆記記錄吧!一段時間沒更新了,由於剛畢業斷了一個時間,走走停停留下一些自己的記錄,就怕自己以後要寫忘了。
下載地址:點擊打開鏈接
以上就是本文的全部內容,希望對大家的學習有所幫助,也希望大家多多支持本站。
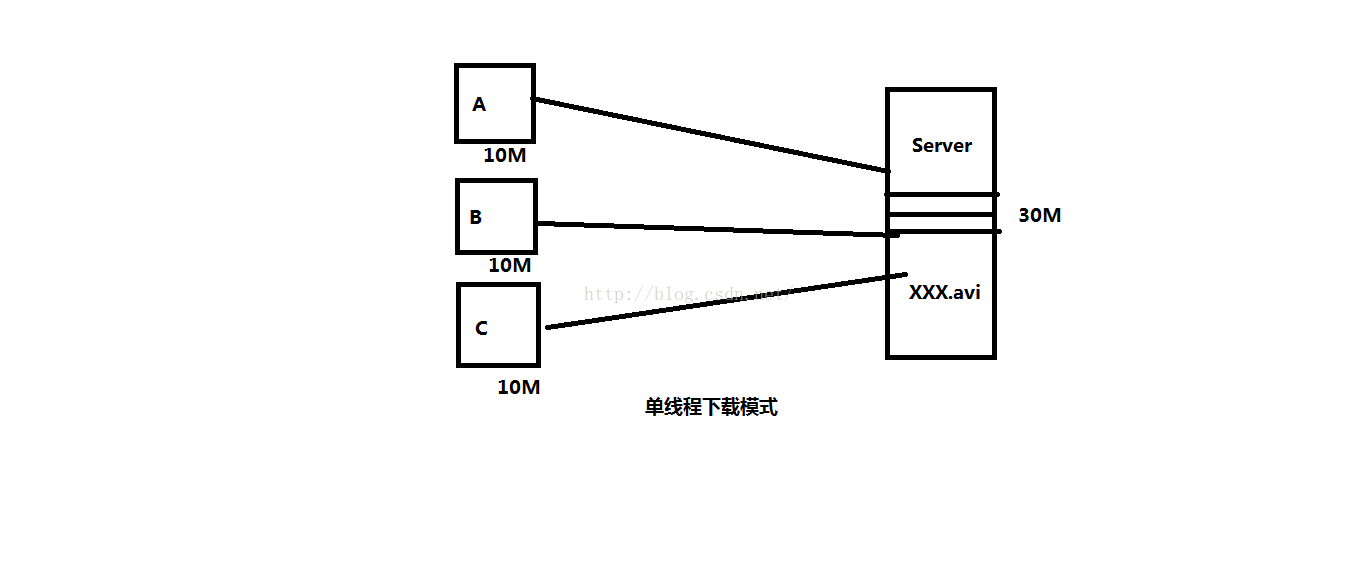 淺談Android和java中的多線程下載
為什麼要使用多線程下載呢?究其原因就一個字:"快",使用多線程下載的速度遠比單線程的下載速度要快,說到下載速度,決定下載速度的因素一般有兩個:一個是客
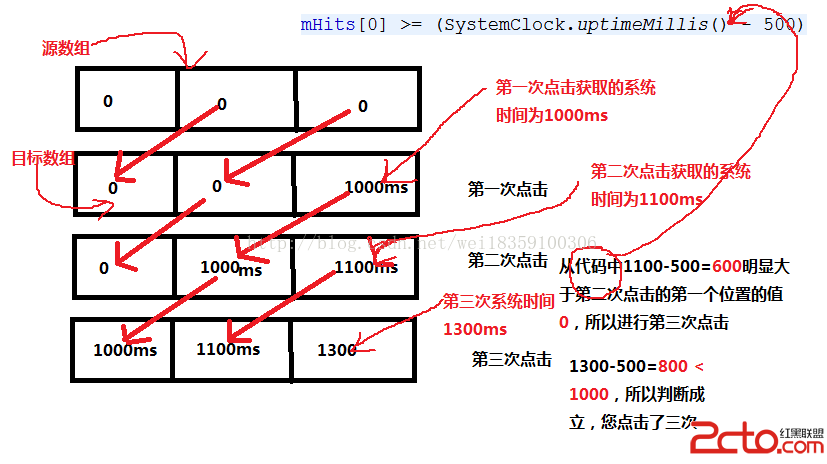 android實現雙擊事件暨多擊事件詳解
最近在多擊事件上稍微研究了下,在此做簡要分析,供大家吐槽參考 方法一: 將兩次點擊的時間間隔小於0.5s的默認為雙擊事件 m
 android源碼解析(二十八)--)電源開關機按鍵事件流程
前面我們講解了系統截屏按鍵處理流程,HOME按鍵處理流程,今天再來講解一下電源開關機按鍵事件流程,當然這也是系統按鍵處理流程方面的最後一篇博客了。和截屏按鍵、HOME按鍵
 Reveal-加載利用全局斷點
在網上搜怎麼加載Reveal的,好多都是利用Reveal.frameWork來拖進工程裡面,這樣很不方便,每次更換新工程都要這樣做,這裡給大家講解一個利用配置一個全局斷點