編輯:關於Android編程
一、前言
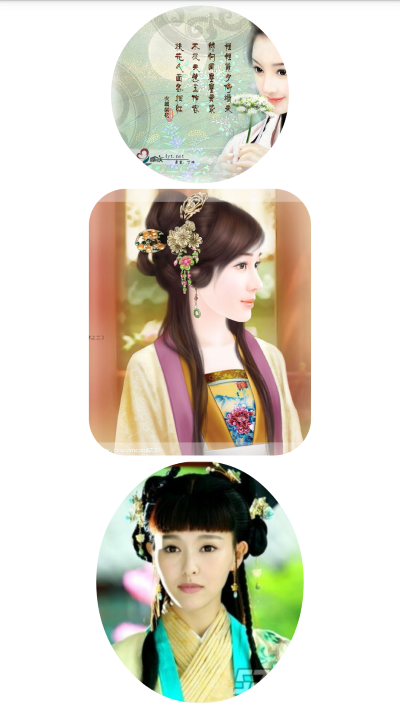
Android實現圓角矩形,圓形或者橢圓等圖形,一般主要是個自定義View加上使用Xfermode實現的。實現圓角圖片的方法其實不少,常見的就是利用Xfermode,Shader。本文直接繼承ImageView,使用BitmapShader方法來實現圓形、圓角和橢圓的繪制,等大家看我本文的方法後,其他的類似形狀也就都能舉一反三來來畫出來了。
二、效果圖:
三、BitmapShader簡介
BitmapShader是Shader的子類,可以通過Paint.setShader(Shader shader)進行設置、
我們這裡只關注BitmapShader,構造方法:
mBitmapShader = new BitmapShader(bitmap, TileMode.CLAMP, TileMode.CLAMP);
參數1:bitmap
參數2,參數3:TileMode;
TileMode的取值有三種:
CLAMP 拉伸
REPEAT 重復
MIRROR 鏡像
如果大家給電腦屏幕設置屏保的時候,如果圖片太小,可以選擇重復、拉伸、鏡像;
重復:就是橫向、縱向不斷重復這個bitmap
鏡像:橫向不斷翻轉重復,縱向不斷翻轉重復;
拉伸:這個和電腦屏保的模式應該有些不同,這個拉伸的是圖片最後的那一個像素;橫向的最後一個橫行像素,不斷的重復,縱項的那一列像素,不斷的重復;
public BitmapShader(Bitmap bitmap,Shader.TileMode tileX,Shader.TileMode tileY)
調用這個方法來產生一個畫有一個位圖的渲染器(Shader)。
bitmap 在渲染器內使用的位圖
tileX The tiling mode for x to draw the bitmap in. 在位圖上X方向花磚模式
tileY The tiling mode for y to draw the bitmap in. 在位圖上Y方向花磚模式
TileMode:(一共有三種)
CLAMP :如果渲染器超出原始邊界范圍,會復制范圍內邊緣染色。
REPEAT :橫向和縱向的重復渲染器圖片,平鋪。
MIRROR :橫向和縱向的重復渲染器圖片,這個和REPEAT 重復方式不一樣,他是以鏡像方式平鋪。
四、自定義圓形、圓角和橢圓的圖片View的實現
1. 測量View的大小
@Override
 protected void onMeasure(int widthMeasureSpec, int heightMeasureSpec) {
  // TODO Auto-generated method stub
  super.onMeasure(widthMeasureSpec, heightMeasureSpec);
  // 如果是繪制圓形,則強制寬高大小一致
  if (mType == TYPE_CIRCLE) {
   mWidth = Math.min(getMeasuredWidth(), getMeasuredHeight());
   mRadius = mWidth / 2;
   setMeasuredDimension(mWidth, mWidth);
  }

 }
2、設置BitmapShader和畫筆Paint
/**
  * 設置BitmapShader
  */
 private void setBitmapShader() {
  Drawable drawable = getDrawable();
  if (null == drawable) {
   return;
  }
  Bitmap bitmap = drawableToBitmap(drawable);
  // 將bitmap作為著色器來創建一個BitmapShader
  mBitmapShader = new BitmapShader(bitmap, TileMode.CLAMP, TileMode.CLAMP);
  float scale = 1.0f;
  if (mType == TYPE_CIRCLE) {
   // 拿到bitmap寬或高的小值
   int bSize = Math.min(bitmap.getWidth(), bitmap.getHeight());
   scale = mWidth * 1.0f / bSize;

  } else if (mType == TYPE_ROUND || mType == TYPE_OVAL) {
   // 如果圖片的寬或者高與view的寬高不匹配,計算出需要縮放的比例;縮放後的圖片的寬高,一定要大於我們view的寬高;所以我們這裡取大值;
   scale = Math.max(getWidth() * 1.0f / bitmap.getWidth(), getHeight() * 1.0f / bitmap.getHeight());
  }
  // shader的變換矩陣,我們這裡主要用於放大或者縮小
  mMatrix.setScale(scale, scale);
  // 設置變換矩陣
  mBitmapShader.setLocalMatrix(mMatrix);
  mPaint.setShader(mBitmapShader);

 }
3.最後就是繪制出來圓角、圓形和橢圓的圖片,肯定在onDraw裡面啦,根本原理就是使用了上面mBitmapShader渲染的畫筆來繪制
@Override
 protected void onDraw(Canvas canvas) {

  if (null == getDrawable()) {
   return;
  }
  setBitmapShader();
  if (mType == TYPE_CIRCLE) {
   canvas.drawCircle(mRadius, mRadius, mRadius, mPaint);
  } else if (mType == TYPE_ROUND) {
   mPaint.setColor(Color.RED);
   canvas.drawRoundRect(mRect, mRoundRadius, mRoundRadius, mPaint);
  }else if(mType == TYPE_OVAL){
   canvas.drawOval(mRect, mPaint);
  }
 }
五、視圖布局實現
這個很簡單,就是3個自定義的view:
<ScrollView xmlns:android="http://schemas.android.com/apk/res/android"
 xmlns:tools="http://schemas.android.com/tools"
 android:layout_width="match_parent"
 android:layout_height="match_parent"
 tools:context=".MainActivity" >

 <LinearLayout
  android:layout_width="match_parent"
  android:layout_height="wrap_content"
  android:gravity="center_horizontal"
  android:layout_marginTop="5dp"
  android:layout_marginBottom="25dp"
  android:orientation="vertical" >

  <com.czm.viewdrawtest.XCRoundAndOvalImageView
   android:id="@+id/cicleImageView"
   android:layout_width="200dp"
   android:layout_height="200dp"
   android:src="@drawable/img1" />

  <com.czm.viewdrawtest.XCRoundAndOvalImageView
   android:id="@+id/roundRectImageView"
   android:layout_width="200dp"
   android:layout_height="240dp"
   android:layout_marginTop="5dp"
   android:src="@drawable/img2" />

  <com.czm.viewdrawtest.XCRoundAndOvalImageView
   android:id="@+id/ovalImageView"
   android:layout_width="wrap_content"
   android:layout_height="wrap_content"
   android:layout_marginTop="5dp"
   android:src="@drawable/img3" />
 </LinearLayout>

</ScrollView>
六、使用和測試自定義View
上面直接繪制的自定義View寫完了,下面就是使用這個View了,使用方法和普通的ImageView一樣,當作普通控件使用即可。
package com.czm.viewdrawtest;


import android.app.Activity;
import android.os.Bundle;
import android.view.Window;
import android.view.WindowManager;
/**
 * 使用自定義ImageView
 * @author caizhiming
 *
 */
public class MainActivity extends Activity {

 private XCRoundAndOvalImageView circleImageView;//圓形圖片
 private XCRoundAndOvalImageView roundRectImageView;//圓角矩形圖片
 private XCRoundAndOvalImageView ovalImageView;//橢圓圖片
 @Override
 protected void onCreate(Bundle savedInstanceState) {
  super.onCreate(savedInstanceState);
  //設置無標題
  requestWindowFeature(Window.FEATURE_NO_TITLE);
  //設置全屏
  getWindow().setFlags(WindowManager.LayoutParams.FLAG_FULLSCREEN,
    WindowManager.LayoutParams.FLAG_FULLSCREEN);
  setContentView(R.layout.activity_main);

  initViews();
 }
 /**
  * 初始化Views
  */
 private void initViews(){
  circleImageView = (XCRoundAndOvalImageView)findViewById(R.id.cicleImageView);
  roundRectImageView = (XCRoundAndOvalImageView)findViewById(R.id.roundRectImageView);
  ovalImageView = (XCRoundAndOvalImageView)findViewById(R.id.ovalImageView);

  roundRectImageView.setType(XCRoundAndOvalImageView.TYPE_ROUND);
  roundRectImageView.setRoundRadius(100);

  ovalImageView.setType(XCRoundAndOvalImageView.TYPE_OVAL);
  ovalImageView.setRoundRadius(50);

 }
}
七、總結
以上就是本文的全部內容,希望這篇文章的內容對大家開發Android能有所幫助。
 Android EventBus3.0使用及源碼解析
叨了個叨最近因為換工作的一些瑣事搞的我一個頭兩個大,也沒怎麼去學新東西,實在是有些愧疚。新項目用到了EventBus3.0,原來只是聽說EventBus的鼎鼎大名,一直沒
 Android初級教程小案例之單選框RadioGroup與復選框CheckBox
Android裡面的單選框和html中的其實是一樣的效果。這裡用到兩個控件:CheckBox和RadioGroup。直接上代碼:radio.xml布局文件:
 Android 多渠道打包:使用Gradle和Android Studio
Gradle,這個東西好復雜,不過在Android中,我們知道它大概怎麼用,它的依據何來,就夠了。 build.gradle
 Android NDK學習筆記15-配置AndroidStudio
現在大家越來越多的使用AndroidStudio進行Android開發,那麼今天就和大家一起交流一下AndroidStudio開發NDK的配置方法。AndroidStud