編輯:關於Android編程
Android Service 詳細介紹:
1、Service的概念
2、Service的生命周期
3、實例:控制音樂播放的Service
一、Service的概念
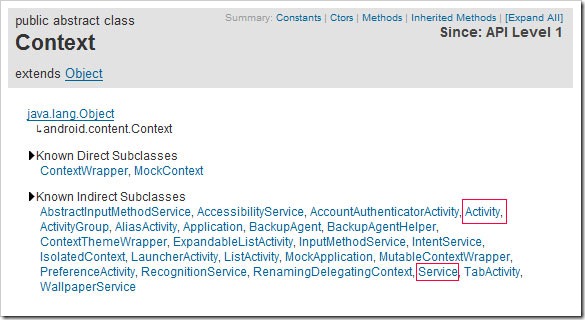
Service是Android程序中四大基礎組件之一,它和Activity一樣都是Context的子類,只不過它沒有UI界面,是在後台運行的組件。
二、Service的生命周期
Service對象不能自己啟動,需要通過某個Activity、Service或者其他Context對象來啟動。啟動的方法有兩種,Context.startService和Context.bindService()。兩種方式的生命周期是不同的,具體如下所示。
Context.startService方式的生命周期:
啟動時,startService –> onCreate() –> onStart()
停止時,stopService –> onDestroy()
Context.bindService方式的生命周期:
綁定時,bindService -> onCreate() –> onBind()
解綁定時,unbindService –>onUnbind() –> onDestory()
三、實例:控制音樂播放的Service
下面我們用一個可以控制在後台播放音樂的例子來演示剛才所學知識,同學們可以通過該例子可以明顯看到通過綁定方式運行的Service在綁定對象被銷毀後也被銷毀了。
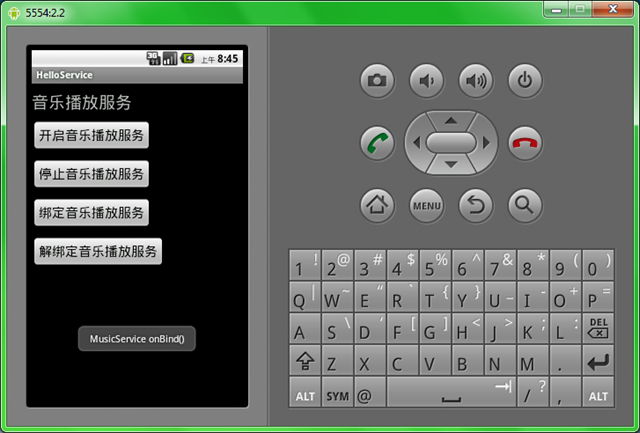
下面把代碼分享如下:
1、建立一個新項目名字叫 Lesson14_HelloService,Activity起名叫MainHelloService.java
2、res/layout/main.xml中代碼寫成
< ?xml version="1.0" encoding="utf-8"?>
<linearlayout xmlns:android="http://schemas.android.com/apk/res/android" android:orientation="vertical" android:layout_width="fill_parent" android:layout_height="fill_parent">
<textview android:layout_width="fill_parent" android:layout_height="wrap_content" android:text="音樂播放服務" android:textsize="25sp" android:layout_margintop="10dp">
<button android:text="開啟音樂播放服務" android:textsize="20sp" android:id="@+id/Button01" android:layout_width="wrap_content" android:layout_height="wrap_content" android:layout_margintop="10dp">
</button>
<button android:text="停止音樂播放服務" android:textsize="20sp" android:id="@+id/Button02" android:layout_width="wrap_content" android:layout_height="wrap_content" android:layout_margintop="10dp">
</button>

<button android:text="綁定音樂播放服務" android:textsize="20sp" android:id="@+id/Button03" android:layout_width="wrap_content" android:layout_height="wrap_content" android:layout_margintop="10dp">
</button>
<button android:text="解綁定音樂播放服務" android:textsize="20sp" android:id="@+id/Button04" android:layout_width="wrap_content" android:layout_height="wrap_content" android:layout_margintop="10dp">
</button>
</textview></linearlayout>
3、在res目錄中建立一個raw目錄,並把一個音樂文件babayetu.mp3拷貝進來3、在Activity的同目錄新建一個service文件
MusicService.java
package android.basic.lesson14;

import android.app.Service;
import android.content.Intent;
import android.media.MediaPlayer;
import android.os.IBinder;
import android.util.Log;
import android.widget.Toast;

public class MusicService extends Service {

    //為日志工具設置標簽
    String tag ="MusicService";

    //定義音樂播放器變量
    MediaPlayer mPlayer;

    //其他對象通過bindService方法通知該Service時該方法會被調用
    @Override
    public IBinder onBind(Intent intent) {
        Toast.makeText(this,"MusicService onBind()",Toast.LENGTH_SHORT).show();
        Log.i(tag, "MusicService onBind()");
        mPlayer.start();
        return null;
    }

    //其他對象通過unbindService方法通知該Service時該方法會被調用
    @Override
    public boolean onUnbind(Intent intent){
        Toast.makeText(this, "MusicService onUnbind()", Toast.LENGTH_SHORT).show();
        Log.i(tag, "MusicService onUnbind()");
        mPlayer.stop();
        return false;
    }

    //該服務不存在需要被創建時被調用,不管startService()還是bindService()都會在啟動時調用該方法
    @Override
    public void onCreate(){
        Toast.makeText(this, "MusicService onCreate()", Toast.LENGTH_SHORT).show();
        //創建一個音樂播放器對象
        mPlayer=MediaPlayer.create(getApplicationContext(), R.raw.babayetu);
        //設置可以重復播放
        mPlayer.setLooping(true);
        Log.i(tag, "MusicService onCreate()");
    }

    //用startService方法調用該服務時,在onCreate()方法調用之後,會調用改方法
    @Override
    public void onStart(Intent intent,int startid){
        Toast.makeText(this,"MusicService onStart",Toast.LENGTH_SHORT).show();
        Log.i(tag, "MusicService onStart()");
        mPlayer.start();
    }

    //該服務被銷毀時調用該方法
    @Override
    public void onDestroy(){
        Toast.makeText(this, "MusicService onDestroy()", Toast.LENGTH_SHORT).show();
        mPlayer.stop();
        Log.i(tag, "MusicService onDestroy()");
    }
}
4、MainHelloService.java中的代碼:
package android.basic.lesson14;

import android.app.Activity;
import android.content.ComponentName;
import android.content.Context;
import android.content.Intent;
import android.content.ServiceConnection;
import android.os.Bundle;
import android.os.IBinder;
import android.util.Log;
import android.view.View;
import android.view.View.OnClickListener;
import android.widget.Button;
import android.widget.Toast;

public class MainHelloService extends Activity {

    //為日志工具設置標簽
    String tag = "MusicService";

  /** Called when the activity is first created. */
  @Override
  public void onCreate(Bundle savedInstanceState) {
    super.onCreate(savedInstanceState);
    setContentView(R.layout.main);

    //輸出Toast消息和日志記錄
        Toast.makeText(MainHelloService.this, "MainHelloService onCreate", Toast.LENGTH_SHORT).show();
        Log.i(tag, "MainHelloService onCreate");

    //定義組件對象
    Button b1= (Button)findViewById(R.id.Button01);
    Button b2= (Button)findViewById(R.id.Button02);
    Button b3= (Button)findViewById(R.id.Button03);
    Button b4= (Button)findViewById(R.id.Button04);

     //定義服務鏈接對象
     final ServiceConnection conn = new ServiceConnection(){

            @Override
            public void onServiceConnected(ComponentName name, IBinder service) {
                Toast.makeText(MainHelloService.this, "ServiceConnection onServiceConnected", Toast.LENGTH_SHORT).show();
                Log.i(tag, "ServiceConnection onServiceConnected");

            }

            @Override
            public void onServiceDisconnected(ComponentName name) {
                Toast.makeText(MainHelloService.this, "ServiceConnection onServiceDisconnected", Toast.LENGTH_SHORT).show();
                Log.i(tag, "ServiceConnection onServiceDisconnected");

            }};

        //定義點擊監聽器
    OnClickListener ocl= new OnClickListener(){

            @Override
            public void onClick(View v) {
                //顯示指定intent所指的對象是個Service
                Intent intent = new Intent(MainHelloService.this,android.basic.lesson14.MusicService.class);
                switch(v.getId()){
                case R.id.Button01:
                    //開始服務
                    startService(intent);
                    break;
                case R.id.Button02:
                    //停止服務
                    stopService(intent);
                    break;
                case R.id.Button03:
                    //綁定服務
                    bindService(intent,conn,Context.BIND_AUTO_CREATE);
                    break;
                case R.id.Button04:
                    //解除綁定
                    unbindService(conn);
                    break;
                }
            }
    };

    //綁定點擊監聽器
    b1.setOnClickListener(ocl);
    b2.setOnClickListener(ocl);
    b3.setOnClickListener(ocl);
    b4.setOnClickListener(ocl);

  }

  @Override
  public void onDestroy(){
      super.onDestroy();
        Toast.makeText(MainHelloService.this, "MainHelloService onDestroy", Toast.LENGTH_SHORT).show();
        Log.i(tag, "MainHelloService onDestroy");
  }
}
以上就是對Android Service的介紹,後續繼續補充相關資料,謝謝大家對本站的支持!
 從java到C解析Binder機制
Binder機制是一種C/S結構,主要包括三部分,分別為Client、Server、ServiceManager。ServiceManager是谷歌設計的,它是一段簡潔的
 Android Fragment應用實戰(音樂播放器界面)
當下很多手機應用都會有一個非常類似的功能,即屏幕的下方顯示一行Tab標簽選項,點擊不同的標簽就可以切換到不同的界面,如以下幾個應用所示:以上底部這四個標簽,每一個分別對應
 細說JVM系列:自動內存管理內存回收:垃圾收集理論-垃圾收集算法
這裡主要講解垃圾收集理論上的算法,下一篇會介紹一些實現了這些算法的垃圾收集器。一般我們談垃圾收集從三個問題來幫你理解jvm的垃圾收集策略:1.怎麼判斷哪些內存是垃圾?2.
 android 底部導航總結
實現android 底部導航的方式有好幾種如:fragment:、TabActivity、ViewGroup、viewPager等, 這裡介紹使用viewPager實現底