編輯:關於Android編程
一、表格布局 TableLayout
表格布局TableLayout以行列的形式管理子元素,每一行是一個TableRow布局對象,當然也可以是普通的View對象,TableRow離每放一個元素就是一列,總列數由列數最多的那一行決定。
我們看一個例子:
<?xml version=”1.0″ encoding=”utf-8″?>
<TableLayout android:id=”@+id/TableLayout01″
android:layout_width=”fill_parent” android:layout_height=”fill_parent”
android:stretchColumns=”0″ xmlns:android=”http://schemas.android.com/apk/res/android”><TableRow android:layout_width=”fill_parent”
android:layout_height=”20dip”>
<TextView android:text=”色彩透明度測試” android:textSize=”18dip”
android:layout_span=”2″ 合並兩列
android:layout_gravity=”center”
android:layout_width=”fill_parent” android:layout_height=”fill_parent”>
</TextView>
在看下顯示效果圖:
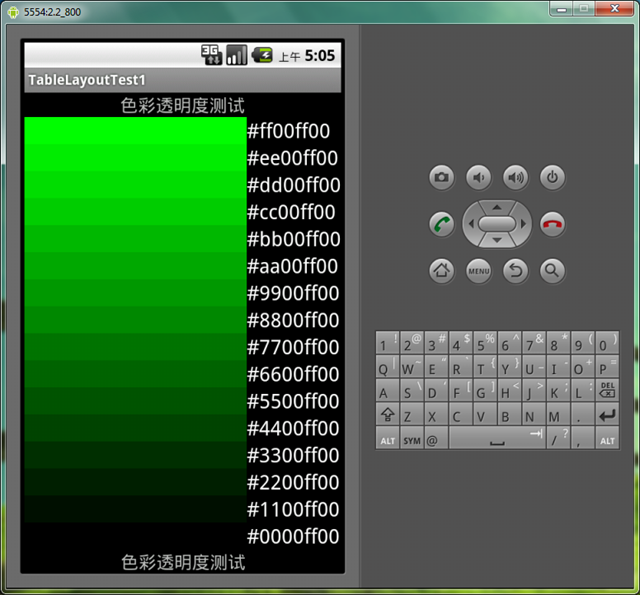
其中 android:stretchColumns=”0″ 作用是讓第一列可以擴展到所有可用空間;下面我們講一下TableLayout幾個重要的屬性:
可以用”*”來表示所有列,同一列可以同時設置為shrinkable和stretchable。
我們再舉一個例子來看一下:
<?xml version=”1.0″ encoding=”utf-8″?>
<TableLayout xmlns:android=”http://schemas.android.com/apk/res/android”
android:layout_width=”fill_parent”
android:layout_height=”fill_parent”
android:stretchColumns=”1″>  第二列自動伸展<TableRow>
<TextView
android:layout_column=”1″   我是第二列
android:text=”打開…”
android:padding=”3dip” /> 元素內容與邊界之間保留3dip的距離
<TextView
android:text=”Ctrl-O”
android:gravity=”right”
android:padding=”3dip” />
</TableRow><TableRow>
<TextView
android:layout_column=”1″
android:text=”保存…”
android:padding=”3dip” />
<TextView
android:text=”Ctrl-S”
android:gravity=”right” 元素本身的內容向右對齊
android:padding=”3dip” />
</TableRow><TableRow>
<TextView
android:layout_column=”1″
android:text=”另存為…”
android:padding=”3dip” />
<TextView
android:text=”Ctrl-Shift-S”
android:gravity=”right”
android:padding=”3dip” />
</TableRow><View
android:layout_height=”2dip”
android:background=”#FF909090″ /><TableRow>
<TextView
android:text=”X”
android:padding=”3dip” />
<TextView
android:text=”導入…”
android:padding=”3dip” />
</TableRow><TableRow>
<TextView
android:text=”X”
android:padding=”3dip” />
<TextView
android:text=”導出…”
android:padding=”3dip” />
<TextView
android:text=”Ctrl-E”
android:gravity=”right”
android:padding=”3dip” />
</TableRow><View
android:layout_height=”2dip”
android:background=”#FF909090″ /><TableRow>
<TextView
android:layout_column=”1″
android:text=”退出”
android:padding=”3dip” />
</TableRow>
</TableLayout>
下面是顯示效果圖:
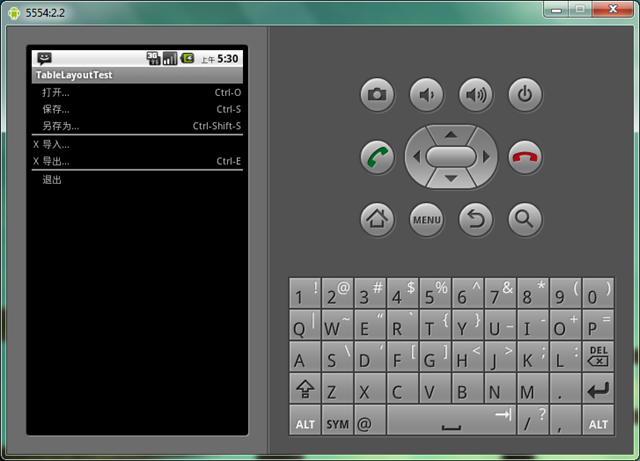
我加粗顯示的地方都有解釋,大家可以留意一下。
Tip:TableRow也是一個Layout,裡面的元素會水平排列,如果TableRow的父元素不是TableLayout的話,那麼他會表現的像一個LinearLayout。
以上就是Android TableLayout 布局的資料,後續繼續補充相關資料,謝謝大家對本站的支持!
 Android之Activity總結
1.Activity簡介Activity是Android一個非常重要的用戶接口(四大組件之一),是可見的,主要是用戶和應用程序之間進行交互的接口。在每個Activity中
 Android中使用RecyclerView實現下拉刷新和上拉加載
推薦閱讀:使用RecyclerView添加Header和Footer的方法
 Android Studio基礎設置和常用操作
熟練掌握開發工具的使用,可以提高我們的開發效率,減少很多工作量!首先介紹一些常用設置:一、代碼默認字體12,偏小,一般設置14: 二、窗口白色比較刺眼,系統有個
 Activity基礎篇整理
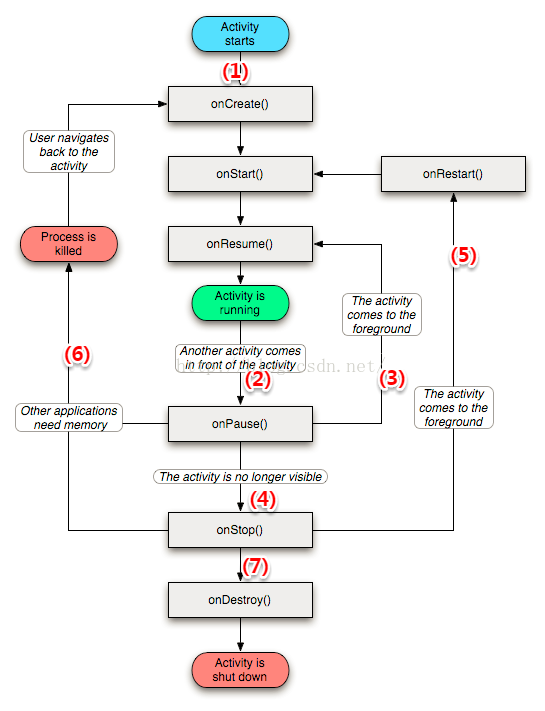
一,Activity生命周期相信不少朋友也已經看過這個流程圖了,也基本了解了Activity生命周期的幾個過程,我們就來說一說一些常見操作的生命周期執行情況吧(1) 啟動