編輯:關於Android編程
最近總是有人來和我說我以前寫的一個小app無法正常獲取數據~Android簡易版天氣預報app
今天就又運行了下來查找問題,發現或許是接口有限制吧,不能在多台手機使用同個apikey
然後,發現了我寫的代碼實在亂七八糟,界面也實在不好看,就又重寫了一遍,小小地修改了一遍,開發環境改為了Android Studio
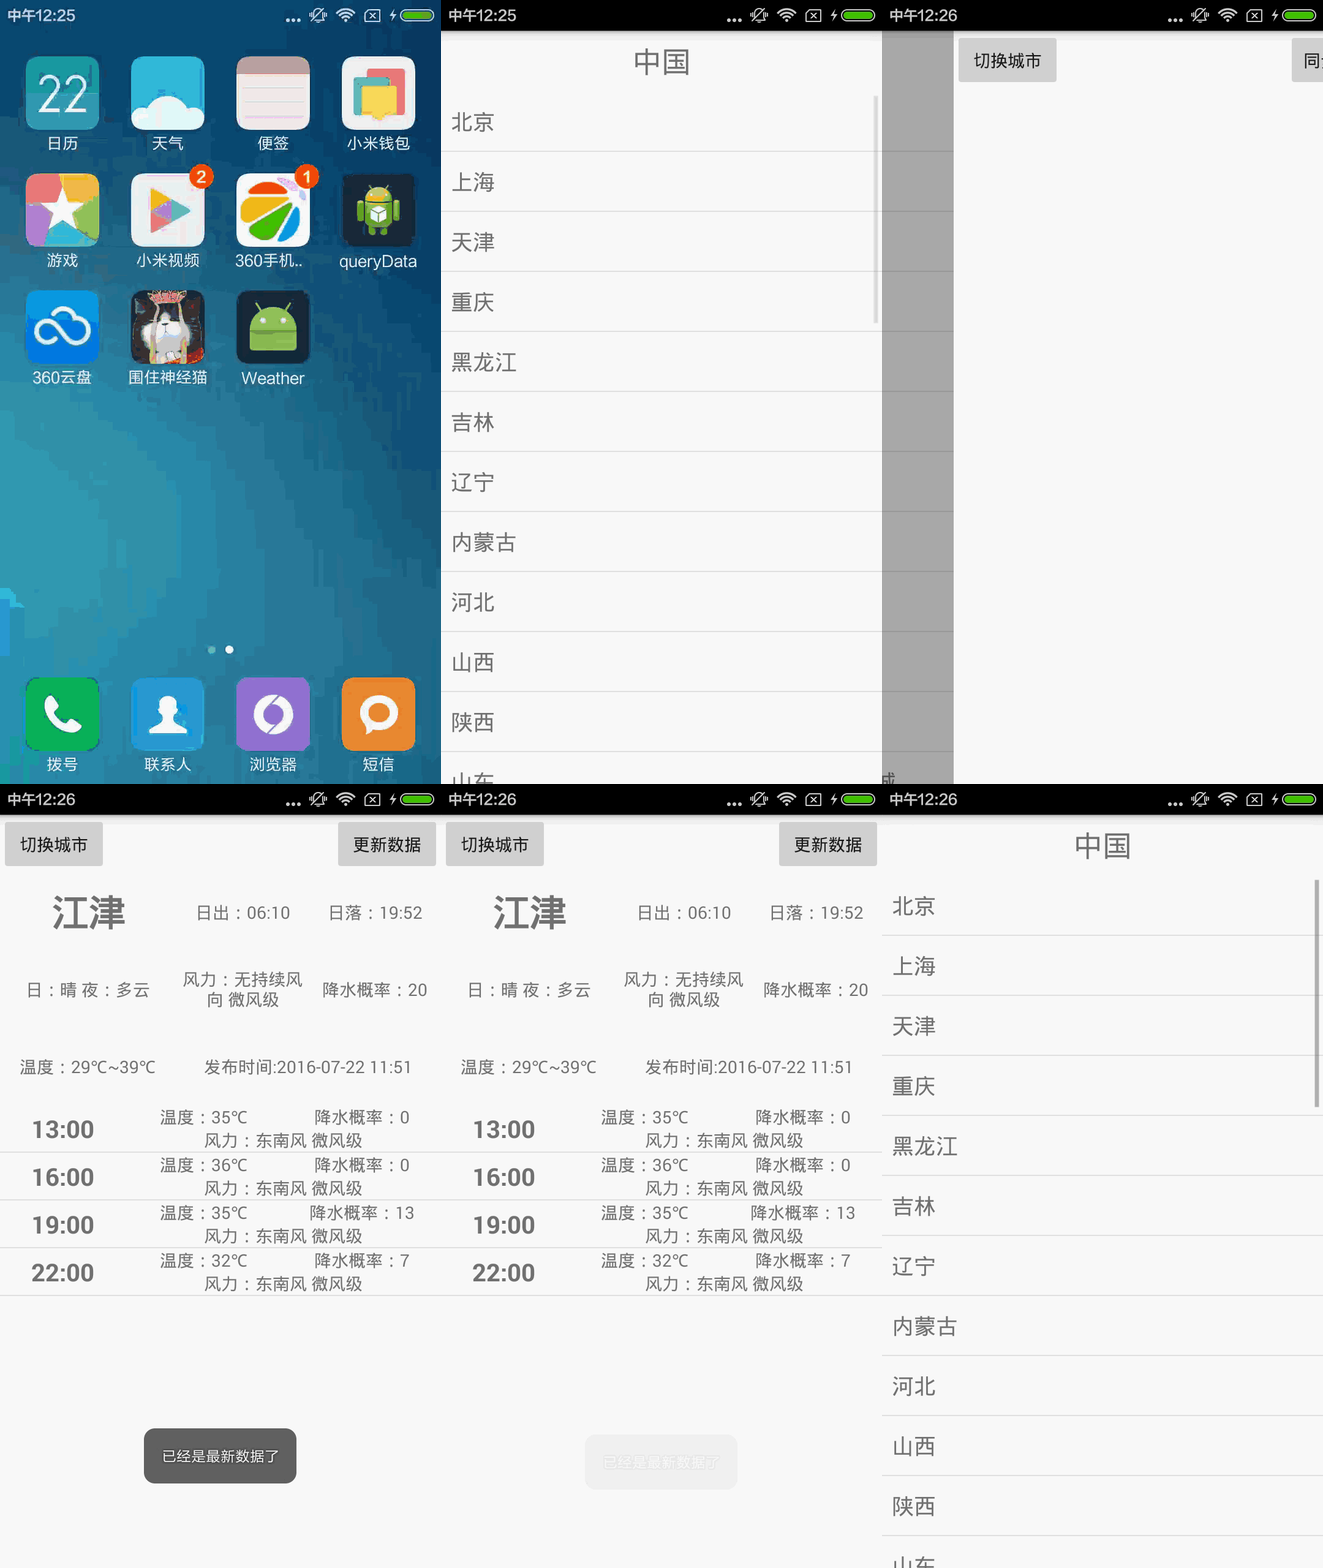
最終效果圖如下
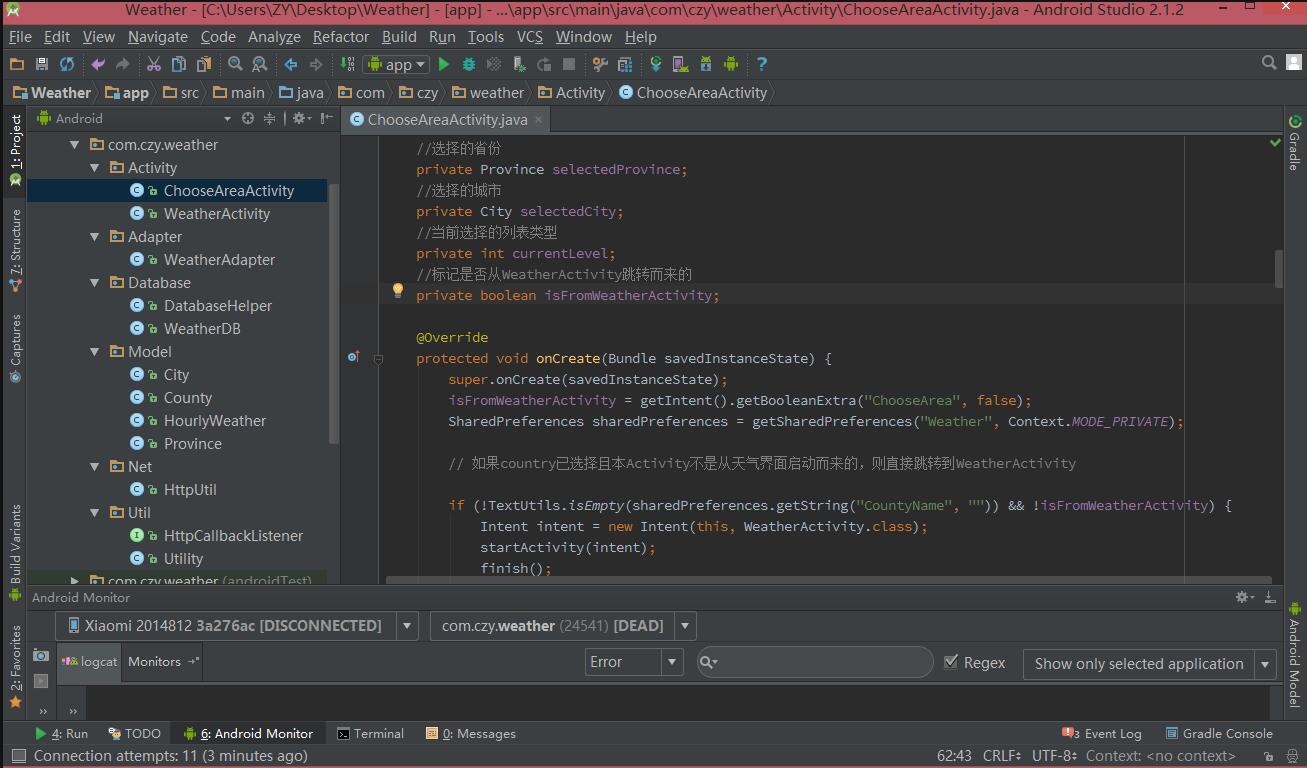
工程圖如下
一、獲取地區信息
做這麼一個天氣預報app,首先就要獲取到國內地區列表
(在我的另一篇博客有介紹:向任意網址發起數據請求)
中國天氣網開放有天氣預報接口,訪問“http://www.weather.com.cn/data/list3/city.xml”就可以獲取到國內省份列表以及其代號了
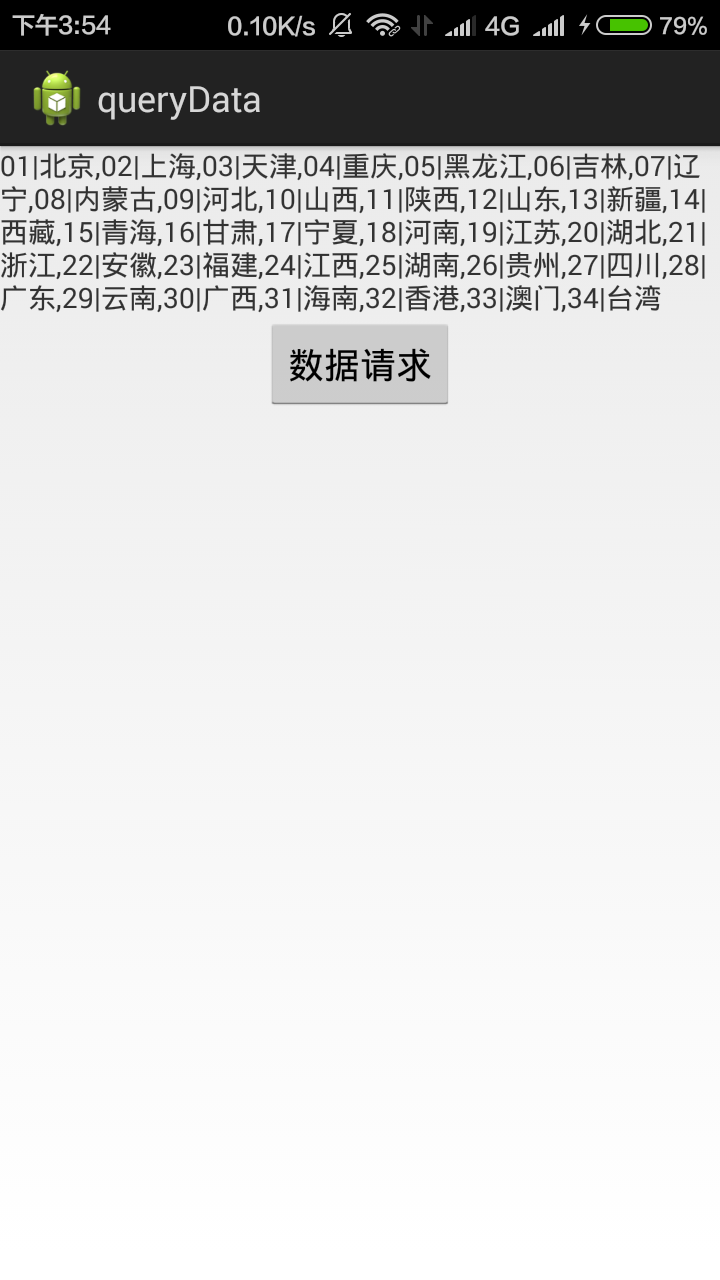
如果想要獲取廣東省下的城市列表,由上圖可知廣東省的代號為28,則接口地址是 “http://www.weather.com.cn/data/list3/city28.xml”,獲取到的城市列表及代號如下:
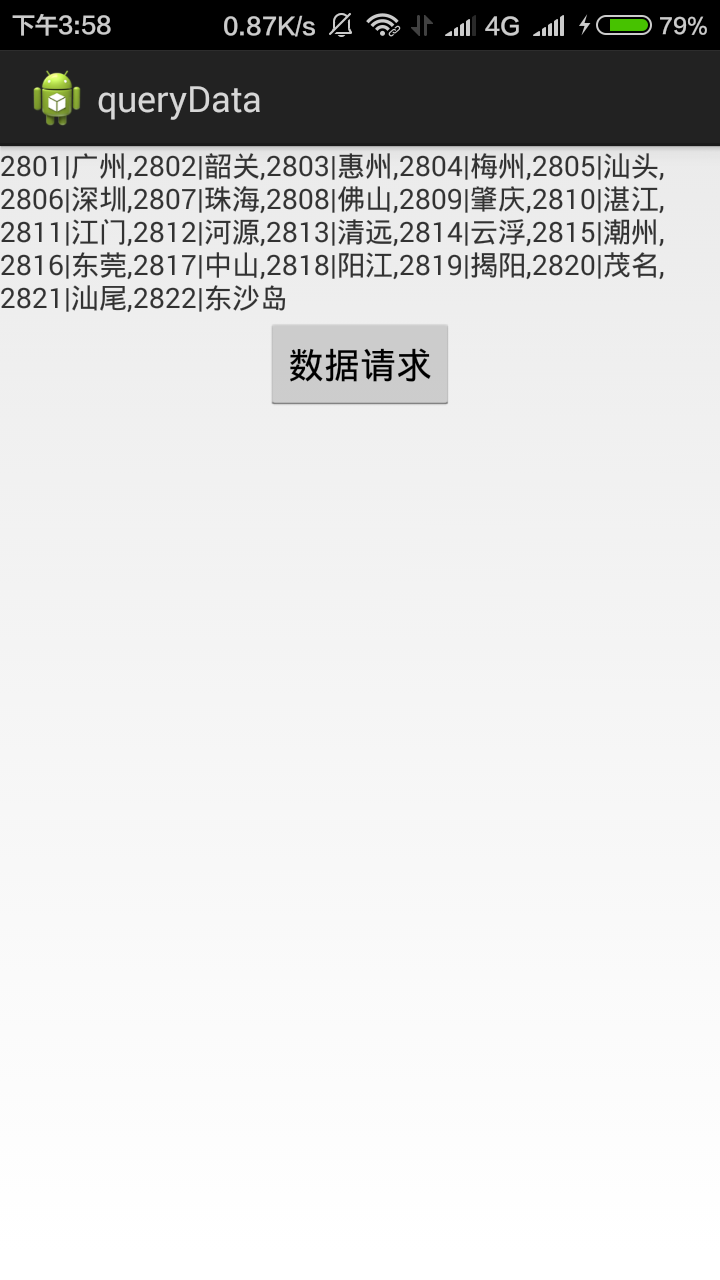
依次類推還可以獲取到更加詳細的地區信息,這樣就完成了開頭部分
二、天氣信息的獲取
百度的APIStore擁有豐富的接口,涵蓋了生活的許多方面。例如,我們就可以通過APIStore的某個接口獲取到含有天氣信息的JSON數據,從而實現天氣預報功能
(在我的另一篇博客有介紹:獲取含天氣信息的JSON數據)
首先,使用者要有一個百度賬號,然後登陸以下網址:中國和世界天氣預報
該接口是免費的,不過因此也就不夠穩定,我在調試的時候就經常出錯
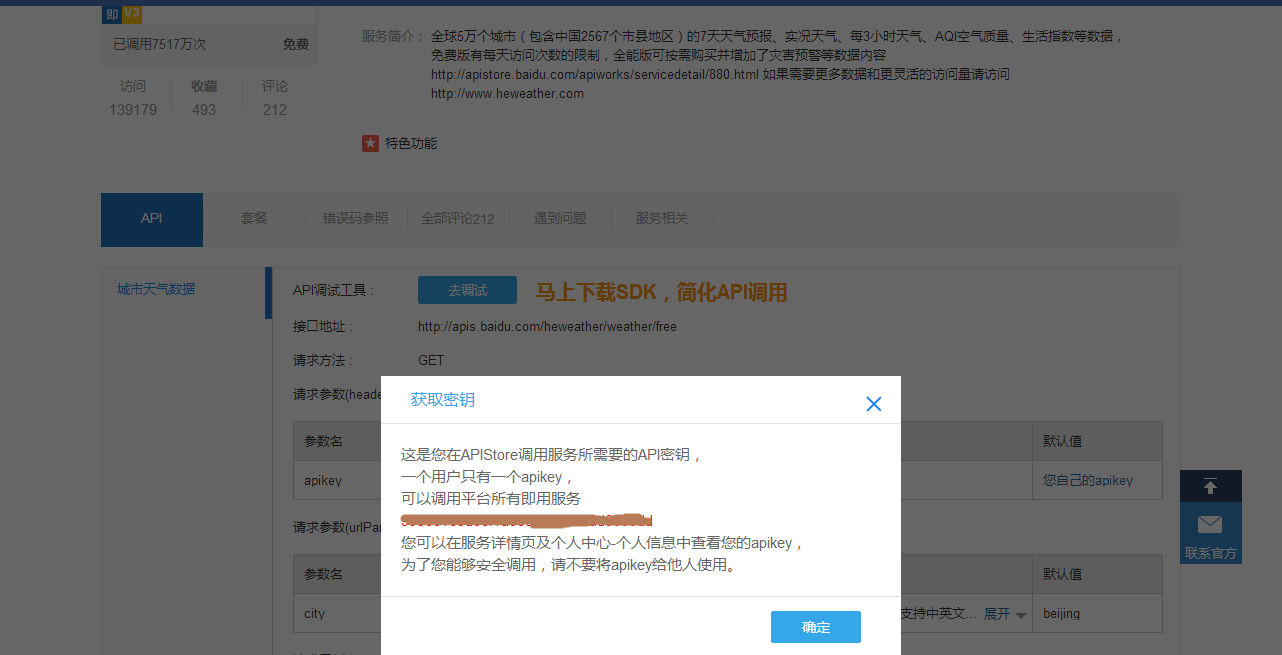
然後在API選項下點擊“您自己的apikey”,查看自己的apikey。該值是每個開發者和app的唯一標識,需要妥善保管,有了apikey才可以進行下一步的操作
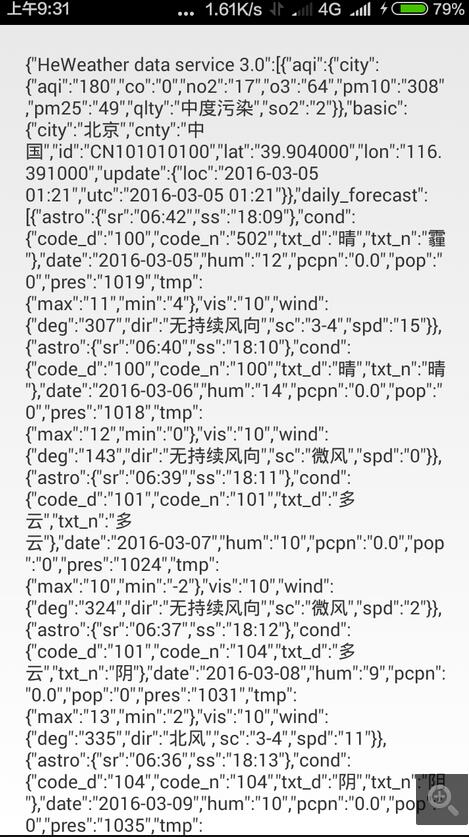
獲取到的天氣信息是JSON格式的,需要在程序中再來解析
三、數據庫的設計
地區列表這些信息一般都是固定不變的,所以我們可以把第一次聯網獲取到的數據存進數據庫裡,下次再次訪問時就從數據庫裡讀取即可
首先要設定四個Model,包括:省份、城市、縣、每小時天氣預測,用來承載數據
每個Model包括幾個屬性以及相應的get和set方法
例如,省份Province的設計如下所示,城市City和縣County的設計類似
/**
 * 省份
 */
public class Province {
 //省份名
 private String provinceName;
 //省份ID
 private String provinceId;

 public String getProvinceId() {
  return provinceId;
 }

 public String getProvinceName() {
  return provinceName;
 }

 public void setProvinceId(String provinceId) {
  this.provinceId = provinceId;
 }

 public void setProvinceName(String provinceName) {
  this.provinceName = provinceName;
 }
}
每小時天氣預測HourlyWeather的設計如下:
/**
 * Created by ZY on 2016/7/21.
 */
public class HourlyWeather {

 //預測時間
 private String time;
 //溫度
 private String temp;
 //降水概率
 private String pop;
 //風力
 private String wind;

 public HourlyWeather(String time, String temp, String pop, String wind) {
  this.time = time;
  this.temp = temp;
  this.pop = pop;
  this.wind = wind;
 }

 public String getTime() {
  return time;
 }

 public String getTemp() {
  return temp;
 }

 public String getPop() {
  return pop;
 }

 public String getWind() {
  return wind;
 }
}
然後,新建一個DatabaseHelper類繼承於SQLiteOpenHelper,用來建立三個數據庫表
public class DatabaseHelper extends SQLiteOpenHelper {

 private final String CREATE_PROVINCE = "create table Province ("
   + "provinceName text," + "provinceId text )";

 private final String CREATE_CITY = "create table City("
   + "cityName text," + "cityId text," + "provinceId text)";

 private final String CREATE_COUNTY = "create table County("
   + "countyName text," + "countyId text," + "cityId text)";

 public DatabaseHelper(Context context, String DbName,
       CursorFactory factory, int version) {
  super(context, DbName, factory, version);
 }

 @Override
 public void onCreate(SQLiteDatabase db) {
  db.execSQL(CREATE_PROVINCE);
  db.execSQL(CREATE_CITY);
  db.execSQL(CREATE_COUNTY);
 }

 @Override
 public void onUpgrade(SQLiteDatabase db, int oldVersion, int newVersion) {

 }

}
然後,再建立一個WeatherDB類,用來進行實際的數據庫操作,包括存取省份信息、城市信息、縣信息等
需要注意的是,因為每個城市都是包含在某個省份下的,所以查詢某個省份下的所有城市列表,需要將省份的ID傳入作為唯一標識
public class WeatherDB {

 private final String DataBaseName = "ZyWeather";

 private final int VERSION = 1;

 private SQLiteDatabase database;

 private static WeatherDB weatherDB;

 private WeatherDB(Context context) {
  DatabaseHelper dataBaseHelper = new DatabaseHelper(context,
    DataBaseName, null, VERSION);
  database = dataBaseHelper.getWritableDatabase();
 }

 //獲取實例
 public static WeatherDB getInstance(Context context) {
  if (weatherDB == null) {
   weatherDB = new WeatherDB(context);
  }
  return weatherDB;
 }

 //保存省份信息
 public void saveProvinces(List<Province> provinceList) {
  if (provinceList != null && provinceList.size() > 0) {
   ContentValues values = new ContentValues();
   for (int i = 0; i < provinceList.size(); i++) {
    values.put("provinceName", provinceList.get(i).getProvinceName());
    values.put("provinceId", provinceList.get(i).getProvinceId());
    database.insert("Province", null, values);
    values.clear();
   }
  }
 }

 //保存城市信息
 public void saveCities(List<City> cityList) {
  if (cityList != null && cityList.size() > 0) {
   ContentValues values = new ContentValues();
   for (int i = 0; i < cityList.size(); i++) {
    values.put("cityName", cityList.get(i).getCityName());
    values.put("cityId", cityList.get(i).getCityId());
    values.put("provinceId", cityList.get(i).getProvinceId());
    database.insert("City", null, values);
    values.clear();
   }
  }
 }

 //保存鄉村信息
 public void saveCounties(List<County> countyList) {
  if (countyList != null && countyList.size() > 0) {
   ContentValues values = new ContentValues();
   for (int i = 0; i < countyList.size(); i++) {
    values.put("countyName", countyList.get(i).getCountyName());
    values.put("countyId", countyList.get(i).getCountyId());
    values.put("cityId", countyList.get(i).getCityId());
    database.insert("County", null, values);
    values.clear();
   }
  }
 }

 //返回所有省份信息
 public List<Province> getAllProvince() {
  Cursor cursor = database.query("Province", null, null, null, null, null, null);
  List<Province> list = new ArrayList<>();
  Province province;
  if (cursor.moveToFirst()) {
   do {
    province = new Province();
    province.setProvinceName(cursor.getString(cursor.getColumnIndex("provinceName")));
    province.setProvinceId(cursor.getString(cursor.getColumnIndex("provinceId")));
    list.add(province);
   } while (cursor.moveToNext());
  }
  return list;
 }

 //返回指定省份下的所有城市
 public List<City> getAllCity(String provinceId) {
  List<City> list = new ArrayList<>();
  City city;
  Cursor cursor = database.query("City", null, "provinceId = ?", new String[]{provinceId}, null, null, null);
  if (cursor.moveToFirst()) {
   do {
    city = new City();
    city.setCityName(cursor.getString(cursor.getColumnIndex("cityName")));
    city.setCityId(cursor.getString(cursor.getColumnIndex("cityId")));
    city.setProvinceId(provinceId);
    list.add(city);
   } while (cursor.moveToNext());
  }
  return list;
 }

 //返回指定城市下的所有鄉村
 public List<County> getAllCountry(String cityId) {
  List<County> list = new ArrayList<>();
  Cursor cursor = database.query("County", null, "cityId=?", new String[]{cityId}, null, null, null);
  County county;
  if (cursor.moveToFirst()) {
   do {
    county = new County();
    county.setCountyName(cursor.getString(cursor.getColumnIndex("countyName")));
    county.setCountyId(cursor.getString(cursor.getColumnIndex("countyId")));
    county.setCityId(cityId);
    list.add(county);
   } while (cursor.moveToNext());
  }
  return list;
 }

}
四、聯網操作
整個app用同一個函數來完成各種數據數據操作,該函數包含在HttpUtil類下,為靜態函數
當中需要填入自己申請的apikey,該key僅在獲取天氣信息時有用,在獲取地區信息時是不需要的,這裡只是為了簡便,所以就一起寫上了
public class HttpUtil {

 public static void sendHttpRequest(final String address, final HttpCallbackListener listener) {
  new Thread(new Runnable() {
   public void run() {
    HttpURLConnection connection = null;
    try {
     URL url = new URL(address);
     connection = (HttpURLConnection) url.openConnection();
     connection.setRequestMethod("GET");
     connection.setConnectTimeout(8000);
     connection.setReadTimeout(8000);
     connection.setRequestProperty("apikey", "填入自己的apikey");
     connection.connect();
     InputStream inputStream = connection.getInputStream();
     InputStreamReader inputStreamReader = new InputStreamReader(inputStream, "UTF-8");
     BufferedReader bufferedReader = new BufferedReader(inputStreamReader);
     StringBuilder response = new StringBuilder();
     String line;
     while ((line = bufferedReader.readLine()) != null) {
      response.append(line);
     }
     if (listener != null) {
      listener.onFinish(response.toString());
     }
    } catch (Exception e) {
     if (listener != null) {
      listener.onError(e);
     }
    } finally {
     if (connection != null) {
      connection.disconnect();
     }
    }
   }
  }).start();
 }
}
五、工具類
在聯網訪問數據成功或失敗後,都需要通過回調方法進行數據處理,所以需要設定一個接口HttpCallbackListener
public interface HttpCallbackListener {

 void onFinish(String response);

 void onError(Exception e);

}
此外,使用HttpUtil 類獲取到地區信息後,因為數據包含一些分隔符,無法直接存入數據庫,而且獲取到的天氣信息也是JSON格式的,也需要進行數據解析,所以還需要有一個Utility類用來進行數據處理
public class Utility {

 // 保存服務器返回的省級數據
 public static boolean saveProvincesResponse(WeatherDB weatherDB, String response) {
  if (!TextUtils.isEmpty(response)) {
   String[] allProvinces = response.split(",");
   if (allProvinces != null && allProvinces.length > 0) {
    Province province;
    List<Province> provinceList = new ArrayList<>();
    for (String p : allProvinces) {
     String[] array = p.split("\\|");
     province = new Province();
     province.setProvinceId(array[0]);
     province.setProvinceName(array[1]);
     provinceList.add(province);
    }
    weatherDB.saveProvinces(provinceList);
    return true;
   }
  }
  return false;
 }

 // 保存服務器返回的市級數據
 public static boolean saveCitiesResponse(WeatherDB weatherDB, String response, String provinceId) {
  if (!TextUtils.isEmpty(response)) {
   String[] allCities = response.split(",");
   if (allCities != null && allCities.length > 0) {
    City city;
    List<City> cityList = new ArrayList<>();
    for (String c : allCities) {
     String[] array = c.split("\\|");
     city = new City();
     city.setCityId(array[0]);
     city.setCityName(array[1]);
     city.setProvinceId(provinceId);
     cityList.add(city);
    }
    weatherDB.saveCities(cityList);
    return true;
   }
  }
  return false;
 }

 // 保存服務器返回的縣級數據
 public static boolean saveCountiesResponse(WeatherDB weatherDB, String response, String cityId) {
  if (!TextUtils.isEmpty(response)) {
   String[] allCounties = response.split(",");
   if (allCounties != null && allCounties.length > 0) {
    County county;
    List<County> countyList = new ArrayList<>();
    for (String c : allCounties) {
     String[] array = c.split("\\|");
     county = new County();
     county.setCountyId(array[0]);
     county.setCountyName(array[1]);
     county.setCityId(cityId);
     countyList.add(county);
    }
    weatherDB.saveCounties(countyList);
    return true;
   }
  }
  return false;
 }

 // 處理服務器返回的json數據
 public static void handleWeatherResponse(Context context, String response) {
  try {
   JSONObject jsonobject = new JSONObject(response);
   JSONArray title = jsonobject.getJSONArray("HeWeather data service 3.0");
   JSONObject first_object = (JSONObject) title.get(0);

   JSONObject basic = (JSONObject) first_object.get("basic");

   //更新時間
   JSONObject update = (JSONObject) basic.get("update");
   JSONArray daily_forecast = (JSONArray) first_object.get("daily_forecast");
   JSONObject daily_forecast_first = (JSONObject) daily_forecast.get(0);
   JSONObject cond = (JSONObject) daily_forecast_first.get("cond");
   //溫度
   JSONObject temp = (JSONObject) daily_forecast_first.get("tmp");

   JSONObject astro = (JSONObject) daily_forecast_first.get("astro");

   JSONObject wind = (JSONObject) daily_forecast_first.get("wind");

   JSONArray hourly_forecast = (JSONArray) first_object.get("hourly_forecast");

   WeatherActivity.weatherList.clear();

   for (int i = 0; i < hourly_forecast.length(); i++) {
    JSONObject json = hourly_forecast.getJSONObject(i);
    JSONObject json_wind = (JSONObject) json.get("wind");
    String date = json.getString("date");
    String[] array = date.split(" ");
    String dir = json_wind.getString("dir");
    String sc = json_wind.getString("sc");
    String hourly_clock = array[1];
    String hourly_temp = "溫度:" + json.getString("tmp") + "℃";
    String hourly_pop = "降水概率:" + json.getString("pop");
    String hourly_wind = "風力:" + dir + " " + sc + "級";
    HourlyWeather weather = new HourlyWeather(hourly_clock, hourly_temp, hourly_pop, hourly_wind);
    WeatherActivity.weatherList.add(weather);
   }
   //日出
   String sunriseTime = astro.getString("sr");
   //日落
   String sunsetTime = astro.getString("ss");
   //白天天氣
   String dayWeather = cond.getString("txt_d");
   //夜晚天氣
   String nightWeather = cond.getString("txt_n");
   //風力
   String windText = wind.getString("dir") + " " + wind.getString("sc") + "級";
   //降水概率
   String pop = daily_forecast_first.getString("pop");
   //溫度
   String tempText = temp.getString("min") + "℃~" + temp.getString("max") + "℃";
   //更新時間
   String updateTime = update.getString("loc");
   //城市名
   String cityName = basic.getString("city");
   saveWeatherInfo(context, cityName, sunriseTime, sunsetTime, dayWeather, nightWeather, windText, pop, tempText, updateTime);
  } catch (Exception e) {
   e.printStackTrace();
  }
 }

 private static void saveWeatherInfo(Context context, String cityName,
          String sunriseTime, String sunsetTime, String dayWeather, String nightWeather,
          String windText, String pop, String tempText, String updateTime) {
  SharedPreferences.Editor editor = context.getSharedPreferences("Weather", Context.MODE_PRIVATE).edit();
  editor.putString("cityName", cityName);
  editor.putString("sunriseTime", sunriseTime);
  editor.putString("sunsetTime", sunsetTime);
  editor.putString("dayWeather", dayWeather);
  editor.putString("nightWeather", nightWeather);
  editor.putString("wind", windText);
  editor.putString("pop", pop);
  editor.putString("temp", tempText);
  editor.putString("updateTime", updateTime);
  editor.commit();
 }
}
六、適配器
由上邊的動態圖可以看到每小時的天氣預測信息,那是使用ListView呈現的,這就要為其提供一個適配器了
ListView使用的布局文件如下:
<?xml version="1.0" encoding="utf-8"?>
<LinearLayout xmlns:android="http://schemas.android.com/apk/res/android"
 android:layout_width="match_parent"
 android:layout_height="match_parent"
 android:orientation="horizontal">

 <!-- 時間 -->

 <TextView
  android:id="@+id/forecastTime"
  android:layout_width="0dp"
  android:layout_height="match_parent"
  android:layout_weight="2"
  android:gravity="center"
  android:textSize="20sp"
  android:text />

 <LinearLayout
  android:layout_width="0dp"
  android:layout_height="match_parent"
  android:layout_weight="5"
  android:orientation="vertical">

  <!-- 溫度 降水概率 -->

  <LinearLayout
   android:layout_width="match_parent"
   android:layout_height="0dp"
   android:layout_weight="1"
   android:gravity="center"
   android:orientation="horizontal">

   <!-- 溫度 -->

   <TextView
    android:id="@+id/forecastTemp"
    android:layout_width="0dp"
    android:layout_height="match_parent"
    android:layout_weight="1"
    android:gravity="center" />

   <!-- 下雨概率 -->

   <TextView
    android:id="@+id/forecastPop"
    android:layout_width="0dp"
    android:layout_height="match_parent"
    android:layout_weight="1"
    android:gravity="center" />
  </LinearLayout>

  <!-- 風力 -->

  <TextView
   android:id="@+id/forecastWind"
   android:layout_width="match_parent"
   android:layout_height="0dp"
   android:layout_weight="1"
   android:gravity="center" />
 </LinearLayout>

</LinearLayout>
然後新建一個WeatherAdapter繼承於ArrayAdapter< HourlyWeather>
只要重寫getView(int position, View convertView, ViewGroup parent)方法即可
public class WeatherAdapter extends ArrayAdapter<HourlyWeather> {

 private int resourceId;

 private Context context;

 public WeatherAdapter(Context context, int textViewResourceId, List<HourlyWeather> objects) {
  super(context, textViewResourceId, objects);
  this.context = context;
  this.resourceId = textViewResourceId;
 }

 public View getView(int position, View convertView, ViewGroup parent) {
  HourlyWeather weather = getItem(position);
  View view = LayoutInflater.from(context).inflate(resourceId, null);

  TextView forecastTime = (TextView) view.findViewById(R.id.forecastTime);
  TextView forecastTemp = (TextView) view.findViewById(R.id.forecastTemp);
  TextView forecastPop = (TextView) view.findViewById(R.id.forecastPop);
  TextView forecastWind = (TextView) view.findViewById(R.id.forecastWind);

  forecastTime.setText(weather.getTime());
  forecastTemp.setText(weather.getTemp());
  forecastPop.setText(weather.getPop());
  forecastWind.setText(weather.getWind());
  return view;
 }

}
七、Activity的編寫
首先要完成地區選擇界面ChooseAreaActivity
ChooseAreaActivity的界面僅包括一個居中的TextView和一個ListView
布局文件如下:
<?xml version="1.0" encoding="utf-8"?>
<LinearLayout xmlns:android="http://schemas.android.com/apk/res/android"
 android:layout_width="match_parent"
 android:layout_height="match_parent"
 android:orientation="vertical">

 <RelativeLayout
  android:layout_width="match_parent"
  android:layout_height="50dp">

  <TextView
   android:id="@+id/title"
   android:layout_width="wrap_content"
   android:layout_height="wrap_content"
   android:layout_centerInParent="true"
   android:textSize="24sp" />
 </RelativeLayout>

 <ListView
  android:id="@+id/listView"
  android:layout_width="match_parent"
  android:layout_height="match_parent" />

</LinearLayout>
ChooseAreaActivity 需要完成的操作有:完成地區列表的加載、將選擇的County名傳遞給WeatherActivity
此外,當中使用了showProgressDialog()來呈現一個進度對話框,也設為無法通過返回鍵關閉,而我又沒有在弱網環境下調試過,每次加載都是很快,也沒見到對話框出來過,所以也不知道showProgressDialog()到底有沒有bug啥的~
public class ChooseAreaActivity extends AppCompatActivity {

 // 標記當前列表為省份
 public static final int LEVEL_PROVINCE = 0;
 // 標記當前列表為城市
 public static final int LEVEL_CITY = 1;
 // 標記當前列表為縣
 public static final int LEVEL_COUNTY = 2;
 // 進度對話框
 private ProgressDialog progressDialog;
 // 標題欄
 private TextView titleText;
 // 數據列表
 private ListView listView;
 // 列表數據
 private ArrayAdapter<String> adapter;
 // 數據庫
 private WeatherDB weatherDB;

 private List<String> dataList;

 private List<Province> provinceList;

 private List<City> cityList;

 private List<County> countyList;
 //選擇的省份
 private Province selectedProvince;
 //選擇的城市
 private City selectedCity;
 //當前選擇的列表類型
 private int currentLevel;
 //標記是否從WeatherActivity跳轉而來的
 private boolean isFromWeatherActivity;

 @Override
 protected void onCreate(Bundle savedInstanceState) {
  super.onCreate(savedInstanceState);
  isFromWeatherActivity = getIntent().getBooleanExtra("ChooseArea", false);
  SharedPreferences sharedPreferences = getSharedPreferences("Weather", Context.MODE_PRIVATE);

  // 如果country已選擇且本Activity不是從天氣界面啟動而來的,則直接跳轉到WeatherActivity

  if (!TextUtils.isEmpty(sharedPreferences.getString("CountyName", "")) && !isFromWeatherActivity) {
   Intent intent = new Intent(this, WeatherActivity.class);
   startActivity(intent);
   finish();
   return;
  }
  setContentView(R.layout.activity_choose_area);
  if (getSupportActionBar() != null) {
   getSupportActionBar().hide();
  }
  listView = (ListView) findViewById(R.id.listView);
  titleText = (TextView) findViewById(R.id.title);
  dataList = new ArrayList<>();
  adapter = new ArrayAdapter<>(this, android.R.layout.simple_list_item_1, dataList);
  listView.setAdapter(adapter);
  weatherDB = WeatherDB.getInstance(this);
  listView.setOnItemClickListener(new AdapterView.OnItemClickListener() {
   @Override
   public void onItemClick(AdapterView<?> arg0, View arg1, int index, long arg3) {
    if (currentLevel == LEVEL_PROVINCE) {
     selectedProvince = provinceList.get(index);
     queryCities();
    } else if (currentLevel == LEVEL_CITY) {
     selectedCity = cityList.get(index);
     queryCounties();
    } else if (currentLevel == LEVEL_COUNTY) {
     //當點擊到縣列表時,就利用Intent跳轉到天氣信息界面
     String countyName = countyList.get(index).getCountyName();
     Intent intent = new Intent(ChooseAreaActivity.this, WeatherActivity.class);
     intent.putExtra("CountyName", countyName);
     startActivity(intent);
     finish();
    }
   }
  });
  queryProvinces();
 }


 private void queryProvinces() {
  showProgressDialog();
  provinceList = weatherDB.getAllProvince();
  if (provinceList.size() > 0) {
   dataList.clear();
   for (Province province : provinceList) {
    dataList.add(province.getProvinceName());
   }
   adapter.notifyDataSetChanged();
   listView.setSelection(0);
   titleText.setText("中國");
   currentLevel = LEVEL_PROVINCE;
   closeProgressDialog();
  } else {
   queryFromServer(null, "province");
  }
 }

 private void queryCities() {
  showProgressDialog();
  cityList = weatherDB.getAllCity(selectedProvince.getProvinceId());
  if (cityList.size() > 0) {
   dataList.clear();
   for (City city : cityList) {
    dataList.add(city.getCityName());
   }
   adapter.notifyDataSetChanged();
   listView.setSelection(0);
   titleText.setText(selectedProvince.getProvinceName());
   currentLevel = LEVEL_CITY;
   closeProgressDialog();
  } else {
   queryFromServer(selectedProvince.getProvinceId(), "city");
  }
 }

 private void queryCounties() {
  showProgressDialog();
  countyList = weatherDB.getAllCountry(selectedCity.getCityId());
  if (countyList.size() > 0) {
   dataList.clear();
   for (County county : countyList) {
    dataList.add(county.getCountyName());
   }
   adapter.notifyDataSetChanged();
   listView.setSelection(0);
   titleText.setText(selectedCity.getCityName());
   currentLevel = LEVEL_COUNTY;
   closeProgressDialog();
  } else {
   queryFromServer(selectedCity.getCityId(), "county");
  }
 }

 private void queryFromServer(final String code, final String type) {
  String address;
  // code不為空
  if (!TextUtils.isEmpty(code)) {
   address = "http://www.weather.com.cn/data/list3/city" + code + ".xml";
  } else {
   address = "http://www.weather.com.cn/data/list3/city.xml";
  }
  HttpUtil.sendHttpRequest(address, new HttpCallbackListener() {
   @Override
   public void onFinish(String response) {
    boolean result = false;
    if ("province".equals(type)) {
     result = Utility.saveProvincesResponse(weatherDB, response);
    } else if ("city".equals(type)) {
     result = Utility.saveCitiesResponse(weatherDB, response, selectedProvince.getProvinceId());
    } else if ("county".equals(type)) {
     result = Utility.saveCountiesResponse(weatherDB, response, selectedCity.getCityId());
    }
    if (result) {
     runOnUiThread(new Runnable() {
      @Override
      public void run() {
       if ("province".equals(type)) {
        queryProvinces();
       } else if ("city".equals(type)) {
        queryCities();
       } else if ("county".equals(type)) {
        queryCounties();
       }
      }
     });
    }
   }

   @Override
   public void onError(Exception e) {
    runOnUiThread(new Runnable() {
     @Override
     public void run() {
      Toast.makeText(ChooseAreaActivity.this, "加載失敗", Toast.LENGTH_SHORT).show();
     }
    });
   }
  });
  closeProgressDialog();
 }

 private void showProgressDialog() {
  if (progressDialog == null) {
   progressDialog = new ProgressDialog(this);
   progressDialog.setMessage("正在加載……");
   progressDialog.setCanceledOnTouchOutside(false);
  }
  progressDialog.show();
 }

 private void closeProgressDialog() {
  if (progressDialog != null) {
   progressDialog.dismiss();
  }
 }

 @Override
 public void onBackPressed() {
  if (currentLevel == LEVEL_COUNTY) {
   queryCities();
  } else if (currentLevel == LEVEL_CITY) {
   queryProvinces();
  } else {
   if (isFromWeatherActivity) {
    Intent intent = new Intent(this, WeatherActivity.class);
    startActivity(intent);
   }
   finish();
  }
 }
}
WeatherActivity的布局相對復雜些,包含了許多個TextView,我也只是想著簡單就好,就簡單地把數據用文本呈現出來
// 城市切換按鈕
 private Button citySwitch;
 // 刷新數據按鈕
 private Button weatherRefresh;
 // 城市名
 private TextView cityName;
 // 白天夜晚天氣描敘
 private TextView DayNightWeather;
 // 溫度
 private TextView temp;
 // 日出時間
 private TextView sunriseTime;
 // 日落時間
 private TextView sunsetTime;
 // 風力
 private TextView wind;
 // 降水概率
 private TextView pop;
 // 發布時間
 private TextView updateTime;
 // 今日天氣預測列表
 private ListView listview;

 public static List<HourlyWeather> weatherList = new ArrayList<>();

 private SharedPreferences sharedPreferences;

 @Override
 protected void onCreate(Bundle savedInstanceState) {
  super.onCreate(savedInstanceState);
  setContentView(R.layout.weather);
  if (getSupportActionBar() != null) {
   getSupportActionBar().hide();
  }
  init();
 }

 private void init() {
  citySwitch = (Button) findViewById(R.id.citySwitch);
  weatherRefresh = (Button) findViewById(R.id.weatherRefresh);
  citySwitch.setOnClickListener(this);
  weatherRefresh.setOnClickListener(this);
  cityName = (TextView) findViewById(R.id.cityName);
  DayNightWeather = (TextView) findViewById(R.id.DayNightWeather);
  temp = (TextView) findViewById(R.id.temp);
  sunriseTime = (TextView) findViewById(R.id.sunriseTime);
  sunsetTime = (TextView) findViewById(R.id.sunsetTime);
  wind = (TextView) findViewById(R.id.wind);
  pop = (TextView) findViewById(R.id.pop);
  updateTime = (TextView) findViewById(R.id.updateTime);
  listview = (ListView) findViewById(R.id.hourlyForecast);
  sharedPreferences = getSharedPreferences("Weather", Context.MODE_PRIVATE);

  String countyName = getIntent().getStringExtra("CountyName");
  // 當countyName不為空
  if (!TextUtils.isEmpty(countyName)) {
   SharedPreferences.Editor editor = sharedPreferences.edit();
   editor.putString("CountyName", countyName);
   editor.commit();
  } else {
   countyName = sharedPreferences.getString("CountyName", "");
  }
  weatherRefresh.setText("同步中……");
  queryFromServer(countyName);
 }

 @Override
 public void onClick(View view) {
  switch (view.getId()) {
   case R.id.citySwitch:
    Intent intent = new Intent(this, ChooseAreaActivity.class);
    intent.putExtra("ChooseArea", true);
    startActivity(intent);
    finish();
    break;
   case R.id.weatherRefresh:
    weatherRefresh.setText("同步中……");
    String countyName = sharedPreferences.getString("CountyName", "");
    if (!TextUtils.isEmpty(countyName)) {
     queryFromServer(countyName);
    }
    break;
  }
 }

 private void queryFromServer(final String countyName) {
  try {
   String url = "http://apis.baidu.com/heweather/weather/free?city=";
   String name = new String(countyName.getBytes("UTF-8"), "iso-8859-1");
   HttpUtil.sendHttpRequest(url + name, new HttpCallbackListener() {
    @Override
    public void onFinish(String response) {
     Utility.handleWeatherResponse(WeatherActivity.this, response);
     runOnUiThread(new Runnable() {
      @Override
      public void run() {
       showWeather();
      }
     });
    }

    @Override
    public void onError(Exception e) {
     runOnUiThread(new Runnable() {
      @Override
      public void run() {
       Toast.makeText(WeatherActivity.this, "同步失敗", Toast.LENGTH_LONG).show();
       weatherRefresh.setText("更新數據");
      }
     });
    }
   });
  } catch (Exception e) {
   e.printStackTrace();
  }

 }

 private void showWeather() {
  cityName.setText(sharedPreferences.getString("cityName", "未知"));
  sunriseTime.setText("日出:" + sharedPreferences.getString("sunriseTime", "未知"));
  sunsetTime.setText("日落:" + sharedPreferences.getString("sunsetTime", "未知"));
  DayNightWeather.setText("日:" + sharedPreferences.getString("dayWeather", "未知") + " 夜:" + sharedPreferences.getString("nightWeather", "未知"));
  temp.setText("溫度:" + sharedPreferences.getString("temp", "未知"));
  wind.setText("風力:" + sharedPreferences.getString("wind", "未知"));
  pop.setText("降水概率:" + sharedPreferences.getString("pop", "未知"));
  updateTime.setText("發布時間:" + sharedPreferences.getString("updateTime", "未知"));
  WeatherAdapter adapter = new WeatherAdapter(this, R.layout.hourly_weather, weatherList);
  listview.setAdapter(adapter);
  Toast.makeText(WeatherActivity.this, "已經是最新數據了", Toast.LENGTH_SHORT).show();
  weatherRefresh.setText("更新數據");
 }

}
八、說明
很奇怪的是,這個小app在我的4.4版本的小米手機上運行無誤,可在5.1系統的模擬器和華為手機上卻提示無法獲取到數據,返回的JSON數據提示說城市未知,查看了很久也沒搞明白,只能作罷~~
代碼下載地址:Android簡易版天氣預報app的實現(改進版)
以上就是本文的全部內容,希望對大家的學習有所幫助,也希望大家多多支持本站。
 Android中Canvas的常用方法總結
一、對Canvas進行操作對Canvas的一系列操作,是指對Canvas進行旋轉、平移、縮放等操作。這些操作可以讓Canvas對象使用起來更加便捷。二、Canvas平移/
 Android 日期和時間的使用實例詳解
Android 日期和時間的使用日期和時間的使用;1:彈出框TimePickerDialog,DatePickerDialog2:組件TimePicker,DatePic
 Android開發之針對聯系人的封裝
大家可能在做app的時候,或多或少需要使用聯系人,而根據google提供的api,你需要編寫大量的代碼,例如首先需要查詢數據庫,涉及到數據庫表和字段以及對應的SQL語句。
 Android 插件化原理解析——插件加載機制
上文我們地完成了『啟動沒有在AndroidManifest.xml中顯式聲明的Activity』的任務;通過HookAMS和攔截ActivityThread中H類對於組件